Do-it-yourself apartment renovations are always a source of pride for anyone. home handyman. But what if you have absolutely no experience in construction and finishing?
In this case, it is better not to touch complex rooms, such as the living room or kitchen, but you can practice on finishing the toilet. First of all, this is the most small room There is not a wide variety of finishing materials in the apartment either. In addition, if in the end nothing works out, you can turn to specialists, and they will redo everything without significant damage to your wallet.
The most common material for finishing a toilet is plastic panels, and it’s not just the ease of installation, there are a number of advantages that speak in favor of this option:
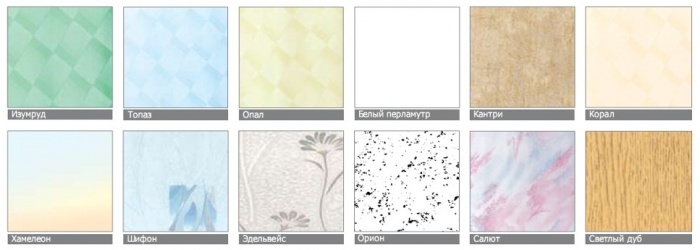
- A wide variety of colors and patterns that are great for decorating a toilet.
- Easy aftercare. Plastic panels are not at all afraid of water and detergents.
- Minimum financial expenses for finishing work, even taking into account all the necessary components.
- No need for a huge number tool. Everything you need to decorate your toilet plastic panels any home craftsman can find it.
Selection of plastic panels for finishing the toilet

As often happens, due to the high demand for plastic panels, many unscrupulous manufacturers have appeared on the market. It is very difficult to determine the quality of plastic by eye, and to the average buyer they all seem the same. But this is not so, and in order not to become a victim of scammers who skimp on the quality of their products, you need to follow a few simple tips:

The correct choice of panels for the toilet is already a 50 percent deposit successful repair. It's much easier to spend an extra hour in the store than to redo all the trim on next year, or even earlier.
Important ! When buying plastic panels for finishing a toilet, you should always take two or three segments in reserve.
If at the end of the repair it turns out that the initial calculations were incorrect, the same panels may no longer be available in the store.
Preparation for installation of plastic panels

A good master, any repair begins with preparatory work and making lists of everything needed. If this is not done, you may have to run to the emergency room more than once. hardware store for missing materials or tools. Often, this takes much more time than the entire renovation, especially when it comes to such a small room as a toilet.
List of necessary materials for finishing the toilet
- Plastic panels with a small margin.
- Decorative elements: corners, baseboards. You also need to take it with a reserve.
- A wooden beam no more than 2 cm thick. The quantity is determined based on the installation horizontally, with a distance of approximately 30-50 cm.
- Impregnation for wood that prevents rotting, and a brush for applying it.
- Primer for walls with an antibacterial effect and a roller for its application.
- Dowels with a diameter of 6 mm and a length of 60-80 mm.
- Staples for a construction stapler.
- Glue for plastic. Will be needed to install external decorative corners.
- Self-tapping screws for wood. Will be needed to finish the riser in the toilet with plastic panels.
- Plastic film or thick fabric to protect the plumbing in the toilet.
Advice ! There is no need to skimp on consumables such as screws or staples. Fasteners are never superfluous in the household, and in finishing works oh, its deficiency can affect the service life of the entire repair.
List of necessary tools for finishing a toilet

- A hammer drill or hammer drill with impact mode, as well as a drill for it corresponding to the selected dowels.
- Hammer.
- Pencil, tape measure.
- Hacksaws for wood and plastic, or a jigsaw.
- Sharp construction knife.
- Metal spatula. Needed to remove old paint from the walls, if there is one.
- Construction stapler.
- Level with horizontal and vertical indicators.
Warning ! Do not cut timber or plastic panels with a grinder. As a result, a lot of acrid smoke is formed, which neighbors may mistake for a fire, and then you will have to explain it to them for a long time.
When both lists are collected and everything you need to finish the toilet is at hand, you can get to work.
Preparing the base for plastic panels
The quality and durability of any finish largely depends on the preparation of the base. Unlike more complex rooms in an apartment, finishing a toilet does not take much time and effort, so you need to pay attention to each stage Special attention. It’s better to spend two extra hours today than to redo everything later.
First of all, you need to completely clean the walls and ceiling of the toilet from old finishes or paint. This is done using a spatula and a light hammer, which is used to tap the surface. A coating that has become unusable will immediately disappear.

Next, the bars are prepared. They must be cut to the required length based on the horizontal attachment to the wall. When all wooden elements When ready, they are treated with impregnations and taken out to dry on the balcony or staircase.

Important ! The size of the bars should be several centimeters smaller than toilet room. This is necessary so that the tree has the opportunity to expand.
In the meantime, while the bars are drying, there is time to continue preparing the walls in the toilet for finishing. They need to be treated generously with an antiseptic primer; it prevents the formation of mold and harmful fungi. Impregnation is done using a foam roller. It takes about an hour to dry completely at room temperature, which means you can take a short break and catch your breath.

Installation of wooden sheathing under plastic panels
When the walls in the toilet and the wood are completely dry, you can begin fastening. First of all, fix the block a couple of centimeters above the floor, along the entire perimeter of the toilet room. The timber is passed under the ceiling in the same way.
If the ceiling in the toilet will also be finished with plastic panels, then lathing is also needed on it; the fastening technology is no different from the wall one:
- The block is applied to the surface, and using a hammer drill, a hole is drilled through the tree into the hay. The first fastening should be approximately five cm from the edge. A dowel is driven into the hole. The second edge is attached in the same way. Now that the block is fixed, it is further strengthened, with a step of 30-50 cm between dowels.
- When the bars around the perimeter of the toilet room are installed, use a tape measure to measure the distance between the lower and upper bars. It is divided into two, and another beam is attached exactly in the middle of the wall.
- The resulting two sections are once again divided in half, and the beam is placed again. This is done until the distance between the guides is approximately 50 cm.
- Certain difficulties may arise with communications, which also need to be finished with plastic panels. To do this, boxes are made from the same block as the sheathing, which are attached to the wall and floor of the toilet. You can connect the bars together with wood screws.
Advice ! if as ceiling lighting planned in the toilet spotlights, the block must be mounted below the ceiling, at least 15 cm. This is done using profile fasteners.
You can watch the video in more detail on how this is done.
Installation of plastic panels in the toilet
Before installing plastic panels, it is necessary to attach guide moldings to the corners of the toilet and to the ceiling.

All finishing strips are fastened with staplers to the bars

When installing plastic panels in a toilet with your own hands, always start from the left edge and the ridge to the corner. Using a construction stapler, fastening brackets are driven into the corner groove and ridge on the other side of the panel.
Important ! The first panel must be installed strictly in level. All other finishing elements will be oriented towards it.
The second plastic panel is inserted into the groove of the first and its ridge is also fixed with staples along each wooden guide. All stages of installation are clearly shown in the video
After the walls of the toilet are completely covered with panels, the boxes covering the communications are finished. Here, perhaps, each panel will have to be cut to length; subsequently, these places will be covered with decorative corners.

In the same way, plastic panels are installed on the toilet ceiling. But here it is important to immediately make holes in the places of the lamps and bring the electrical wires out.
Installation of decorative elements on plastic panels
The easiest way to use it is to decorate the toilet outer corners, they are much more convenient to install and are not inferior in quality to those into which plastic panels must be inserted.

Plastic glue is applied to the corner and applied to the junction of the panels. Good glue It sets in a few seconds, so it is important to have time to glue the corner before it dries.
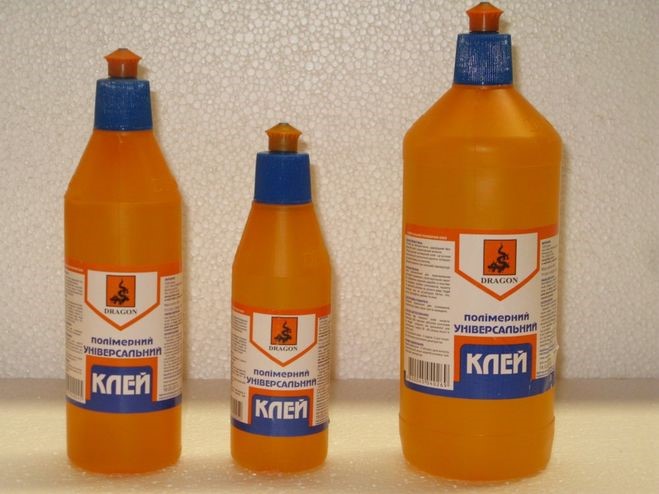
Using the same glue, floor and ceiling skirting boards are fixed. Any excess glue can be removed with a soft cloth, and at this point finishing the toilet with plastic panels with your own hands can be considered complete.
It's all up to the installation necessary accessories and lamps, but this is a topic for another conversation.

Conclusion
As you can see, there is nothing complicated about decorating a toilet with panels yourself. All stages of repair will take a maximum of two days. Even if it's the first do-it-yourself repair in the apartment, he will allow you to get invaluable experience, and perhaps the next step will be more complex premises, which also require repair and finishing.

And in order to avoid the most common mistakes when renovating a bathroom, you can watch the video
Traditionally for interior decoration bathrooms and toilets are used tile. However, with all its many advantages, tile is not a cheap and easy-to-install material. If the bathroom renovation is planned to be done with your own hands and with minimal costs, it is worth considering such an option as finishing the toilet PVC panels. Such finishing material as polyvinyl chloride panels becomes indispensable if repairs need to be completed as quickly as possible.
Do-it-yourself toilet finishing with plastic panels
The main advantages of polyvinyl chloride panels
The positive aspects when decorating a bathroom or toilet with polyvinyl chloride slats can be expressed as follows:
- Easy installation. It is quite possible for a high school student to carry out renovations in a toilet using PVC panels. Plastic panels are not particularly heavy.
- Price category. After spending comparative analysis, you can find out that prices for such material as tiles exceed the price of panels at least three times. This does not take into account the remuneration of the tiler-finisher, but laying the tiles with your own hands is beautiful and neat without preliminary preparation quite problematic.
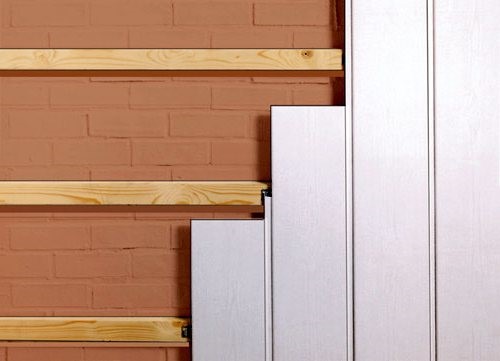
- The walls of the room do not have to be prepared for finishing them with plastic. PVC panels are usually fixed to a frame or sheathing, which means that possible defects can be leveled with their help.

PVC panels are fixed to the frame
- A material such as polyvinyl chloride is absolutely indifferent to the effects of a humid atmosphere. However, it is not moisture resistant, in other words, plastic panels are not able to withstand the appearance of dampness in the toilet. Waterproofing should still be taken care of preparatory stage, preferably before installing the sheathing.
- Easy to use. In order to care for such a finish and maintain it in decent appearance, no expensive imported products will be required. On the contrary, cleaning the toilet will not take more than 10 minutes, and all you need is a damp cloth.
- Long service life. The attractive appearance of plastic lamellas, inherent to them initially, is difficult to spoil, even intentionally. Polyvinyl chloride is able to withstand the effects of most household chemicals and solutions.
Disadvantages of polyvinyl chloride panels
In addition to numerous advantages, finishing materials such as plastic panels also have certain disadvantages. Otherwise, only plastic panels would be presented on the windows of finishing materials stores.

Plastic panels in the bathroom interior
The main disadvantages of plastic slats are:
- Flammability and formation of combustion products. Unfortunately, any plastic cannot withstand exposure to open fire. During a fire, one material begins to burn, the other melts, but in both cases the process will be accompanied by the release of toxic gas.
- Fixing the panels to the wall is enough simple work, but to ensure its efficiency and continuity, you will have to think about it when planning repairs.
- Decorating a bathroom or toilet with plastic will affect the overall volume of the room. When fixing the panels to the frame, it is possible to narrow the toilet by about 5 centimeters, but this is only if the surfaces do not require correction using lathing. If when decorating the ceiling with plastic this does not matter much, then when decorating the walls you should be extremely careful. Otherwise, there may be difficulties with closing or opening room doors or connecting plumbing and electrical equipment.
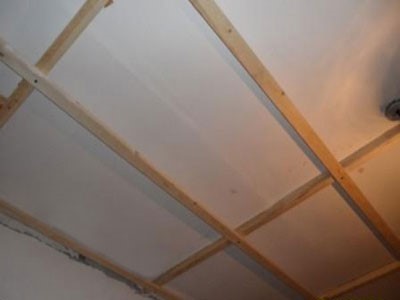
It is no coincidence that finishing a ceiling with plastic is much more common than completely decorating a toilet with PVC panels.

Plastic ceiling trim - a spectacular and practical look
You can often find combined solutions when panels and tiles (or other material) complement and shade each other. However, most often such combinations are found when decorating bathrooms.
What to consider when choosing PVC panels
When purchasing plastic panels, some homeowners focus on parameters such as price and beauty. Of course, in some cases this approach is justified, but when decorating a toilet in an apartment with your own hands, it is fundamentally wrong. The main characteristics that you should pay attention to when buying plastic panels should be reliability and durability. This is due to the fact that exactly on Wall panels Various shelves and fittings will be hung from plastic. In other words, when choosing panels, focus not on their appearance, but on quality and rigidity. High value This parameter will ensure long-term operation of plastic panels. In addition, a more rigid plastic panel is much preferable for direct installation. The chance of vibration resulting from accidental movement is very small. In addition, in the sheathing you can increase the distance between its vertical bars.
Having chosen a certain type of panels, whose rigidity seemed acceptable to you, evaluate the dimensions and design features material. The dimensions of decorative panels made of polyvinyl chloride are, as a rule, three meters in length, but their width can vary from 120 to 250 millimeters. Keep in mind that the width of the products directly affects the requirements for the frame. That is, the wider the PVC lamella, the better and smoother the lathing should be. For those who decorate a toilet or bathroom with their own hands, the best option is panels whose width does not exceed 15 centimeters.
Having decided on the parameters that play the main role when installing the panels, you can begin choosing their design. Before leaving the store or finishing materials salon, do not forget to make sure there is a sufficient amount of consumables (corners, plastic ends). Such elements must be combined with the main background created decorative panels.

A wide range of plastic panels
Buy Consumables it costs with some margin because in the first stages, especially when installing the toilet design with your own hands, breakdowns and errors are possible. Naturally, you don’t want to go to the store for the missing pair of corners.
For the frame or sheathing, slats with a cross section of 2 * 2.5 centimeters are used. To create a reliable and durable frame, you should use square or rectangular shape. You need to evaluate the quality of each slats, and to do this you will have to unpack a stack of bars prepared for the frame.
It is impossible to build a high-quality sheathing from the material poor quality. The frame is assembled using such necessary elements as self-tapping screws and mounting nails for fastening plastic products. There is no need to use small construction nails; they can easily be replaced with analog tar nails with a small head. If the toilet is often exposed to “man-made” floods from neighbors, then it is better to use an antiseptic for high-quality wood processing.
DIY frame installation
Before installing the plastic frame, it is necessary to lay the floor tiles and install the toilet, since the work will require Smooth surface flooring.

DIY frame installation
Proper frame assembly
- At the first stage, it is necessary to treat the elements of the wooden sheathing or frame with an antiseptic. If you carefully lubricate the installed material with an antifungal solution, then such a structure will last for decades. It is worth noting that most of these solutions are toxic, so this procedure is best carried out outside a confined space. The antiseptic is applied to the entire surface of the sheathing.
- Setting up side bars. The recommended number of slats for installation coincides with the number of corners in the room, i.e. there should be four of them. The basic rule is that the slats should never come into contact with the surface of the ceiling and floor. In this regard, small pieces of plastic can be placed under the slats, but after precise installation they are removed.

The accuracy of fixing the side posts is extremely important for the further installation of the panels, so a plumb line is used when fastening them. Then check the parallelism of all faces using a long ruler. It is on these four elements that the quality of the frame will depend in the future. Mounts have step by step execution with an accuracy of approximately 30-40 centimeters and are mounted using self-tapping screws.
- Sheathing of side posts. After installing the main vertical slats, it is necessary to secure the bars along the upper and lower contours of the room. Mounting screws in in this case mounted at an angle of 45 degrees. This is necessary to secure the bars more tightly. After this, the material must be supplemented by attaching slats to the walls using long self-tapping screws. When the base of the sheathing has already been assembled, it is necessary to install additional racks. It is recommended to keep the step between these posts approximately 50 centimeters apart. In this case, the frame connection can be considered quite safe and strong.
We work with accessories with our own hands

Plastic accompanying elements are fixed to the main posts and rails. Their corners must be cut at 45 degrees. Since the plastic panel is very elastic, the fittings are attached in all turns and corners. There is a distance of approximately 30-35 centimeters between the nails. If the lath begins to lag behind the wall, it is recommended to place a piece of plastic under it, and only then hammer in a nail. Mounting nails should have flat and wide heads. If you cannot find such nails, then it is recommended to use any nails, the length of which is 20-25 centimeters, and you need to cut small gaskets of 1 x 1 centimeter from PET bottles, which will allow you to pull the plastic to the tree without damaging it. Use a hammer carefully so as not to damage the surface of the panel.
Installation of PVC panels on a finished frame
When the frame is completely ready, installation of the panels is quite simple and quick. Each part is sawed off separately with a fine-toothed hacksaw. At the same time it becomes smaller seat by 1-1.5 centimeters, which is easily compensated by shelves of fittings.

Installation of PVC panels indoors
Other plastic elements are moved closely to the previous one and fastened in the same way as the first one, with nails that have a plastic washer. This allows you to save the surface from being hit with a hammer.
The final PVC is cut to length. Such work must be carried out with extreme precision. The cut panel is inserted all the way into the lock of the previous one using a screwdriver. It is worth noting that the size of the locks is relatively smaller than the seat, and therefore the final panel must have contact with the surface of the previous ones. It must be secured with nails in a place where movement is not possible.
So, the renovation of the toilet room with PVC plastic panels is completed. But do not forget to leave small marks on the finished panels for the shelves, which will later be attached to the finished surface. Plastic panels are one of the ways to decorate a toilet beautifully and inexpensively. They will look good both in temporary and permanent finishes.
When starting an apartment renovation, the main emphasis is on the main rooms in the house, such as the living room or bedroom. Repairing a toilet is often left for later, because there is no way to a large number of requirements. The environment here is not as aggressive as, for example, in the bathroom or kitchen. But there is one significant difficulty, namely the small space.
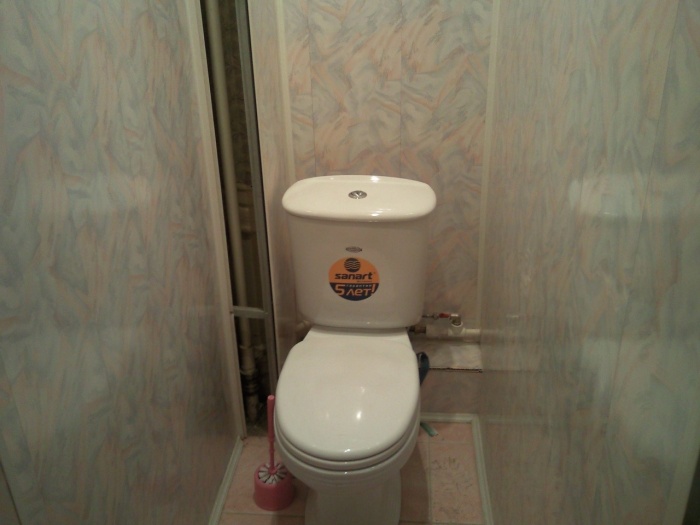
Most materials for wall decoration significantly reduce space, and if in the case of, for example, a living room this is acceptable, then in a cramped toilet every centimeter counts. That is why finishing bathrooms and toilets with PVC panels is the most common option.
The video shows how simple finishing with PVC panels can transform a toilet room.
Advantages
- PVC panels can be mounted on minimum distance from the wall. In total, after finishing the walls, the room will lose only 3-5 cm.
- Plastic is not afraid of wet cleaning and detergents.
- Plastic panels are much cheaper than most finishing materials.
- Huge variety of colors and designs.
- Finishing a toilet with your own hands, even without special skills, will only take a few hours.
- To work with panels, you do not need to level the walls. They will hide all the irregularities and mistakes of the builders.
Unfortunately, like any other material, PVC panels have a number of disadvantages, which also need to be taken into account when choosing a finish for a toilet.
Flaws

- Unlike wallpaper and painting, PVC panels will still take a few centimeters away from the room.
- Even though vinyl has a low flammability rating, it produces acrid, toxic fumes when melted.
- PVC is of low quality and easily damaged. And they will need to be replaced.
As you can see, there are still fewer shortcomings. AND positive traits clearly winning. But in order to new renovation did not bring disappointments, you should know a few rules that must be followed when choosing PVC panels.
Selection Guide

At first glance, PVC panels differ only in design, but this is a misconception; the quality of the plastic can vary significantly depending on the manufacturer.
It is best to ask friends who have encountered this issue, since it is quite difficult to visually determine quality. But there are some tips:
- The PVC panel must be soft. High-quality plastic can bend to an angle of more than 90 degrees. You can bend the panel slightly until you feel tension; the larger the angle, the better.
- The fastening groove should bend freely without kinks, and return to its original position when you release it.
- The panels should not emit any noticeable odors. A noticeable smell of plastic is a sign of poor quality production.
The next nuance that needs to be taken into account is the width of the panel. It can be from 12 to 35 cm; the wider the segment, the more carefully the sheathing will need to be leveled. The best option For walls, a width of less than 25 cm is considered.
Advice ! Panels wider than 25 cm can be used on the ceiling. There, a slight distortion will not be so noticeable.
Once these two factors are taken into account, you can move on to choosing colors and patterns. It all depends on personal preferences and style. general interior apartments.
Preparation for installation of panels
Finishing a toilet with PVC panels will not take much time; a more complex and responsible process is making the sheathing on which the panels will be attached.


If the walls are perfectly smooth, or they have been plastered, then the panels can simply be glued to the wall without lathing. This method will save space, but the surface will first have to be treated with a primer.

Any DIY repair must begin with preparing the tool; this will avoid unnecessary fuss and significantly save time. The list of everything you need is not so long, and there is nothing specific in it:
- Roulette.
- Building level.
- Pencil.
- Hacksaws for wood and plastic (suitable for metal, with fine teeth).
- Hammer or drill with impact mode.
- Hammer.
- Construction stapler.
For making sheathing it is best to use wooden beam 1.5-2 cm thick, this is quite enough for PVC panels and it will not steal much space. Before you begin to fasten the timber, it must be treated with impregnations that will protect it from the formation of mold and mildew.

First of all, using a hammer drill and dowels, the upper and lower strips are secured. The lower one should be located parallel to the floor and at a minimum distance from the floor covering. The top one is under the ceiling, but taking into account the future ceiling decoration.
The remaining bars are also attached horizontally at a distance of approximately 30 cm from each other.
Advice ! The smaller the distance between the sheathing strips, the more firmly the panels will hold.
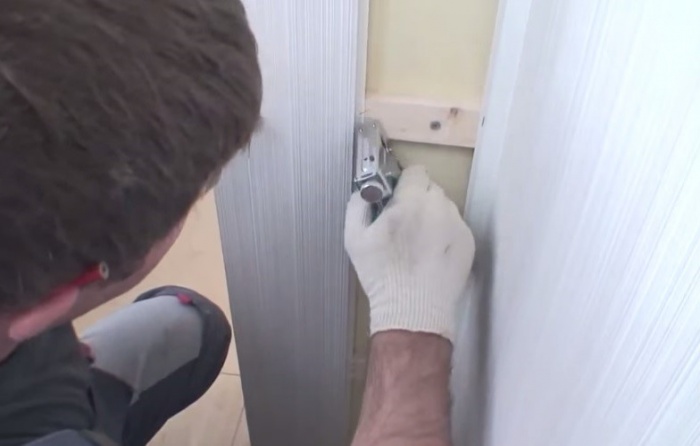
When all the sheathing bars are ready, you need to take care of the places where various accessories will be attached:
- Mirror.
- Hangers.
- Paper holders.
In these places you need to install small bars so that later when drilling holes in the plastic you do not damage it.

When the wood work is completed, install decorative corner in the left corner of the room, from where the installation of panels will begin. To install the corner, it is best to use a construction stapler, but if you don’t have one, they will do furniture nails. They are similar in size to shoe boots, but have a wider clamping cap.
The corner is attached in 5-6 places at an equal distance, this is quite enough. If during the installation process a slight curvature appears, then you should not pay attention to it; subsequently it will straighten out with the panel.
The most difficult stage of finishing a toilet with PVC panels is behind us.
Panel installation
Installation begins on the left side, inserting the panel with the comb into the corner. The first segment must be set to the building level; further it will not be needed.

Once the panel is exposed, a stapler or nail is driven into the tab of the groove. Fastenings are made into each bar along the entire height.

To clearly understand how the frame is manufactured and the panels are installed, you can watch the video. For clarity, the master demonstrates the process on a simple wall, and every nuance is clearly visible.
Important ! When reaching the places where the bars for attaching accessories are located, they need to be marked with a pencil so that you do not later have to look for this place through the installed panels.
In this way, fastening is carried out to the next corner. The edge panel is cut along its entire length and a corner is placed on it before installation. It will be fixed to the next wall, from where the next segments will come.
Finishing in communication areas
The most difficult places for finishing work are communications. In order to cover the pipes with PVC panels, you will have to make wooden box, on which the panels will be attached. Sometimes such structures are intentionally made large sizes, than required, then decorative frame Can also serve as an additional shelf.

Fastening panels to a frame is no different from finishing walls, the only difference is that the fastening is not made into a special groove, but into the body of the panel itself, as close to the edge as possible, subsequently this place will be covered with decorative fittings.

Advice ! for finishing boxes, it is better to use external corners that do not fit onto the panel, but are attached to it with glue.
An important point when finishing communications is to remember about valves and meters that may be located in the toilet room. Access to such places should not be limited, so you will have to either make small doors, which is not so easy, or leave these places open.

Ceiling finishing
After the work with the walls is completed, you can move on to the ceiling. The principle here is the same, with the only difference that there is no need to install corners; their role will subsequently be played by ceiling plinths.

Advice ! To make the room look symmetrical, you can calculate the distance so that the joint of the panels runs exactly in the middle. In this case, you will have to cut not one, but two outer panels.
When finishing the ceiling, it is important to remember about lighting fixtures. It is better to drill holes in the required places on the floor before the panel is secured. And during installation, the wires are led out into the holes.
All stages of work can be seen in the video
Conclusion
When the ceiling and walls are completely finished, all that remains is to do finishing touches, namely, fix the baseboards. In stores you can find special skirting boards for PVC panels; they have a groove that is fixed on top of the panels, but to work with them you will have to carefully calculate the height of each segment.
Therefore, ordinary plastic skirting boards are often used, which are simply placed on construction glue. Working with them is much easier and there is no need to carry out complex calculations and measurements of each panel.

Lastly, the lighting fixtures are connected, and at this point the toilet renovation can be considered complete.
As seen, modern finishing installing a toilet with PVC panels is a completely simple process that anyone can handle. To do this, you do not need to have construction skills or experience, you just need to buy everything you need and follow the instructions.
Despite the fact that the toilet is one of the most important rooms in the house, owners try to leave its renovation until the very last moment. In principle, finishing a toilet with PVC panels can be done independently.
To do this, you only need to know what tools and materials will be needed, as well as the sequence of repair work and some features.
The fact is that this room in many apartments is considered the smallest, so it is quite difficult to carry out repair work in it with your own hands. When involving professionals, the cost of renovation can be even higher than in a bathroom.
At the same time, the toilet room also requires Beautiful design and quality finishing.
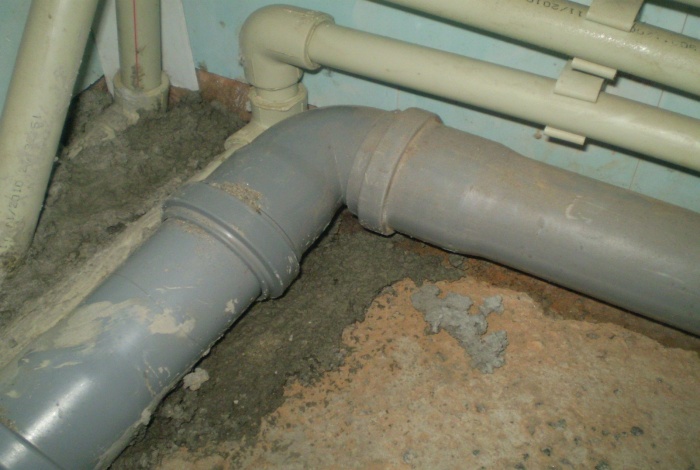
Advice. Before deciding on the choice of new finishing materials for the walls and ceiling in the toilet, you need to replace old, outdated sewer and water pipes new, more modern and reliable. Timely replacement of communications will avoid new repairs in the future.
As soon as these works are completed, you can move on to the main work.
Taking into account the fact that the air in the toilet is less humid than in the bathroom, the choice of materials for cladding the ceiling and walls increases. Finishing materials should be selected in such a way that the walls and ceiling are easy to clean and do not absorb odors.
Therefore, the most ideal materials for the toilet are:
- washable wallpaper,
- ceramic tile,
- PVC panels.
The last option, as practice shows, is considered the most convenient and economical option when decorating a toilet with your own hands.
Advantages of PVC panels

The advantages of PVC panels are that the range of these finishing materials is large, the buyer can choose a plain material for this room, panels with imitation wood, marble, malachite, etc. You can create more in the toilet bright design using PVC panels with abstract designs and patterns.
In addition, the cost of panels per square meter, as a rule, does not exceed eight dollars.
So:
- The length of one plastic panel ranges from 2.5 to 3 meters. This makes it possible to use one sheet along the entire length of the wall.
- Another advantage of this material is that it can be used to decorate not only walls, but also ceilings. True, for such surfaces it is better to use narrower plastic panels.
In this case, the ceiling covering will look more neat and harmonious. - In addition to all this, finishing the walls with PVC panels for the toilet is much faster and easier. To cover walls with this material, rough work on leveling and priming the wall surfaces will not be required.
Another positive thing is that you can easily hide all communications behind the panels. - Installation of the panels can be carried out without preliminary heavy leveling of the walls with plaster. You can quickly level even the most uneven and crooked walls using a special lathing that can be attached to the surface without removing some old coatings (wallpaper, whitewash, tiles and putty).
In addition, when creating the lathing, no special skills or any special knowledge is required.
Finishing a toilet with PVC panels, video instructions can be viewed right now.
PVC is considered the most attractive material due to its moisture resistance. The same coating allows for quick and very easy cleaning of the room.
Advice. For cleaning wall and ceiling surfaces from limescale, dust and stains will only need to be done wet cleaning using a soft sponge or cloth soaked in detergent.
Instructions for finishing a toilet with PVC panels

All cladding repair work comes down to three main stages. First you need to prepare the surfaces, then create the sheathing, and finally you can install the panels themselves.
So:
- The repair begins with measuring the toilet. You need to measure the length, width and height of the room, and when taking measurements you should take into account all areas and protrusions around the perimeter of the door. Do not forget that you will have to create a decorative box with which you can hide communications, i.e. you will also have to take its measurements.
- Now you need to properly prepare for repair work room. If the toilet room is finished with PVC panels only on the surface of the walls, then it will be necessary to remove all the old coatings and clean the walls.
If the finishing is carried out on the ceiling, then its surface will also need to be thoroughly cleaned of old coatings and dust. - After removing old coatings from the surfaces of walls and ceilings, you should remove construction garbage and clean the room, since repairs are easier to do in a clean room. If the walls in the toilet were covered with wallpaper, then finishing with plastic panels can be done without removing this old coating.
But wallpaper can only be left if the room is dry enough and condensation does not accumulate on the surfaces. Otherwise, fungus will collect on the damp wallpaper under the new coating. - Next, you will need to create a sheathing of timber measuring 20x40 mm. At the same time, it is worth remembering that wooden beams may be susceptible to rotting, so in a toilet with increased level humidity, it is advisable to make a metal frame.
Between the elements of the sheathing it is necessary to maintain a distance of no more than 500 mm.
Advice. Suitable for creating sheathing wooden slats 10x50 mm, with their help you can also level the surfaces of the walls. In addition, all wooden parts of the sheathing should be treated special composition for protection against fungus and microorganisms.
- Next, all that remains is to install the PVC panels. Before starting work you should look step by step photo installation.
First, it is recommended to decide where exactly the plastic strips will be installed from. This finishing material can be attached to the sheathing using staples from a construction or furniture stapler or small self-tapping screws with a press washer.

- Each subsequent plastic strip should be installed in the previous one. As a result, you can get a uniform glossy finish.
The same applies to those strips on which any patterns or designs are depicted. During the work, there is no need to adjust the design or pattern of one plank to another. - When installing PVC panels, it is advisable to use a level, and the panels will need to be cut to required size, then insert it all the way into the profile. Using small screws or a stapler, one panel is secured, and the rest are installed in the same way.
In order for a small toilet room to look attractive, well-groomed and visually larger, it is advisable to use panels in light colors, for example, pale blue, light pink, beige, pistachio, sand. At the same time, plain panels can be combined with themes that depict an interesting pattern or design.
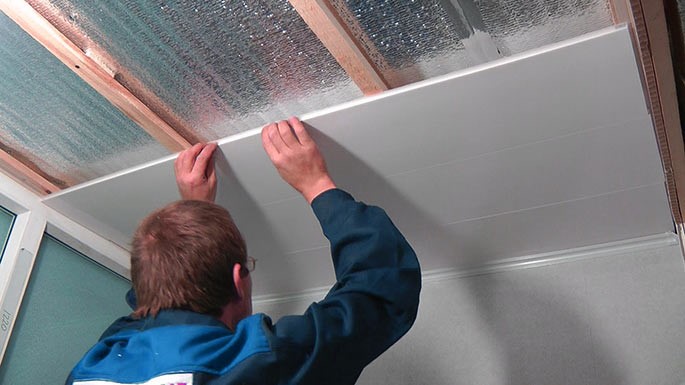
Finishing the ceiling in the toilet with PVC panels
After covering the walls with plastic panels, you can begin finishing the ceiling with the same material, if the need arises. Installing this finishing material on the ceiling surface differs from installing panels on walls only by creating a frame.
Lightweight bars with a small cross-section or ceiling profiles are installed on the ceiling surface using direct hangers.
So, you can easily adjust the ceiling height and make installation easier lighting fixtures. Holes for the lamps are cut using a thin and very sharp knife.
It is also necessary to leave small gaps at the edges of the ceiling for future installation ceiling skirting boards. After installing the frame, you can install PVC panels in exactly the same way as on the walls.
Finishing the toilet in the areas where communications are located
Apartment owners who have decided to renovate their premises themselves are also interested in the question of how to close communications in the toilet in such a way that it looks attractive.
Naturally, you should first install the box from metal profile at pipe locations. Next you need to cut off all unnecessary pieces of the profile.
Those parts that have been cut are connected using self-tapping screws, and the structure itself must be secured to the wall using dowels and screws. After this, all that remains is to cover the created box with PVC panels.
Do not forget that plumbers must have constant access to communications, so the box must also have doors with fittings mechanical lock or latch. What the cost of repairs will be is up to you to decide.