In this article I want to tell you, without expensive, bulky equipment, quickly, in the place where you want, even in an already built house. If you need to arrange autonomous water supply country house, then after reading this article and watching my video, you will know how to drill a well by hand independently without resorting to the services of numerous expensive specialists. Or maybe, having mastered this original method, you will be able to drill wells for your acquaintances, friends, relatives, and perhaps in the future it will become for you source of additional income.
Using this method it was drilled huge amount wells The method is quite simple to implement and I have never encountered it anywhere in my life. I also have not seen a description of this method on the Internet. An acquaintance of mine came up with the idea of drilling water wells in this way; he is a turner by profession.
For a comfortable stay, any home must have running water. Your own well in the house, even if there is a central water supply, can be very useful. Firstly, you do not depend on utility services and interruptions in the supply of water do not threaten you. Secondly, you do not need to pay for water according to the meter, and when watering the garden or washing machine requires a lot of water. Thirdly, water from a well is often best quality than the water that is supplied to our homes through the water supply. Also, water from a well is better than water from a well, since it does not come into contact with air and various debris from the surface of the earth does not fall into the well as in a well. A well can be installed in a built house, and then there will be no danger that it will freeze in winter time years, and you will be left without water supply.
You need to start drilling with a simple drill, to the maximum possible depth. Then we insert a galvanized pipe into the drilled hole, to which a cone-shaped tip with a hole in the center is welded.

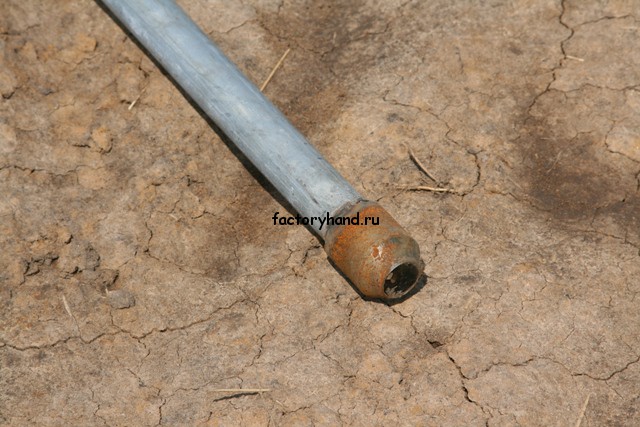
Pipe tip
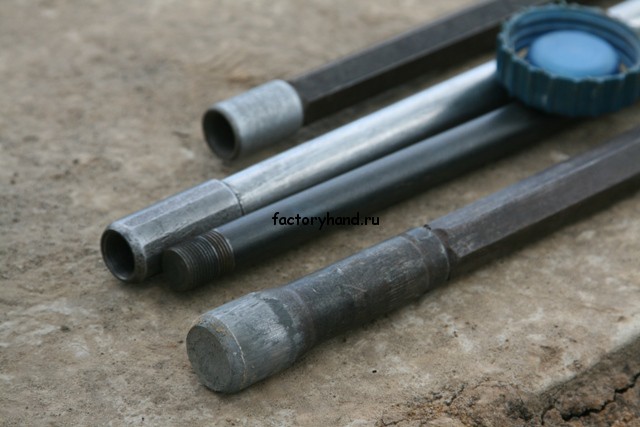
Rods with tip
Then we lower a rod into the pipe, the tip of which is slightly larger in diameter than the hole in the tip of the pipe. And we begin to hammer the pipe into the ground with a barbell. In this case, the blows are applied not to the pipe, but to the tip of the pipe (the photo of which is shown above), the pipe and threads are not damaged. As the pipe sinks into the ground, we extend it and the rod by screwing in additional extension elements. As soon as we reach the limestone (this will be clear because the rod will begin to bounce back upward when struck), we pull the rod out of the pipe and insert a drill into it (the drill is smaller than the size of the hole in the tip of the pipe). Now you need to drill a hole in the limestone, find an aquifer in it and drive a pipe into the limestone. We check the presence of water in the well by pouring water from a watering can into the pipe. If the water does not leave the pipe, it means you have not reached the aquifer. As soon as the water runs “merrily” into the pipe, this indicates that everything in your house will now work plumbing equipment. This is how the drilling process happens in our country. A pipe driven into limestone works for many years and she is not afraid of sand. After drilling a well, it must be thoroughly pumped to remove all the dirt that has accumulated in it during drilling. About
Drilling a well for water is a completely doable task, and everything can be done with your own hands. The only thing is that it may not be possible to make an artesian well.
This work is quite labor-intensive. The cost of drilling a water well depends entirely on the depth of the source.
So how much it costs to drill a water well will depend entirely on your site. In the video in this article you can see the entire procedure for performing the work. And from the photo you can see it in more detail.
Criteria by which the quality of drinking water from a well is determined
The main purpose of drilling a well at a site is to extract water for irrigation and drinking.
- Transparency of at least 30 cm.
- Nitrates should not be more than 10 mg/l.
- One liter of water cannot contain more than 10 E. coli.
- Smell and taste scores must be at least three points.
Tip: To ensure quality drinking water a sample of it must be submitted to the Sanitary and Epidemiological Service for examination.
Drilling methods
There are several ways to construct water wells with a depth of more than 20 meters.
It could be:
- Auger drilling.
- Core drilling.
- Shock-rope method.
- Impact-rotational.
- Using an ice ax.
Tools
Water well drilling technology includes correct selection the right tool and equipment.
To drill a well, you need the following tools and equipment:
- You must have a drilling rig or make the device yourself;
- Gur, which will correspond to the diameter of the well;
- winch;
- A steel pipe, which is intended for fastening the walls, and a rod.
Attention: If you have a deep well, then you will need a drilling rig; it is suitable for drilling a well to great depth. This design allows you to load and lift a drill with rods.
Determining the type of well
This issue is quite important and will completely affect not only the cost of work, but also the quality of water:

- Before drilling begins, the site area must be examined to determine the depth at which the groundwater, since this parameter will determine the amount of work required to be performed, which will lead to the well becoming aquiferous.
Attention: The choice of well type is directly influenced by the depth at which the water-bearing formation lies.
- If the aquifer is shallow and can be found at a depth of 3 to 12 meters, you should choose a well of the “” type.
- A sand well is used at a depth of up to 50 meters.
- An artesian-type well will be used when water lies in the ground up to 200 meters.
The first and second types of wells can be done manually, but an artesian type well will require professional drillers and a drilling rig. Instructions for making other types will be below.
Making a sand well by hand
Pumping out water this type provides from a depth not exceeding 50 meters. The well is called so because it produces water from the sandy layer of soil containing it, usually located at a depth of fifty meters.
The depth at which it lies aquifer, requires periodic checking of the water contents at a sanitation station, since it does not guarantee its purity.

A sand well is organized according to the classical scheme using a pump. Water is purified from debris and suspended matter using a filter installed at depth, which requires regular cleaning. This type has a service life of about 15 years.
Construction of a well according to the “Abyssinian well” type
This one is the easiest to implement. Since it is not deep, a careful approach is required when choosing a place for its installation.

There should be no sewage or cesspools, septic tanks or garbage heaps near such a structure, since the shallow depth increases the risk of contamination of the source with harmful substances.
Attention: If there is no pebbles or other hard rocks in the soil, the well can be drilled on local area, or directly, in the basement of the house.
This design makes it easy to use at sub-zero temperatures. In order to use water in the absence of electricity, except for the pump home well also equipped with a manual column.
Drilling an artesian well

If there are artesian-type wells in neighboring areas, then the occurrence of water in this area most likely occurs in a limestone formation. In other cases, to determine the depth at which the water lies, an experimental well is used by drillers.
They are able to provide water to more than one area, so in order to obtain the desired result and save money, drilling is often ordered together.
The choice of one type of well or another is determined by the type of soil and the amount of water planned for consumption. Sand well and Abyssinian well will provide low water consumption needs.
If the flow rate exceeds 10 cubic meters per hour, then in this case it is necessary artesian well. To ensure that there are no problems with the laying of the water supply system in the future, it is better to drill any type of well close to the house.
Drilling tools and equipment
Artesian wells are drilled by professionals using a drilling rig. To drill shallower wells, a tripod with a winch is used, which will lower and raise the drilling tool - drill, drilling column, drill rods, core pipe.
The well is drilled manually using a metal auger, which can be used as an ice drill for ice fishing. In this case, the drill must be made of high-strength steel.
This option of drilling a well is the most economical. In addition, you will also need a pump for the well, filters, a caisson, valves, pipes of various diameters (casing, water supply) and hoses.
Stages of drilling work
So:
- To begin with, a pit or hole measuring one and a half by one and a half meters is dug. To prevent shedding, the recess is lined with pieces of chipboard, boards or plywood.
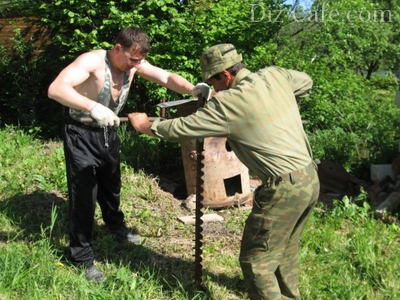
For greater stability in vertical position pipes, a conventional drill breaks through a trunk 1 meter deep and 15-20 centimeters in diameter. - A durable wooden or metal tripod, called a drilling derrick, is installed above the recess and a winch is secured to it. Very often, towers are built from logs. Also, a drill string with rods 150 centimeters long is suspended on a tripod (subject to self-drilling).
- The rods are attached using threaded connection and secured with a clamp. This design used for lowering and lifting equipment.
- The pump is purchased in advance and determines the future diameter of the core pipe and well. For the pump to pass freely into the pipe, the difference between the diameters of the pump and the pipe from the inside must be at least 5 millimeters.
- Lowering and raising equipment for drilling is considered drilling a well. During operation, the rod rotates in the ground and is simultaneously struck from above with a chisel.
Attention: It is much more convenient to do this work in pairs. One cranks the barbell gas wrench, and the other breaks through the rock, striking the bar from above.
The winch makes it easier to lower and lift equipment into the well, greatly simplifying the work process. In order to determine the time of removal of the rod for cleaning the drill, it is marked and cleaning is carried out every half a meter.
To make it easier to overcome different layers of soil for drilling, various drills are used:
- Used for clay soils spiral drill(coil);
- To loosen hard soils, a drill bit is used;
- For sandy soil, a spoon drill is used;
- A bailer is used to lift the soil to the surface.
Let's now figure out how the work itself is done:
- A spoon drill is used to penetrate the sand layer, with the addition of water during drilling. In the case of hard soil, drill bits with a flat and cross shape are used.
These drills are designed to loosen hard soil. Overcoming quicksand sands occurs using the impact method. - The bailer, coil and spoon drill are used on clay soils. Since spiral drills (coils) have a design similar to a spiral, they cope well with clay soils. The spiral pitch in such drills will be equal to the diameter of the drill itself. The base of the drill has dimensions from 45 to 85 millimeters, and the blade varies from 285 to 290 millimeters.
Pebble beds containing gravel are punched using casing pipes, alternating between a bit and a bailer. In some cases, you cannot do without pouring water into the holes, since this greatly simplifies drilling a well. using a pump also deserves attention. - The proximity of an aquifer will be indicated by wet rock extracted to the surface. Drilling will become noticeably easier, but you should not stop, since you need to use a drill to find a water-resistant layer.
Well development and improvement
When the required depth is reached, you can proceed to the next stage of well improvement:
- A filter column consisting of a filter, a settling tank and a pipe is lowered into the finished well. The filter can be purchased at the store or made on our own from casing pipe, perforation and filtration mesh.
- The pipe is strengthened by filling the space behind it with coarse sand or crushed stone with a fraction of up to 5 millimeters. Backfilling must be carried out above the filter level.
Since the function of the filter is to protect the well from large impurities and sand, it is the most important element of the design. In parallel with backfilling, water is pumped into a pipe with a sealed end at the top.
This operation washes the filter and the annulus. With the help of this operation, a natural barrier is formed from large impurities. - Next, a gelatinization operation is carried out to ensure the pumping of water. screw pump or a special bailer attachment until clear and clean water appears from a fresh well. This is the build-up stage. Most often, a centrifugal electric pump is used.
Attention: The advantage of this mechanism is its ability to pump liquid media with increased density. Let's say a regular pump household type, but unfortunately it will take more time and effort. In case of lack of electricity, it is possible to use hand pump.
- Upon completion of pumping, using a safety rope to a depth, the pump is lowered, to which a hose or water pipe with a diameter from 25 to 50 millimeters. The choice of the required diameter depends on how much water it will be possible to pump out from the well in a certain period of time.
- When using a steel pipe, the pump does not need to be fixed, and the waterproof cable feeding the pump is attached to its body.
Choosing a pump
The price of this mechanism will depend on its power and manufacturer. It is better, of course, to give preference to proven brands, because they have significant better quality production.
When choosing, you should also apply the following parameters:
- The main indicator in this matter will be;
- The diameter of the casing pipe will also affect it; it must be taken into account, otherwise the pump simply will not fit;
- You will also need power, and this, in turn, will be affected by the distance of water delivery.
Attention: For water depths up to 9 meters, it is perfect surface pump self-priming. For deeper burials, use borehole pump submersible
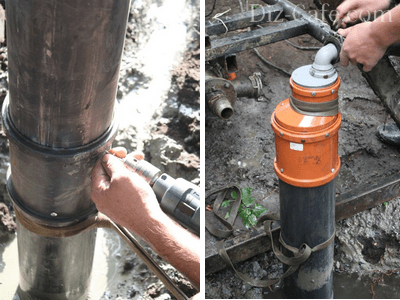
- First, the wellhead should be equipped with a caisson. There is a detailed article on this topic on our website;
- We take out the pipe and at the same time weld it to the head. Now we lower the pump there;
Attention: Do not forget that the valve must be secured to the neck. With its help, you can always turn off the water if necessary. This is needed if problems occur.
Now you have an idea of how this work is done. The most important thing is to take your time and correctly determine the type of well. After this, when working, do a high-quality sealing of the seams and everything will turn out well and the repairs will not often bother you.
Thanks to the well, you can gain access to water in places where access to communication lines is very limited. However, the process of manufacturing such a structure is quite tedious and requires certain equipment.
However, there is also manual drilling of wells, which allows you to achieve the desired result without resorting to the help of special equipment.
Step by step process
To begin with, it must be said that this type The work is designed to ensure that the level of the aquifer is located no deeper than 15 meters. At the same time, manual drilling of a well is best combined with an Abyssinian well, or as it is also called “igla”. The fact is that this is the most optimal design for this process, and it does not require special effort or special equipment.
Preparatory work
*First you need to purchase or rent hand-held drilling rigs for drilling wells. They have different type and method of application, but the main task of such devices is to make holes of a certain depth in the ground.
*It must be said that the chosen type of construction is quite suitable for the initial three-meter well. However, to make work easier, craftsmen try to increase this distance to the maximum possible. Namely, to the depth that the equipment allows.
*The following installation instructions recommend preparing special needles. They are made from a pipe, at the end of which a kind of pin is fixed so that the structure easily fits into the ground.
*Several holes are made in the pipe a little above the needle, through which water will flow. Some experts in this field advise installing a wire filter for the well, although quite often it is simply not installed.
Advice!
Professional craftsmen do not recommend using thin-walled pipes, since they will not only serve as a water supply system, but also as a casing column.
Installation
*First of all, it must be said that water from a well is the property of the state, since it belongs to the category of minerals. That is why you first need to complete all the relevant documents and obtain a license.
*After all the formalities have been settled, you can take a hand drill for drilling wells and start working.
*Professional craftsmen advise choosing a drill such that its diameter is slightly smaller than that of the pipe. This way the structure will fit tightly into the soil and be securely fixed in it.
*It is believed that a depth of 3 meters is sufficient to produce such a well. However, if the work is done with your own hands, then you should use the drill as much as possible. This is why professionals make a hole to the depth that their equipment allows.
*At the next stage, a pipe is inserted into the well with the sharp end down. After that she is slaughtered.
*If the length of the needle does not allow it to reach the aquifer, then it is extended and also buried as deep as possible into the soil.
*For this work, use a special impact tool that will not damage the threads at the end of the pipe. However, it is worth mentioning that there is a drill for drilling a well manually, already equipped with the necessary mechanism for driving.
*Immerse the needle into the ground until it enters the aquifer. After this, a water pump is installed on top. It should be mentioned that such a system can work perfectly with a hand pump.
*The point is that the price similar device may be slightly higher than the cost of the pump, but it does not require electrical energy and is highly reliable.
*The fact that for hand made wells, a huge number of all kinds of devices and devices were invented. They all differ in their design and require a certain application of force. That is why the choice of the appropriate system should be approached based on calculations technical specifications specific area and expected length of the well.
Advice!
If there is an opportunity to use technology, then it is worth using it.
It is quite possible to manually create a well that will have a depth of no more than 15 meters. For other water supply systems, the use of specialized equipment is recommended.


Any estate, be it country house or private house must be provided with water. Without life-giving moisture, they cannot grow, delighting the eye with lush flowering, or fully bear fruit. cultivated plants. Do-it-yourself water well, despite the seeming enormity of the process, is quite real opportunity water extraction, which can be done independently without the use of heavy drilling equipment. There are several drilling methods that are quite simple to implement and do not require the use of expensive equipment or significant effort.
Water can be produced by using different technologies. The main types of water wells used to extract life-giving moisture:
- Construction of a well, which, in the presence of a good spring, fills quickly and, being an excellent water storage device, can hold up to 2 cubic meters of water;
- A sand filter well, which is a pipe d=100 mm, immersed using an auger to a depth of 20-30 meters. A stainless mesh is attached to the recessed end of the pipe, which acts as a filter, being immersed in coarse sand. Well depth is 10-50 meters, service life is 5-15 years.
- A filterless artesian well used to extract water from porous limestone rock layers. The depth of the well is 20-100 meters, the service life is about 50 years.
The exact depth of the water well cannot be determined in advance. Approximately, this will be the same depth as a similar well drilled in neighboring areas, or a nearby well. Since deviations are possible due to the uneven occurrence of soil layers, casing pipes should be purchased based on the parameters of the water supply sources already installed on the site, but taking into account minor adjustments.

The design of the water well is a kind of narrow well

The service life of wells directly depends on the intensity of use: the more often the structure is used, the longer it will last
Drilling a well manually
To perform the work, you need the drill itself, a drilling rig, a winch, rods and casing pipes. A drill tower is necessary when digging deep well, with the help of this design the drill with rods is immersed and lifted.
The easiest way to drill a water well is rotary, which is done by rotating the drill
When drilling shallow wells, the drill string can be removed manually, without using a tower at all. Drill rods can be made of pipes; the products are connected using keys or threads. The lowest rod is additionally equipped with a drill.
The cutting attachments are made of 3 mm sheet steel. When sharpening the edges of the attachments, it should be taken into account that when the drill mechanism rotates, they should cut into the soil clockwise.

Drilling technology familiar to most owners personal plots, also applicable for constructing a water well
The tower is installed above the drilling site; its height should exceed the height of the drill rod in order to facilitate the removal of the rod when lifting. Then a guide recess for the drill is dug onto two bayonets of the shovel. The first turns of rotation of the drill can be performed by one person, but as the pipe sinks it will be necessary additional help. If the drill does not come out the first time, you should turn it counterclockwise and try again.
As the drill goes deeper, it becomes more difficult to rotate the pipe. Softening the soil with water will help make the work easier. As the drill moves downwards, every half a meter the drilling structure should be brought to the surface and freed from the soil. The drilling cycle is repeated again. At the stage when the tool handle is level with the ground, the structure is extended with an additional elbow.
Since lifting and cleaning the drill takes a significant part of the time, you should make the most of the design, capturing and extracting to the surface the maximum possible portion of the soil layer.

When working on loose soils, additional casing pipes should be installed in the well to prevent soil from falling off the walls of the hole and blocking the well.
Drilling continues until it enters the aquifer, which is easily determined by the condition of the soil being removed. Passing the aquifer, the drill dives even deeper until it reaches the next aquifer - the aquifer. Immersion to the level of the waterproof layer will ensure maximum water flow into the well. It is important to note that manual drilling is only applicable for diving to the first aquifer, the depth of which does not exceed 10-20 meters.
To pump out dirty water, you can use a hand pump or pump submersible type. After two or three buckets of dirty water, the aquifer is washed out and usually appears clean water. If this does not happen, the well should be deepened another 1-2 meters.
Can also be used manual method drilling based on use conventional drill and hydraulic pumps:
More details about manual drilling.
Rope Impact Drilling Technology
The essence of this method of making a water well with your own hands is that the rock is broken using a driving glass - a heavy tool falling from the height of an equipped tower.
To carry out the work, you need a homemade drilling rig, as well as tools for using the shock-rope method and extracting soil from the well.
A well tower, which looks like an ordinary tripod, can be made of either steel pipes or ordinary wooden logs. The dimensions of the structure must be proportional to the dimensions of the downhole tool.

The optimal ratio is the height of the tower, which exceeds the length of the downhole glass by one and a half meters
The process consists of alternately lowering the driving nozzle, which breaks and captures the rock, and raising it to the surface with the captured blade of the drilling tool.
To equip the drilling rig, you can use a steel pipe, the end of which is equipped with a cutting device. Cutting edge resembling appearance half of the auger turn will be in direct contact with the bottom. Half a meter from the edge in steel pipe a hole must be made through which the extracted soil can be removed by emptying the drill bit. A cable is attached to the top of the glass, which will be used to lower the glass and remove its contents to the surface. The glass should be freed from the ground as the structure deepens every half meter.
Here is a video example of conducting exploration drilling in this way:
The nuances of installing casing pipes
A do-it-yourself water well dug requires additional casing, which can be made from a solid asbestos cement pipe, and individual sections asbestos pipes. When working with cuts special attention is given equal to the diameter of the pipes in order to ensure subsequent unhindered immersion of the entire structure. Each pipe link is kept from slipping and secured with brackets, which are then hidden under stainless steel strips.
A do-it-yourself water well can also be “lined” with steel or plastic pipes
Pipe casing is required:
- to prevent walls from collapsing during drilling;
- to prevent clogging of the well during operation;
- to cover the upper aquifers with poor water.
A pipe with a filter made of a fine mesh that does not allow grains of sand to pass through is lowered to the bottom of the well and provides water filtration. The pipe, lowered to the required depth, is secured with a clamp. This will prevent spontaneous subsidence.
With proper installation of a water well aboveground part The structure is covered with a caisson - a cap that protects the source from contamination.

The head is a tank with a closing hatch with a hole diameter that allows easy access to the water intake well
Over time, the effect of a slight “squeezing” of the pipe from the soil may be observed. Natural process spontaneous lifting of the pipe to the ground surface does not require additional measures for deepening.
Video example of well construction
Not all owners suburban areas ready to post large amounts to attract drillers to construct a water intake well. However, the convenience of using your own water intake is difficult to overestimate. You can save money by building a water source with my own hands. How to make it?
You will learn everything about how to manually drill water wells from our article. We will tell you how and how the work is carried out, and what novice drillers will need to implement the idea. Taking into account our recommendations, you can drill and equip a mine without any problems.
For independent masters we presented and analyzed all the techniques of manual drilling, explained in what cases they should be used. Attached are diagrams of drilling rigs and projectiles available for self-production, and posted photo selections and video instructions.
Your own source of water is an excellent opportunity to provide yourself and your loved ones with clean, life-giving water and satisfy your household needs. By drilling, the water supply problem can be solved for several decades in advance.
The choice of drilling method and the amount of work to equip the well depends on the type of hydraulic structure.
Abyssinian type well
If the water on the site is supposedly located at a depth of 10-15 meters, then it is more profitable and easier to install an Abyssinian well. This type of hydraulic structure uses an aquifer located above a waterproof clay layer. The aquifer is fed by infiltration of precipitation and water from nearby reservoirs.
A simple needle well can be drilled even by a novice craftsman who is just mastering basic drilling skills
A relatively shallow narrow well is a column of thick-walled VGP pipes with a diameter of 50 - 80 mm. In the lower, very first link of the column, a special filter is installed by drilling holes in the walls of the pipe.
The pipes serve as a trunk; the Abyssinian needle well does not require additional casing. It is not drilled, but immersed in the ground by driving it.


Features of sand wells
When the depth of the aquifer is up to 30 - 40 meters, widespread in loose, incoherent sediments, a sandy aquifer is constructed. It is called so because it extracts water from saturated sands.

The fifty-meter depth of the source cannot guarantee the crystal purity of the water, and therefore the contents of the well should be tested in the laboratory for the presence of chemical compounds
The aquifer of a sand well is located only three to four tens of meters from the surface. And to achieve it, you don’t have to go through hard rocks and semi-rocky rocks. Therefore, carry out drilling sand well manually is not difficult if you use one of the methods described below.
Deep artesian well
But when planning to drill an artesian well, you cannot do it on your own. Artesian water distributed along cracks in impenetrable rock and semi-rock at a depth of about 40 -200 meters.

Only professionals who have the necessary knowledge and have special drilling equipment at their disposal can cope with the task of drilling a well on limestone
To determine the depth of water, they should rely on the data of hydraulic structures of this kind, drilled not far from the upcoming work site.
Since an artesian well can provide water to several areas at once, it is convenient to order drilling services together. This will allow you to significantly save on drilling and arrangement of a water supply source.
Self-drilling methods
In order to choose the best one for you personally, you must first study their specifics and understand what tool is needed and whether it will be possible to drill with your own hands.
Manual auger method
Drilling using an auger is one of the most common and accessible methods. It is effective when constructing wells whose depth does not exceed 40 m.

The auger is a helical rod equipped with a drill bit and angled steel blades
The essence of the method is that the auger, like a corkscrew, is screwed into the ground. As it penetrates deeper into the soil, the helical rod destroys the layers, and its metal blades bring waste soil to the surface.
Augers used for manual drilling are of two types:
- Rods to which the cutting blades are welded at right angles.
- Structures to which the blades are welded at an angle of 30-60°.
The designs of the second version are more convenient to use. Due to the location of the blades at an angle, the crushed soil does not fall into the well, but is completely removed to the surface.
To make it easier manual labor and speed up the process, you can use small-sized screw installations.

This technique is especially effective if the work has to be done with complex soils that contain rock inclusions
Small-sized auger units work on the same principle as a hand drill, but are driven by an electric motor.
You can generally drill a shallow well to collect water for watering your garden using a garden drill. True, to line the walls, you will need pipes from which the mine shaft is assembled, and metal rod pipes required for extension.
Core drilling is performed using special tool in the form of a pipe equipped with a crown. The specifics of drilling and the pipe diameter, which does not exceed 160 mm, allow us to work quite quickly. In a day of work, depending on the density of the rock, you can walk up to several tens of meters.
Using the fastening unit located in the upper part of the core pipe, one and a half meter rods are built up as the tool deepens. The build-up is carried out in stages, forming a technological column from a projectile with rods.
The crown is made of durable metal. The edges of the crown are sharpened so that its incisors can easily cope with dense rocks. The shape and size of the crowns used are determined by the physical and mechanical characteristics of the rock.

As it rotates, the pipe, equipped with a crown, is buried in the rock and forms a hole for a well of the appropriate diameter
When dealing with super-hard rocks, a chisel is first used before plunging the pipe. Then a hole is drilled using a crown, and the slurry clogged in the core pipe shell is lifted to the surface.

Forcefully descending onto the drilling site, the tool breaks the rock, and the cutting bailer located in the lower part captures the cuttings and brings them to the surface
The glass is freed from the soil it has captured through its bottom, tapping the walls of the projectile with a sledgehammer. The bailer is cleaned through a technological hole located in its upper part.
The work is performed in the following sequence:
- In the selected location, dig a hole measuring 1x1 meter at a depth of 0.5 meters.
- A garden drill is installed in the center of the hole at a right angle. By rotating the tool around its axis, it is buried in the ground. As necessary, the screw rod is extended with a pipe, fixing it with a bolted connection.
- After wet sand appears, the drill is removed. Instead, it is specially installed in the hole assembled structure from casing pipes, which is driven in with a sledgehammer.
- The rock collapsed during installation of the casing is removed with a bailer. Each time a projectile penetrates into a rock formation, it captures and holds part of it.
- As the casing pipe deepens, it is extended with another section of the same diameter. The sections are screwed or welded together to obtain a single sealed barrel.
- To deepen the casing, carefully turn it and listen to the sounds produced. A grinding noise will occur during friction of coarse-grained sand, rustling - with fine-grained sand, silence - when passing through clay soil.
- For drilling loose rocks, such as loose sand, pebbles, gravel, a bailer is used. Clay rocks and dense sands pass through the glass.
- After performing a series of successive blows, the glass or bailer is raised to the surface, removing the soil from it. After this, the cycle of work is repeated.
As in previous methods, to facilitate the process of manual drilling of a well, a clay mixture or water is poured into the hole, and then removed back using a special bucket. If noise occurs during drilling, the well should be filled with water. If the water drains slowly, the pipe should be deepened another half a meter, but if it drains quickly - only 20-30 cm.
For shallow excavations it is easily possible. To do this, you will need a pipe with a diameter of 100-120 mm, a metal earring and an eye for attaching a cable, which must be attached to the top of the pipe.
Image gallery


Impact-rotational method
The main difference between this method is that the drilling rig simultaneously performs both impact and rotational movements. This approach allows you to speed up the drilling process. This method is especially effective when it is necessary to arrange a hydraulic structure if the geological section in the area is heterogeneous.

The rotary impact method also involves the use of a tripod, which makes it much easier to immerse and then remove the drill to the surface
Impact-rotary and percussion-rope drilling methods are effective when constructing wells in loose soils, the particles of which are not interconnected. Both methods are suitable for drilling and extracting clayey soils: sandy loam, loam.
When drilling in loose rocks, due to insufficient connection of soil particles with each other at the stage of well construction, there is a high probability of its walls collapsing. Therefore, sand wells in mandatory are equipped with casing and filters that prevent large inclusions from entering the extracted water.
Step-by-step auger drilling technology
Among all the listed methods, the auger method is rightfully considered the simplest. But it is worth considering that it is effective only when drilling loose and clayey soils.
Image gallery


Preparing the necessary tools
Before you drill a well manually, you need to prepare the following tools:
- drill or small-sized auger installation.
- drilling derrick with winch.
- set of 3-4 rods.
- casing.
If it is necessary to construct a well at a depth of more than 8 meters, to facilitate the immersion of the drill and its subsequent removal from the wellbore, the equipment is fixed to.

A drilling rig can be constructed from wooden beams or metal pipes, assembling them into a tripod-shaped structure
The size of the tripod should correspond in proportion to the height of the drill string section. To create the structure, the beams are laid in the form of a triangle and fixed using a bolted or welded connection.
Holes are made in them for insertion metal pipe, which will serve as a support. The dimensions of the base are determined only by the stability of the structure.
An additional hole will be installed in the upper part of the structure through which the rod will pass.
To protect the wellbore from destruction and shedding of the walls, a casing string is installed from pipes that have a high bearing capacity to shear and compressive formation loads. For work, pipes made of metal, asbestos cement or polymers are used.

To create a casing, it is convenient to use pipes equipped with a threaded connection on the outer and inner surfaces
When assembling the structure, segments of such elements can be easily screwed into each other without the use of additional assembly units.
Making a screw from scrap materials
Material for, in in this case screw-shaped rod, a pipe d100mm can protrude. For this purpose, it is better to use high-quality steel pipes with a wall thickness of at least 5 mm.
The upper part of the structure must have:
- at the upper end there is a screw thread with outside for connecting to a rod;
- at the lower end there is a screw auger with a number of turns of at least two.
To facilitate the process of turning the drill, a 1.5 meter long handle is welded to the upper section of the pipe. The transition element between the handle and the collapsible rods will be a tee equipped with an internal screw thread.

The cutting blades of the drill are made from strips sheet metal 2-2.5 mm thick, which are welded to the pipe at an equidistant distance
Rods 1.5 meters long are made from a pipe of the same diameter:
- a first rod with an external screw thread at the lower end for attaching a drill;
- all subsequent rods are threaded at both ends of the same size.
The couplings must have the same thread parameters. As the structure needs to be expanded, they are simply screwed to the auger, having first unscrewed the handle.
Some craftsmen use an ice drill as an auger. The knife of the tool in this case serves as the cutting blades of the auger. Extension rods are manufactured separately.

In order to use the tool as a drill and be able to reach great depths with it, rods are made from pipes d25 mm for extension
Trying to improve the tool, some craftsmen additionally weld reinforced cutters to the factory edges of an improvised auger.
Carrying out drilling operations
A hole measuring 150x150 cm is dug. It is necessary to ensure the stability of a vertically installed pipe. To prevent the walls of the recess from crumbling, they are reinforced with pieces of board or pieces of chipboard.

The drill is immersed in the hole and, holding the tool by the handle, they begin to gradually screw it into the soil in a clockwise direction.
The drill is immersed in the hole and, holding the tool by the handle, they begin to gradually screw it into the soil in a clockwise direction. It is more convenient to do this work with two people: the first one will rotate the handle of the tool, and the second one will press on it from above.
After passing the first meter, they begin to form a structure trunk with a diameter of at least 12-15 cm. To do this, a casing pipe is lowered into the recess. The pipe diameter should be slightly larger size drill blades. Subsequently, the pipes are driven in parallel with the deepening of the well.
After the drill is deepened by 1.5-2 meters, it will be quite difficult to rotate the tool on your own. The use of pipe wrenches and other gripping devices will help make the job easier.

After passing every three to four meters, the screw rod should be removed to the surface, and its jaws should be cleared of the ground
When the moment comes that the drilling tool will be buried to its full height during immersion, it should be “increased.” To do this, a rod is fixed to it using a threaded connection or a “pin-rod” extension.
At this stage, it is important to ensure the strength of the connection of the elements. To simplify the task of determining the depth traveled, it is advisable to mark the extended rods.
As the layers pass, they continue to form the casing, not forgetting to check the verticality of the trunk. Even minimal distortion can prevent the casing from descending freely. Therefore, if during work the drill begins to hit the walls of the casing, wooden wedges are driven between the soil and the casing to adjust the verticality of the trunk.
Work continues until the soil delivered to the surface is wet. This will indicate that the aquifer is already close. To overcome aquifer, all that remains is to go a little deeper.
It is possible, but not advisable, to install the casing after drilling is completed. After installing the casing pipe into a completely drilled shaft, the collapsed soil will again need to be removed from the well, but this will have to be done using a bailer.

To prevent the extended casing from sinking into the barrel until the next section is attached, it is held in place with a clamp
To temporarily fix the casing installed in the drilled shaft, you should use a device in the form of a clamp equipped with handles. It will not allow the casing to descend into the excavation before the next section of casing pipe is connected.
But it is worth noting that this method is far from the most rational, since it requires a long time to clear the face of sludge. When forming a column, you should not lower the pipes to the bottom of the well. They should not reach the lowest point of the bottom by approximately half a meter.

For casing formation plastic pipes introduced sequentially, connecting elements as they deepen
To facilitate the drilling process using an auger, experts recommend flushing with water from time to time. The jet pumped into the cavity of the casing pipe will wash the dump to the surface.
Conclusions and useful video on the topic
Drilling a well using the percussion-rope method:
The subtleties of making a screw with your own hands:
For those who want to know how to correctly drill a water intake well by hand, we have provided methods proven in practice. You need to choose the optimal drilling method and take the choice seriously necessary equipment, and when drilling, strictly follow the advice of experienced professionals.
The result of the efforts will be a self-developed source of water supply, providing clean water all household members.
Would you like to tell us how we drilled a well in own plot? Have questions or interesting facts on the topic of the article? Please write comments in the block below.