Wicker weaving dates back to Ancient Egypt and Ancient Rome; wicker chairs and boxes were found during excavations. IN Ancient times Various baskets were woven from willow. During the Renaissance and the Middle Ages, boxes, bread bins, baskets and baskets, baby cradles, and carts were created using wicker weaving. A master class on simple and quick weaving from dense wicker will help beginners quickly master the technique.
In Russia, initially, in most cases, baskets were woven and fishing gear, later, with the development of trade, weaving began to be used for packing transported goods into boxes for sale. In the 19th and early 20th centuries, before the Great Patriotic War, many factories were created throughout the country for growing cultivated willow and weaving furniture and household utensils from it. Entire plantations, abandoned during the war, began to be revived and weaving factories, mainly baskets, were created anew. There were entire villages that were engaged in weaving baskets.

Originally used for weaving vine, but more often in Europe and Asia flexible willow rods began to be used for weaving. In addition, in Asia they weave furniture from materials such as rattan and bamboo.
Due to the fact that in today's Russia there are few masters in weaving from wicker, some began to wonder how to weave a basket from willow vine with your own hands, because there is a desire to have such a natural thing with a special aura in everyday life or in the interior. The natural energy of this item brings coziness and comfort to the home.
Harvesting vines for weaving products for beginners
Before you start creating a wicker item, you must first prepare a vine for weaving.
You can, of course, buy ready-made rods to start weaving right away, but it’s better to learn how to prepare the material yourself, this will help later in working on the product.
For weaving, shoots of the first year of growth are used, and they are collected all year round. The branches should be cut at a sharp angle with a knife or pruning shears, so as not to harm the tree; it is more useful to leave 3-4 buds on the branch remaining on the tree. When collecting twigs, it is important to check them for flexibility: the first twig cut from the tree must be bent in the place where the thicker end is, if it is not cracked, then it is suitable for decorative weaving. Spring shoots have a very soft bark, so the bark can be removed without pre-treatment, and if the shoots were collected at another time of the year, then the rods must first be soaked for 1-2 weeks or steamed for 1-2 hours, or boiled for 20 minutes, removed bark After peeling the bark, the shoots must be dried, otherwise the rod will finished product will delaminate and break. The rods should be sorted to make it convenient during painting and weaving. Before work itself, the vine is again soaked in water to gain flexibility.
Painting can be done with aniline dyes, a solution of potassium permanganate or herbal decoctions, immersed in the dye for some time, then the rods are rinsed clean water and dried on flat surface, it is better on the flooring so that there are no stains in the paint.
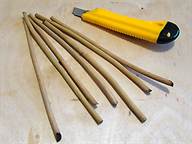
Some rods are too thick for weaving small to medium sized items, so you will need some tools to cut the rods into narrower strips.


And a pinch or pinch helps to remove the bark from the twigs.

Mastering weaving with a simple master class
Immediately before weaving, it is necessary to soak the willow twigs in hot water, and also during work it will be necessary to moisten them with water - all this to maintain the flexibility of the rods.
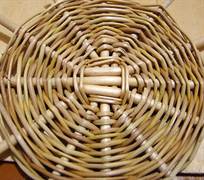
For beginners in wicker weaving, it is better to start with a simple element - from the bottom, this is the basis of many wicker items, using a photo or video master class.
It is better to take rods for weaving with a reserve, because... for beginners, rods often break during work; soak or wrap wet rag For the bottom you need seven or more sticks with a diameter of 4-7 mm, a length of about 20 cm, more is possible, depending on the desired size of the bottom and thin twigs (up to 3 mm in diameter) 30 pcs. and more, the length of which must be at least 50 cm. The thicker ones are used to create the skeleton (rays), and the thin ones in the form of a rope braid all the ray sticks.
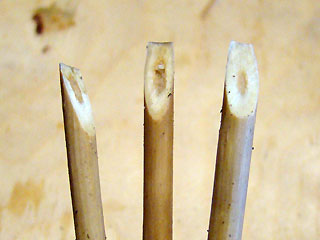
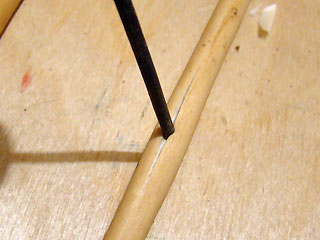
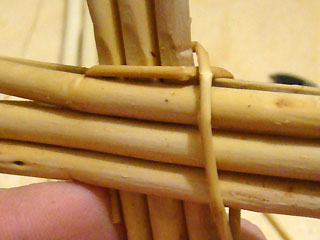
The first step is to make a cross, around which weaving will then be carried out. You need to take 3 thick sticks (you can take four for each side of the cross), cut off a third of the thickness on them in the middle part and sharpen the ends from the thinner edge, for the convenience of inserting other sticks into the crack. The other three or four sticks must also be split in the middle with a knife or awl.
This should be done carefully so as not to split too much or the entire stick, because this cannot be corrected, and the product will be defective.
Then it all comes together.

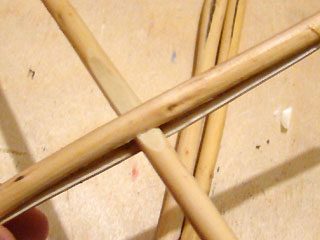

It is imperative that all the inner sticks, on which part of the thickness was cut off, be turned to one wrong side, and the fit of the outer sticks to the inner ones, in the place of the crack, should be as tight as possible.
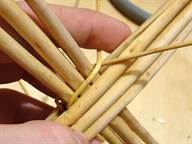
Now you should take two thin twigs and begin the braiding process. The ends of the so-called rope must be hidden in the crack of the axial sticks.

Two twigs diverge in directions, one will first go above the axes, an arc will go under the axes, then they change position. The inner guides must be braided first.
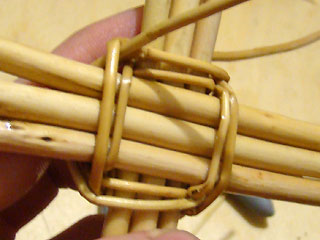
Two rows are braided (you can make three such rows of braiding), then you need to move the axes to the position of the rays, like the sun, in a circle so that the distances between all the rays are equal. The diagram in the photo below:

The braiding begins not of three sticks at once, but of each one separately in the same manner.
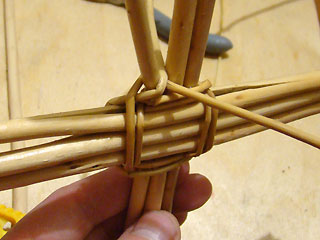
When the twig used to braid ends, you need to weave the next twig of similar size and color, as shown in the photo.

We must try to ensure that the ends of the finished twigs come out on the wrong side, then the front side of the bottom will be smooth and beautiful.


The twigs must be taken of different lengths so that the growth occurs evenly in different places. The larger the bottom of the product, the greater the distance between the beams of the cross, so if the product big size, must be used large quantity rays.
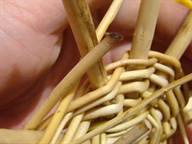
For the oval bottom of a basket or cradle, use a similar cross pattern:

Furniture for skilled hands with job description
Furniture weaving is already being done skilled craftsmen in this craft with my own hands, because I had to weave a lot of different bottoms and baskets for these bottoms and gain experience. Also, to make furniture with your own hands using wicker weaving, you will need not only experience, but also a greater variety of materials and tools. Furniture requires strength, because... a greater force of gravity will act on it than, for example, on the bottom of a basket or cradle, so first a frame of sticks (2 cm thick or more) is built. Next, you need to attach racks to the frame, which will later be braided with thinner twigs or strips/ribbons of twigs; during the weaving process, perpendicular racks are regularly added for rigidity. You can braid various types weaving.
Despite the fact that today furniture stores You can buy almost any furniture; finding something to your liking is quite difficult. This is especially true for non-standard models, which are represented, in particular, by wicker furniture. Wicker furniture with your own hands is no worse than a ready-made one made by professionals. The main thing is to thoroughly study the technology of its manufacture, and then an excellent result will not be long in coming. Furniture created independently will be an excellent addition to the decoration of the garden, and will also emphasize unique style and design of your garden. Furniture created using weaving technology is very aesthetically pleasing and reliable; these are its clear advantages over other types of furniture. Such furniture is not afraid of moisture and other aggressive influences.
Disadvantages of ready-made wicker furniture
Ready-made wicker furniture is quite expensive, it is inaccessible to the middle class of users, and this is its main disadvantage. But it looks very elegant and harmonious, so many people want to learn how to make it with their own hands. This is not only profitable, but also interesting.
To work you need to prepare following materials and tools:
- fasteners;
- plywood;
- nails;
- skin

Before you start weaving furniture with your own hands, you need to clarify that it can be different types. That's it frameless furniture, suggesting the need to use strong sticks that act as stiffeners for such furniture. Wicker furniture can be joinery-frame and frame, i.e. created from individual elements. In such products, duralumin tubes act as a frame, which, however, can be safely replaced with metal rods. Weaving is done between such rods. There is also stick furniture. In this case, the sticks are load-bearing structure, and do not play the role of stiffeners. There are also semi-rigid and soft wicker furniture.

Preparing for work
Having decided to make furniture by weaving with your own hands, you should prepare drawings and study the basic methods of weaving:
- single;
- combined;
- openwork.
In combined weaving, several rods are used at once. To prevent wicker furniture from falling apart before your eyes in the first days of use, you should ensure reliable fastening its components. When working, you can use following types connections:
- one-piece;
- detachable.

When using a detachable connection, the product can be easily disassembled and, if necessary, quickly assembled. But this method is used extremely rarely. The second fastening technique is more widespread, because The result is a more reliable product. The permanent fastening method involves the use of:
- hammer;
- self-tapping screws;
- nails;
- glue.
The disadvantage of wicker furniture assembled using this method is that it is large in size; if it needs to be transported, it cannot be disassembled, which means it is more difficult to transport it to a new installation site.
Wicker furniture is made from willow according to pre-prepared drawings. To work, you need to stock up on reliable sticks with a diameter of 2.5-3 centimeters. This material is the basis of the furniture frame. First you need to prepare the sticks by removing the bark from them. They are then left to dry. The surface of the material should be sanded. This is done in order to eliminate the possibility of skidding during weaving of furniture and during its use.

Select a sketch
While the material is drying, you can choose a suitable sketch of the furniture and decide what size it will be. When making a sofa, decide what size the width and length of its seat will be. You should determine what the distance from the floor to the seat will be, as well as what height the back of the sofa will be.
After preliminary work You can start making furniture. First you need to make a frame for the seat. To do this, 4 sticks are cut to required sizes. For example, consider the following dimensions of sticks: 4 pieces of 60 cm and a pair of 40 cm. Weaving furniture at this stage involves installing sticks with self-tapping screws so that the result is a rectangle. Then they move on to cutting out the front legs of the sofa. There should be 3 of them. They are also made from sticks. The height of the legs should be equal to the selected distance of the seat to the floor. For example, let’s define this distance as 40 cm.

The legs are attached to the seat using self-tapping screws. They are installed at an equal distance from each other. In our example - at a distance of 20 cm. The sofa will not stand if there is no hind legs. To calculate their height, we do the following: add the height of the back to the height of the front legs. Let's assume that the backrest height is 25 cm, then the legs will be 65 cm high. These elements are mounted along the edges of the wicker sofa. For reliability, a leg 75 cm high should be installed in the middle. The legs are attached to the seat with self-tapping screws.
Making the back of the sofa
To do this, choose a stick longer than the expected length of the seat. Using self-tapping screws, it is attached to the upper ends of the legs located at the back. Since the leg in the middle is higher than the rest, the back will have a beautiful curved shape.

Bar sorting
Now you can start making ribbons to create your own wicker furniture. To do this, we divide the twigs into 4 parts. To do this, you can use a stick cut in the shape of a star with four rays. The stick will help you make cuts at the ends of the twigs, after which you can separate them with your hands. Such twigs will allow you to hide the heads of nails and screws.

We add rigidity to the frame
Wicker furniture should be rigid and reliable. One stick should be fixed between the legs located on the sides of the sofa. This must be done using self-tapping screws. In addition, the legs installed in the middle should be strengthened together. The stiffening ribs of wicker furniture should be at the same height.
The furniture's wickerwork is complemented with a few touches. So, you should use a willow twig, which needs to be rolled into an arc and installed in the back of the sofa on the left. It is fixed with nails: the ends of the twig are attached to the legs located at the edges and in the middle. The top point of the arc is attached to the back. Do the same with the right side of the back. The wicker sofa is complemented with another rod. Its size should already be larger than the first twig. It is rolled into an arc, the ends of which are fixed with nails to the front legs installed on the sides of the wicker furniture. Top part The rod is attached in two places to the seat of the wicker sofa.

Final touches
When making wicker furniture with your own hands, the places where the heads of screws and nails are visible are wrapped with tape. The method for their preparation was described above. Weaving the sofa at this stage is accompanied by the use of glue. Furniture made by weaving with your own hands must have a seat. It is made from plywood according to the dimensions of the frame. This element is nailed to wicker furniture. The plywood is covered on top decorative pillows or a soft blanket. The sofa is ready to use!
IN Lately furniture made from natural materials. It is beautiful, environmentally friendly, has a special warmth, is durable, and does not cause allergic reactions, creates a special atmosphere of coziness and comfort. On furniture market special place occupied by wickerwork. But furniture made independently is considered a special chic and source of pride.
It is beautiful, environmentally friendly, has a special warmth, is durable, does not cause allergic reactions, and creates a special atmosphere of coziness and comfort.
Made with your own hands, such furniture has advantages and certain disadvantages. Among the undeniable advantages:
- light weight, allowing you to move it to any place in the room or area of the site;
- does not require special care: looks elegant and fresh if you periodically wipe it with a damp cloth or sponge, this simple procedure protects the product from cracking;
- fits perfectly into any interior, adding lightness and sophistication;
- environmentally friendly, not emitting substances harmful to health into the surrounding atmosphere;
- when weaving is done correctly, it is durable and strong;
- complete freedom of imagination for home craftsmen;
- will significantly save the family budget;
- the opportunity to acquire skills that allow you to organize your own small profitable business.

Made with your own hands, such furniture has advantages and certain disadvantages.
Despite the undoubted advantages of wicker furniture, there are also disadvantages that must be taken into account:
- fears high humidity: cannot be left under open air in bad weather;
- At the same time, the scorching sun will also not do any good: the furniture will dry out, warp, and lose appearance, which will lead to a reduction in service life.

Light weight, allowing you to move it to any place in the room or area of the site.
Deciding on design and construction
Structurally, wicker furniture can be:
- frameless,
- frame.

Fits perfectly into any interior, adding lightness and sophistication.
For a frameless structure, it is enough to use sticks. They perform the function of hard ribs. The difference between frame products is the presence of a metal base, for which they are used steel bars. The weaving seems to be “attached” to them. Stability and rigidity wooden structure attached wooden poles.

Does not require special care: it looks elegant and fresh if you periodically wipe it with a damp cloth or sponge.
If home craftsmen are taking their first steps in weaving furniture, they should not take on complex products: it will be extremely difficult for an inexperienced craftsman to complete them, which will lead to numerous mistakes and disappointments; you need to start with the simplest ones, which give you the opportunity to master the necessary skills.

In order for the product to be of high quality and durable, you need to properly prepare the raw materials.
The furniture has several types of weaving:
| Type of weaving | Distinctive features |
| Single | Simple weaving is easy to master: each branch alternately braids all the frame posts. Usually used as the main method of making wicker items. Gives additional strength and keeps the shape of the product. |
| Openwork | Weaving is used in furniture decoration, adding special chic and originality. It can be used to create waves, corners, ovals, crosses, and diamonds. Requires perseverance, attention, accuracy. Before execution, you need to decide on the ornament, weave several single rows, then choose a decoration method. The most commonly used is straight openwork with stripes of light. Enough complex look work requiring significant skills. |
| Combined | This type is a combination of single and openwork weaving in their varieties. The design of wicker products using combined weaving is “aerobatics” and indicates high level skill. |

Environmentally friendly, does not emit substances harmful to health into the surrounding atmosphere.
Necessary materials
To make furniture from wicker you will need materials. It is worth noting that they can be different, and many are exotic and inaccessible to us: banana leaves, bamboo, water hyacinth, seaweed. But most of the furniture is made from rattan, willow twigs, bird cherry vines, alder, raspberry, and hazel.

Experts say that it is possible to harvest raw materials in the spring.
IMPORTANT! If you decide to use a vine, willow and bird cherry, which are particularly flexible and plastic, are best suited. Bird cherry is especially good in this regard.
When weaving correctly, it is durable and strong.
Excellent decorative elements are colored pillows and blankets of various colors.


Preparation of raw materials for robots
In order for the product to be of high quality and durable, you need to properly prepare the raw materials. Most often these are willow twigs.
- For weaving, you can harvest material that is collected from living trees in the absence of buds, most the right time blanks – late fall. You need to make it before the first frost - such raw materials are easy to clean and store dry.
- Experts say that you can harvest raw materials in the spring, but you need to remember that you need to cut the rods before the buds begin to swell; if you are late, green leaves will appear on the new furniture.
- You need to conduct a kind of flexibility test. The cut branch must be bent: if it does not break, then the raw material is suitable for the job. Thin vine used for fine binding of products is considered to be of high quality.

An opportunity to acquire skills that allow you to organize your own small profitable business.
Required Tools
To weave furniture from wicker, you don’t need many tools, but you should have:
- knives and pruners;
- tape measure and measuring tape;
- various templates.

Afraid of high humidity: cannot be left outdoors in bad weather.

This - minimum required, with the help of such a set of tools you can weave simple and small-sized products.

The difference between frame products is the presence of a metal base; steel rods are used for it.
Manufacturing process: technology and manufacturing nuances
In order not to lose interest in weaving furniture and not spoil a large number of material, you should not immediately “swing” at large and quite complex products - a sofa or a table. It’s better to start with the simplest “braids”, for example, a chair. It consists of several elements: a lower bench, a seat, a backrest, and armrests. To work, you will need willow sticks with a diameter of up to 30 mm and thin willow twigs.

Wooden poles provide stability and rigidity to the wooden structure.

The beginning of the work is the manufacture of the frame.
ADVICE. When working on a chair, you will need curved parts. To bend the rods, you need to soak them, and when they become soft, remove the irregularities and bend them on a prepared template, let them dry.
You need to cut the branches at forty degrees - pruning will not harm the tree, and in a year or two new branches will appear.

The beginning of the work is the manufacture of the frame. If a craftsman is taking his first steps in weaving furniture, it is better to use the frame of an old chair made of metal or wood to make the work easier.

You need to conduct a kind of flexibility test.

When working on a chair, you will need curved parts.
ATTENTION! We must not forget about the armrests, which, however, are made at the request of the master, but serve additional element strengthening the entire structure.
But most of the furniture is made from rattan, willow twigs, bird cherry vines, alder, raspberry, and hazel.

The procedure for making a chair.
- We make the frame. The frame itself is made of thick, durable sticks and a piece of plywood, which is used as a seat. One pair of sticks will act as the front legs; it should be 15-20 cm shorter than the second.
- The legs are connected with self-tapping screws, the seat is nailed down.
- Also, the curved elements of the chair back and armrests are attached to the frame with self-tapping screws.
- The frame is wrapped with willow ribbons and can be secured with glue for strength.
- The frame is braided using single weaving.

Bird cherry is especially good in this regard.

It’s better to start with the simplest “braids”, for example, a chair.
If desired, the resulting chair is treated with stain.

To make furniture from wicker you will need materials.
The final stage is decoration
High-quality wicker furniture practically does not need decoration: it is good in itself. If you want to introduce an element of creativity and “revive” bright colors, you can use willow ribbons in weaving, including dyed ones, they will be organically combined in the ornament of the product. Excellent decorative elements are colored pillows and blankets of various colors.

If home craftsmen are taking their first steps in weaving furniture, they should not take on complex products.

Thicker branches are used to make the frame.
VIDEO: we make wicker furniture ourselves
An integral attribute of everyone country house Rocking chairs are becoming more and more common. From wide range products made from wicker, which fit wonderfully into the interior of the dacha and provide the owners with comfortable stay Outdoors. This chair is easy to make yourself at home.
Pros and cons of wicker structures
Rocking chairs made of wicker have a number of advantages. The advantages of such products include:
- availability of material to perform the work;
- ability to withstand significant weight;
- small weight;
- Possibility of location in any convenient place;
- environmental cleanliness;
- unique design thanks to openwork weaving;
- ease of maintenance and operation.
A chair made from wicker also has some disadvantages. For example, when exposed to precipitation and direct rain for a long time sun rays the rocking chairs darken, crack, and lose their shape.
Preparation of material
Several types of trees are used to weave furniture items. More often it is willow (due to its wide distribution). In addition to it, hazel, broom, alder and bird cherry are used. As an option, a vine from grape or raspberry bushes is suitable.

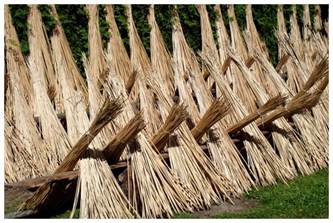
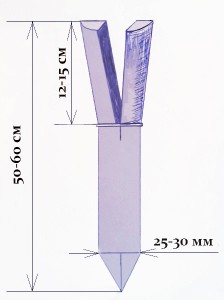
The best time to collect raw materials begins with the arrival of cold weather and ends with the onset of a thaw. At this time, the sap inside the tree does not move and the material is easily processed. Harvested vines are kept outdoors for vertical position within 3-5 days.
The material is sorted based on the purpose of the rods. To make the frame of the structure, a vine with a diameter of up to 4 cm is used, for weaving - 0.5-1 cm.
Thematic material:
Raw material processing
Weaving from vines is possible after the prepared the material will pass certain preparation. The order is as follows:

The complete drying period lasts about 72 hours. After this, they begin to assemble the rocking chair.
Creating a design
A wicker chair should be durable, the basis of which will be correct production. The procedure for forming the skeleton of the structure is as follows:

Braid construction
This exciting process begin when the frame is completely assembled. The braiding procedure includes the following steps:

When the braid is ready, support skis and supports are attached.
Installation of runners
To increase the service life of the rocking chair, it is recommended to install runners that are wear-resistant. The procedure is as follows:
- Turn the structure upside down.
- Heat the skis with a hairdryer, place them on the runners one by one and wrap them along the entire length with cotton tape.
- After the pads have cooled and taken the required form, glue them to the runners, after removing the fabric. For high-quality fastening, secure the ends of the planks with nails.
- Allow the glue to harden for 48 hours, after which remove the nails and replace them with self-tapping screws. Cover the installation areas with a mixture of glue and sawdust.
Final Steps
The finished structure is treated with an antifungal agent and liquid that will prevent the appearance of wood pests.

To increase moisture resistance, special varnishes with water-repellent characteristics are used. Before coating protective agent The product is given the required shade. To do this, use stain or paint.
The finished rocking chair will bring beauty, comfort to your home and will become a favorite relaxation spot for every family member.
Wicker furniture made from wicker favorably decorates and complements any interior, both classic and modern. If desired, thanks to the creatively thought-out design of such furniture, you can create a unique and unique style in your apartment or on a country plot with your own hands.
Some lovers of natural furniture dare to completely fill their home with interior items made from wicker. These can be not only rocking chairs, but also wicker cabinets, tables and shelving. In any office or living room, on the veranda or summer terrace Such decorative elements become the main leitmotif of the entire interior. At all times in Rus', people were engaged in making household items from wicker. These were bast shoes, vases, baskets, boxes and furniture. The structure of the vine is very flexible and pliable, and it also holds its shape remarkably well. Craftsmen from Europe also took over this craft, largely due to the environmental friendliness of the raw materials, thanks to their plant origin.
Stylish chairs and tables look great in combination with glass, metal and wood.
Durable wicker furniture weighs quite a bit, but can withstand quite heavy loads - up to 200 kg. It is resistant to moisture and, with appropriate treatment, to sunlight even in the hottest heat. This allows you to use such furniture by the pool, in the sauna, in the country house by the river, and so on.
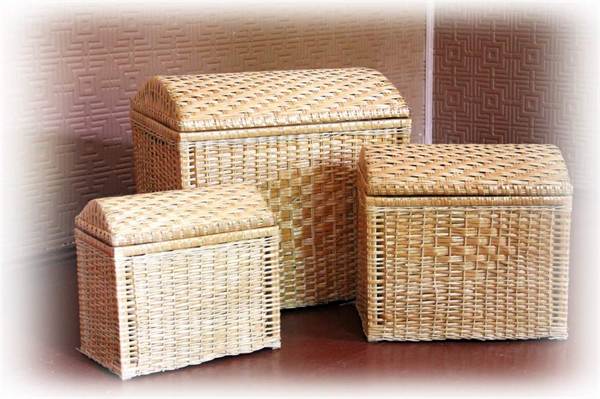
At proper care and using wicker furniture for its intended purpose, it can serve its owners for more than a quarter of a century. You can see the traditional and most common models of wicker furniture in the photo.


Weaving technique
Modern craftsmen have learned to weave vines with the most in unusual ways. In many ways, the style of weaving depends on the elasticity of the materials, as well as the personal preferences of customers or craftsmen. Products made from wicker are mainly woven in several ways:
- simple weaving, in which the rod goes around all the risers, as with outside, and from the inside;
- checkerboard weaving;
- weaving with two rods;
- three-strand weaving;
- sealing the sides with a pigtail;
- layer-by-layer weaving, when the number of rods corresponds to the number of risers.
Advantages and disadvantages of wicker furniture
Advantages of wicker furniture:
- environmental friendliness of raw materials;
- unique style of wicker furniture;
- combination of wicker furniture with absolutely any interior;
- the use of natural materials in the manufacture of furniture;
- practicality and durability;
- durability (about 20 years);
- pleasant woody smell;
- absence of pests due to pre-treatment of the vine;
- the furniture “breathes” and is ventilated well.
Disadvantages of wicker furniture:
- no matter how you try to protect wicker furniture, under prolonged exposure to sunlight it can fade and sometimes even crack;
- Artificial rattan furniture is destroyed in the rain;
- over the years, furniture (especially homemade) can become unraveled;
- the main disadvantage is high price wicker furniture.

Choosing the right rod
A high-quality rod for weaving relatively small openwork furniture should have a thin core. Rods with a thick core are useful for making gazebos or fences. Another selection criterion is the size of the willow leaf. The wider the leaf, the worse the vine will bend, and vice versa.
Popular raw materials for making wicker furniture are rattan or tropical vine. The material is very pliable for weaving, as it has increased flexibility, a strong bark with soft wood and a hard core. Rattan branches are smooth and have no extra branches. Their length can sometimes reach 300 m.
Preparing the vine for weaving
Taking into account such parameters as the quality of raw materials, its price, durability and practicality, specialists mainly use rattan or wicker to weave furniture. Since rattan is southern plant, which can rarely be found in our area, and purchasing it in a store is not very profitable, craftsmen mainly use willow branches to make furniture from wicker with their own hands. Willow of any variety is suitable for this craft. It is necessary to procure raw materials from the end of autumn to the end of winter due to the fact that during this period there is no sap flow in the trees, thus it becomes possible to procure as much as possible. quality material. Using a special tree pruner, you need to cut straight, unbranched and long twigs.
If in the future your wicker furniture will be located outside, then it is better not to peel the cut branches. If your decorative element is intended solely for decorating the interior of the room, then it is better to clean the vine. To do this, boil freshly cut branches in water for 2 hours. Try to use large and deep dishes so as not to bend the branches several times. After 2 hours, the peel from the branches will be easy to separate.
DIY rattan sofa
To work on creating a rattan sofa you will need:
- vine;
- pruner;
- pencil;
- ruler;
- screws, screwdriver;
- jigsaw for wood;
- stain;
- wooden sticks for the frame (2 cm thick);
- drill, drill bits.
Technology for making a rattan sofa:
- Before you start weaving, carefully sand the sticks for the sofa frame.
- Prepare the vine as well. After boiling and removing the skin, wait until the materials are completely dry.
- To make the frame of the sofa seat, take 4 prepared sticks: 2 - 60 cm each, and another 2 - 40 cm each. Fasten them together with a screwdriver and self-tapping screws so that you get a rectangle.
- Next, prepare the front legs. There will be 3 of them, with a height that you determine yourself. But standard height– 40 cm.
- Attach sticks to the prepared frame in the corners: two at the edges, one in the center.
- If the height of the back of your sofa is 25 cm, then together with the height from the floor to the seat, the back poles should be 65 cm. Measure and cut to exactly this length with a jigsaw.
- Using self-tapping screws, attach the 3 rear legs to the rectangular frame according to the same principle as the front legs.
- If desired, you can connect the rear frame poles with a common arc. So, the back of your sofa will have a rounded shape. The length of the stick is approximately 100 cm; it must be screwed with self-tapping screws to the tops of the two rear sticks so that an arc is formed.
- For greater strength fasten the legs of the sofa together with additional sticks.
- The main frame is ready, now the rattan branches should be planed to obtain flexible ribbons.
- The shavings can be done with a knife. Carefully trim the long branches of the vine from top to bottom.
- When everything is ready, all that remains is to make the frame. IN in this case you can use the most different equipment, but the easiest way is to use the technique of simple weaving through one stand with two or three rods on the outside and inside.
- Use the rod to bend around one post from the front, and the next post from the back, until the circle is closed. At the same time, for the circle to close, there must be an odd number of racks.
- When you start weaving the next row, do not forget to go around the first post from the opposite side, fixing each post in the correct position.
- If the rod runs out at its base, place a new one behind the same rack and tuck its ends inward.
- After completing the weaving of the frame, the sofa needs to be covered with stain and then varnish. And when the structure dries, it can be decorated with a foam seat covered with a beautiful fabric.

DIY coffee table made of wicker
To make a small wicker coffee table, stock up on a set of necessary tools:
- plywood sheet;
- 4 boards for the frame and the same number of bars for the legs;
- plywood upholstery plates;
- 4 rods for fastening table legs;
- rods and tapes for braiding.
Manufacturing technology:
- Using a jigsaw, cut a rectangle of the desired size from a thick plywood sheet.
- Using ribbons and willow rods, weave a fabric that fits the size of the plywood table top.
- Carefully and inconspicuously nail the canvas to the tabletop with small nails and set it aside.
- Now start making the base. Make a table frame from 4 boards, nail 4 bars to it - the legs of the structure.
- Using additional branches, fasten the legs together approximately in the middle, crosswise. After this, wrap the structural parts with willow tapes.
- Nail the table top to the frame.
- Dry the wicker table and then coat it with a layer of varnish.

DIY grocery basket made of wicker
At a picnic or on a hike, a compact basket made of wicker will always come in handy; besides, even novice craftsmen can make such a simple product. Let's talk about the basket weaving technology in order:
- To begin, make a hoop from thin willow twig. Bend it up required diameter, use a willow ribbon to tie the ends together, and cut off the excess with a knife.
- To create the base, start weaving vertical rods into the hoop one at a time at equal distances from each other. Maintain a right angle when doing this.
- Loop the tail of the rod around the hoop and the riser rod and press with your fingers.
- Following the sequence, weave in another riser rod. As an example, weaving technology on initial stage reminiscent of weaving a wreath of flowers.
- The result is an approximate frame for the future basket. Start braiding it using the rods. Press the rows of rods closer together.
- When you reach the bottom, bend the riser rods and trim off the excess ends that are too long.
- After this, braid the bottom of the basket with a thin vine.
- Make the handle of the product from several rods woven together. The base of the handle is a thick knitting rod; it must be wrapped with thinner rods.
- Tie the ends of the bow and fold them over both sides of the basket.
- You can use willow ribbons as an additional decoration. different colors to weave them into the process of making the walls of the product.

Do-it-yourself openwork bread box made of wicker
To make a bread box you will need to prepare one wicker bottom round shape(diameter 15 cm), crosspiece (4x4), risers 55 cm long (19 pcs), thin rods-ropes, blank template (diameter 20 cm), plywood stand (diameter 14 cm). From the list of tools, take with you an awl, a screwdriver, 20 mm long screws, twine, and varnish.
Manufacturing stages:
- Moisten the finished bottom to avoid damage to the weaving and attach it to the blank with screws. The height from the bottom to the blank can be determined independently. It is expected to be 6 cm.
- Sharpen the thick ends of the riser rods with a knife and insert them into the bottom next to the sticks.
- Using pliers, squeeze the risers at the base, lift the tops of the heads up and tie.
- Then, directly at the bottom of the basket, braid the risers with a rope of three rods, and make the walls with one rod 60 mm high.
- Bend the risers in the form of an arc and weave the excess ends together.
- When working with vines, do not forget to wipe the twigs with a damp cloth to prevent them from breaking.
- Align the height of the sides of the bread box and the bending of the risers along the upper side of the template attached to the bottom at the very beginning.
- When you finish weaving the sides, the blank can be removed.
- Coat the finished product with varnish for durability.

Take into account all the nuances when making wicker furniture, and also remember the sequence of the wicker weaving procedure various furniture you can by watching the video.
Caring for wicker furniture
The durability of wicker furniture made from natural materials is directly affected by proper care. There are three basic rules that must be followed when caring for wicker furniture:
- To prevent cracks on such furniture, it needs to be slightly moistened about once or twice a month. Simply cover your chair or table with a damp blanket or sheet.
- If your wicker set gets wet in the rain, leave it overnight in a dry and preferably ventilated area until completely dry.
- Clean the vine from dust regularly. This can be done with a regular soft, dry or damp cloth.
- Greasy and dirty places can simply be removed by any soap solution. Fat can also be removed using talcum powder.
- Under no circumstances should wet wicker furniture be loaded with anything. Otherwise, it may change its shape.
