All boys love watching films about Iron Man, heroic adventures and interesting pastimes. Many young men dream of feeling like they are in the shoes of the main character, Iron Man Tony Stark. To become one, you need to have a super suit like the main character. Of course, the costume has no real analogues yet. Such uniforms are a figment of the author’s imagination. Every father wants to give his son a fairy tale and make a similar set like Tony’s. To start making it, you need to understand its unique structure.
To start making heroic outfits detailed instructions, you need to study the structure of the original in detail. This is necessary to draw up a detailed sketch.
The energy source is fusion reactor technology. Tony also has an indispensable weapon that he constantly uses throughout the film - these are gloves with a jet beam. The hero rises into the air thanks to a powerful stream of energy gushing from under the hero’s feet. In reality, there are no analogues of jet shoes, but there is a jetpack jetpack. In addition, when Tony was inside the armored structure, a holographic screen lit up; similar technologies are already being prepared for implementation. Now let's try to make a simple version of heroic equipment.
First, you need to familiarize yourself with the works of the masters who succeeded in this and created a similar iron man design. A resident of Norway, John Beckensten, managed to recreate the heroic equipment; he used fiberglass and plastic as the basis for its creation.
State resident Anthony Lee managed to make another successful copy, using polyurethane slabs to create it. To create the helmet, he needed a special mixture of resin and sculpting clay. Rivets, old auto parts, LEDs, and servomotors were used to connect the plates. They all added realism to the image.
If you decide to become a design fan and join their ranks, then you will need fresh ideas and a unique approach to the choice of metal (thin foil, durable aluminum or tin), endless inspiration.
To start creating equipment, you need detailed plan all components, taking into account the dynamics of movements in it. You can create an image from a helmet; to form it we use soft metal or tin.
After cutting out the parts, it is necessary to process the edges so that they are not so hard and do not injure the owner of the costume.
When designing a helmet, leave functional gaps, use ready-made drawings that are available online, or create them yourself. We connect the parts with strong staples or rivets, this is less dangerous. For ease of wearing, we glue the frame inside the helmet soft cloth, we insert special lenses into the eye slits that reflect sunlight. As the basis for the costume, we take any jumpsuit made of thick fabric. We will fix the armor onto the fabric. For convenience, we attach metal plates to the fabric on the mannequin. The body frame must be completely cut out and all slots for attaching auxiliary components must be provided.

After the release of the film of the same name, he gained many enthusiastic fans around the world. Hero equipment has become very popular. To make it, we perform the following sequence of actions:
- We form a helmet - to do this, we accurately depict the helmet diagram, cut out the parts, and fix them together with safe connections. Cover the entire mask and lower jaw with tape for strength. To add rigidity to the structure, treat it with a small amount of epoxy glue. After drying, the inner side is glued with safe fiberglass;
- Next comes the manufacture of the back, this also needs to be done based on the drawing. To firmly fix the back parts, we use special clamps. The finished back is glued with a layer of epoxy glue for strength;
- Now we begin to form the chest shell, cut out small semicircular strips, circles of such a width that you can insert the reactor. We form the limbs according to similar scheme, as the previous details;
- When all the costume parts are covered epoxy glue, wait until they are completely dry, then start painting the uniform. So that the design acquires spectacular look, apply acrylic paints evenly, try not to leave any white spots on the surface;
- The complete assembly of important components begins: we glue a wide, dense elastic band to the moving parts of the suit, a thin elastic band is needed to the fingers;
- To firmly connect all the parts to each other, we use a snap hook; it goes to all parts of the iron equipment in the following places: shoulders and forearms, chest armor, lower torso, sides, lower limbs;
- Since all parts must move without creating obstacles to movement, secure them together using ordinary nuts. Lower limbs shape it so that your shoeed foot can fit into it;
- To support the mask so that it does not fall at the wrong time, to inside glue magnets and iron strips;
- Don’t forget about lighting: mount a compact flashlight or battery-powered night light in your chest. Let there be flashlights and buttons in your hands computer mouse place under your thumb, secure everything together with a soldering iron.
One of our versions of the miracle design is ready for use.

The children's design should be simple and highly safe, so you should not install all the accompanying electronics there in order to recreate glowing eyes or other elements of the hero's image. For a child, you can form simple equipment using paper, thick cardboard, strong gluing special technology. To make the design and helmet more realistic, you need to use diagrams or drawings to create it.
You can find ready-made patterns, take the child’s measurements, then adjust the patterns to the child’s specific parameters. Ready-made schemes can be printed on a printer, then transferred to thick Whatman paper. To create hero gear for your child, you will need:
- A good stationery knife;
- Special cutting mat;
- Dense fiberglass;
- Awl;
- Glue or glue gun;
- Scissors;
- High quality epoxy resin;
- Respirator;
- Rubber gloves;
- High-quality acrylic paints (red and golden colors);
- Transparent plastic;
- Sandpaper.
Let's begin the step-by-step assembly:
- First comes the making of the helmet. To do this, we print out all its details. Then we cut out all the parts from thick cardboard and secure it all tightly with glue. The back of the mask, which is pulled out, does not need to be glued;
- When the helmet is completely assembled, cover it with the mixture. epoxy resin and hardener. All helmet components are fixed with reverse side using stationery clips and cover it with glue. When assembling, follow correct proportion so that the product can dry and be suitable for use;
- We reinforce the helmet from the inside with fiberglass. We cut the material into thin strips, and glue several layers of this material from the inside of the product. Cover the top with epoxy glue. After the glue has dried, we sand the helmet so that it looks like it’s cast, so that small parts are not visible;
- Next comes painting the finished product. Since you need to use all the colors, you will have to secure with tape those places where you are supposed to paint with a different color. Paint red, leave those areas where there should be gold;
- We do the back part separately. Ears on paper are easy to do round shape, but you can make them out of wood and then glue them to the helmet. To make the helmet easy to take off and put on, you can use magnets or a simple manual mechanism;
- Similarly, we assemble the neck, chest, back, shoulders, arms, legs, and other parts of the iron man’s body. It is necessary to constantly do fittings to make sure that all parameters are in order. When painting, make sure that no gaps or gaps appear;
- We carry out general assembly parts, giving them mobility. For this purpose, a glue gun will be useful, and you will also need wide and narrow elastic bands. Plastic carabiner fasteners are also required for large parts;
- If desired and possible, additional luminous elements can be formed;
- To make Iron Man's chest glow, you need to glue it into it. led flashlight, runs on batteries, and for the hands we use a small flashlight. Place a mouse button on the side of the index finger, then the wearer of the equipment can easily create a glow at will;
- The eyes are made using glowing LED lights. You will also need a switch, batteries, and wires. Cut two pieces of clear plastic and place the lights just below the eye holes.
If you decide to make an excellent outfit of your favorite character for your child with your own hands, then first you need to be patient. The work will require a lot of time and some perseverance. Study all the details of the main character, look through the comics. All these actions will help to create a detailed picture of the future outfit. It will be impossible to create real equipment, but every parent can imitate a similar design.
DIY legendary hero: material for equipment
Making heroic equipment with your own hands is quite a difficult task. After getting acquainted with the character, you need to decide on the material from which the superhero outfit will be made. There may be several options:
- Paper or cardboard is the most practical, pliable material. It is easy to cut out the necessary parts from it and glue everything into a single structure;
- Aluminum sheets are also interesting option. Due to the texture of the metal, a realistic effect is formed. Parts need to be painted car paint. It is necessary to take into account the safety of the connections for the child, otherwise he may get injured;
- Foam rubber is also a pleasant material that is easy to work with. The only downside is that this design is quite hot. Long time It’s quite difficult to stay in a foam outfit;
- Fabric is a material that any parent can work with. To do this, you need to find a sports uniform that serves as the basis for future equipment. Next, sew the volumetric parts into the appropriate places. We use thin foam rubber as padding. Interesting effect Acrylic paints will add realism to the costume.
In order for the equipment to fit perfectly, it is better to use drawings adapted to the size of your child, otherwise he will experience inconvenience and quickly tear his outfit. Of all the proposed options for creating heroic equipment, thick cardboard and aluminum sheets are suitable. You need to start working with the helmet. In this way you will gain the necessary skills, this part needs to be redone. We cut out each part separately, making indents from the edge of about 1 cm.
Forming a hero's body
The back and chest are made separately and require a separate drawing. We measure the size of the chest. A specific lamp should glow in the middle. It can be imitated using a basic night light of a suitable diameter. Just walk through the hardware store, you will definitely find necessary element decor. You can use foil, which will shimmer perfectly.
Upper and lower limbs
Arms and legs are the most mobile parts of our heroic equipment. In places of direct bending, transitions or gaps need to be formed. It is important to take into account that children are quite mobile; nothing should hinder their movements in this design. For convenience, you can make shields and gloves in addition to them. You can use sneakers or sneakers as shoes. Only separate shields can be glued to the calves, this will ensure mobility.
An important point is the rigidity of the structure
After the equipment is completely assembled, you need to add rigidity to the structure. For this purpose, you need to purchase epoxy glue, apply it in an even layer to all parts and wait until it dries completely. To ventilate and dry completely, leave it for a day. Only after the glue has completely dried do we begin to apply paint and other decorative elements to the structure.

Required for initial stage be prepared that construction will take several days. You want to make your child some real hero gear, not dress him up in a box of household appliances. A robot should not be confused with an iron man. If you are not sure about the presence of some details, then just ask your son about it, because he knows almost everything about his favorite hero. If you have a vague idea of what Iron Man looks like, pictures of the costumes will help you finally understand the image of this hero.
Starting creative process, remember that you are not the first person trying his hand at designing heroic equipment for the first time. Many craftsmen have been able to recreate realistic Iron Man uniforms for themselves and their children. This means that you can make your child happy too. You just need to arm yourself with enthusiasm, be patient, and the joy on your child’s face and satisfied smile will be the best reward for your titanic work and diligence. When creating a model, remember that the design is safe for the child; nothing should scratch his delicate skin or create obstacles to movements.
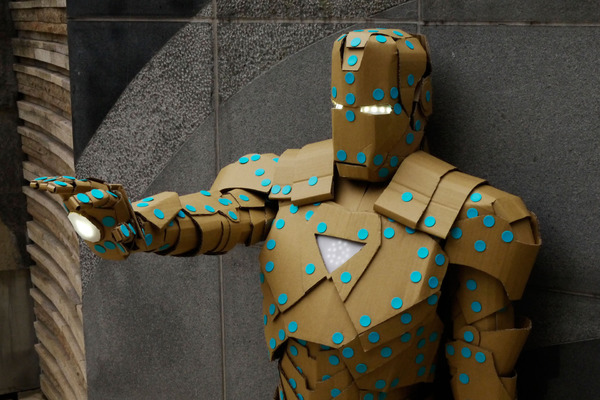
You can involve your child in a common cause, this creative process is great way get closer to your child. Nothing unites like exciting process creating cool hero outfits. Our simple guide will help you create your own version of the heroic equipment, or you can create a similar copy of it. It is quite easy to create such a design, since in order to make it, you do not need to purchase expensive materials and equipment. All you need is thick cardboard, which will form the basis of our costume.
After you learn how to make uniforms from paper, you can switch to soft aluminum or tin. These metals will help increase your skills in crafting iron equipment. Then you will be able to create more realistic images, and your child will be able to appreciate the result.
See step-by-step creation realistic iron equipment can be seen in this video, namely the assembly of a helmet.
After the movie "Iron Man" hit theaters, the whole world exploded with the idea of recreating an exact replica of his suit. Every fan of this hero also dreamed of wearing it at least once and saving the world from the enemies of humanity. Many people had a question: how to do it without spending a lot of money?
Fans of the film are not only boys, but also adult men who are also not averse to showing off in such an outfit at New Year's corporate party. There are known facts when fairly rich people spent not only time, but also money on recreating the image Iron Man, and some even succeeded quite well.
First winners
The first world famous suit was made from plastic and fiberglass. In America it was made from polyurethane board and sculpture clay. It is clear that the outfit was unfinished without large quantity various rivets, LEDs, servomotors and other necessary spare parts. Many craftsmen are still puzzling over the original inventions of this costume. In this article you will learn how to make a mask from Iron Man paper and also from other materials.
Using papier-mâché technique
Any New Year's costume has a mask; it is this that complements the image and hides the face. Working with the papier-mâché technique takes a lot of time, but the result is worth it. A mask for a child under 10 years old can be made on a form three-liter jar. We take newspapers and begin to cover the jar with pieces dipped in PVA glue. A small distance should remain free so that later it is easy to remove the mask shape from the jar without cutting it. When everything is dry, take off the product and try it on to see if the size fits or if something needs to be changed, at this stage everything is still possible. The next day, after final drying, we outline the eye area and cut them out.

Now you need to draw the main lines. To do this, look at the sample and simply copy them. The next stage is creating a relief, this is done using the same paper and glue. Let the product dry completely and see what happens. If you are satisfied with the result, you can start coloring. The paints should be thick, it is better to use gouache. After the primary colors have completely dried, use a very thin brush to draw lines. The metallic effect can be achieved using golden paint. Now that you know how to make a mask from Zhelezny paper human lung way, you can begin to master a more complex option.

Take the paper
Every year before New Year holidays All parents have questions about children's costumes. If earlier you could just buy a mask of any animal and attach a tail, now children want to be like superheroes exclusively. Therefore, parents begin searching for the most interesting costume. There are some moms and dads who want to make it with their own hands. The following information is especially for them.
The first thing to do is be patient and prepare everything you need. Finding drawings today is not a problem. We provide a diagram of how to make an Iron Man mask from cardboard. All that remains is to try to follow it.

Required materials and tools
To make an Iron Man mask you will need:
- paper with a density of 160 g/m2 or cardboard;
- cutting mat;
- big;
- old awl;
- ruler;
- tweezers;
- PVA construction adhesive, epoxy;
- fiberglass;
- acrylic paint;
- scissors;
How to make an Iron Man paper mask
Having decided on the model, you need to cut out parts of the product and start gluing them together. When the mask is ready, we will give it rigidity. To do this, we will cover the product with two components. To make the mask more believable, you need to tape the seams on the end parts with tape. These are the parts that will separate in finished product. Remember that working with epoxy requires caution and following the instructions. When everything is completely dry, you can start working with fiberglass. It is glued in small strips on inner part masks in several layers. The next step is to give the product an ideal smooth shape. This is achieved using a primer and sandpaper. When the Iron Man mask is made with your own hands, you can apply paint, and after it dries, varnish.
Another option
Nowadays many people are interested in handmade products. Many people make incredibly beautiful and exclusive things with their own hands. Why not please your child and make him a costume of his favorite hero?! Below we will describe another option on how to make an Iron Man mask from paper. The instructions are very simple and accessible to anyone.

The first stage of production is printing out the mask pattern diagrams. Carefully cut out the parts. The process is quite labor-intensive, although it may seem simple the first time. Now we connect the parts that will subsequently be immovable. The remaining parts must be connected using openings. Now we make the mask denser, this will help us. It can be applied both to outer part, and on the inside. Let the product dry completely, then cover it with a primer to hide inaccuracies and various flaws. Now let's start painting - the color depends on the chosen model. The main thing is to apply the paint carefully to avoid smudges on other parts of the mask. It is best to use masking tape for this. Using a spray can, apply one coat of paint, let it dry and repeat the procedure. If you use acrylic paint, it is better to paint on fresh air. If after everything dries you find some imperfections, they can be covered up with a simple color-matched nail polish. The product is ready - enjoy your work.
Now you know how to make an Iron Man paper mask. Go for it and be sure that everything will work out. Your child or you yourself will have a bright, memorable fancy dress costume.
Well, fellow papercrafters, it’s time to make an Iron Man Suit with your own hands.
By popular demand, we are posting the iron man suit mark 6. I don’t know why, but we decided to start with this model, so get ready for a long and exciting quest to put all the parts together. First of all, we buy a pack of valerian, scalpels there, that’s all, and read further about that how to make an iron man suit with your own hands.

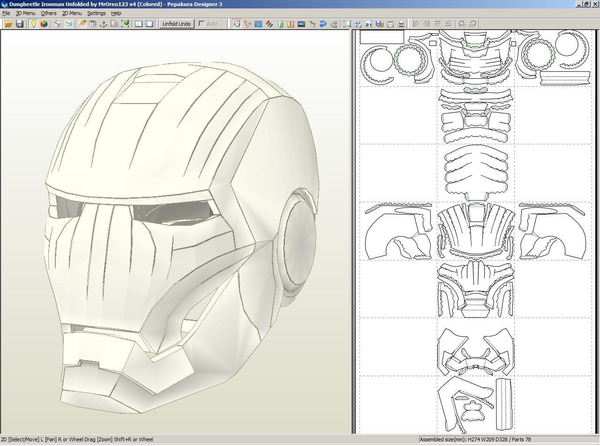
Well, first of all we need an Iron Man Mark VI helmet. I am attaching the actual layout (drawings). Occupies 14 pages in pepakura. Well, actually, we assemble it like a regular helmet. Even a couple of spacers are included.

Iron Man Helmet Mark 6 -
What in our DIY iron man suit comes with the helmet? That's right Neck! It takes up 7 pages in papakura, it’s not difficult to put together, as always, you’ll have to struggle a little with tricks.

Next we will start working on the chest of the stomach. Here you should measure your chest, or rather your ribs, and compare them with this scan. This ZhCh chest model is made for the average adult papercrafter. The girth of the ribs in this drawing is 32 cm at the narrowest point, on average 35. Perhaps you are starving or, conversely, are a renowned bodybuilder, so it is better to play it safe.


Oh yes, I almost forgot about the collar from the iron man suit. Two pages and easy to assemble.


This time the Iron Man suit will have forearms. Contrary to what some might expect, the forearm is located between the biceps and the hand. This useful part takes up 10 pages in pepakura. Easy to assemble. Requires mirroring.

And finally last part hands - actually the palm and fingers of the iron man made of paper. Judging by the development of the hand, there is a hint of the first difficulties here, although it may only seem so.


So, our DIY Iron Man suit is slowly starting to take shape. Now it's time for the abs, or belly, which makes us a little sad, because it takes up a whole 25 pages, a lot of ends.

The time has come for the intimate part - the panties. These, of course, are not panties, but a codpiece, but whoever likes it more. The trouser takes up 8 pages in pepakura and is easy to assemble.

Well, we’ve come to the feet of our iron man suit. Our hero's thigh is located on 15 pages. Don't forget to mirror.

Well, the shin has arrived. It also spans 21 pages, has both a left and a right part. A couple of spacers are included.

Well, we have come to the end of our miracle costume. Foot fellow papercrafters, foot...

This part in the Iron Man suit is attached between the forearm and palm. Some call it the carpal plate. But the main thing is that you understand where it should find its refuge.

Well, that seems to be all. There's nothing to do here. I sincerely wish you good luck, because it will be useful to you if you decide to bring all this to fruition. Something like this should happen after gluing the paper model together. True, it's a different brand.

The briefing is over. A short lesson anatomy carried out. Start gluing! GOOD LUCK!
The character of many animated series, cartoons and three wonderful films, is gradually becoming extremely popular among both cosplayers and children. What child doesn’t dream of such a wonderful outfit that will not only make him almost invulnerable, but also allow him to fly? Of course, it is impossible to assemble a real suit for obvious reasons, but a child’s imagination surprisingly well compensates for all the shortcomings if the iron man suit becomes his own. Read on to learn how to assemble it yourself!
Collecting in parts
In order to make your child an iron man suit that is as similar to the real one as possible, all you need to do is show a little imagination and invest a little work and free time into it. It is best to use aluminum for these purposes. It is light, durable, bends well, and you don't need many tools to process it. To make the costume more realistic appearance It is recommended to paint its parts using spray cans of yellow and red paint. The slits for the eyes can be sealed from the inside with glasses from dark glasses. In addition, you will need any yellow turtleneck with a neck and long sleeves. 

In general, there are now quite a few professional imitators trying to copy this superhero. Iron Man suits are made from the most various materials. They can be of any shape and color. Lots of cosplay photos of Tony Stark and his awesome costume have surfaced! Don’t be lazy and give your child a dream, because who among us in childhood did not dream of being a superhero and accomplishing great feats?
Everyone has probably seen the movie “Iron Man” and, probably, everyone, at least once, imagined themselves in the place of the main character Tony Stark in the iron man suit. Of course, not everyone can make an iron man suit like in the movies. However, you still want to be in the role of “Superman”, whether as a child or as an adult.
So the young Chinese Wang Kang, wanting to feel like an “iron man”, set out to createfirst version Iron Man MK I suit. He devoted all his free time to working on the costume. To create it I used materials that can easily be purchased at hardware store. And, after several months of hard work, he managed to recreate iron man suit. The total weight of the suit is about 50 kg, which only a trained person can wear.
According to Wang, make an iron man suit did not amount to special labor. One of the main rules that must be followed when creating such structures is the careful preparation of sketches of parts and an action plan.
To create the costume, V. Kang used dense porous foam rubber, which is used in construction, glue, wire, light bulbs, batteries ( see also). Regular building materials, which V. Kang used to create the iron man suit.
Materials for creating an iron man suit
The first details and elements of the costume - it all starts with the head.

iron man helmet

iron man helmet
Then the parts are created to be put on the body.

Iron Man helmet and torso elements
The details are assembled and the main elements of the costume are already visible.

Fitting individual parts iron man suit
Without trying on, nowhere.

The iron man suit is almost ready
All that's left is to paint it the color of the metal and you're done!

The iron man suit is READY!
Now everything is ready. You can put it on and go for a walk! People will definitely appreciate it.
We turn on our imagination, ask adults for advice and try to repeat it.