How to tighten plastic windows so that there is no draft from the sash? This question interests every owner of an opening double-glazed window. Indeed, in the cold season, even a small gap between the double-glazed window and the frame leads to a loss of comfort in the house.
How does the double-glazed window sash mechanism work?
A plastic window consists of a polymer frame (sometimes with a sash), a multilayer package assembled from 2-3 glasses separated by a void (air is the best heat insulator) and a mechanism that ensures the opening and closing of the window.
The mechanism of the sash allows you to open it by turning it on its hinges, or tilt it back, opening it at a precisely adjusted angle. To ensure these actions, the following components are included in the double-glazed window mechanism:
- Top loop - complex element, providing both rotation and tilting.
- The bottom loop is a simple element that provides only rotation.
- Constipation – complex knot, which both locks the sash and adjusts the functionality of the top hinge.
How the window will work - tilt or open - is decided by the constipation. When its handle (lever) is moved down, parallel to the side of the frame, the window closes tightly. Rotating the lever 90 degrees unlocks the swinging function - the window can be opened by pulling the handle towards you. Rotating the lever 180 degrees unlocks the tilting mechanism - the window will open slightly under its own weight or due to muscular force.
When do you need to adjust the window sash?
Firstly, adjustment is needed in case of errors during window installation. Insufficiently qualified craftsmen may make a mistake when checking the horizontal or vertical position of the glass unit, after which the sash will begin to scratch the frame. In this case, you will need a 2-3 mm adjustable gap in height and width.
Secondly, adjustment will come in handy after several years of window operation, when the seals lose their elasticity or simply wear out. The sash will be pressed against the frame, but the worn seal will no longer seal the joint. Then the millimeter adjustable clamping gap will come in handy.
Thirdly, manual adjustment of the gaps will be needed when the seasons change. In winter, everyone wants perfect tightness of the joints (so as not to blow), and in the summer, no one will refuse a slight draft.
Moreover, even in winter, before tightening the plastic windows, it is necessary to provide for the existence ventilation gap, providing a flow of fresh air into the insulated room. Therefore, further in the text we will look at adjusting windows that blow either too strongly or very weakly.
Preparing a window for winter: how to adjust a plastic window so it doesn’t blow
If the sash scratches the frame, then in winter there is a blow from the window due to the distortion of the structure. To eliminate this drawback, you will have to do the following: slam the window and lock it with the handle. After this, grab the edge of the sash with both hands and pull it towards you, without offering much force. If it moves out of place at the bottom, then you have a loose bottom hinge. If it's at the top, you have problems with the top hinge.
After localizing the location of the displacement, you need to start eliminating the distortion. The loop at the bottom is adjustable both vertically and horizontally. The upper mechanism can be adjusted in the same way. The tool usually used is a 4mm hex wrench. Sometimes a cross-head screwdriver or a special star wrench included in the window delivery kit is used.
To adjust horizontally, open the sash and insert the key into the groove located at the bottom of the hinge. Turning clockwise brings the glass unit closer to the hinge, turning in the opposite direction moves it away.
Vertical adjustment of the lower hinge is performed differently: the window is opened slightly, tilted into the room, the key is inserted into the groove located in the end part of the curtain. Turning clockwise raises the sash, turning in the opposite direction lowers it. After completing the adjustment, you can close the window and check whether the sash moves away from the frame or not.
The hinge at the top of the window is adjusted slightly differently. To do this, you need to open the window 180 degrees and get to the adjusting screw located on the side edge of the sash, in the area of the top hinge. Next, insert a key into the head of the screw and turn it a quarter turn. After this, close the window and check the degree of pressing of the sash again. If necessary, the operation is repeated.
If the screw at the top hinge does not help, then it is necessary to adjust another unit, which is located in the area of the tilt mechanism plate that holds the window in an inclined position. To do this, open the sash and, holding the lock, tilt it back, gaining access to the plate at the top of the window. Next, insert a key into the head of the screw and turn it a quarter turn clockwise or in the opposite direction.

To get to the tilt mechanism plate, you need to do the following: turn the handle 90 degrees, open the window, press the lock with your finger and turn the handle up 180°. After this, the open sash will tilt towards the room, exposing a plate with an adjusting screw.
If the sash closes easily and without squeaks and does not move when closed, but there is still a draft coming from the windows, tighten the clamp of the glass unit to the frame. To do this, do the following:
- Open the frame and turn the locking handle down. In this case, part of the metal pins protruding from the sash moves out of place. These parts must be marked with a felt-tip pen.
- Next you need to take pliers (for smooth surfaces) or a flat-head screwdriver (for a slot) or a hex wrench (for an internal recess) and turn the pins sequentially so that most of them move towards the seal.
Typically, to create additional clamping force, the pins are turned clockwise half a turn. Moreover, until the manipulations with all the pins that move when the handle is closed are completed, the sash should be kept open. You will be able to evaluate the results of your efforts only after completing this work. Otherwise, the window will warp on the locking elements.
Adjustment does not help - change the seals
In particular difficult cases To eliminate an unwanted draft, in addition to adjusting the sash mechanism, it is necessary to replace the seals. To do this, you need to open the window and fix the sash. Next, grab the seal and pull it towards you. With enough effort it will come out of the groove very easily.
The next stage is the installation of a new seal. It starts with cutting to size. Moreover, the old seal acts as a template, so it cannot be stretched when dismantling. After trimming new material pressed into the groove and checked for the absence of creases and other defects.

According to manufacturers' recommendations, such a replacement should be done no more than once every 10 years, but the seal could be installed unevenly or damaged due to use. Typically, the main cause of damage to the seal is abuse of the sash pressure setting. Therefore, sometimes it is changed before the end of the 10-year period.
If the seal squeaks, then instead of replacing it, you should try silicone grease - it will remove the unpleasant noise. In this case, it is strictly not recommended to use machine oil.
Preparing a window for summer: how to create a light draft
Before this, we figured out how to tighten the hinges on plastic windows so that cold air does not blow from the sash. Now we have to solve another problem - to create a light draft that will blow through the stuffy room. To do this you need to do the following:
First, find the trunnions on the side surface of the sash - the moving parts of the clamping mechanism. Their details protrude above the surface more than other elements.
Secondly, inspect the trunnions and find eccentrics - special screws screwed into the trunnions with a center offset. They will give themselves away not only by their slightly uneven location, but also by the presence of marks (marks) on the screw head.
Third, turn the off-center screw in the desired direction. The standard position of the eccentric is exactly in the center of the trunnion, which gives a medium-pressure force. However, in summer we need the weakest clamp so that fresh air can enter the apartment. Therefore, we rotate the eccentric so that its smaller side faces the rubber band (seal). Typically, this is done by turning the screw counterclockwise by half or a quarter of a turn.
The described operation will have to be done with all the trunnions, setting the eccentric marks in one direction, otherwise the sash will begin to mow when locked, and its mechanism will wear out prematurely.
Today, metal-plastic windows are a popular product among all users. Almost every apartment in the building has PVC windows installed in at least one room. But during operation, various problems may arise. For example, windows can jam, Maybe do not turn the handle or there may be other problems with opening and closing windows. In order to solve the problem, you need to know how to adjust plastic windows.
It is worth noting that PVC windows stop functioning correctly not only due to a long period of operation. And given average term window service (more than 15 years), it is unlikely that the owners of such double-glazed windows should have any difficulties. However, problems do happen, quite often. And if you can’t call a specialist or don’t want to spend extra money on repairs, you can make basic adjustments to the plastic window yourself, which will help get rid of most problems.
When and for what problems is adjustment necessary?
Of course, you need to adjust PVC windows yourself as needed. As soon as a certain problem arises, you should immediately look for ways to eliminate it. Even with correct initial “calibration,” problems may arise later. They are associated with improper operating techniques, deformation of fasteners, violations of structural integrity, tightness, etc.
What problems can be eliminated using self-adjustment of PVC windows?
Advice: If you cannot independently and accurately determine the cause, you need to seek help from a specialist. Still better to pay for minor repairs than replacing broken parts of a metal-plastic structure.
Tools required for adjustment
In order for plastic windows to be adjusted independently, you will need a few tools. Configuration is carried out using:
- A set of hexagons (a 4 mm hexagon must be included in the kit);
- Cross-shaped and star-shaped screwdriver bits (as a rule, they should be marked “T” or “TX”);
- Phillips screwdriver size 3 or 4;
- Pliers;
- Universal WD-40 aerosol and regular machine oil.
Mainly used only hexagon, which in everyday life is called a furniture key. This is a small metal hexagonal rod L-shaped, which can be made in an S-shape for ease of use.
Star attachments are necessary for working with certain models of fittings, so it is better to take several of these attachments. As a rule, the fittings are fastened by craftsmen with ordinary screws and a Phillips screwdriver, so to adjust them you will need the latter.
The adjustment process is greatly simplified in the event that operation is disrupted sliding windows. In this case, all work comes down to adjusting the roller carriages intended for fastening the sash.
Main adjustment points for PVC windows
There are a total of five adjustment points on the window that help you correct settings. Let's take a closer look at each of these points.

Using all of the above points, you can calibrate all existing window positions. As a rule, all manufacturers produce standard models windows, so if your metal-plastic double-glazed windows were not made according to individual order, then there will be no difficulties in determining each adjustment point.
Tip: Immediately after you find these points, check them for deformation - in this case, you will need to immediately contact a specialist. And if debris is found, you need to remove it and try again to carry out the action that was previously performed with difficulty.
General features of adjusting PVC windows
How to properly adjust plastic windows and how to do it yourself? It must be remembered that there are different models windows They provide different fittings, double-glazed windows and strength. We tried to summarize everything existing options and output general features, which allow you to customize windows.
Horizontal adjustment

To move the frame or eliminate a slight bevel, it is necessary to use horizontal adjustment, which is carried out using bottom And top loops. The hinges themselves have special hexagon holes. Bottom hinge allows adjustment from both external and external inside(accordingly, you can configure open or closed window). As a result of turning the key clockwise, the sash with the hinge will be tightened. As a result of this action, the bottom of the window, which is on the opposite side of the hinge, will rise. Accordingly, when rotating counterclockwise, the lower part of the window will lower.
Horizontal adjustment plastic windows can be carried out independently in the area of the top hinge, as a result of which the top of the sash will already be adjusted, but this should be done only when open window. It should be noted that the shift is within 2 mm.

Vertical adjustment

Metal-plastic windows can be calibrated vertically using bottom hanging loop. For this action, you need to open the plug to ensure free access to the hexagon. The sash will begin to rise when the hexagon is rotated clockwise, and in the opposite direction the sash will begin to fall. As with the horizontal adjustment, the shift range is 2 mm.
Adjusting the sash pressure
It is used when there is blowing from a PVC window. The quality of the pressure can be checked as follows: a lit match is brought to a closed PVC window and the movement of the flame is observed. If it deviates to the side, then there is a gap in the window.
IN in this case the pressure is adjusted using eccentrics, which are located along perimeter of fittings(this method is used to adjust plastic windows for the winter). As a result of turning the handle, they move beyond the clamping pads. Since the setup is not particularly difficult, you can also do it yourself.
 The sash pressure is adjusted using eccentrics (trunnions)
 The sash will be pressed against the frame if the eccentric is moved clockwise. Accordingly, when the eccentric is moved counterclockwise, the sash will move away from the frame. There is a small strip on the surface of the eccentric, with which you can determine the degree of compression of the sash and frame. The closer this strip is to the seal, the stronger the sash is pressed.

The adjustment range is within 1-2 mm. More or less strong pressure on the sash is allowed different times years - In summer you can loosen it, and in winter you can tighten it more. This is done to ensure air supply - in summer time more air will pass through, and in winter - less.
Tip: Do not clamp the sash and frame too tightly. This can lead to premature wear of the seal.
Adjusting the hinges
The tilt window has two hinges that can be adjusted to improve functionality. The lower hinges are adjusted using a horizontal screw located on them. In order to adjust the pressure on the upper hinges, you need to open the PVC window for ventilation (turn the handle so that only upper part windows). In this case, you need to hold the window with your hand, since it will only be held on one, lower hinge. Adjusting the hinges helps determine the degree of compression of the window with hinges. The acceptable range is within 2.5 mm. As the distance increases, the window will adhere less to the hinges and more air will be provided. As the distance decreases, the window will fit more tightly to the hinges and provide reliable protection from air coming from outside.
Conclusion
The following conclusion can be drawn: the adjustment of all positions of the adjustment points can be carried out even without experience. The only requirement is to be careful. Incorrect calibration may cause the window to no longer function correctly. As a result, you will have to call a technician to re-set it up.
Adjusting plastic windows video
In this section, we invite you to watch a video on the topic of our article on how to adjust plastic windows.
Attention! For each order, a service book is issued free of charge at the Kaleva sales office. A service book is a document required to be issued upon concluding an agreement with a client. It is a user manual for the operation of Kaleva products, and also serves as the main document for marking the completion of paid annual maintenance for renewal warranty period product maintenance up to 10 years.
Book in mandatory must be completed by the sales office manager. Upon completion of the installation and finishing work, the foreman of the installation and finishing team must indicate the acceptance date of the work performed and the contract number. When carrying out maintenance work, the mark is also mandatory.
Please note that an unfilled service book is invalid.
Current price list for maintenance work:
Definitions
Maintenance(THAT):
Maintenance of Kaleva products means regular inspections, checks, adjustments, lubrication of fittings and rubber seals on a paid basis.
Maintenance must be performed by a Kaleva Service Center in the region where the product was purchased.
Service center Kaleva:
A specialized division of the seller that provides warranty and post-warranty service for Kaleva products.
Ventilation of the room
Kaleva products meet the highest quality standards. They provide reliable thermal insulation and energy saving.
When moist vapor accumulates in a room, it condenses on the surface of the glass inside the room. In such cases, the room should be ventilated. The duration and frequency of ventilation depends on your personal preferences, as well as the time of year, weather conditions and the number of people in the room.
You can open the window for ventilation in a rotary or inclined manner, however, the hardware manufacturer recommends an inclined state for ventilation to remove loads from the hinge group.
To bring the sash into a rotating position, you need to turn the handle 90 degrees, so that it takes strictly horizontal position, and only then pull it towards you.
To bring the sash into an inclined state, it is necessary to rotate the handle 180 degrees, so that it takes strictly vertical position, and only then pull it towards you.
Restoring the functioning of the sash
If, as a result of incorrect opening, the sash becomes warped and hangs on the bottom hinge, do not be alarmed. This is not a breakdown!
For recovery normal functioning do the windows following operations(you may need help from a second person):
- Without closing the window, press the folded edge of the sash so that it top corner(a) approach the loop (see figure b) and hold it in this position (this may require the help of another person);
- While holding the sash in this position, with one hand, bring the sideways locking flag (c) (marked with an arrow) into a strictly vertical position (nose down) and hold it in this position, and with the other hand, turn the handle to a vertical position (d);
- Press the upper edge of the sash (b) (in the area of the top hinge) so that the sash takes a strictly vertical position;
- Turn the handle back to the horizontal position;
- Release the lock lever (c) ;
- The shutter should return to its normal position.

Adjusting fittings
The fittings are adjusted to bring the sash pressure to the summer/winter position, which will ensure a loose/tight fit of the sash to the frame.

Security measures
Kaleva products are equipped complete set fittings that ensure a tight fit of the sash around the entire perimeter and are convenient to use.
To avoid damage to hardware components, we ask you to take the following precautions:
Do not load the sash with additional load;
Do not allow strong pressure or collision between the sash and the window slope;
Do not insert foreign objects between the frame and the sash.

Attention
Kaleva products do not have anti-burglary functions or characteristics to prevent unauthorized entry into premises by unauthorized persons.
Product care
Kaleva products are practical and won't require much effort from you to keep them clean. After all, one of the most important not only aesthetic, but also functional advantages of Kaleva products is the ultra-smooth glossy surface of the plastic profile.
This is why it is recommended to use special home window care kits for cleaning Kaleva products, which you can purchase at Kaleva offices. Care product PVC profile Provides intensive and at the same time gentle cleaning. It should be applied to the contaminated surface directly from the bottle and washed with a soft cloth using movements along the profile. To prevent the profile from losing its glossy shine, do not rub the product in a circular motion. After treatment, the surface of the profile should be wiped with a damp cloth.
The appearance of traces of contamination on the surface of the profile under the sash (on the internal rebate) is associated with the ingress of street dust through drainage holes and is not a sign of loss performance qualities products.
When washing windows with painted profile surfaces, use only a weak soap solution*.
Attention
Do not use sandpaper, cleaning agents containing abrasive (scratching) elements (Pemolux, Hygiene, Sanita, etc.), solvents, gasoline, acetic acid, nail polish remover and other products to remove dirt. , which can damage the appearance of the window. *Slight coloration of the water is allowed during the first cleaning. This is not a sign of damage to the painted surface.
Glass care
Kaleva products use polished glass premium M-1, which has best characteristics evenness and transparency.
Glass in Kaleva products must be washed with water and/or neutral detergent, not containing ammonia or solvents.
The detergent is applied to the central part of the glass unit, then, using a soft cloth, dirt is removed from the entire surface using circular movements.
When using an aerosol product, it must be applied from a distance of 20–30 cm from the glass surface.
Be careful:
Guarantee
Warranty period:
The products are certified, manufactured in accordance with the requirements of GOST 30674-99 and GOST 23166-99, and are recognized as suitable and safe during operation. The warranty period for Kaleva products is 5 (five) years. With voluntary paid annual maintenance, the warranty period for Kaleva products is extended to 10 years.
Warranty period for additional products - blinds, roller blinds, mosquito nets, window sills made of FSF, laminated with plastic, is 1 (one) year.
The guarantee is valid from the moment the owner signs the work completion certificate or the delivery certificate (depending on which document is signed later). The owner has the right to make warranty claims related to defects in the Kaleva product only during the warranty period.
Conditions for warranty extension
Inspections and periodic maintenance during the warranty period must only be performed by the Kaleva Service Center where the products were purchased. When carrying out maintenance, a mark must be made on the corresponding sheets of the service book. Contacting a Kaleva Service Center for maintenance or repairs may result in your warranty claims not being satisfied.
A single case of failure to carry out maintenance or untimely maintenance is grounds for non-extension of the warranty or early termination of the extended warranty.
Maintenance
Proper maintenance will help maintain Kaleva product performance, safety and reliability. This will also help you maximize your investment in your Kaleva product.
Annual maintenance increases the warranty on Kaleva products from 5 to 10 years. To schedule a service appointment, we recommend that you contact the Kaleva Service Center in your region.
During maintenance, the following work is performed:
Examination technical condition products;
Adjustment of fittings;
Lubricating fittings;
Lubricating rubber seals.
Attention
The interval for recommended scheduled maintenance is determined and limited by a period of time - the owner must carry out maintenance of the product annually no later than 30 days after every 12 months of operation. The first 12 months of operation are calculated from the moment of signing the acceptance certificate for the work performed, the next 12 months of operation are calculated from the moment of the next maintenance.
Correct adjustment of plastic windows and timely care– this is the basis long service, eliminating sudden expensive repair work.
Adjusting the sashes
Frequent adjustment window fittings may be necessary when the quality of installation work is poor, when the structure is not aligned vertically and horizontally. It is also required in case of natural wear and tear, when the sashes begin to touch the frame and fittings. If the windows do not fit tightly, cold air begins to pass through and drafts appear. Instructions for self-adjustment plastic windows will help you save a significant amount on the services of third-party specialists.
To work you will need simple tools:
- hex wrench;
- screwdriver.
Inspect the window to determine the installed fittings, since the adjustment will directly depend on this factor. In one case, the sash will need to be removed, in another, tightening the fastening screw will be sufficient.
Horizontal and vertical adjustment
On the horizontal side, the sash is subject to adjustment in the event of a bevel of the frame caused by shrinkage of the structure, incorrect opening of the window or loose fastenings of the fittings. To fix the problem, you need to insert a hex key into the upper window hinge, turning it clockwise until the sash moves a sufficient distance away.
In this case, the lower part of the opposite element should drop noticeably. Adjustment of the lower loop is carried out with outside. The shifts average 2 mm.

 Diagram of the main position correction points
 The window can be adjusted vertically using the hinge located at the bottom of the frame. Remove the protective cap from the loop and begin rotational movements tuning mechanism. Moving the tool in a clockwise direction will lift the sash, moving it in reverse side- will lower it.

Regulation plastic structures should occur smoothly so that the mechanisms move no more than 1 mm in one approach.
The sash stopped closing: problem solving
Pressure adjustment must be made when the window is difficult to move from open position in closed. Often the reason is the lock device, which does not allow the handle to be turned. The exact sequence of actions depends on the specific manufacturer. Some examples are equipped with a thin plate equipped with a spring on the inside, which must be pressed and the handle turned to close the window. Other copies are equipped with a tongue under the handle - when you press on it, the lock of the adjusted mechanism is removed.
 If the sash stops closing, you need to unlock the lock
 In a situation where the window still does not want to close, you will need minor repairs. It is necessary to open the sash, find the element of the mechanism that serves as a hook for the tongue, unscrew and install a thin plate on the inside. The solution helps to shift the mechanism closer to the response element. As a result, the contact area will increase, allowing you to easily close the window.
Pressure density adjustment
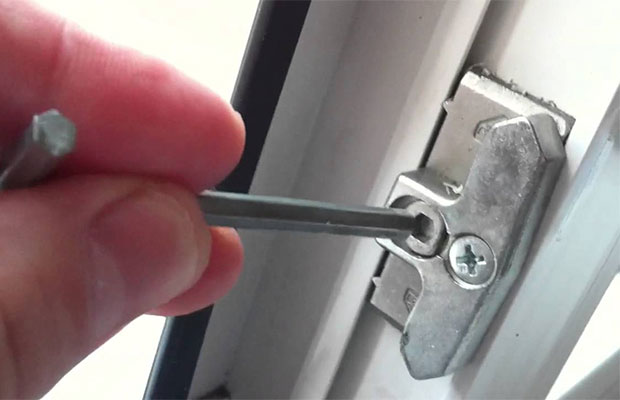
Setting the pressure on a plastic window is quite simple if you follow a simple sequence of actions. Find in the area of the handle, located at the side end, a system of eccentrics that serve as the main adjustment tool.
 Winter and summer mode adjustable using trunnions
 Their external design may be slightly different depending on the window manufacturer, but the principle of operation is the same, whatever their type.
 Options appearance eccentrics
When it is necessary to adjust the pressure on the side of the window hinges, you need to refer to the adjusting screw located on the bottom of the hinges. For swing-out sashes they do additional settings using the top loop.
In order to successfully get to the adjustment bolt located on the scissors next to the top hinge, you need to open the window, press the locking tab and set the handle to the ventilation mode. When it is necessary to press the sash against the window frame, the bolt rotates clockwise. Rotating in the opposite direction will weaken the seal.
 By adjusting the tilt-and-turn scissors, you can adjust the degree of window pressure
 The method of adjusting window fittings depends on the manufacturing company, since there are varieties that are adjusted with screwdrivers located on the side of the handles. Others only fit hexagons. In order to increase the pressure, the bar is carefully shifted to the street side. If you look at the hinges, you will notice retractable clamping elements. A smaller extension will provide a loose fit, while a larger extension will press the sash tightly against the frame.
Cleaning the fittings from accumulated dust
Once every 5-7 years, windows need deep cleaning from accumulated dirt. hard to reach places. Without cleaning them in a timely manner, sooner or later you will have to repair them, since their functioning will be impaired. Repairs are quite labor-intensive in terms of the weight of the structure, so it is advisable to carry out the work with assistants.
Scheme for adjusting elements to keep them clean and tidy:
- remove the sash from its hinges, removing the overhead frame elements;
- remove the top axle;
- remove the sash from the lower hinges;
- carefully set aside.
 Removal of elements must be done with an assistant
 The surface of the sash is carefully inspected and the screws attached to it are unscrewed. The mechanism parts are washed well, preferably using specialized solutions that are easy to apply with a brush. After this, the structure is well dried fresh air or using cold air from a hairdryer. Lubricant is applied to each driving mechanism. The fittings are assembled in the reverse order and installed in their original place.
 Before assembling the window, all fittings must be lubricated.
 We repair window handles
Adjustment questions window frames quite often related to the operation of handles, since periodically they can break or lose functionality. It is important to remember that the handles of a plastic window require periodic attention, since more often than other parts they are subject to rapid wear: sometimes they require repair or complete replacement.
Timely adjustment - here best solution problems with handles losing functionality. Thus, a fairly loose handle requires tightening of the fastenings, which can be done in a matter of minutes, since this breakdown is one of the most simple types repair work.
Find the decorative rectangular trim under the handle, lightly hook your fingers on both edges and turn 90°. There are a couple of bolts under the trim that need to be tightened with a Phillips screwdriver.
 Under the decorative trim there are bolts that are tightened with a screwdriver
 You should not use tools to lift the plate covering the bolts, since there is a possibility of damaging the surface of the profile and disrupting the shape of the plug element.
One more common problem is the sticking of the handle, which periodically does not turn to the required angle. In this case, you need to lubricate the fasteners with machine oil using a cotton swab. A special spray or silicone lubricant will also work.
 The problem of the handle sticking can be solved by lubricating the fasteners with oil.
 To replace, the handle is rotated 90° and the cover in the form of holding screws is removed. The unscrewed element can be easily replaced by installing the screws in the same sequence. Repair of plastic windows with complete replacement of fittings is inevitable if the handle is thoroughly jammed. Cases are extremely rare, but they do happen.
Do-it-yourself adjustment will not be difficult for owners, since the whole procedure is quite simple. It is only important to approach the setup with a degree of responsibility and strictly follow the instructions.
Pay attention! All clients of our company in the sales office can receive free service book. This document is required to be issued upon conclusion of the contract. The service book serves as instructions for the user on the operation of all Kaleva products, in addition, it is the main document for marking the completion of paid annual maintenance to extend the product warranty to 10 years.
The service book must be filled out by the manager in our sales office. After all installation and finishing work has been completed, the head of the installation team must enter the contract number and the date of acceptance of the work performed in the book. A similar mark is also required when carrying out maintenance work on your windows.
Please note that an unfilled service book is invalid.
Cost of maintenance work
Departure in Moscow and Moscow Region (with lubrication of fittings and sealing rubber):
1 product, regardless of the number of sashes - 430 rubles.
from 7 products(fixed cost) - 3,500 rub.
Definitions
Maintenance: Maintenance of Kaleva products involves regular inspection, testing and adjustment, as well as paid services for lubrication of fittings and rubber seals. Maintenance can be carried out by contacting the Kaleva Service Center.
Service center: A special division of our company that provides warranty and post-warranty service for all products we produce.
Ventilation of premises
All of our company's plastic products are different high quality and reliability, provide excellent thermal insulation and energy savings.
At high humidity In the room, vapor condensation occurs on the surface of the glass - in such cases the room must be ventilated. How often and for how long to ventilate the room depends on your personal preferences, weather conditions and season, as well as the number of guests.
In order to ventilate the room, you can open the window by turning or tilting it. Interestingly, for ventilation, hardware manufacturers advise using an inclined window to reduce the load on the hinges.
In order to bring the sash into a rotating position, you need to turn the window handle 90 degrees, so that it is in a strictly horizontal position, after which you need to pull it towards you.
In order to bring the sash into an inclined state, you need to rotate the window handle 180 degrees, so that it takes a strictly vertical position, after which you need to pull it towards you.
Restoring the functioning of the sash
It happens that if the door is opened incorrectly, it may warp and hang on the bottom hinge. Don't be scared - it's not a breakdown!
In order to restore the normal functioning of your window, you need to perform the steps described below, if necessary, you can involve a second person:
1. Without closing the window, press the folded edge of the sash so that its upper corner (a) approaches the hinge (see figure below) and hold it in this position, if necessary, use the help of a second person;
2. Continuing to hold the sash in this position, with one hand you need to bring the blocker flag (c) looking to the side (it is marked with an arrow) into a strictly vertical position (nose down) and hold it in this position, and with the other hand you need to turn the window handle to a vertical position (d);
3. Press the upper edge of the sash (b) in the area of the top hinge so that the sash is in a strictly vertical position;
4. Then you need to turn the handle back to the horizontal position;
5. Now you need to release the lock lever (c);
6. After all these operations, the sash will return to its normal position.
Adjusting fittings
Adjusting the fittings is necessary in order to bring the window sash clamp to a summer or winter position, ensuring a loose or, conversely, tight fit of the sash to the frame.

Security measures
We equip all our company's products with a full set of fittings, which ensures a tight fit of the sash around the entire perimeter of the frame and ease of use.
To prevent damage to any hardware components, follow the precautions described below:
- Do not load the window sash with additional loads
- Do not allow strong pressure or impact of the sash against the window slope
- Do not insert foreign objects between the sash and frame

Care of PVC products
Kaleva windows or doors are not required to support special efforts and a lot of time. This is possible due to the fact that all plastic products we install have an ultra-smooth surface. glossy surface profile, which is one of their main advantages.
To wash plastic windows and doors, we recommend using special care kits plastic products(they can be purchased at our office). This set includes special remedy for the care of PVC profiles, which provides intensive and gentle cleaning at the same time. This tool Apply directly from the bottle to the contaminated surface of the profile and wipe along the profile with a soft cloth. To prevent the profile from losing its glossy shine, do not rub the product in a circular motion under any circumstances. After this treatment, you need to wipe the surface of the profile with a damp cloth.
If street dust enters through the drainage holes, you may notice the appearance of traces of contamination on the surface of the profile under the sash (on the internal rebate), but this is not a sign of loss of performance properties of the product.
Painted profile surfaces should only be washed with a mild soap solution*.
Attention!
To remove dirt, under no circumstances should you use sandpaper, cleaning agents that may contain abrasive (scratching) particles (for example, Pemolux, Hygiene, etc.), solvents, nail polish remover, gasoline, acetic acid , and any other means that may harm the appearance of the product.
*During the first cleaning, there may be slight discoloration of the water, which is not a sign of damage to the painted surface.
Glass care
Kaleva products use polished glass of the highest grade M-1, which has the best characteristics of evenness and transparency.
Glass in Kaleva products must be washed with water and/or a neutral detergent that does not contain ammonia or solvents.
The detergent is applied to the central part of the glass unit, then, using a soft cloth, dirt is removed from the entire surface using circular movements.
When using an aerosol product, it must be applied from a distance of 20–30 cm from the glass surface.
Be careful: When spraying an aerosol, keep the can away from your eyes! If the aerosol product gets into your eyes, immediately rinse your eyes with water and consult a doctor!
Guarantee
Warranty period:
The products are certified, manufactured in accordance with the requirements of GOST 30674-99 and GOST 23166-99, and are recognized as suitable and safe during operation. The warranty period for Kaleva products is 5 (five) years. With voluntary paid annual maintenance, the warranty period for Kaleva products is extended to 10 years.
The warranty period for additional products - blinds, blinds, mosquito nets, window sills made of FSF, laminated with plastic, is 1 (one) year.
The guarantee is valid from the moment the owner signs the work completion certificate or the delivery certificate (depending on which document is signed later). The owner has the right to make warranty claims related to defects in the Kaleva product only during the warranty period.
Warranty extension conditions:
Inspections and periodic maintenance during the warranty period must only be performed by the Kaleva Service Center where the products were purchased. When carrying out maintenance, a mark must be made on the corresponding sheets of the service book. Contacting a Kaleva Service Center for maintenance or repairs may result in your warranty claims not being satisfied.
A single case of failure to carry out maintenance or untimely maintenance is grounds for non-extension of the warranty or early termination of the extended warranty.
Maintenance
Proper maintenance will help maintain Kaleva product performance, safety and reliability. This will also help you maximize your investment in your Kaleva product.
Annual maintenance increases the warranty on Kaleva products from 5 to 10 years. To schedule a service appointment, we recommend that you contact the Kaleva Service Center in your region.
During maintenance, the following work is performed:
- Checking the technical condition of the product
- Adjusting fittings
- Lubricating hardware
- Lubricating rubber seals
Attention
The interval for recommended scheduled maintenance is determined and limited by a period of time - the owner must carry out maintenance of the product annually no later than 30 days after every 12 months of operation. The first 12 months of operation are calculated from the moment of signing the acceptance certificate for the work performed, the next 12 months of operation are calculated from the moment of the next maintenance.