In order to improve the appearance of the room, sockets are installed hidden installation. They are safer and easier to use. About the types, features and advantages of sockets hidden installation Let's talk further.
Concealed socket - characteristics
Flush sockets are more popular among consumers than devices open mounting. This is primarily due to the increased security they provide.

Flush-mount sockets are common when installing hidden wiring. They also require cutting out a specific space in the wall where the outlet will be installed.
During the cutting process plasterboard wall no problems arise, and if the socket is installed on a brick or concrete surface, great efforts should be made to achieve the desired result.
Among the main advantages of hidden installation sockets is their aesthetic appearance, which is explained by the fact that the socket is hidden in the wall, and only its outer part is visible on the surface.
In relation to the number of sockets, hidden sockets are divided into devices:
- single type;
- double type;
- block.
Most best option- installation of a single socket. When installing such an outlet on a surface made of plasterboard or foam plastic, you should adhere to special installation rules, which imply a more gentle approach to the work.

For example, a casing for installing wires and other electrical wiring elements is made of metal or special plastic substances. All elements must be securely fixed with screws.
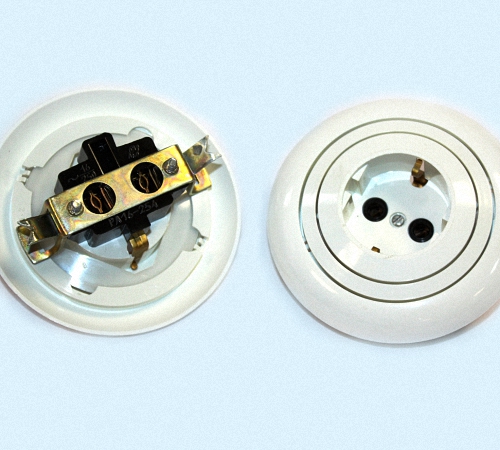
There are sockets with and without grounding. The first option is safer and more common, since these types of outlets withstand power surges much better. In addition, to install such an outlet, you need to build a niche, the depth of which is 1-2 cm greater than for an outlet without grounding.
There are sockets of two- or three-pin type for single purpose. Their main difference from single-pin sockets in appearance, which are round or flat in shape. The location of the sockets can be either symmetrical or asymmetrical; this factor depends on the type of device connected to the outlet.
If you need to connect two or more devices to one outlet, then it is better to take care of installing a double or triple hidden outlet. Its main difference from a single room is the number and size of the opening that is made in the wall for the installation of an outlet.
There are two options for installing double sockets:
- vertical to the wall;
- horizontally.

Hidden ip44 sockets - their features
Marking on sockets in the form of IP indicates the degree of its protection from external irritants, depending on a certain type of European standards. The first number, in this case four, indicates resistance to dust and foreign objects larger than one millimeter.
The second number, also four, indicates the level of protection of the outlet from high humidity; such outlets can easily withstand moderate splashes of water.
Hidden sockets IP 44 are the most common, as they are characterized by optimal parameters use in any kind of residential premises.
These types of sockets will be appropriate for installation in the bedroom or children's room, as well as in the bathroom or kitchen. Exists large number manufacturers involved in the manufacture of sockets, but it is still better to give preference brands Hungary “Prodaks”, France “LeGrand”, Germany “Gira”. Although their cost is an order of magnitude higher, the quality fully justifies itself. Hidden installation socket price depends on the manufacturer and the quality of the materials used in the process of its manufacture.
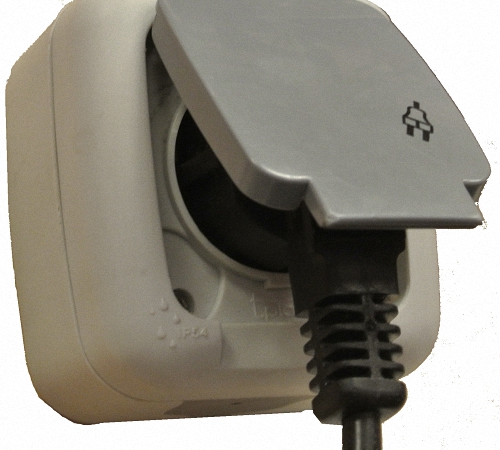
These types of sockets have an additional plastic protective casing, and on the outer panel there is a rubber lining and an additional cover.
But keep in mind that installing such sockets will not be appropriate in a garage, at a car wash, on the street and in other places where there is a risk of moisture.
Switches and sockets for hidden installation: types and properties
All sockets in relation to design features divided into:
- open;
- hidden.
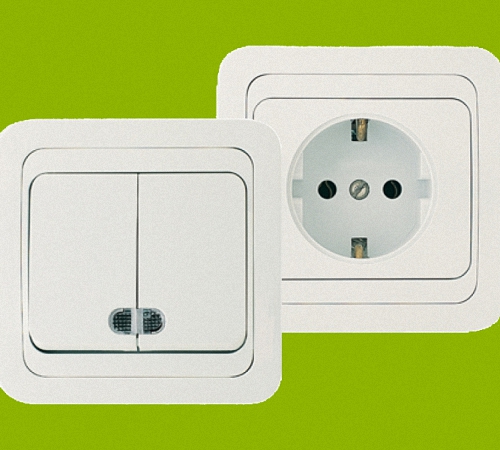
The first option is installed if the electrical wiring in the room is open. The main part of the socket is placed in a plastic case, which is installed on the wall with a socket box. Such sockets are complemented by the function of illuminating the frame, a protective cover, a self-shut-off timer and child protection.
A hidden plug socket allows you to install internal electrical wiring. The main part of the socket is placed in the wall, and only the screen is attached to the outside. The fork is pressed by a spring part and a special thrust mechanism.
In relation to a certain electrical diagram, sockets are:
- with grounding;
- without grounding.
A flush-mount socket with a grounding contact has a special part that is connected to a wire that provides grounding. This type electrical outlets is appropriate if there is a grounding type wire in the room. The socket is characterized by the presence of sockets for pins, which are responsible for carrying out grounding before the supply of electricity. This type of socket is suitable for connecting a stove, refrigerator, air conditioner or freezer.

Flush-mounted sockets in which there is no grounding are two-pin models, and are installed if there is two-wire electrical wiring in the room, and there is no possibility of grounding.
In relation to the type of protection of the surface of the outlet from moisture, they are divided into:
- standard sockets;
- devices with increased moisture protection.
The first option is perfect for a room with normal moisture; this outlet does not have a moisture protection function.
A waterproof hidden socket is installed if there is a high humidity, for example, in the bathroom, sauna or kitchen. A socket of this type is equipped with a special rubber membrane and dense rubber rings that serve as reliable protection from moisture.
The presence of plastic curtains and outlet covers allows you to remove the accumulation of condensation or water from its surface. Some sockets of this type have an additional cover that prevents moisture from entering their surface.
In relation to the number of blocks, hidden sockets are:
- single;
- double;
- triple.

A single hidden socket has only one socket for turning on an electrical device.
A double hidden socket assumes the presence of two sockets that can provide electricity to two electrical appliances. These electrical sockets are common in the kitchen, since this room requires connecting a large number of devices.
A hidden triple socket is a less common option that can connect three electrical appliances to the mains at once.
A correctly installed hidden socket is the key to safe, long-term and convenient operation of electrical appliances that are connected to it. Therefore, before installing a flush-mounted socket, you should definitely familiarize yourself with general rules carrying out work:
1. Optimal height When installing a socket in a standard living room, a distance of 300-800 mm from the floor is considered. Although there are also above-plinth types of sockets installed directly below the wall.
2. If the socket has a grounding function, then they are installed at a distance of at least 500 mm from the gas pipeline or electrical heating appliance.
3. If there are children in the house, it is better to increase the installation height of the socket by a few centimeters.
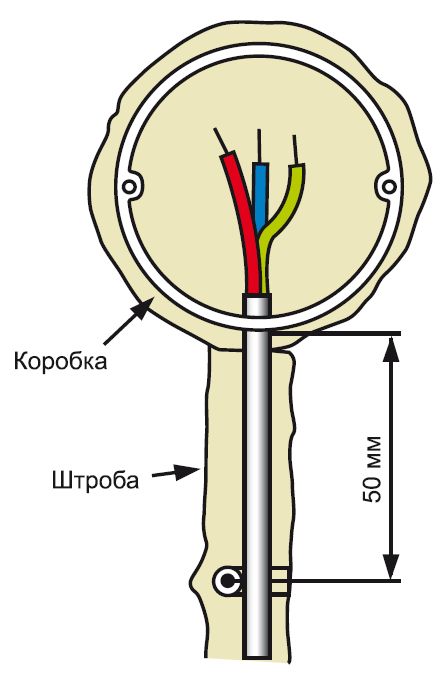
4. Installation of a double or single plug socket is carried out in a specially designated box made of plastic or metal. Please note that it is better to ensure that you have a cable reserve of 50-60 mm.
5. If you plan to install a new outlet to which the cable is laid, then all work is carried out simultaneously.
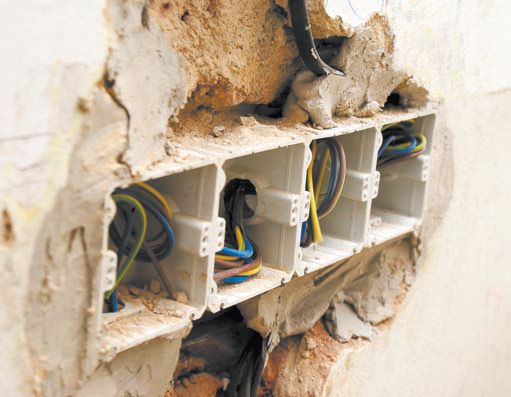
6. If you plan to install several sockets at once, located close to each other, then it is better to use double-frame boxes or socket boxes, which are connected to each other after installation.
7. Installation of this type of sockets is done using a cable. That is, the contacts of the previous socket are connected to the next one.
8. Please note that before starting any installation work related to connecting the outlet, you should first turn off the power to the room and check the absence of voltage using an indicator screwdriver.
Installation instructions for flush-mounted socket outlets
1. Take care to turn off the power from electrical network. Determine the location for installing the outlet and mark it with a pencil.
2. Using a drill, electric drill or use a hammer to make a hole for installing a socket in the wall. The type of equipment directly depends on the material from which the wall is constructed.
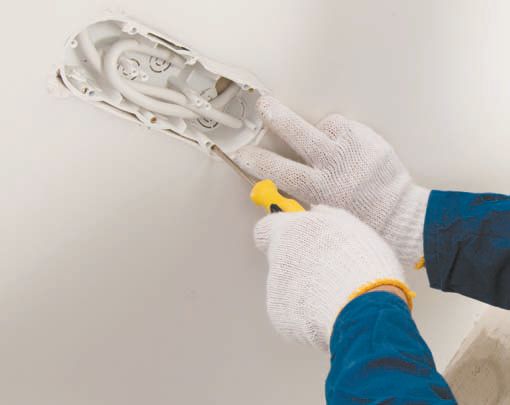
3. Try to equip the hole with as smooth edges as possible. Next, a special box is installed, which will contain the housing part of the socket and all the wires.
4. The bottom of the installation box has two holes in which the conductors from the electrical cable are located.
5. To fix the socket box to the wall, use plaster, glue on gypsum base or building gypsum. The work procedure consists of lubricating all the cracks with a solution and fixing the box. The material should have the consistency of soft plasticine.
6. Wait for the material to completely harden, about 15 minutes, and then proceed to the next stage of installation work.
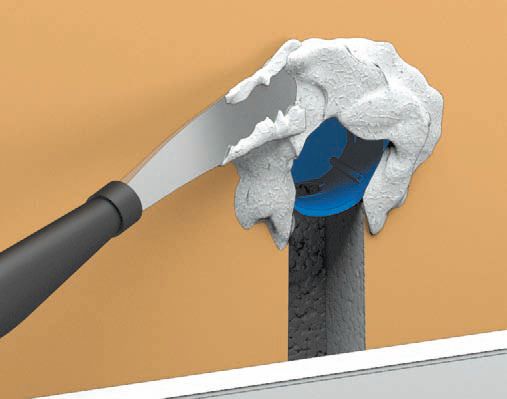
7. If there are gypsum residues, take care to remove it, and then level the wall surface.
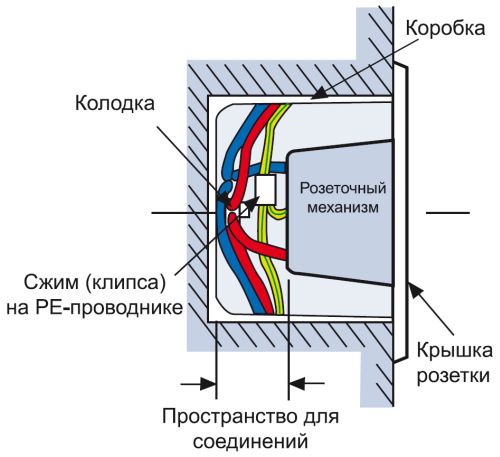
8. To facilitate further connection of the socket, secure the wire in the installation box using a clamp.
9. Strip two or three cable cores by two centimeters and connect the contacts of the block with the cable from the mains. First, the neutral wires are connected, then the phase wires and grounding, if available. The contacts are at the bottom, and the wires are at the top.
10. The wires are fixed using a spring or screws. The excess areas are installed on the bottom of the socket box.
- using sliding tabs, which tighten the screws on the surface of the socket;
- the second method involves the use of screws that pass through the surface of the socket itself and the socket box.
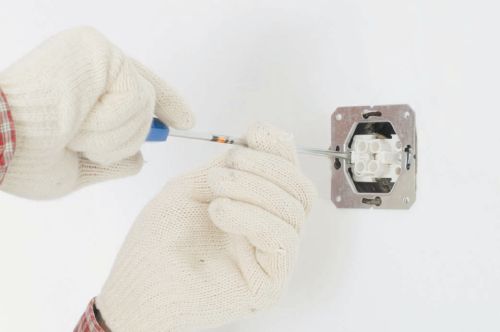
12. After fixing the socket box, the plastic case is installed and the functionality of the device is checked.
General requirements for installing sockets
There are certain documents that declare the rules for installing sockets in premises various kinds appointments.
1. If the area of the room is 18 square meters, then only three sockets can be installed in it. Since only one socket should be installed per six square meters of area.
2. If the room serves as a corridor, then the number of outlets is reduced, two outlets per twenty square meters.
3. The kitchen has its own characteristics for installing sockets, since a large number of outlets are installed in this room. electrical appliances, which require constant electricity to operate. If the kitchen area does not exceed eight square meters, then it is allowed to install at least three sockets with a capacity of six amperes and one with grounding of ten amperes. Using the second outlet, you can connect an electrical appliance with a power of more than two kilowatts, for example, a refrigerator.

4. If the kitchen area is more than eight square meters, then it is allowed to install four sockets of six amperes each, and to ensure uninterrupted operation electric stove, you should install an outlet that passes a voltage of 25 Amps. This outlet must have a ground connection.
Each outlet must have a marking that indicates the degree of its protection from moisture or dust. It is better to give preference to sockets marked IP22, IP44.
When choosing an electrical outlet for your home, you should focus on the following indicators:
1. Variety electrical wiring: external or open type. In the first case, you will need to install hidden sockets, and in the second - open ones.
2. In addition, you should pay attention to such indicators as the operating nominal value of the outlet, the magnitude of the current, its type and the voltage of the electrical network.
3. Absence or presence of a circuit providing grounding.
4. The place in which the outlet is installed determines its type, in relation to moisture and dirt protection.
Please note that to select quality socket one should take into account the fact that the materials from which it is made must be non-flammable, which can provide reliable connection contacts.
Electrical points are sockets, switches and distribution boxes. They are nodes of the electrical network. The type of wiring used ( or ) determines the type of points and the rules for their installation.
Installation of sockets and switches with hidden wiring
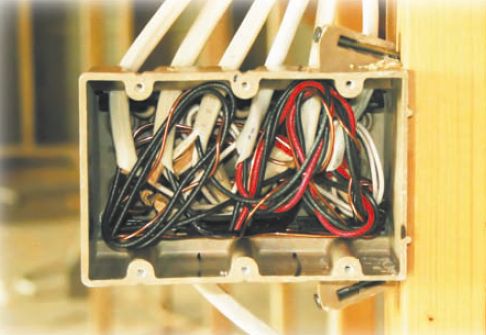
For long period At the time, electrical points were made like this: more or less made a hole in the wall round hole, into which a metal box was inserted (and sometimes not inserted), then a socket or switch block was placed there, which was secured with spacer legs or cement mortar. After that, all the cracks were sealed with the same solution.
This method amazed the imagination with its service life, but, as a rule, it was not possible to change the socket without a jackhammer. Today, both materials and technology have changed electrical installation work. Device electrical points begins simultaneously with cable installation. While the wiring lines are being marked, the location of electrical points is also noted, because they serve as final points cable lines or junction stations, if we are talking about distribution boxes.
Example socket installation
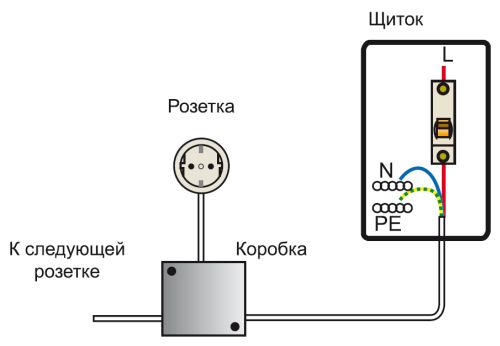
Installation of sockets
It begins, as mentioned above, with marking the position. A point is marked right on the wall that shows the center of the outlet. As a rule, it is located at a height of 25–30 cm from the floor.
A grounded power outlet should be located no closer than 50 cm from electrical appliances and gas pipes.
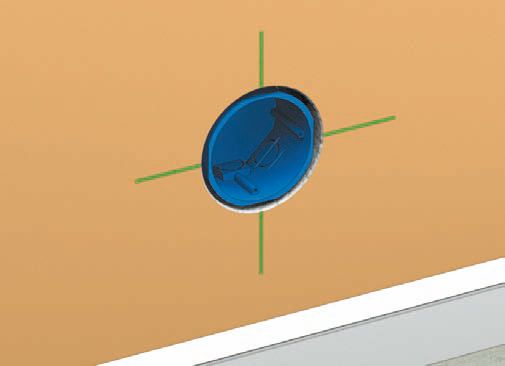
If there are small children in the house, the connectors can be placed higher. In the kitchen they are located just above table level. Strict rules not here, but it is more aesthetically pleasing when sockets in living areas are located at the same height. Once the location of the center of the socket is determined, the outline of the socket hole can be drawn. This is done like this: take the installation box, which will stand as a socket box, apply it bottom to the wall and trace it with a pencil. The circuit is ready. Now you need to hollow out a hole in the wall to place the box there.


Having drilled the contour with the hole from the drill in the middle, the crown is removed to the side. With light blows of the hammer, the stone is knocked out of the hole. All that remains is to level the bottom of the recess using a chisel. Hole ready for further work. You can also drill a hole using a concrete drill. Holes are drilled next to each other along the perimeter of the contour, and then the excess material is knocked out with a chisel. If you don’t have a power tool at hand, you will have to cut a hole in the wall using a chisel and hammer.
To install sockets, round ones are most often used. installation boxes, but there are also square ones. In this case, a crown will not work; you will have to drill a hole with a hammer drill or, if there are several sockets, cut it out with a grinder. The easiest way to do this is with a hammer drill equipped with a special attachment - a diamond bit for concrete. Working with such a tool is a pleasure. equipped with a drill, which is located in the center of the nozzle. It is attached to the center of the contour, then a recess is outlined with several test turns of the punch. The drill bit goes deep into the wall and locks the bit in place so it doesn't move while you work. The height of the crown is such that it goes deep into the surface of the wall just to the depth of the socket.
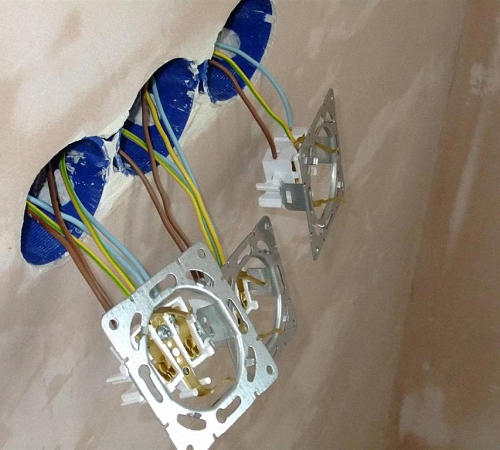
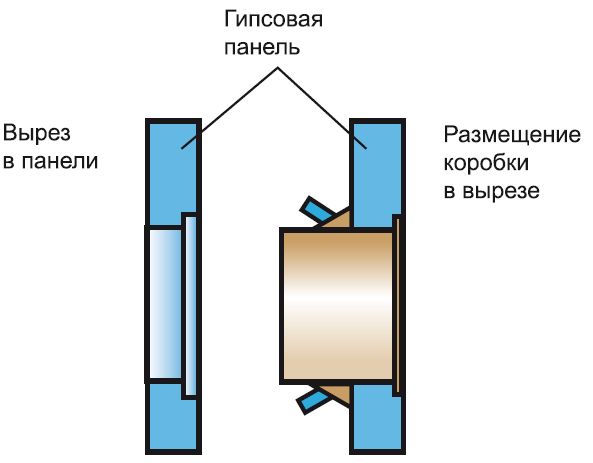
The next stage is installing the socket box. For monolithic walls There are special installation boxes. They are available both for single installation and for joining in groups: this type of box has special ears on the sides. The groove approaches the hole itself and goes deep into it so that the cable passes freely into the recess. At the bottom of the box there are several holes covered with plastic hatches that can be easily broken off. The cable cores are inserted into these holes.


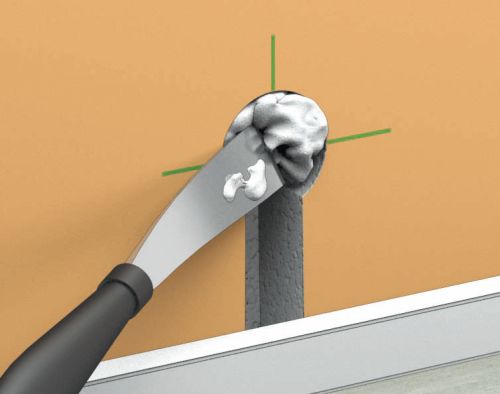
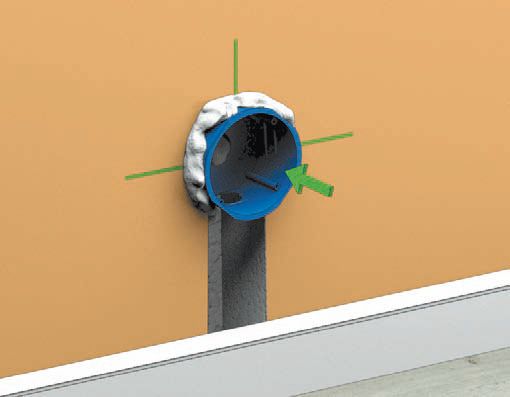
To secure the socket box in the recess, use building plaster or ordinary plaster. In some cases, for connection strength, use gypsum glue. It is kneaded to the consistency of softened plasticine. Then the socket box is held in place by hand, and the gap between the edge of the hole and the box is sealed with a spatula.
After waiting a little (about half an hour, if gypsum is used, then 5–10 minutes), you should remove the excess mixture. After the mixture has completely dried, you can begin installing the block. To prevent the wire from jumping out of the box when connecting the block, it is held with a bracket or clamp next to the box. The insulation is removed from the ends of the conductors to a distance of approximately 1–2 cm. If the conductor is multi-wire, then the exposed conductor is twisted into a tight bundle.

There are 2 contacts on the socket block; if it is grounded, then 3. The phase and neutral wires are connected to two, and the grounding wire is connected to the third contact. At correct installation socket contacts should be located at the bottom. The wires go up. The contacts may have a screw or spring clamp. The first type is more reliable, the second requires less time for installation. Then the excess wire is twisted into a spiral and hidden at the bottom of the socket so as not to interfere with the installation.


The block is attached in two ways:
1. Using sliding tabs: installation is very simple - the block is inserted into the box and two screws on the sides, connected to the sliding tabs with teeth, are screwed in with a screwdriver. When tightened with a screw, the legs spread out to the sides and rest against the walls of the socket box, fixing the block in the box.
2. With ordinary screws - there are special holes along the edges of the socket box that coincide with the holes in the block. The screws are inserted into them, and the block is screwed to the box.
The installation of the socket is completed, all that remains is to attach the protective plastic case - and the socket is ready for use. If the finishing is done from scratch, then after the socket box is installed in place, the block is not inserted into it, and the hole itself is filled with crumpled newsprint to prevent various construction debris from getting in.
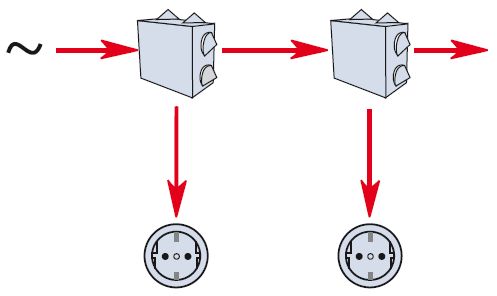
In order to install several sockets in a row, there is great way- this is the installation of a special box for 2 pads. The hole for such a box is drilled with a diamond bit. The edges of the holes should touch, and the excess stone is knocked off with a chisel.
If more than 2 sockets are needed, then a group of socket boxes is used, which can be attached to each other. There are plenty of options here. Sockets can be located both vertically and horizontally.
![]()
Sockets can be installed in a “daisy chain” or each connected to a separate line leading from the switchboard or distribution box. In the case of a “daisy chain” installation, the power wires of the next socket are attached to the contacts of the previous one.

Installation of switches
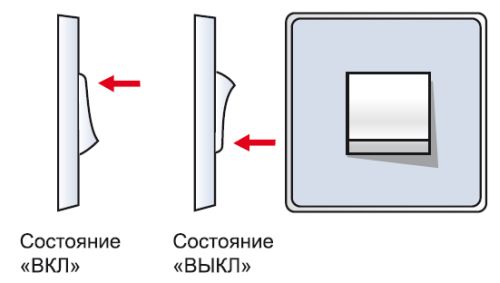
The installation of the switch repeats the installation of the socket down to the smallest detail. The difference is this: when installing the switch block, you must ensure that the keys are positioned correctly, that is, when turning on, the upper part of them should be pressed, not the lower.
In some types of switches, such as walk-through switches or dimmers, the contacts indicate which wire the incoming wire is connected to and which the outgoing wire is connected to. Of course, there is no ground wire on the switches, although one can be installed on the lamp.
The range of products includes special frames for sockets and switches. They can be one-, two-, three-socket, etc. Frames border electrical points and groups, giving sockets and switches an aesthetic appearance.
Installation of distribution boxes
The size and configuration of the junction box depends on the number of wire connections and the environment in which it is installed. The hidden junction box is protected by itself, with only a cover on the outside. It comes in two types: with protective gasket or without it. In the first case, the lid has a rubber ring that seals its connection with the junction box. In the second, the cover is attached with screws or simply snapped into the grooves.
When installing cables in plastic pipes, regardless of the type of installation, the pipe should extend into the box by 1–3 cm, without leaving the cable unprotected. This also applies to installation boxes. If the box small size, you can use a diamond core bit to drill a hole for it, just as you would to gouge out a recess for a socket or switch. The diameter of the box in this case should not exceed 70–100 mm.
If the box is larger, using the same bit, several holes are drilled side by side, and then the hole is trimmed with a chisel. The depth of the excavation should be such that closed lid the box was flush with the wall surface.
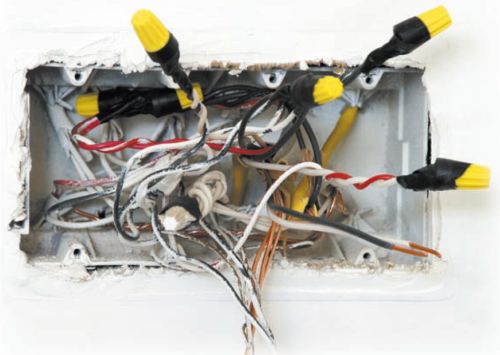
The next stage of installation is to insert all the connected wires inside the box. There are plastic hatches at the bottom of the box or on the sides that can be broken off as needed. The ends of the cables are inserted into these holes. The wires are then connected to each other using terminal blocks, caps, clamps, clamps, or hand twisting.
The wires can be additionally wrapped with electrical tape. After this, the wires are twisted, hidden in a box and covered with a lid. Then the box is inserted into the recess and fixed in it with plaster or plaster. In addition, almost all types of boxes can be attached using dowel nails or screws.

Installation of sockets and switches in hollow partitions
Hidden wiring runs not only inside monolithic walls, but also behind plasterboard partitions and cladding, plywood or fiberboard panels, plastic lining in general, behind thin sheets of material, between which and the wall there is emptiness.
The installation of sockets and switches in this case is somewhat different from the usual way. To make holes for installation boxes, do not use diamond crown, and a crown for drywall. It is easier to work with than diamond. You can use not a hammer drill, but a regular drill. Holes in the material are made in advance, immediately after the sheets are mounted in place. The ends of the wires are first pulled to the place where the holes will be; Once they are drilled, the cables are routed out.

The next stage is installing the socket box. There are special boxes for hollow walls. There are special claws on the box for attaching them to the wall. You need to insert the box into the hole and pull it out through the hatches in the bottom of the wire, and then tighten the two screws on the sides with a screwdriver. The screws tighten the tabs, which rest against the sheet of material with reverse side, fixing the socket box in place.
After this, the socket is installed in the box. If the junction boxes attached to the main wall are not hidden behind the walls, then they are attached to the material in the same way as socket boxes - using presser feet.
Installation of sockets and switches with open wiring
Installation of sockets and switches when open wiring less labor-intensive than with hidden. There is no need to drill holes in the walls for installation boxes and mess around with plaster mixture or plaster. For older style switches and sockets, before attaching them to the wall, you must first install a dielectric support on the surface. This is an ordinary flat wooden plate that is attached to the wall with a screw or nailed. When it is installed, the electrical device is screwed to it.
Modern sockets and switches do not require such a stand. They can be mounted on the wall using dowel nails or screws. To do this, the device is disassembled and the lower part (bottom) is screwed to the wall. Then the wires are connected to the block, it is attached to the bottom, and the entire structure is covered plastic cover, which is screwed on. On many sockets and switches, special holes are cut in the casing, covered with inserts so that a cable duct or plastic pipe. In sockets with increased degree protection located in the bathroom, where the wire enters the housing there is a special rubber seal.
If the wiring is enclosed in a cable channel, then installation of electrical points is even easier. Some manufacturers of plastic boxes produce so many accessories for them that installing an electrical network resembles assembling Lego constructor. Special inserts on the surface of the cable channel for sockets and switches are called supports. There are calipers for 1, 2, 5 and even 10 electrical points. In addition, there are landing boxes and modules and even distribution boxes. Of course, the cable channel must be of the appropriate width. Open type distribution boxes are easier to install than closed ones. They are attached to the ceilings using a wide variety of fasteners: dowel-nails, screws and even ordinary nails.
Most often, switches and sockets are replaced when complete replacement old electrical wiring . This is best done when general repairs apartments/houses. The range of modern “electrical fittings” is very extensive. In terms of design and functionality, you can choose an option that meets your specific requirements. But the main criterion, of course, is the quality of workmanship and compliance of products with electrical safety standards.
Types of sockets/switches
As for sockets, according to the installation method, they are all divided into external and internal. In the latter case, you need to hollow out/cut a hole in the wall to pre-install the “glass”, into which the socket itself is then inserted. External sockets are monoblock structures. They are simply screwed to the plane. If the walls are wooden, then ordinary wood screws are used for this. When installing on concrete/brick walls, you will need a hammer drill or impact drill- for drilling “holes” for plugs, into which self-tapping screws are then screwed. Hidden sockets look much more ergonomic and aesthetically pleasing. Outdoor models are cheaper and install faster.
By type of design, the market mainly offers single sockets and modifications with two/three cells. Multi-cell sockets are great for connecting several electrical appliances in one place. It should be remembered that the supply wire with this connection option must be designed for the appropriate loads. If, with simultaneous “powering”, all equipment will consume about three kilowatts, then it is recommended to use a wire with a cross-section of 2.5 “squares”.
When choosing sockets, it is better to give preference to models with a pressure spring - they are safer and more reliable in operation.
If we talk about switches, they are also produced external and internal according to the type of installation. In addition to traditional push-button models, there are also circular ones - with their help you can very accurately adjust the lighting intensity (by simply turning the circle of the switch). Single-button switches have the simplest design. Multi-button modifications are used to connect chandeliers equipped with several lamps. Many switches are equipped LED indicators, making it easy to find “light” in the dark.
Installation of sockets and switches
There are several general rules, which should guide you when installing sockets. Those who have “extra” money most often hire professional master. But installing such electrical equipment is not such a complicated process. By and large, it requires general “electrical” knowledge and the ability to use a screwdriver and pliers. It will also require accuracy and patience. If you do everything yourself, you can save a decent amount of money. “Installing” one socket/switch now costs approximately 300/350 rubles. So count how many of them you will have in your house.
Most often, sockets are mounted at a distance of 500/800 mm from the floor level. This location option can be found in most residential and non-residential premises. It is very convenient and practical. Firstly, you don’t have to bend over to connect any device to the network. Secondly, you won’t trip over sockets either. In some cases, they choose the “bottom” installation method - directly above the baseboard. It is convenient when you rarely use the outlet.
In addition, the “lower” sockets do not “spoil” the interior at all, as they are not conspicuous. It is recommended to purchase models equipped with protective covers. After all, dust “collects” on the floor, which, as is known, is a conductor of electricity. In addition, the cover will protect the outlet from possible ingress of water/moisture when washing floors. For safety reasons, bathrooms should only be equipped with sockets with protective covers.
If the socket needs to be located in the place where the heating radiator is located, then there are only two options - either on the side of the battery or above it (at a distance of at least 500 mm). Installation under the radiator is strictly prohibited, since in case of a breakthrough heating system the likelihood of a short circuit is too high.
When plugging sockets into interior partitions Very often they resort to mirror arrangement of products. This significantly speeds up installation- after all, you only need to make one through hole and run one cable channel for parallel connection of several sockets.
You should clearly determine the location of the sockets, as well as the power of the equipment you will connect to them. This will avoid inconveniences after the renovation is completed, such as, for example, the need to “carry” extension cords around the apartment.
Now let's talk about switches. Not so long ago, it was customary to install them at a height of about half a meter from the floor surface - next to doorways. IN recent years most prefer the European installation standard - at a height of 80 cm. This is done mostly for children so that they do not “reach” to the switches. It wouldn’t hurt to additionally decorate the space near the switch. Not so much for aesthetic reasons, but for practical reasons - so as not to contaminate the wallpaper/paint. There are various types of decorative overlays available for sale, made of metal, glass, plastic or composite materials.
If you have not yet installed the doors, then decide which way they will open before installing the switch. Agree that it will not be very convenient to enter dark room and every time “look” for the switch behind the door.
Methods for wiring to switches/sockets
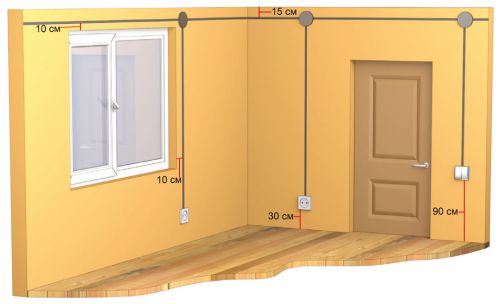
With the vertical method, the current-carrying cable must be distanced 10-15 centimeters from door/window openings and corners of the room. When stretching “horizontally”, you should maintain a distance of 15 cm from the floor and ceiling. Whatever method you use, be sure to mark on the apartment plan, where is the wiring installed?. This will prevent it from being damaged during scheduled repairs or furnishing your home. It is better to install a box in places where there are twists to make them easier to access if necessary. As with installation of any electrical wiring, power wires for switches/sockets are pulled in internal gates or external cable channels.
The Electro911 company will professionally make correct installation electrical wiring and electrical equipment!
Electrical wiring project, Vertical and horizontal wiring installation, Connecting electrical appliances, Installing electrical equipment...
- - - - -
The article was prepared by: "Kostyabolshoi"(from Advego - approx. ed.) especially for the official website of the Electro911 company.
A switch is an electrical switching device designed to manually supply current to electrical wiring.
Exists huge amount types of switches, but in this article we will talk about switches for electrical wiring wall type, which are one-key and have two or three keys. There are also switches in the form of combined sides, in which, in addition to keys, there is also a socket, for example Viko.
Rules for connecting switches
Before you begin repairing, replacing a broken one, or installing a new switch on the wall, it is useful to familiarize yourself with the rules for connecting it to the electrical network.
When installing switches on the wall in an electrical box, especially in previous years, the electricians connected the electrical wires to the terminals of the switch randomly. As a result, half of the switches currently in operation are connected in violation of the rules of the Electrical Installation Regulations. This does not affect the operation of the switches, since compliance with the connection rules is only required to increase the safety of the electrical wiring.
The rules require breaking the circuit exclusively of the phase wire, and not the neutral one. If you connect a neutral wire to the switch, then the operational safety of the electrical wiring is reduced, and here's why.
Switch connection diagram
When disconnected from the load by a switch neutral wire, the electrical wiring to the chandelier and the wires in the chandelier remain under phase voltage. If it opens phase wire, as in the diagram above, then most of the electrical wiring is de-energized.

When the switch is correctly connected when it is in the “off” position, injury to a person is virtually eliminated electric shock in case of any malfunction of the chandelier or errors when replacing a light bulb in a lamp, for example, accidental contact with live parts of the electric cartridge.
The operational safety of electrical wiring also increases. Water leakage from top floor will not lead to short circuit and failure of electrical wiring, although wet walls are a good conductor of current, but the wires, due to correct connection switch is not energized.
Below is the wiring diagram for connecting the switch in the chandelier wiring diagram. The phase wire from the meter is connected to the machine and then goes to the switch.
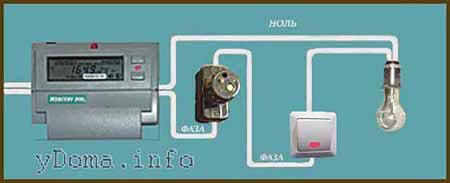
And one more requirement of the PUE rules, when connecting the switch the phase wire must be connected to the bottom contact of the switch.
When connecting a multi-key switch without a socket, assuming any of possible errors, nothing bad will happen. So you can act boldly.
If all the wires are connected together, both lamps will burn constantly. If you mess up the wires and don't turn on one lamp, you won't be able to turn on the second one. Although this option may be useful to eliminate the possibility of forgetting to turn off the lights in the auxiliary room. If the light is turned off in the hallway, it will automatically turn off in another room. But there is also the other side of the coin. Without turning on the light in the hallway, you will not be able to turn on the light in the auxiliary room. To implement such a connection circuit, you need to apply a phase to the upper contact of the switch. Connect the wire from the priority lamp to the lower contact, and the secondary one to the remaining free upper one.
Installing a hidden socket and switch on the wall
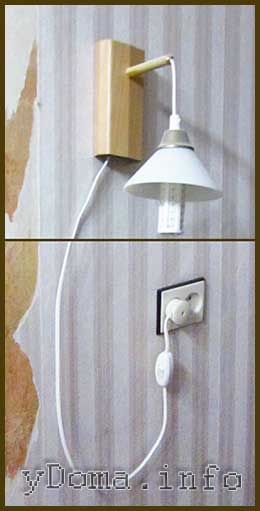
From the point of view of today's aesthetics, wires for connecting wall and ceiling lamps and electrical outlets should be hidden in the wall. When I made a sconce for the hallway, I had to, so as not to spoil appearance walls, connect the sconce lamp using an external wire with a plug and a switch on the wire itself. The wire was hidden behind the mirror, but the switch and plug remained in plain sight, and in addition, one of the socket positions was occupied.
How to fix a loose switch or socket
Switches and sockets for indoor wiring installed in metal electrical boxes will become loose over time. Tightening the mounting screws ensures fixation on short time. The claws at the ends are sharp and the contact area with the walls of the electrical box is small, so they do not hold well. The design does not allow the screws to be tightened any further; the claws bend and hold the switch even worse.
To ensure reliable and long-term fixation of the switches, it is necessary to glue pieces of leather or thick cardboard with a thickness of at least 2 mm to the entire depth of the box on the sides inside the electrical box at the places where the expanding fixing tabs rest. Take a strip, spread it with glue and insert it all the way into the bottom of the box. The excess is cut off with a knife.

Then, when tightening the screws, the teeth of the tabs will dig into the stickers and will no longer slide. All this work can be done without dismantling the switch.
How to secure an electrical box
switch or socket in the wall
More difficult case when the box itself becomes loose. You need to disconnect the wires from the switch or socket and dismantle them, remove the box, widen the hole and, using cement, alabaster or their equivalent, reinstall the electrical box. Wait until the solution hardens and install the switch or socket in place.
There is a simpler solution. It is enough to dismantle the switch or socket, drill a couple of holes for the dowel in the bottom of the box without removing it with a simple drill. Then drill into the wall in these places. Insert the dowels and screw the screws into them.

If the diameter of the screw heads is smaller than the diameter of the holes in the electrical box, then washers should be placed on the screws. The switch or socket is installed in place.
Installation with hidden wiring
For a long period of time, electrical points were made like this: a more or less round hole was punched in the wall, into which a metal box was inserted (or sometimes not inserted), then a socket or switch block was placed there, which was secured with spacers or cement mortar. After that, all the cracks were sealed with the same solution. This method amazed the imagination with its service life, but, as a rule, it was not possible to change the socket without a jackhammer.
Today, both the materials and the technology of electrical installation work have changed.
The installation of electrical points begins simultaneously with the installation of the cable. While the wiring lines are being marked, the location of electrical points is also noted, because they serve as the end points of cable lines or junction stations when it comes to distribution boxes. We will talk about the latter a little later, but now we will give an example of installing a power outlet.
Installation of sockets
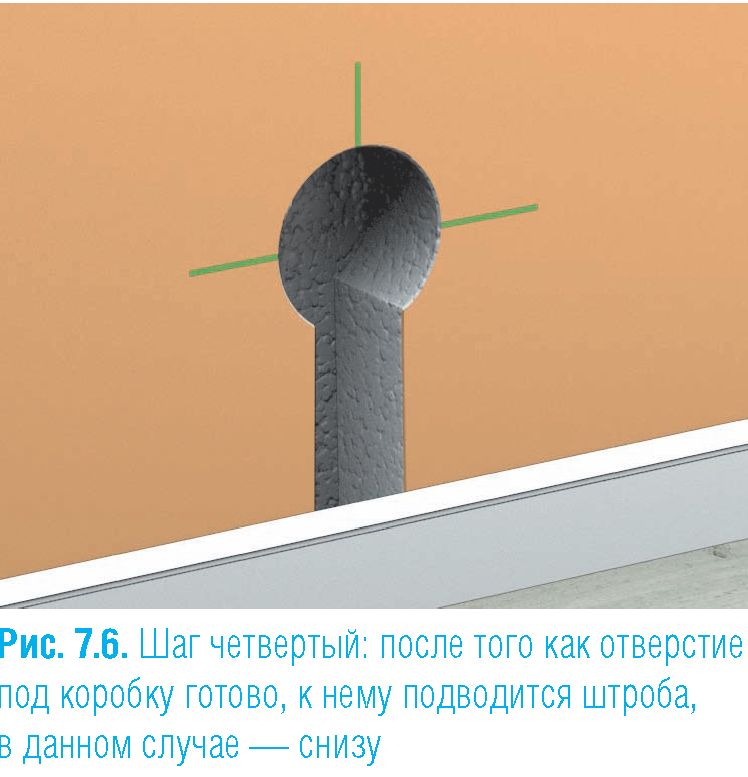
It begins, as mentioned above, with marking the position. A point is marked right on the wall that shows the center of the outlet. As a rule, it is located at a height of 25-30 cm from the floor (Fig. 7.1 and 7.2).
NOTE
A grounded power outlet should be located no closer than 50 cm from electrical appliances and gas pipes.
If there are small children in the house, the connectors can be placed higher. In the kitchen they are located just above table level. There are no strict rules here, but it is more aesthetically pleasing when sockets in residential premises are located at the same height.
Once the location of the center of the socket is determined, the outline of the socket hole can be drawn. This is done like this: take the installation box, which will stand as a socket box, apply it bottom to the wall and trace it with a pencil. The circuit is ready.
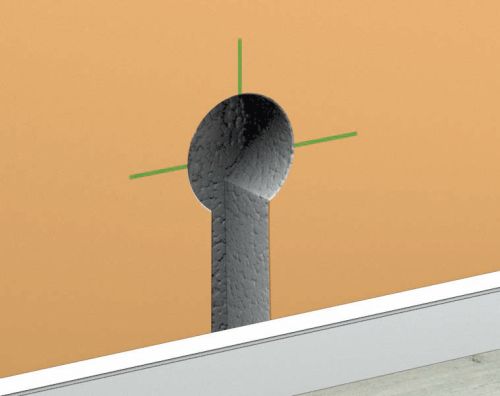
Now you need to hollow out a hole in the wall to place the box there. The easiest way to do this is with a hammer drill equipped with a special attachment - a diamond bit for concrete (Fig. 7.3-7.14). Working with such a tool is a pleasure. The diamond bit is equipped with a drill bit, which is located in the center of the bit. It is attached to the center of the contour, then a recess is outlined with several test turns of the punch. The drill bit goes deep into the wall and locks the bit in place so it doesn't move while you work. The height of the crown is such that it goes deep into the surface of the wall just to the depth of the socket. Having drilled the contour with the hole from the drill in the middle, the crown is removed to the side. With light blows of the hammer, the stone is knocked out of the hole. All that remains is to level the bottom of the recess using a chisel. The hole is ready for further work.


Rice. 7.14. Step twelve: after a fewhours, when the plaster is completely dry,the edges are sanded - the box is ready for installation
You can also drill a hole using a concrete drill. Holes are drilled next to each other along the perimeter of the contour, and then the excess material is knocked out with a chisel.
If you don’t have a power tool at hand, you will have to cut a hole in the wall using a chisel and hammer.
For mounting sockets, round installation boxes are most often used, but there are also square ones. In this case, a crown will not work; you will have to drill a hole with a hammer drill or, if there are several sockets, cut it out with a grinder.
The next stage is installing the socket box. There are special installation boxes for monolithic walls. They are available both for single installation and for joining in groups: this type of box has special ears on the sides.
The groove approaches the hole itself and goes deep into it so that the cable passes freely into the recess. At the bottom of the box there are several holes covered with plastic hatches that can be easily broken off. The cable cores are inserted into these holes. To secure the socket box in the recess, building plaster or ordinary plaster is used (Fig. 7.15 and 7.16).
 |
Rice. 7.1 6. Group of installation boxes,fixed in the wall with plaster |
In some cases, gypsum glue, for example “VOLMA MONTAGE”, is used to ensure the strength of the connection. It is kneaded to the consistency of softened plasticine. Then the socket box is held in place by hand, and the gap between the edge of the hole and the box is sealed with a spatula. After waiting a little (about half an hour, if gypsum is used, then 5-10 minutes), you should remove the excess mixture. After the mixture has completely dried, you can begin installing the block.
To prevent the wire from jumping out of the box when connecting the block, it is held with a bracket or clamp next to the box (Fig. 7.17).
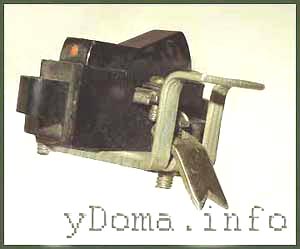
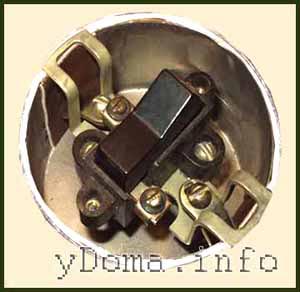
If the core is multi-wire, then the exposed conductor is twisted into a tight bundle. There are 2 contacts on the socket block; if it is grounded, then 3. The phase and neutral wires are connected to two, and the grounding wire is connected to the third contact (Fig. 7.19).
When the socket is installed correctly, the contacts should be located at the bottom. The wires go up (Fig. 7.20).
The contacts may have a screw or spring clamp. The first type is more reliable, the second requires less time for installation.
Then the excess wire is twisted into a spiral and hidden at the bottom of the socket so as not to interfere with the installation. The block is attached in two ways.
1. Using sliding tabs: installation is very simple - the block is inserted into the box and two screws on the sides, connected to the sliding tabs with teeth, are screwed in with a screwdriver. When tightened with a screw, the legs spread out to the sides and rest against the walls of the socket box, fixing the block in the box.
2. With ordinary screws - there are special holes along the edges of the socket box that coincide with the holes in the block. The screws are inserted into them, and the block is screwed to the box.
The installation of the point is completed, all that remains is to attach the protective plastic case - and the socket is ready for use (Fig. 7.21).
If the finishing is done from scratch, then after the socket box is installed in place, the block is not inserted into it, and the hole itself is filled with crumpled newsprint to prevent various construction debris from getting in.
In order to install several sockets in a row, there is a great way - this is by installing a special box with 2 blocks.
The hole for such a box is drilled with a diamond bit. The edges of the holes should touch, and the excess stone is knocked off with a chisel. If more than 2 sockets are needed, then a group of socket boxes is used, which can be attached to each other. There are plenty of options here. Sockets can be located both vertically and horizontally.
NOTE
Sockets can be installed in a “daisy chain” or each connected to a separate line leading from the switchboard or distribution box. In the case of a “daisy chain” installation, the power wires of the next socket are attached to the contacts of the previous one.
Installation of switches
Repeats the installation of the socket down to the smallest detail. The difference is this: when installing the switch block, you must ensure that the keys are positioned correctly, that is, when turning on, the upper part of them should be pressed, not the lower (Fig. 7.22). In some types of switches, such as walk-through switches or dimmers, the contacts indicate which wire the incoming wire is connected to and which the outgoing wire is connected to. Of course, there is no ground wire on the switches, although one can be installed on the lamp.
NOTE
The range of products includes special frames for sockets and switches. They can be one-, two-, three-socket, etc. Frames border electrical points and groups, giving sockets and switches an aesthetic appearance.
Installation of distribution boxes
The size and configuration of the distribution box depends on the number of wire connections and the conditions in which it is installed (Figure 7.23).
The hidden, unsoldered box is protected by itself, with only a lid on the outside. It comes in two types: with or without a protective gasket (Fig. 7.24).
In the first case, the lid has a rubber ring that seals its connection to the box. In the second, the cover is attached with screws or simply snapped into the grooves.
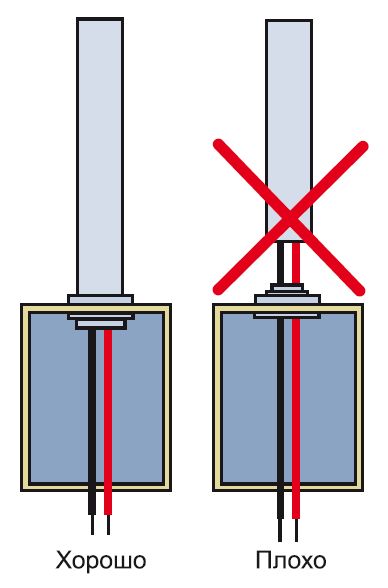
When installing cables in plastic pipes, regardless of the type of installation, the pipe should extend into the box by 1-3 cm, without leaving the cable unprotected (Fig. 7.25). This also applies to installation boxes.
If the box is small, you can use a diamond core bit to drill a hole for it, just as you would to drill out a hole for an outlet or switch. The diameter of the box in this case should not exceed 70-100 mm (Fig. 7.26). If the box is larger, using the same bit, several holes are drilled side by side, and then the hole is trimmed with a chisel. The depth of the recess should be such that the closed box lid is flush with the wall surface.
The next stage of installation is to insert all the connected wires inside the box. There are plastic hatches at the bottom of the box or on the sides that can be broken off as needed. The ends of the cables are inserted into these holes. The wires are then connected to each other using terminal blocks, caps, clamps, clamps, or hand twisting. The wires can be additionally wrapped with electrical tape (Fig. 7.27).
After this, the wires are twisted, hidden in a box and covered with a lid. Then the box is inserted into the recess and fixed in it with plaster or plaster. In addition, almost all types of boxes can be attached using dowel nails or screws.
Installation in hollow partitions
Hidden wiring runs not only inside monolithic walls, but also behind plasterboard partitions and cladding, plywood or fiberboard panels, plastic cladding in general, behind thin sheets of material, between which and the wall there is emptiness.
The installation of points in this case is somewhat different from the usual method (Fig. 7.28).
To make holes for installation boxes, use not a diamond bit, but a plasterboard bit. It is easier to work with than diamond. You can use a regular drill rather than a hammer drill. Holes in the material are made in advance, immediately after the sheets are mounted in place. The ends of the wires are first pulled to the place where the holes will be; once they are drilled, the cables are brought out (Fig. 7.29).
The next stage is installing the socket box. There are special boxes for hollow walls. There are special claws on the box for attaching them to the wall. You need to insert the box into the hole and pull it out through the hatches in the bottom of the wire, and then tighten the two screws on the sides with a screwdriver (Fig. 7.30). The screws tighten the tabs, which rest against the sheet of material on the reverse side, fixing the socket box in place. After this, the socket is mounted in the installation box (Fig. 7.31).
If the soldered boxes attached to the main wall are not hidden behind the walls, then they are attached to the material in the same way as socket boxes - using presser feet.
Installation with open wiring
Installation of sockets and switches with open wiring is less labor-intensive than with hidden wiring. There is no need to drill holes in the walls for installation boxes and mess around with plaster mixture or plaster. For older style switches and sockets, before attaching them to the wall, you must first install a dielectric support on the surface. This is an ordinary flat wooden plate that is attached to the wall with a screw or nailed. When it is installed, the electrical device is screwed to it. Modern sockets and switches do not require such a stand. They can be mounted on the wall using dowel nails or screws. To do this, the device is disassembled and the lower part (bottom) is screwed to the wall. Then the wires are connected to the block, it is attached to the bottom, and the entire structure is covered with a plastic cover, which is screwed on.
On many sockets and switches, special holes are cut in the casing, covered with inserts so that a cable duct or plastic pipe can fit in there. In sockets with a high degree of protection located in the bathroom, a special rubber gland is located where the wire enters the housing.
If the wiring is enclosed in a cable duct, then installation of electrical points is even easier. Some manufacturers of plastic boxes produce so many accessories for them that installing an electrical network is reminiscent of assembling a Lego set.
Special inserts on the surface of the cable channel for sockets and switches are called supports. There are calipers for 1, 2, 5 and even 10 electrical points. In addition, there are landing boxes and modules and even distribution boxes. Of course, the cable channel must be of the appropriate width. You can view these products in the table. 5.1 and 5.2.
Open type distribution boxes are easier to install than closed ones. They are attached to the ceilings using a wide variety of fasteners: dowel-nails, screws and even ordinary nails.
Also about installation when open type postings