The entrance doors of apartments and private houses must not only be insulated, but also, if necessary, sealed, achieving the maximum permissible value possible. design features tightness between the canvas and the box. The effect of a correctly performed seal will make itself felt immediately - your apartment or home will become warmer and even cleaner; there will be fewer drafts, if they do not disappear completely; Annoying extraneous sounds and odors will no longer penetrate from the entrance or from the street. You can do the sealing of any doorway yourself - for this there are several ways to do this work and types of seals for both metal and wooden doors, as they say, to suit any ability and budget of the home owner.
Where and how to start correctly - preparatory work
First, we inspect the door and frame. If they already have some kind of seal that has ceased to perform its functions, then it must be dismantled. After this, if necessary, we perform preliminary cleaning of surfaces in those places where there was old material, removing its remains. We use fine sandpaper for this.
Then recommended if necessary. Distortions will cause uneven fit and wear of the seal. Different sizes of gaps between the frame and the door, top and bottom, left and right, will also lead to this if the material of the same thickness is chosen for the entire opening. Or you will have to select a seal for each side of the opening. The critical value of the skew and the difference in gap sizes is 1–1.5 mm. If they are larger, then it is better to eliminate them by adjusting the door. It happens that performing this operation eliminates the reason why it was decided to seal the opening, and the need for such work disappears.
Now we decide on the installation location and type of seal. This determines which part of the door or frame needs to be measured to find out required quantity material.
Then we measure the perimeter (or it is enough to just have the width and height in one place, and then add and multiply by 2) of the contour on which the sealing inserts will be installed. This is the total length the required material. But it is better to take it with a reserve, based on the location and method of installation.
Then, if the seal is intended to be installed in one of the gaps between the door and the frame, its required width and thickness should be determined. The first size is clear. It is determined by measuring the width of the installation site.
Regular plasticine is best suited for determining thickness. We place it on the box at the location where the material will be installed and close the door. Then we open it and measure the thickness of the flattened and lubricated plasticine. This is what will happen right size height of the sealing insert. But this is the thickness of the material in a compressed state when the door is closed.
You need to take a slightly thicker seal. In this case, it is necessary to take into account what material the insert is made of, as well as its density, rigidity and strength. For example, a foam pad that is too thick may soon simply tear, while a rubber pad will prevent the door from closing well and will open it up, which will create additional stress on the lock and hinges, thereby shortening their service life. And if the insert is not thick enough, there may be gaps somewhere.

If the gap size on the left, right, bottom and top is different and very different, then it will be necessary to take thickness measurements using plasticine for each of these sides and, possibly, take material from the corresponding different heights. For wooden unadjusted (misaligned) doors, in the case of sealing with slats along the gap, adjustment may generally be required at at least 2 extreme points of each side.
You need to buy sealing inserts in whole pieces of the required total length for all sides or for each of them, if it needs to be cut. And in any case, it is not recommended to use separate pieces, much less trimmings of the sealant. The result of such work will be poor-quality sealing of the door, therefore, if part of the material was damaged due to unsuccessful cutting or installation, it is better to purchase it in the required length.
After purchasing the material, if necessary, we cut it (cut it) into pieces of the required sizes. And only immediately before installation, if necessary, do we prepare the surfaces on which the seal will be installed. We clean them from dust and dirt and remove convex irregularities. Then, if a seal is installed with an adhesive base (self-adhesive) or using glue, the surface metal door You also need to degrease it (with white spirit, solvent, acetone or gasoline), and sand the wooden one with the finest sandpaper (zero sandpaper).
Then we begin installing the material. Special attention, precision and accuracy require sealing corners. This is where the risk of leaving gaps is highest. When laying the seal in pieces (2 short ones for the bottom and top and 2 long ones for the left and right sides), loose joints may result between them. And when installed as a whole, the seal in the corners tends to wrinkle and/or may not attach tightly enough.
We seal a metal door - types of materials and their installation
The choice of seal must be taken no less seriously than its subsequent installation. After all, how long it will last also depends on this, and most importantly, it will be possible to increase the tightness of the opening, including. Choose desired type and type of material according to the following criteria:
- Design features front door: Are there special grooves or space for installing a sealing insert. They are provided in branded doors from reputable manufacturers.
- The location of the door is apartment in the entrance or with access to the street in a private house. Operating conditions such as temperature and humidity depend on this. Their performance is especially important in winter.
- The size of the gap in the doorway that needs to be eliminated.
Accordingly, we select a product with the necessary characteristics:
- 1. Type of material: rubber, plastic, polyethylene foam, silicone or foam rubber.
- 2. Type of profile: regular rectangular or square without cross-sectional cavities or profiled - can have the most different shape and cavities and/or projections, including those intended for mounting on a door.
- 3. Type or method of fastening: coupling of profile elements with the intended part of the door structure (for profiled seals); fixation with a clamping bar (metal or made of the same material); by gluing with an adhesive backing (for self-adhesive inserts) or using universal glue or.
Note:
- 1. You can make your own seal: for example, we wrap foam rubber in leatherette or artificial leather. Installation is done by gluing.
- 2. Seals attached to self-tapping screws are installed only on wooden doors.
- 3. What compounds should be used to glue foam inserts is described in the article.
To seal a metal entrance door, rubber inserts are most often used. By the way, they are produced in all types of profiles and mounting methods. In great demand Various profiled rubber seals are used, the most common of which are shaped like letters:
- C, K and E-profiles - used for small gaps - up to 3 mm - between the frame and the door;
- P and V profiles – for medium gaps measuring 3–5 mm;
- D and O profiles – for large gaps up to 7 mm.
Most profiled inserts are designed for installation in the opening on the end of the door or opposite it on the frame. The latter are mounted only by gluing. Doors can also be so-called mortise - they are installed by pressing into a special groove on the door frame. There are also sealing inserts installed on the door frame. They just stick together. When the vestibule is double, the material is usually mounted on each of them. The dimensions of the insert for the first and second vestibules are different. There are also seals that are mounted not in the opening, but on the edge (end) of the outer decorative sheet doors.
Solid rectangular and square rubber seals are no less in demand. Mounted by gluing in the opening and/or on the porch and on the door and/or frame.

Plastic, polyethylene foam and silicone seals are also produced in almost all of the types listed above (rubber). Foam rubber - mostly of solid rectangular and square cross-section, but there are also profiled products with a simple profile. But all foam rubber seals are installed only by gluing.
Rubber, plastic, polyethylene foam and silicone plastic sealing inserts are produced different colors, which allows you to choose the material to match the color of the door or its tone. Rubber seals have the most colors. However, experts say that dyes significantly reduce the quality of seals. And first of all, again, this applies to rubber products.
The seal is installed in the selected location of the frame and/or door along their entire perimeter and in accordance with the intended type of installation. A joint is usually made at the corners, that is, the material is cut. To do this, first measure the required length for each side from one corner to the other. Then the material is cut into pieces, which are cut from the total skein at an angle of 45 o . And then they install it.
Self-adhesive (with a base in the form of a film on which glue is applied), as many believe, are the easiest to install. The protective paper from their adhesive base must be removed during the process (after cutting into pieces) and as the seal is installed . That is, separated from small area material paper and immediately pressed him to the door. And so gradually, but without stopping, we move until we finish the entire opening (if we seal in one piece inserts) or one of its sides (when the door seal is cut into 4 parts). Then press the sealing insert well again. If the glued seal comes off after some time, then it must be glued with Moment glue.
Sealing a wooden door - the most common options
To seal a wooden door, you can glue any of the profiled or solid rectangular (square) materials listed in the previous chapter. Of course, from among those that are designed for such installation (self-adhesive and mounted with glue). For greater reliability of attachment, you can additionally screw the sealing inserts through the washers with self-tapping screws. The installation locations are the same as for a metal door.

Can the seal be made with material self-made- so-called rollers. We wrap some kind of insulation (foam rubber is most often used) in leatherette or artificial leather. This is the roller. It must be installed inside the apartment (house). Installation is carried out:
- On the box - along its inner surface on the left, right and top at a short distance from the door. It is necessary to ensure that the door fits snugly against the rollers when closing. Rollers are not mounted on the threshold because they wear out very quickly.
- And on the door - to its lower edge.
The rollers are fastened with decorative nails along the side opposite to where the leatherette is folded in half around the foam rubber.
Despite the effectiveness of sealing using the above methods, it is currently customary to use a variety of floor strips for wooden doors:
- wedge-shaped strips;
- external strips;
- plastic tubes inserted into grooves using special clamps on them;
- metal and plastic strips with a brush or rubber band;
- and others.
A wedge-shaped strip is installed on the box in the corner between the rebate and the surface opposite the frame closed door. Moreover, installation is done only for the upper part of the opening and its sides. Before installation, the plank is cut to the size of these installation locations. For joining points (at the top of the opening) cut at an angle of 45 degrees. And it is necessary to trim the bar in the places where it will adjoin door lock and loops. Then we nail it down.
The outer strip is installed on door stop boxes (that is, it is, as it were, a continuation of the vestibule). It is also cut to the size of the opening for its top and sides. Mounted using screws or self-tapping screws. After correct installation There should be a sheet of paper between the bar and the closed door.
There are also slats that are installed on the outer face of the door, closing the gap in the opening. They are also first cut into pieces of the required sizes. Then they screw it to the door, which must be closed. It is very important to carry out installation with corrosion-resistant screws - rusted hardware can cause rotting wooden door.
The bottom of the doorway is sealed with other types of planks, the technology of which is also slightly different . Some flashing strips are nailed to the threshold, while others are nailed to the inside face of the door. All of them are cut to the width of the bottom of the doorway and fastened with screws.
Flat threshold products consist of an aluminum or plastic base, to the bottom of which a brush or rubber plate is attached. Such strips can be installed both on external and on interior doors. After correct installation The gap between the flat rail and the threshold should be minimal. But at the same time, the bar should not interfere with the easy free opening and closing of the door. Some types of flat planks are equipped with special (elongated) holes for screws, thanks to which you can adjust the height of their installation.
Threshold products with a plastic shield prevent entry into the apartment (house) humid air. As a rule, they are installed on an external door.
Combined slats consist of 2 metal strips, one of which has a nylon brush attached. The product without a brush is mounted on the threshold. And the bar with the brush is on the door. The rail on the threshold is equipped with a special groove that prevents water from penetrating into the room.
After correct installation of the combined strip, the hanging edge of the strip installed on the threshold should “look” towards the premises. And the door trim brush should exert slight pressure on the threshold rail.
How to insulate the front door with your own hands (10+)
Insulation and sealing of the entrance door
The front door is often the source of a draft. Cold air blows through it into the living space. IN apartment building this air comes from staircase along with cigarette smoke and other foreign substances. The seal not only protects from the cold, but also saves from foreign odors. In suburban housing, sealing is even more important, since the front door in this case usually opens directly onto the street.
The traditional sealing method is inconvenient
Usually special self-adhesive seals are sold for insulation. They are proposed to be glued between the door and the frame at the points of their contact. But this approach has shown to be ineffective. The seal installed in this way is very sensitive to door distortions. The slightest misalignment leads to loss of tightness, as the seal no longer fits. Installing such a tape is also not easy. Only if the door is perfectly positioned can you simply glue the strip on. Otherwise, the distance between the door and the frame is different places miscellaneous. So you have to put something under the sealing tape to ensure a secure fit.
How to properly insulate your front door
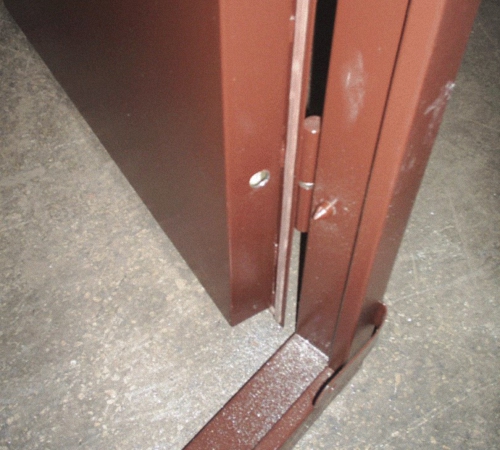
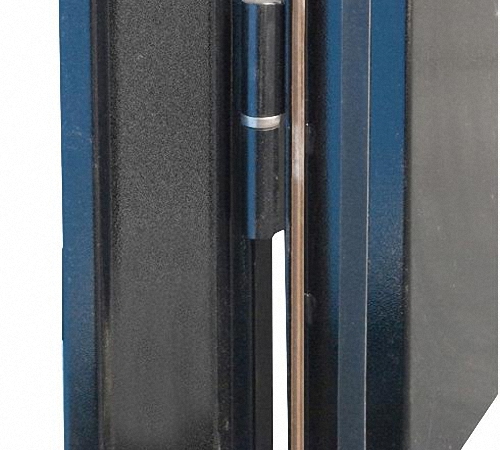
Another approach is reliable. It is shown in the picture.
The seal is not installed between the door and the jamb, but on the jamb, so that it fits snugly against the door. At the same time, the seal has a greater degree of freedom and, accordingly, ensures tightness even with greater door deformation. This installation method does not depend on the initial position of the door relative to the frame, since when gluing the seal can be installed in exactly the position that will ensure sealing.
For this work I use Moment glue. The work is done like this. The door frame in the place where the seal will be glued is lubricated with glue. The sealing tape itself is cut to the required length. The edges are cut at 45 degrees to join other strips of tape. The side that will be glued is also lubricated with glue. The glue is kept for 15 minutes. Then the door closes. The tape is applied to the area coated with glue so that it fits snugly against the door, and is pressed firmly with your hands for 2 - 3 seconds. Then the glue is left for a day to dry completely.
It is convenient to use a rubber tube as a sealing tape (only the rubber must be stable, not decompose or stain) or a special round sealing cord made of foamed polyethylene.
Disadvantages of such insulation
The only drawback of the method is that if you accidentally touch the seal, it can be torn off. Okay. Gluing it in place is not difficult at all.
Example of a sealed door

Unfortunately, errors are periodically found in articles; they are corrected, articles are supplemented, developed, and new ones are prepared. Subscribe to the news to stay informed.
If something is unclear, be sure to ask!
Ask a question. Discussion of the article.
More articles
Insulation, thermal insulation of the house with your own hands...
Insulation, thermal insulation of the house. Little-known, but very important facts, I share personally...
Why is it cold at home, where does the heat go, heat loss....
Why is it cold at home? Where does the heat go? How to make it warm? Those losses...
Why does a wooden floor squeak...
My practical experience combating floor squeaks. And also advice from old people. How do I get off...
Why does concrete crumble, crack, collapse in the foundation, walkway, ...
The path and foundation were poured in the summer. After winter, serious damage is visible, observing...
Fence posts, DIY fences. Put it up, install it, dig it in...
Fence posts, fencing. We will make a good support for the fence so that the fence will last...
Insulation and heating of water pipes. Water pipe freezing...
DIY plumbing. External, non-freezing. Pad water pipes h...
Homemade extension ladder. With my own hands. Prefabricated, collapsible,...
How to make a reliable folding ladder yourself....
How to reinforce concrete, install and tie reinforcement....
Reinforcement of concrete, how and why. How to install and knit reinforcement. Secrets, ow...
To provide additional sound insulation, any metal doors require the installation of a seal. This article will tell you how to choose and correctly install a high-quality seal for metal doors.
General concept and functions of a seal for a metal door
The seal is a hardware element of a metal door. Main function The seal is to protect the room from extraneous sounds. Additional features seal:
- protecting the premises from foreign odors;
- thermal protection - preventing the formation of drafts;

- sealing - ensuring a tight fit of the door leaf to the door frame.
Let's consider the basic requirements for a high-quality seal for a metal door:
- the seal must ensure complete tightness, the door protects the room from the entry of extraneous noise, moisture, cold air, small dust particles or strong odors;
- the seal ensures reliable and smooth closing of the door;
- the seal must meet high standards that ensure water and air tightness and excellent shock-absorbing properties of the metal door;
- the seal eliminates sharp unpleasant sounds sounds that a metal door makes when closing, after installing the seal, the door closes softly and silently;
- the seal for a metal door must be resistant to sudden temperature changes to avoid hardening or peeling off;
- the seal should interact well with the door, there should be no gaps when closing;
- ensuring fire safety: using a rubber contour to trap cold smoke, using a thermally expanding layer to fill cracks and prevent the spread of fire.
Types of seals for metal doors
Depending on the type of material, sealants are divided into:
- rubber,
- silicone,
- polyurethane,
- plastic,
- foam rubber.

The rubber seal for a metal door is characterized by durability and endurance.
Advantages of installing a rubber seal on a metal door:
- high level of air and moisture resistance;
- resistance to prolonged exposure to precipitation, temperature changes, and ultraviolet radiation;
- long term operation;
- low cost;
- no cracking.
Rubber seals are made from oil-resistant, acid-resistant rubber, which is food grade or high-tech grade.
Silicone seals, which are excellent for metal doors, are not inferior to rubber ones. The advantage of a silicone seal is that silicone does not emit harmful substances and ensures the environmental safety of the home. Silicone does not provoke allergies, which is why such seals are installed on metal doors in children's or medical institutions.
The polyurethane seal is easily attached to the door, as it has a self-adhesive film on one side. Plastic seals are rarely installed on metal doors, just like foam rubber ones. Although the cost of these seals is quite low, quality characteristics do not allow the use of such seals on a metal door long time.

In relation to the design and type of fastening, seals are divided into:
- magnetic seal for metal doors;
- seal with an additional clamping mechanism;
- The seal for metal doors is self-adhesive.
The magnetic seal appeared not so long ago, but is increasingly used in the manufacture of metal doors from the manufacturer. Magnetic seals are installed on refrigerator doors or freezer. The principle of operation of the seal is based on attraction permanent magnets using poles of attraction. A triple circuit magnetic seal is installed on metal doors. The first two circuits are located directly on the door, and the third - on the door frame. Magnetic seals have a drawback: if there is a strong attraction of magnets, such a door will be difficult to open for a child or an elderly person, and if there are weak magnets, the door will not meet all the requirements for sealing and sound insulation.
It is better to install a magnetic seal on metal doors that do not have decorative elements, and consist of ordinary sheets metal The magnetic seal has two components: a soft part and a magnetic insert. The soft part is made of thermoplastic elastomer. Advantages of using thermoplastic elastomer:
- aging resistance;
- operating temperature from -65 to +90 °C;
- After use, this material is recycled.
1. When choosing a self-adhesive seal, be sure to check the expiration date of the adhesive that is applied to one side of the tape.
2. Do not use foam seals on a metal door. After all, as a rule, a metal door is used at the entrance to a room and has the greatest load in terms of the number of openings; in this case, foam rubber will deteriorate very quickly.
3. Before giving preference to a particular seal, carefully study the information about materials, shelf life and technical features seal.
4. To check the sealing properties of the seal, you should press the seal slightly; if the material quickly regains its shape, the seal will provide a good seal.
5. When choosing a seal that requires additional gluing, buy good quality silicone glue.
6. Pay attention to the color of the seal, in most cases it is black, brown or white, but there are exceptions and some companies allow you to choose the color individually to match the color of the door.
7. When choosing a seal for a metal entrance door, you should not rely on color variety, since paint significantly affects the quality characteristics of the seal, it is better to choose a standard black seal.
8. The rubber seal should be of medium hardness; a material that is too soft will quickly become unusable, and a seal that is too hard will prevent the door from closing.
9. When choosing self-adhesive sealant, the sticky side should be covered small particles fiberglass.
Rules for selecting a seal for a metal door
Before you buy a seal for metal doors, you should decide on the shape and type of seal. Seals are sold in in roll form with medium length tapes 600 cm, for standard door This seal will be sufficient.
To choose the right seal, you need to measure the gaps of the metal door. For this procedure, take plasticine that needs to be wrapped in plastic and insert it into the slot with the door closed. Use a tape measure or ruler to measure the length of the gap.
For a gap that ranges from 1 to 3 mm, use a rectangular foam rubber, polyethylene foam or polyvinyl chloride sealant.
For gaps that exceed 3 mm, rubber seals are used, which are divided into:
- seals with a C-shaped, K-shaped or E-shape- used in three-millimeter gaps;
- A P-shaped or V-shaped seal is used to close a gap with a thickness of 3 to 5 mm;
- in gaps that exceed 5 mm, install an O-shaped or D-shaped seal.
When replacing a seal, you should tear off a piece of the old seal and select a new seal that is as similar in size as possible in the store.
To determine the size of seal needed, decide on the number of layers, and then measure the dimensions of the metal door and determine the perimeter door frame, multiply the resulting number by the number of layers. It is better to purchase a seal with a reserve.

Installing a seal on a metal door
1. When replacing the seal, you should thoroughly clean the surface of the doors from the old seal with fine sandpaper and wash the doors well with an acetone or alcohol solution.
2. Metal doors are used at the entrance to a room, so it is advisable to install two or three layers of sealing to ensure a more reliable seal.
3. When installing a seal on the front door of an apartment that does not face the street, install two layers of seal. Place the first layer on the outer door leaf, and install the second layer on the door frame.
4. If the seal is installed on a metal door that opens directly onto the street, it is better to lay three layers of seal. The first and second circuits are installed on the door frame and the inside of the door, and the third - on the outer surface of the door. Requirements for an external seal for a metal door: resistance to temperature changes, ultraviolet radiation, moisture, precipitation, good dimensional stability and tightness.
5. When purchasing branded doors from the manufacturer, a seal is present on such doors. If there is a double door sash, the seal is located on each sash.
6. The rubber seal is installed using silicone glue. To do this, the seal is gradually coated with glue and applied to the surface of the door.
7. When installing a seal on a painted metal door, at least twenty days must pass from the moment of painting.

Installation of self-adhesive seal
Before replacing the seal, you should clean the surface from any remnants of the old seal and wipe the doors with an acetone-containing solution.
A self-adhesive seal is even easier to install than a rubber one. To install, you need to gradually, removing the tape, glue the seal around the perimeter of the door leaf. If the seal begins to hold poorly over time, use glue or sealant for gluing. When replacing the seal, do not use separate pieces, as there is a risk that the seal will not perform its sealing function properly. Pay attention to the sealing of the corners, as in these places the seal may wrinkle or adhere poorly. After the seal is completely glued, trim off the remaining parts with scissors.
Review of manufacturers of seals for metal doors
1. Deventer (Germany)
Peculiarities:
- environmentally friendly use pure materials for the manufacture of seals;
- availability of certificates of compliance with international standards;
- excellent recovery properties after compression of the seal;
- the use of thermoplastic elastomer, which prevents aging of the seal due to exposure to ultraviolet radiation.

2. Stomil Sanok (Poland)
Peculiarities:
- high level of wear resistance;
- additional sealing circuit;
- production of a rubber seal from special microporous rubber;
- resistance to temperature changes from -44 to +66 °C;
- softness and high elasticity of the seal;
- service life from seven to ten years;
- The seal ensures silent closing of the metal door.
3. Akord (Türkiye)
Peculiarities:
- service life from 5 years and above;
- harmlessness and environmental friendliness;
- preventing dust, sound or foreign odors from entering the room;
- affordable price.

4. Welless (Germany)
Peculiarities:
- variety of colors: black, beige, transparent, white, brown, dark brown;
- ensuring maximum density and silent closing of a metal door;
- high performance during temperature changes;
- resistance to chemical influences;
- anti-toxicity, suggests the use of a sealant in medical institutions.
5. Varnamo (Sweden)
Peculiarities:
- the use of porous rubber for the manufacture of self-adhesive seals;
- variety of seal shapes: K-shaped, P-shaped and D-shaped;
- minimum service life of seven years;
- ease and simplicity of installation of the seal;
- rolls are sold in convenient packaging of 6, 16, 24 and 100 meters.

6. Cyclone (Switzerland)
Peculiarities:
- moisture and wind resistance;
- heat resistance from -40 to +60 °C;
- good adhesion of self-adhesive sealant;
- provides excellent tightness and silent closing of the door.
Warmth and comfort in the house are the main tasks facing every owner of his own living space. Particular attention is paid to the entrance door, as it is in direct contact with the street. And in the cold season, heat can leave the room through the doorway. To avoid unpleasant consequences, you should insulate the front door. Execute this work you can do it yourself. But before you insulate a wooden door in a private house, you should prepare everything necessary for this.
How can you insulate your front door?
The guarantee of future comfort, for the sake of which insulation was started, depends on the chosen material. And if several decades ago only felt, foam rubber and dermantin were available, today the choice is much greater. And here's what the manufacturers offer:
- Mineral wool;
- Foam;
- Expanded polystyrene.
Mineral wool, like polystyrene foam, is most often used as the basis for insulation for metal door panels. Both materials perfectly retain heat indoors and are not affected by microorganisms. Mineral wool is also worth noting because no rodents will spoil this insulation.
Mineral wool absorbs moisture
But these materials have some restrictions on their use.
Polystyrene foam belongs to the category of combustible insulation, so its use for working with wood is possible only when processing special compounds. And the “disease” of mineral wool is subsidence. Over time, the sheathing may end up at the bottom of the canvas and stop retaining heat. Besides mineral wool accumulates moisture inside itself, which adds weight to the entire structure. Therefore, this material should not be used to insulate a bath or sauna.
The use of isolon is more justified to achieve the goal of heat retention. This material is made on the basis of polyethylene foam, which gives it minimal thermal conductivity. The advantages of the material include the fact that a sheet with a thickness of 10 - 15 mm will be sufficient for work. This allows you to maintain an attractive appearance door leaf without thickening it or making it bulky.
 Izolon has low thermal conductivity
 Expanded polystyrene has excellent performance. A door insulated in this way will become a reliable and safe barrier between warm home and cold street. Among the advantages of polystyrene foam, its non-flammability should be highlighted. When a flame appears, it will gradually disappear on the surface of the material.
For inexpensive insulation you can always use foam rubber. The material is convenient in all respects and for a beginner home handyman will be a real find. Foam rubber will forgive mistakes and allow you to correct them painlessly.
Tool
It is impossible to complete the job without the right set of tools. To create insulated wooden entrance doors you will need:
- Tape measure and pencil;
- Stationery knife;
- Hacksaw;
- Hammer;
- Screwdriver;
- A flat rod or metal meter;
- Mounting tool or nail puller;
- Construction stapler.
 It is necessary to prepare tools and cladding material
 If necessary, this set can be expanded, but for most operations it will be quite sufficient. It should be noted that a hacksaw can easily be replaced with an electric jigsaw. This tool allows you to get the job done with the same quality, but much faster. And if there is no screwdriver in the house, then you can take a simple drill. The main thing is that it has a reverse, which will allow you to unscrew any self-tapping screw or screw if necessary.
In addition to the tools, it is necessary to prepare the covering material. For most door panels, it will be enough to use leatherette, which has an attractive appearance. This material has good characteristics and wear resistance, so the canvas will not need to be repaired for a long time.
And if you like to do everything with your own hands, then we recommend you instructions on how to
Preparatory work
To insulate the door leaf, you should go step by step, stage by stage. This approach allows us to achieve good result and eliminate errors. And first there is preparatory work to be done.
To ensure that nothing interferes with the work, you need to remove the door leaf. This is done using a mounting tool or a nail puller. It is enough to pry the canvas from below and it will rise from its hinges. If the rotary axis is slightly rusty, then it must be lubricated with machine oil. After this, with small forward movements you can move the hinge and remove the door leaf.

When the door is outside the frame, all existing elements must be removed from it. The hinges, handles, peephole and lock are carefully unscrewed and put aside. If the door is not made only of wood, then it is necessary to remove the sheet internal lining to access internal space canvases.
Cutting and laying insulation
The next stage of insulating the door leaf will be laying material that will make it warmer. To do this, you need to arm yourself with a stationery knife. Thermal insulation is cut to the length and width of the sheet so that there is no empty space left. If the door is a frame with voids, then they need to be filled with insulation.
 The insulation is tightly inserted between the bars
 All pieces must be tightly inserted between the bars to prevent the formation of cold bridges. At the same time, the material should not bubble, which would indicate an excessively large supply. In this case, it is worth cutting off a little excess material. Once everything is adjusted, you need to secure the insulation with staples. A construction stapler allows you to do this quickly and efficiently.
New door trim
The next step will be upholstery of the prepared wooden doors. For this purpose, you can use soft materials such as leather substitute or dermantine. The upholstery fabric is cut with a margin of at least 10 cm in length and width. This is necessary for hemming the material, which should have some thickening around the entire perimeter of the door leaf.
 Dermantin can be used as a finishing material
 It is best to attach dermantine to special nails. They have a large decorative cap, which gives the trim more attractive appearance. You can also hit nails copper wire. If you pull it, you get an additional fastening for both insulation and exterior finishing.
An analogue of soft materials is MDF. This type of finishing is used for frame panels. In this case, each panel is attached to a clamp and nailed along the perimeter.
Installation of hinges and fittings
When the canvas gets a new appearance, you need to put the removed fittings back in place. The hinges must occupy their nests exactly as they were installed before work began. The seat for the lock must be carefully cut out so that there is no damage to the upholstery of the door leaf around it.
If necessary, insulation can be combined with.
 The insulated door is mounted back
 Seal installation
Installing frost-resistant insulation on the door leaf is only half the battle in eliminating the penetration of cold air into the living space. Even with the door closed, there remains a small gap between it and the frame, through which the cold will penetrate. Eliminating drafts is the next task for the home handyman.
To do this job, you should choose the optimal type of seal. Today, manufacturers can offer the following types of this material:
- Foam seals;
- Silicone seals;
- Rubber seals.
The first type of seal allows you to quickly and inexpensively solve the problem of drafts. It is ideal for doorway such a structure as a dacha, where there is no great intensity of opening and closing doors.
 Foam rubber seal - inexpensive, but also short-lived
 Using a silicone door seal will help eliminate drafts for a longer period of time than a foam rubber counterpart can do. The shape of the product ensures that the canvas is pressed tightly against the box, which will not allow air masses to move inside the room.
The best option is a rubber seal. Thanks to its characteristics, it allows you to get a warm opening for a long time, even with the most intensive use. In addition, the variety of shapes of this product makes it possible to install it on all types of door blocks.
 For intensive use of doors, a rubber seal is used.
 Having chosen the desired seal option, all that remains is to install it in place. There are two main installation options:
- Using an adhesive strip.
- Using a harpoon in the groove.
The fastest way to install a new door seal is to use self-adhesive products. But durability this type cannot please, so many experts recommend harpoon fastening into the groove.
It will be quite difficult to select a small groove in the quarter without disassembling the boxes. Therefore, it is permissible to carefully nail the seal with small nails. Fastening must be done in the very corner of the quarter. This will allow the canvas to take its position in the door block without difficulty and ensure reliable protection from a draft.
Regardless of which wooden door you choose for your home, it must perform its functions 100%: protect your house or apartment from the intrusion of noise, smell, dust, and drafts. Canvas and box without additional elements they cannot fully ensure this.
Gaps and cracks are the main disadvantage of wooden doors due to the specific nature of wood. Seals solve the problem.
Wood tends to change its qualities under the influence of climatic phenomena and environment. Therefore, cracks and gaps for both the entrance and are provided even for expensive models.
Modern technologies make it possible to solve this problem either in a factory or with your own hands. The seal for wooden doors is of interest to many consumers who care about their comfort. Let's consider the specifics and types of insulation to eliminate gaps between any panel and the frame in the doorway.
Seal for wooden doors: specifics of use
Do not rush to run to the store immediately if your door does not fit tightly to the frame. Without knowledge detailed characteristics sealant, it is difficult to choose what suits your door. Just as door blocks are different, seals have their own classification.
 A large assortment of seals can confuse any buyer.
 Let's figure it out.
Based on the material used for production, door seals are divided into the following types:
- rubber;
- made of PVC material;
- on a foam base;
- rubber;
- silicone.
How softer material, used for the production of the seal, the better its properties and the tightness of the junction of the canvas to the box. For self-installation Not all types of seals can be used, because the specific installation of each type has its own subtleties.
Seals are divided according to their installation location and their functional purpose:
- threshold seals - hide the gap between the floor and the canvas;
- fire protection - allow you to reduce the penetration of smoke into an apartment or another room during a fire;
- contour - mounted on all sides of the leaf or door frame to prevent the influence of external factors.
Let's get acquainted with each type insulating tapes more details.
Threshold door seals
They are attached to the bottom of the canvas at the end. A seal that replaces the threshold improves the tight fit of the door if there is no threshold in the opening or the floors have different levels, different flooring is used in two adjoining rooms.
 Threshold seal for doors allows you to hide the gap between the floor and the leaf in the absence of a threshold.
 This seal only works when the door is closed, completely hiding the gap between the floor and the door leaf. Installation is carried out in the factory.
 It is difficult to install threshold insulation yourself. It is better to provide for its installation when ordering from the door manufacturer.
 In the lower part of the canvas, a special slot-profile is made with a milling cutter, into which a seal with special button. This button is a specific lever that is compressed when the door is closed and lowers the seal brush down. When the door opens, the button returns to its original position and lifts the aluminum strip with the brush inside the door. The button is most often installed on the hinge side.
If you do not want to install a threshold in the interior opening in a house or apartment, but there is a need for thermal, noise or sound insulation, use a threshold seal for.
Fire seals for wooden doors
This special kind a seal made of a material that has the property of foaming and swelling when exposed to high temperatures.
 Fireproof sealant under influence high temperatures foams and blocks the path of smoke.
 Typically, such elements are installed in institutions with high level fire hazard. The seal prevents smoke from entering the room, which increases the possibility of evacuation or saving lives. In apartments, fireproof material is fixed at the request of the owner when ordering a wooden door.
Contour seal for wooden door
Installed in two ways:
- along the perimeter of the canvas;
- along the perimeter of the racks.
The option is chosen by the client based on its features. Available in the form of a tape using most in demand among analogues. It can be included with the door when ordering or installed independently.
 The contour seal is installed in the groove of the canvas or box. Can be glued to surface. The choice is up to the consumer.
 When factory equipped, a groove is made along the end part of the box or canvas into which the mount (leg) of the seal is inserted. For better adhesion, the base is coated with silicone-based glue.
When installing it yourself, choose self-adhesive tape, which is easily attached with the sticky side to the surface. Needs to be removed protective film, stick the tape yourself, pressing firmly and holding for several seconds. The disadvantage of this model is its short service life. Under constant friction, the tape loses its elasticity and the glue dries out. In a year or two you will have to replace the entire insulating layer.
 You can install the seal in the groove yourself if you first make a special cut with a router.
 The contour seal installed in the groove lasts longer and is more reliable. If the door was purchased a long time ago and there is no seal on it, remove the door leaf, make a groove with your own hands and install an insulating profile. It will take a little time, but it will create comfortable conditions for living without odors, noise, drafts.
Choosing the right door seal
To purchase a product, it is not enough to know information about its varieties; it is necessary to clarify the parameters of the door block that needs to be improved. Slots and gaps are never the same, so each case requires a seal that is different in size and type of profile.
You may have noticed the similarity of the edge of the product with some letters of the alphabet: E, P, S, O, etc. This different types profiles that have their own purpose. Some products are universal and can be installed both at the entrance and interior door. But some models are developed only for a certain canvas, its thickness, and the material used. The more information you know about your door, the easier it is to choose the right type profile.
Some products can be selected in a color scheme that matches the color of the door: beech, alder, oak, wenge, etc. But there are also classic seals in black, white and brown shades.
You cannot use 1 mm thick tape if the gap between the sheet and the box is 9 mm. Choose the right size for positive results.
When choosing a wooden one for your home, take care of the seals when ordering the product. Specialists will take into account all the nuances of installing the unit and select the necessary insulating materials. And you will enjoy the comfort that a reliable wooden door will provide.
Watch a video about the threshold seal and how the system works in operation: