To ensure that the power supply in your homes is always of high quality, uninterrupted and reliable, it is very important when installation work connect the wires correctly. There are a lot of methods, we will consider each in detail separately with its advantages and disadvantages, with step by step instructions perform switching. We will also pay attention to the eternal question of electricians - how to connect wires whose cores are made of different metals (for example, copper and aluminum).
Removing the insulating layer from the wires
I would like to immediately dwell on a question that will be common to any method. Before connecting the wires into a common electrical unit, they must be stripped of the top insulating layer.
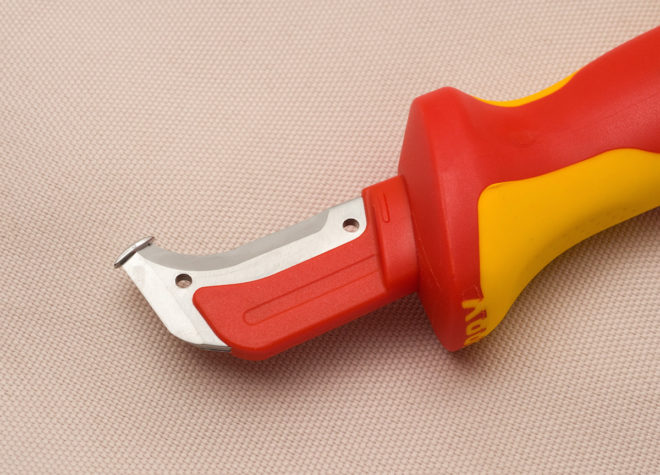
This can be done using a mechanic's knife. This method is simple, but there is a high probability of damage to the conductor. To do everything correctly, you must strictly follow the step-by-step instructions:
- Place the wire on some flat surface(type of table).
- Press it with your left index finger.
- Right hand take a knife and lightly press it into the insulating sheath of the wire. To avoid snagging the metal core, position it towards the cut at an angle. If the angle is right, there is a possibility of a circular cut in the core, as a result of which it may subsequently break.
- Hold the knife in this position. Using the index finger of your left hand, slowly twist the conductor one full turn, thus cutting the insulation around the entire circle.
- All that remains is to pull off the cut piece of insulation.
Professional electricians now necessarily have in their arsenal such a device as a stripper. This is a multifunctional tool that can be used to strip insulation from a wire or cut a cable. It can be simple, semi-automatic or automatic. The most important thing is that when stripping the insulation with a stripper, the conductor is not damaged. For each standard core diameter, such a tool has a calibrated hole with a cutting edge.
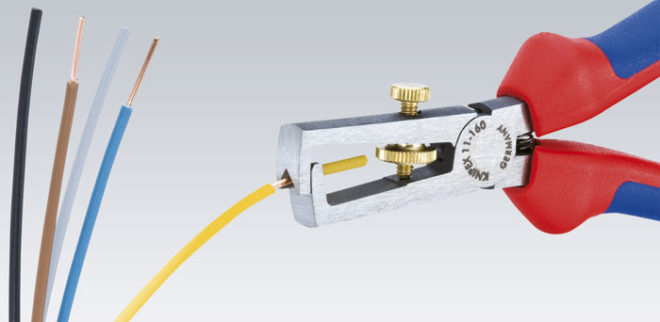
The length to which wire cores need to be stripped is different for each connection method.
Twist
Let's start with the simplest and most well-known method - twisting. It can also be called the oldest; it’s not for nothing that electricians call twisting the “old-fashioned method.”
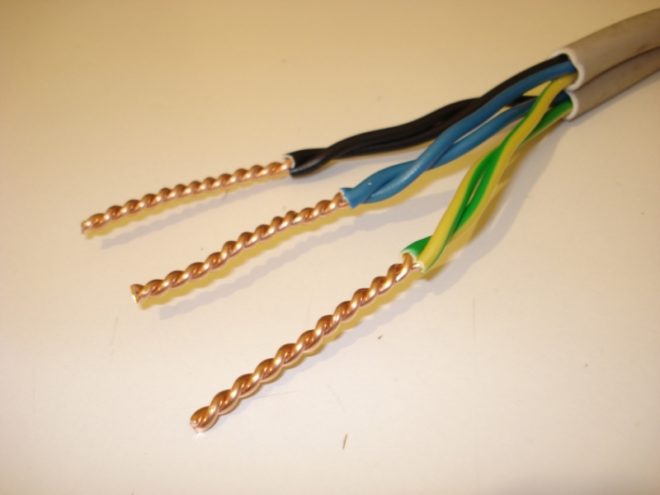
We will not tell you that such a connection of wires is durable and reliable. According to the main document in electrical engineering, PUE (“Rules for the Construction of Electrical Installations”), twisting is generally prohibited, despite the fact that half a century ago it was used everywhere. The fact is that in those days the load in apartments consisted only of lighting, radio or television. Considering what the current load is in modern apartments With a huge amount household appliances used daily, then no old insulation, core cross-sections or methods of connecting wires are any longer suitable.
Nevertheless, we will talk about twisting, and even first of all, because it is the main stage of such connection options as welding and soldering.
Positive aspects
The most important advantage of twisting is that it requires absolutely no material costs. All you need is a knife to remove the insulating layer from the wire cores and pliers to make the connection.
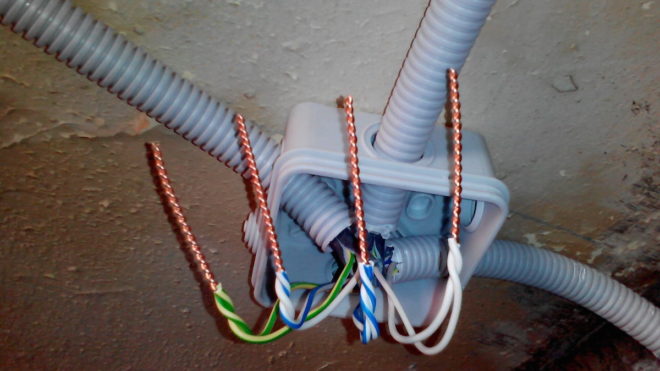
The second indisputable advantage of twisting is its ease of execution. You don’t need any special knowledge or skills; it can be done by anyone who has ever held pliers in their hands.
Several wires can be connected simultaneously in a twist, but their total number should not exceed six.
Negatives
The main disadvantage of twisting is its unreliability; it weakens over time. This is due to the fact that there is residual elastic deformation in the cable or wire cores. At the point of twisting, the contact resistance increases, which can lead to contact failure and heating. IN best case scenario, you will detect this in time and re-seal the connection; in the worst case, a fire may occur.

Electrical wires made of different metals cannot be connected using twisting. As an exception, you can twist copper and aluminum wire, but only if the copper core is first tinned with solder.
In electrical engineering there are concepts of detachable or permanent connection. So twisting does not apply to one or the other. Detachable connection characterized by the fact that its ends can be separated many times. This cannot be fully done in twisting; every time after the next unwinding and twisting of the cores, they will deteriorate. It is also impossible to call twisting a permanent connection, because it does not contain the concepts of strength, reliability and stability necessary for this. This is another disadvantage of the twist connection.
Installation
If for some reason you do not have the opportunity to use other methods of connecting electrical wires, you can use twisting, just do it well. Very often it is used as a temporary option and is subsequently replaced by more in reliable ways switching
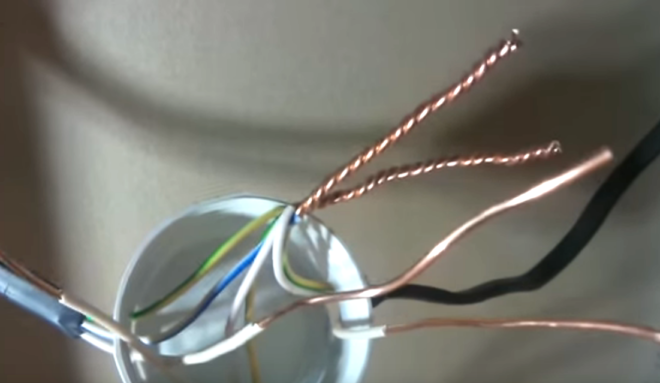
How to connect wires using twist? To begin with, the cores are stripped to 70-80 mm. The main thing is to twist all switched conductors into one single twist at the same time, and not wind one around the other.
Many people mistakenly begin to twist the wires together from the place where they end insulating layer. But it’s better to clamp both wires in this place with one pliers, and grab the ends of the wires with the second and make rotational movements in a clockwise direction.
If the wire cross-section is small, you can twist it by hand. Align the conductors along the cut of the insulation and hold them firmly in this place with your left hand. Bend all switchable ends into one single bend at an angle of 90 degrees (a bend length of 10-15 mm will be enough). Hold this bend with your right hand and rotate clockwise. This must be done firmly and firmly. If it is already difficult to twist your hands at the end, use pliers as described above. As soon as the twist becomes smooth and beautiful, you can trim the bend.
You can connect several wires this way, but then to make it easier to twist them, make the bend longer, somewhere around 20-30 mm.
How to properly twist wires is shown in this video:
There is also a way to twist wires using a screwdriver, see about it here:
For information on twisting wires using a special tool, see here:
Now the resulting twist must be carefully insulated. Electrical tape is used for this. Do not spare it, wind it in several layers, and insulate not only the connection itself, but also step 2-3 cm over the core insulation. Thus, you will ensure the insulating reliability of the twist and protect contact connection from moisture.
You can also insulate the connection of wires using heat pipes. The main thing is not to forget to put the tube on one of the cores to be connected in advance, and then push it into the place where it is twisted. When exposed to heat, the thermal tube shrinks, so slightly heat its edges and it will firmly grip the wire, thereby providing reliable insulation.
If the twist is done well, there is a chance that it will serve you for many years, provided that the load current in the network is normal. But it’s still better not to stop at this stage and strengthen the joint by welding or soldering.
Soldering

Soldering is when electrical wires connected using molten solder. This type of connection is most suitable for copper wires. Although there are now various fluxes for aluminum, experienced electricians prefer to refrain from such soldering. But if necessary, you can use special fluxes and even solder copper and aluminum.
Positive aspects
This type of connection cannot be compared with twisting; soldering is much more reliable (in terms of reliability it is second only to welding).
Soldering can be used to connect stranded and single-core wires, as well as cores of various sections.
This type of connection does not require any maintenance throughout the entire period of operation.
Soldering is considered low in cost, the only equipment you need is a soldering iron, and flux and solder are very inexpensive, and their consumption is quite negligible.
Negatives
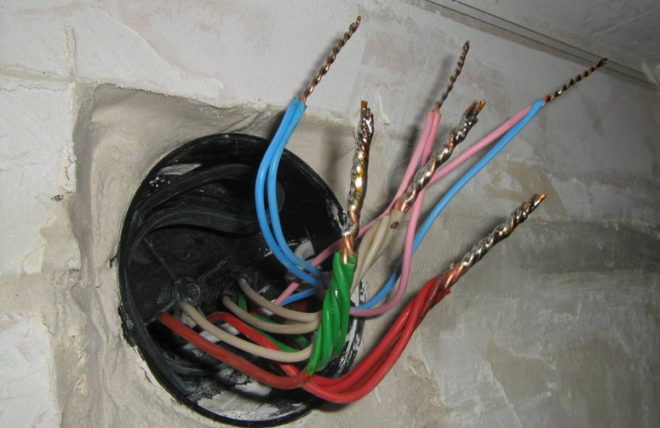
The disadvantages of this method include high labor intensity. Soldering requires certain preparatory work, wire strands must first be tinned before twisting. The surfaces to be soldered must be free of oxides and absolutely clean before starting work.
And of course, you need experience in using a soldering iron, that is, the person who will connect the wires by soldering must have a certain qualification. Indeed, during the soldering process it is very important to maintain the necessary temperature regime. An underheated soldering iron will not heat the connection well; overheating is also unacceptable, because the flux will burn out very quickly, not having time to do its job.
Soldering is a slow process, but this disadvantage is compensated by the reliability of the contact connection.
Installation
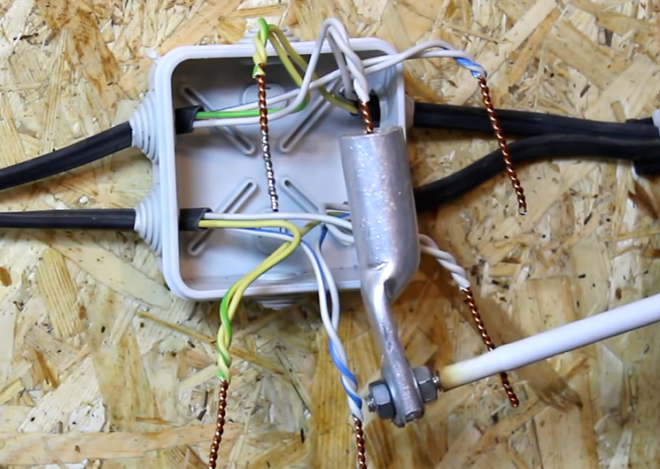
The step-by-step soldering process is as follows:
- Remove the insulation from the cores by 40-50 mm.
- Sand the bare areas of the wires until they shine using sandpaper.
- Dip a heated soldering iron into rosin and move it over the cleaned surfaces several times.
- Perform a twist.
- Bring the soldering iron tip to the solder.
- Now immediately heat the twist with solder, the tin should melt and fill the gaps between the turns.
- Thus, the entire twist is enveloped in tin, after which it is allowed to cool.
- Wipe the hardened solder with alcohol and insulate it.
Soldering wires with a soldering iron is shown in this video:
Soldering wires using a gas soldering iron:
Soldering twists by immersion in molten solder:
Welding
In order for the connection of electrical wires to be as reliable as possible, the considered twisting method must be subsequently secured by welding. It's similar to soldering, only now you use a soldering iron instead of a soldering iron. welding machine.
Positive aspects
This method is most preferable to all others, since it meets all regulatory requirements in terms of reliability and quality.
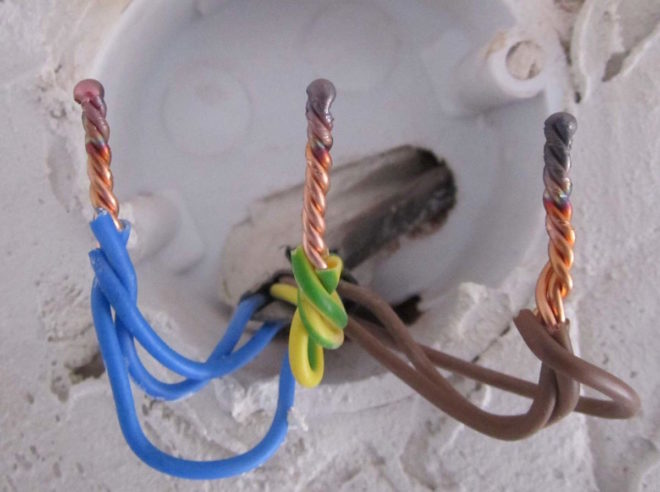
The welding method is based on contact heating of the ends of the wires with a carbon electrode until a ball (contact point) is formed. This ball is obtained as a single unit from the fused ends of all connected cores, which ensures safe and reliable contact; it will not weaken or oxidize over time.
Negatives
The disadvantage of welding is that to carry out such work you need certain knowledge, experience, skills and special devices, you often have to turn to specialists.
Installation
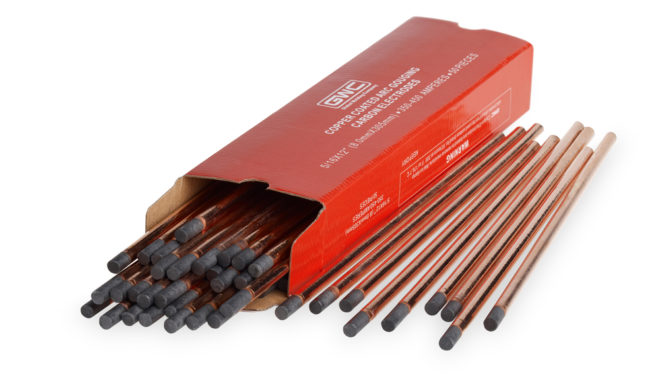
In order to connect wires using welding, you will need the following devices, tools and materials:
- welding inverter with a power of at least 1 kW, its output voltage must be up to 24 V;
- carbon or graphite electrode;
- goggles or eye mask;
- welding leather gloves to protect hands;
- a mechanic's knife or stripper for removing the insulating layer from conductors;
- sandpaper (for cleaning the conductive surfaces to be connected);
- insulating tape for further insulation of the welding joint.
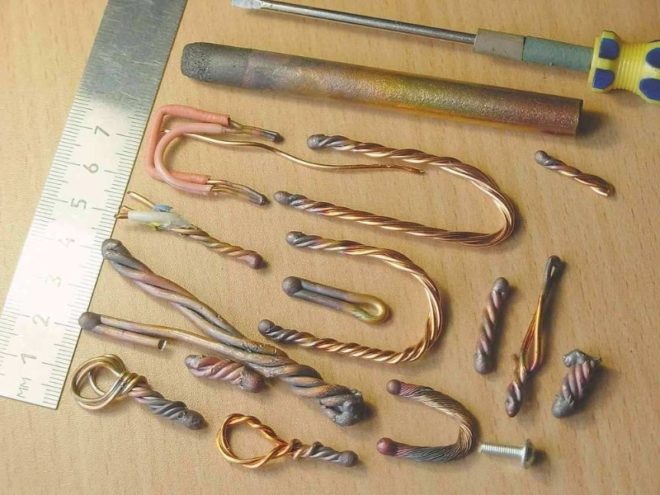
The sequence of work is as follows:
- Remove 60-70 mm of insulation from each wire to be connected.
- Sand the exposed wires until they are shiny using sandpaper.
- Twist, after biting, the length of its ends should be at least 50 mm.
- Attach grounding clamps to the top of the twist.
- To ignite the arc, bring the electrode to the bottom of the twist and lightly touch the connected wires with it. Welding happens very quickly.
- It turns out to be a contact ball, give it time to cool, and then insulate it with tape.
As a result, an almost solid wire is obtained at the end, that is, the contact will have the lowest transition resistance.

If you connect copper wires in this way, then choose a carbon-copper electrode.
I would like to recommend that if you purchase a welding machine (it will be useful not only for connecting wires, but also for many other purposes), then choose the inverter option. With small dimensions, weight and consumption electrical energy, it has a wide range of welding current adjustment and produces stable welding arc. And this is very important to be able to regulate the welding current. If you choose it correctly, the electrode will not stick, and the arc will hold steady.
Watch how welding is done in this video:
We looked at the main types of wire connections. Now let’s briefly talk about methods that are used less frequently, but also guarantee quality and reliability.
Crimping
For this method, special tubular sleeves or lugs are used, with which the wires to be connected are crimped and crimped. The essence of the method is the joint deformation of the sleeve and the cores inserted into it. When deformed, the sleeve contracts and puts pressure on the conductive surfaces. The conductors engage in mutual adhesion, which ensures reliable electrical contact.
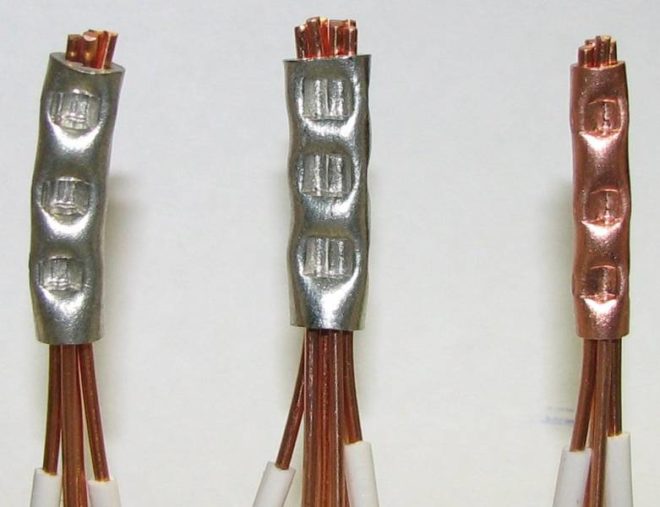
The advantage of such a connection is its reliability, and also the fact that it can be classified as “set and forget”; it does not require maintenance.
But along with positive aspects Crimping also has a number of disadvantages. Firstly, it is required special tool(crimp press or mechanical or hydraulic tongs). Secondly, the quality of the connection directly depends on the correctly selected sleeve (it is selected depending on the number of cores being connected and their cross-section).
Before connecting two wires using crimping, they are not only stripped of insulation, but also lubricated with a special paste. Aluminum is treated with quartz-vaseline paste; it removes the oxide film and prevents it from appearing again. For copper conductors, quartz impurities are not needed; technical petroleum jelly is sufficient. It is needed to reduce friction. Lubrication also minimizes the risk of damage to the cores during deformation.
Next, the cores must be inserted into the sleeve until they mutually stop, and alternate crimping is performed on both sides. The pressed connection point is isolated using insulation tape, varnished fabric or thermal tubes.
How to connect wires with sleeves is shown in these videos:
Bolted connection
Bolts for connecting wires used to be often used, now this method is more characteristic of circuits with increased voltage. The contact is reliable, but the electrical unit connected in this way is too cumbersome. Until recently, large distribution boxes were installed in apartments; at least somehow, such a connection could be placed in them. Modern boxes smaller and not designed for switching wires using this method.

But you definitely need to know about it, because this is one of the ways to solve the eternal problem of connecting conductors made of different metals. The bolt contact is ideal for switching completely incompatible conductors - thin and thick, aluminum and copper, single-core and stranded.
The wire strands must be stripped and the ends twisted into rings. A steel washer is put on the bolt, then rings of wires to be connected are put on (this is the case when they are made of homogeneous metal), then another steel washer follows and everything is tightened with a nut. If aluminum and copper wires are connected, another additional washer must be placed between them.
The advantages of this connection are its simplicity. If necessary, the bolted structure can always be unscrewed. If necessary, you can add more wire strands (as long as the bolt length allows).
The most important thing in this type of connection is to prevent direct contact between copper and aluminum, and do not forget to place an additional washer between them. And then such a switching unit will serve for a long time and reliably.
Modern technologies

In many cases, the methods discussed are gradually becoming a thing of the past. They were replaced by factory wire connectors, which made installation and switching work much easier and faster:
- Terminal blocks, inside of which there are tubular brass sleeves. Stripped wire strands are inserted into these tubes and secured by tightening the screws.
- PPE caps, inside of which there are compression springs. The cores are inserted into the cap and then turned clockwise with little effort, thereby reliably compressing the connected wires inside.
- Self-clamping terminals. It is enough to place the wiring in them, and there it is automatically fixed due to the pressure plate.
- Lever-type terminal blocks. Such connecting element reusable. It is enough just to lift the lever, insert the conductor into the contact hole and lower the lever back, reliable fixation is ensured.
We do not talk in detail about all existing terminal blocks, since there is a separate article about this, where each type of wire clamp is discussed in detail.
We hope that we have clearly explained to you how to connect the wires correctly. Choose the method that suits you best. When choosing, take into account the cross-section and material of the conductors, the location of the connection (outdoors or indoors), and the amount of load current that will flow in this electrical circuit.
Electrical contact depends on the quality and reliability of the wire connection. When installing electrical wiring it is not possible to do without wire connections.
At the connection points, the electrical contacts must satisfy the following basic requirements:
- - reliable contact, without additional resistance. The resistance of the connecting contact should not be more resistance a whole piece of wire;
- - mechanical strength in case of tension. If the wire at the connection points is subject to random stretching, then the strength of the contact should be no less than the strength of the conductor itself.
Wire connection methods
1. Twisted wire connections. Due to its simplicity, the most common method. To do this, just take two wires, remove the insulation (for reliable twisting, at least 5 cm of insulation is removed), then the bare wires are twisted together.
The twisted bare conductors are insulated with conventional insulating PVC tape. In place of the insulating tape, you can use special “twist caps”. Twist caps are screwed onto the connected wires, thereby insulating the exposed parts and additionally pressing the electrical contact.
It is not permissible to connect wires of dissimilar metals by twisting, such as copper and aluminum .
2. Connecting wires by soldering. Using soldering, making connections takes a little longer, but this method is more reliable than conventional twisting.
When twisting contacts, no matter how good it is, the connection points have some resistance and when current flows, the twisted contacts overheat.
The consequences of poor quality twisting are melting of the insulation at the joints, short circuit and fire.
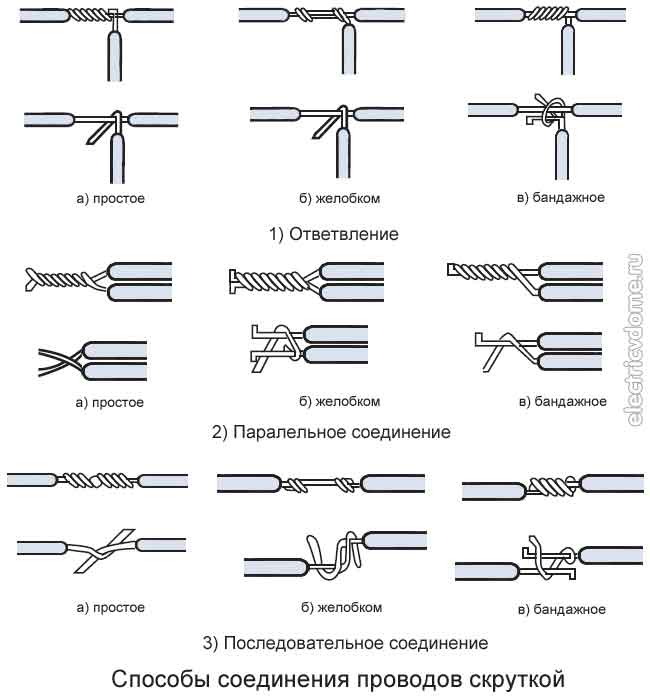
Soldering guarantees reliable electrical contact with low resistance and the necessary mechanical strength. For soldering, ordinary tin-lead solder and rosin are used.
3. Use of terminal blocks. The terminal block itself is an insulating plate with contacts. Using terminal blocks, you can connect copper wires to aluminum wires.
Terminal blocks, based on the method of securing wires in them, are divided into terminal blocks with a tightening screw and terminal blocks with clamping plates.
Terminal blocks in which the wires are pressed with a screw have one drawback. In them, the wire can be damaged by the twist itself when the contact is tightened. This is especially true when connecting aluminum or stranded wires.
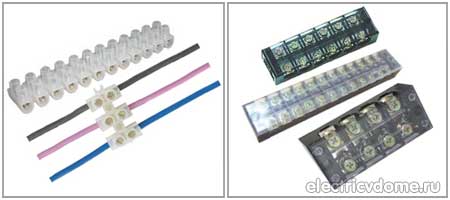
Terminals with pressure plates are more reliable than screw terminals, since when tightened, the wire is pressed against the terminal by the plate.
4. Spring terminals. Probably the fastest and effective way wire connections. To do this, the insulation is removed from the conductive core and inserted into the terminal. They differ from screw ones in that the wires are fixed not with a screw, but with a spring clamp.
Today there are a lot of spring-type clamps, the most common of them are terminal blocks from Wago.
Used to connect both soft stranded and single-core wires of different sections.
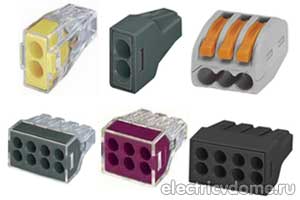
These terminals can also be used to connect copper and aluminum wires. For this purpose, special “Wago” terminal blocks are used. They use contacts made of a bimetallic plate coated with a special paste that prevents oxidation of the wires.
5. Branch compression. Branch clamps, or “nuts” as they are popularly called, are used to connect a line to the main without creating a break in it.
The compression itself consists of three metal plates with screws and an insulating box in which these plates are located. Branch clamp is often used to connect copper and aluminum wires, for example to connect to overhead line made of aluminum.
Connecting copper and aluminum wires at home
If required connection of copper and aluminum wires, and the terminal clamps and blocks are not at hand, you can do without them. Twisting the wires in this case is not a good way out, because sooner or later the place where the copper and aluminum are twisted will oxidize and this will lead to loss of contact.
An effective solution to this problem is to use a regular nut, bolt and washer.
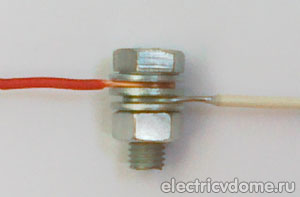
The reliability of this connection is in no way inferior to the terminal blocks described above. The only drawback is the bulkiness (for example, when used in a junction box) and the large amount of PVC insulating tape for reliable insulation.
How to connect wires correctly? A simple question, but not many people know the basic rules for twisting, soldering or welding electrical wires. In the article, we examined in detail the main options for reliable connections. These simple tips will help novice electricians avoid making basic mistakes during installation electrical wiring. At the end of the article there is a material compatibility table.
Twisting is the main type of connection of wires. Another thing is that twisting is not yet a completed connection. In order for the twist to provide reliable contact, it must either be soldered, crimped or scalded. Although, if you need to make a temporary shelter (temporary electrical wiring or lighting), then connecting the wires by simple twisting will be more than sufficient. In housing and communal services, when permanent electrical wiring is done carelessly and without processing the twists, they say it was done in snot.
It is difficult to say how long a wire connection using simple twisting can last. It all depends on operating conditions (temperature, humidity) and loads, i.e. currents that pass through the twist. It could be months, years, tens of years. The reason for the unreliability of this type of connection is oxidation of the wires and, as a result, poor contact. The consequence is that the twist begins to heat up, the insulation on it melts, which becomes the cause short circuit. In addition, poor contact can cause damage to electrical equipment (sparking effect of untreated strands).
Twisting is done using pliers. The ends of the wires are stripped to the same length and aligned. The entire bundle is grabbed with pliers and twisted. There is a limit on the number of wires in a twist. In order for the twist to be reliable and not fall apart, its diameter should not be more than 1 centimeter (with a length of up to 5 centimeters). True, this is my subjective opinion. When installing, I try not to have more than 7 wires with a cross-section of 2.5 sq. mm in one twist, or up to 12 wires with a cross-section of 1.5 sq. mm.
Soldering in electrical installation is the joining of wire strands using solder. In practice, meaning electrical installation work, strands and stranded wires have to be soldered. The soldering of the twists ensures reliable electrical contact of the wires. In addition, the soldered surface is protected from corrosion. In my opinion, this type of connection is the most universal.
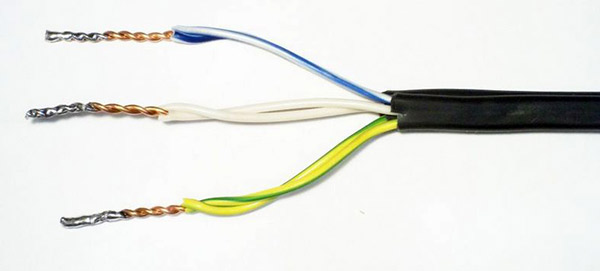
It is also necessary to solder stranded wires when connecting them to a screw terminal. For example, when you connect a plug or socket of an extension cord, it is recommended to solder the ends of the wires. Although in this case you can get by with special tips required diameter. Since we are talking about multi-core wires, I think it would be useful to remind you that for the installation of stationary electrical wiring you need to use wires with solid cores; multi-core wires are not recommended in this case.
For soldering we need a 100 Watt soldering iron and solder with rosin. Turn on the soldering iron, let it warm up for a few minutes, apply it to the soldering area and bring the solder under the tip.
An equally popular method of processing twists is welding. In mass construction, all twists in distribution boxes are welded. The reason for the popularity of this method is its speed and low cost. Welding wires takes significantly less time than soldering. For welding, you will need a transformer with a power of 500 Watts, a voltage of 36 Volts or a welding machine with a carbon electrode.

It is, of course, recommended to use a welding machine - it can be used to set the optimal current for welding. To weld, we apply the ground wire to the twist and touch its edge with a carbon electrode. The twist should be turned end down so that the molten metal hangs on it in a drop. Today, welding wires is one of the requirements of the GPN (State Fire Supervision).
Crimping is the connection of wire cores by crimping the connecting sleeve. The sleeve is crimped using a special tool - press pliers. Crimping sleeves come in a variety of diameters and are made from different materials– copper, aluminum, tinned copper.
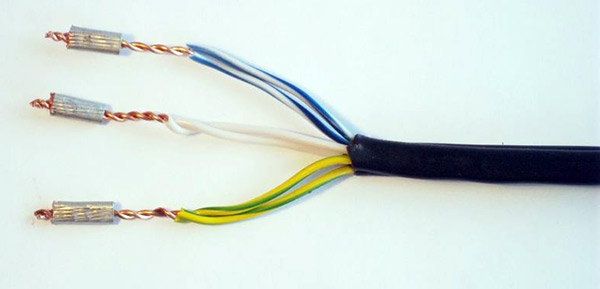
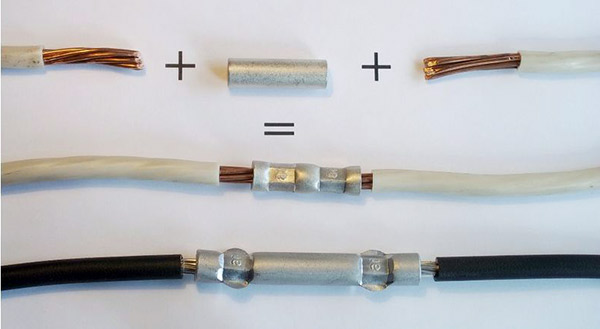
This method is one of the most reliable.
In electrical installation, terminal blocks are used primarily for connecting lamps and various electrical appliances. Terminal blocks are indispensable for repair work.
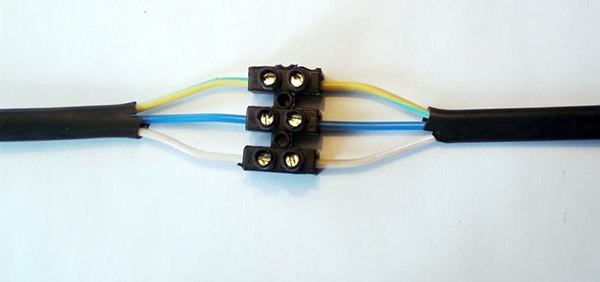
A significant disadvantage of this type of connection is that most terminal blocks sold are of very low quality and, therefore, unreliable. A poor-quality terminal block may burst when tightened (thread), which causes poor contact. The consequences can be very different.
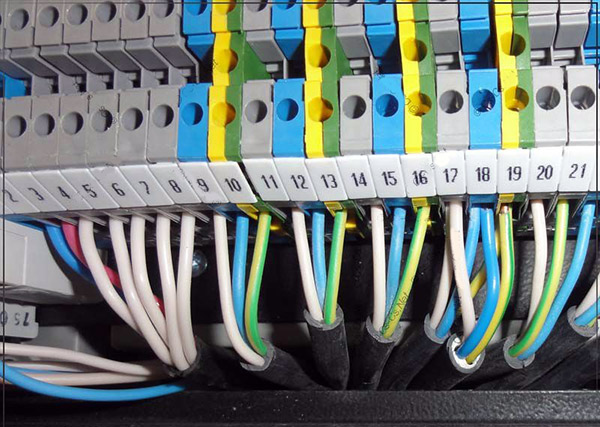
More expensive and more reliable terminal blocks are used in distribution cabinets and boxes.
Bolted connections are rare in practice. However, this type of connection is quite reliable and can withstand high currents.
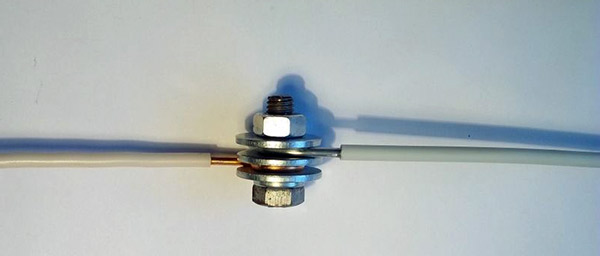
And just in case, it’s worth remembering this method of connecting wires. In this way, you can connect copper and aluminum wires by placing a washer between the wires.
The method of connecting wires using self-clamping terminal blocks is quite popular.
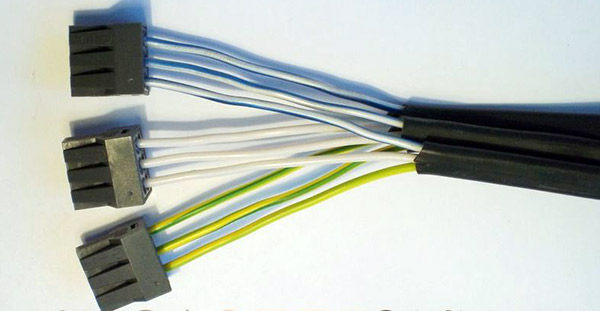
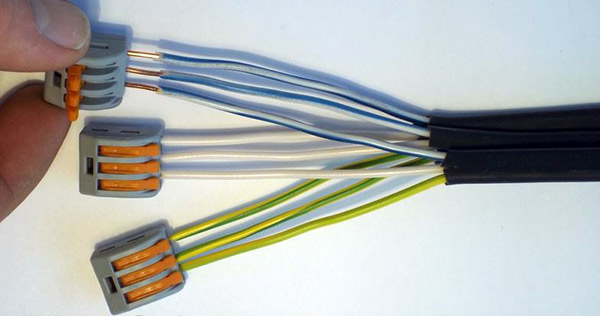
Its main advantage is that no special skills are required, everything is simple to the point of primitiveness. You strip the wire and put it into the self-clamping block. The contact turns out to be quite reliable.
The disadvantage of this type of connection, as in the case of screw blocks, is the limitation on the maximum current. If you plan to use self-clamping blocks in circuits with powerful electrical equipment, I recommend getting to know them technical specifications whether they are suitable for your purposes. Another drawback is that not all self-clamping terminals are suitable for connecting stranded wires.
The most popular are self-clamping pads from Wago. Maximum current for most pads from this company it is more than 32A, this is quite enough for household loads.
The connecting clamp is designed for connections (branches) of cable lines and wires. Moreover, the branch does not require cutting the main conductor. This type of wire connection is used everywhere; it can be seen in almost any entrance electrical panel. As a rule, cable clamps are used to connect (branch) wires with a cross-section of 10 sq mm or more.
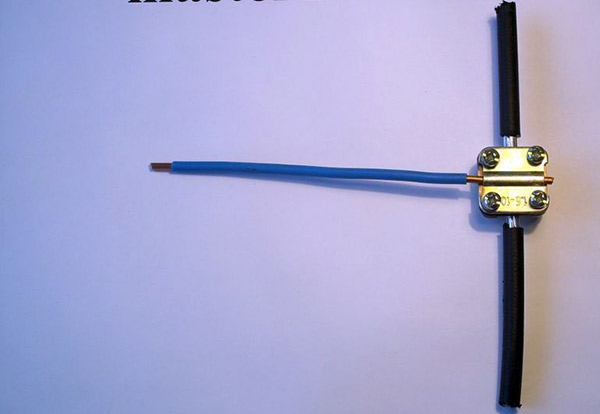
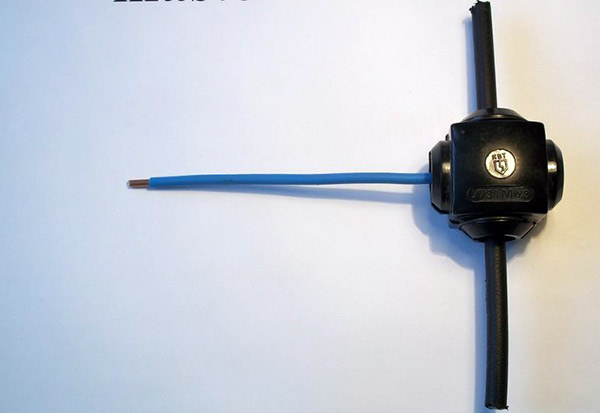
The common people call the cable clamp a nut. So you can hear about the connection through the nut.
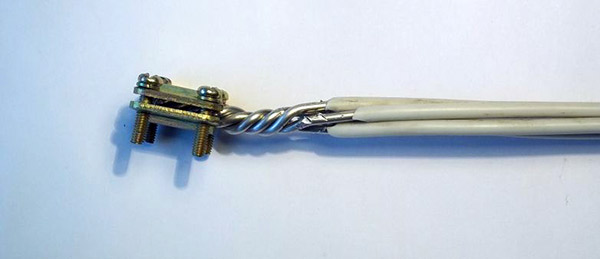
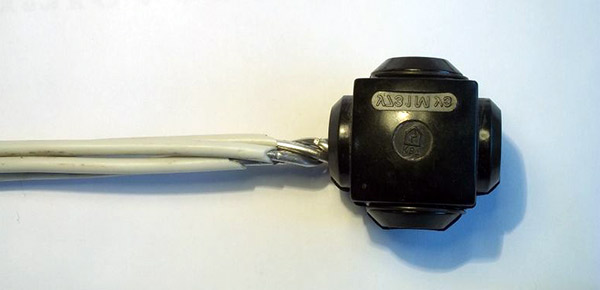
Application practice has proven 100% reliability of this type of connection. In addition to its direct purpose, the cable clamp can be used as a crimp for twisting.
There are as many as two reasons, but they ultimately boil down to one consequence - over time, contact becomes poor. This in turn leads to its heating and all the ensuing consequences.
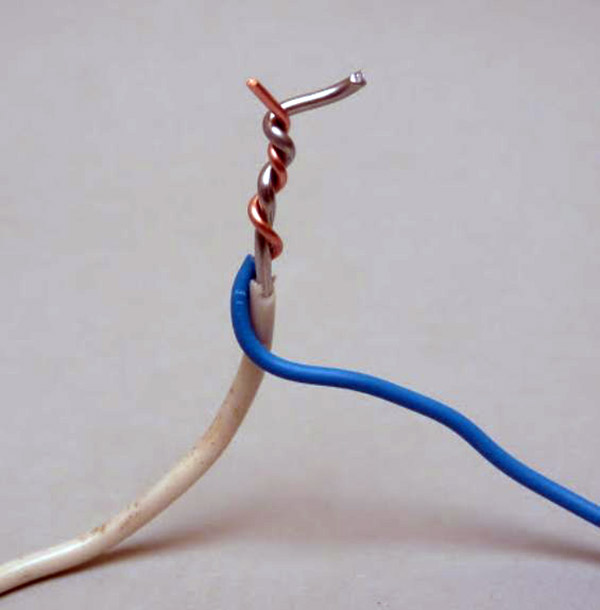
First reason- oxidation of aluminum wire. The oxide layer has a greater resistance than the aluminum itself and this leads to excessive heating of the latter.
Second reason- weakening of contact. As you know, when heated, any body, including a wire, expands. But aluminum is a softer material than copper. And it has less electrical conductivity, which means it heats up more. As a result of many cycles of expansion and contraction, the contact weakens and begins to heat up more and more.
S = (3.14 x D2)/4
Where:
S is the area of the circle (section), and D is the diameter of the conductor.
For a stranded conductor (incorrectly stranded), the cross-section is equal to the cross-section of one wire multiplied by their number.
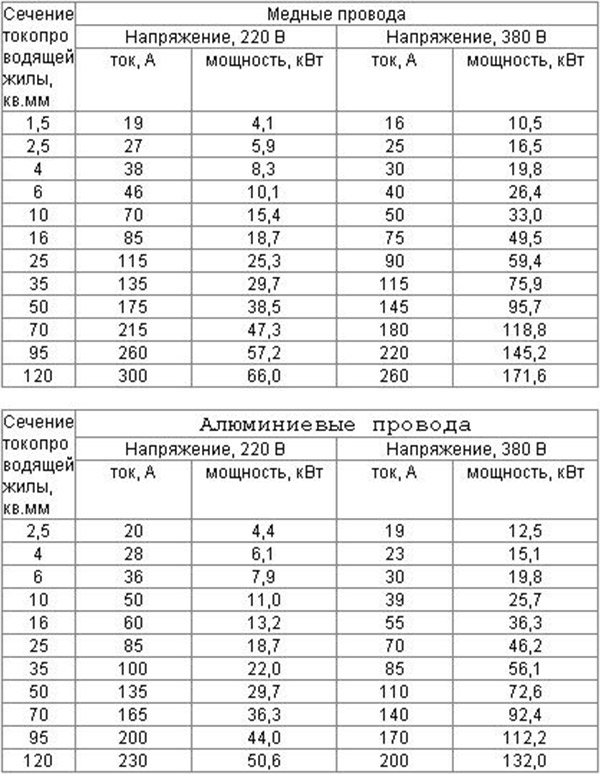
In addition, aluminum and copper are incompatible materials (oxide film, various thermal expansion). But because they form a galvanic couple, which leads to increased corrosion.
Electricity is an area where everything needs to be done correctly and thoroughly. In this regard, many people prefer to figure things out on their own rather than trust strangers. One of key points- connection of wires in distribution box. Firstly, the correct operation of the system, and secondly, safety - electrical and fire safety - depends on the quality of work.
What is a junction box
From electrical panel wires disperse throughout the rooms in a house or apartment. Each room, as a rule, has more than one connection point: there are several sockets and a switch. To standardize the methods of connecting wires and collect them in one place, distribution boxes are used (they are also sometimes called branch boxes or junction boxes). They contain cables from all connected devices, the connection of which occurs inside the hollow housing.
To avoid searching for wiring during the next repair, it is laid along certain rules, which are prescribed in the PUE - Rules for the Construction of Electrical Installations.

One recommendation is to carry out all connections and branch wires in the junction box. Therefore, the wires are run along the top of the wall, at a distance of 15 cm from the ceiling level. Having reached the branch point, the cable is lowered vertically down. A distribution box is installed at the branch point. It is where all the wires are connected according to the required circuit.
According to the type of installation, junction boxes are internal (for hidden installation) and external. Under the internal ones, a hole is made in the wall into which the box is built. With this installation, the cover is flush with the finishing material. Sometimes it is closed during the renovation process. finishing materials. However, such installation is not always possible: the thickness of the walls or finishing does not allow it. Then a box for external mounting is used, which is attached directly to the wall surface.
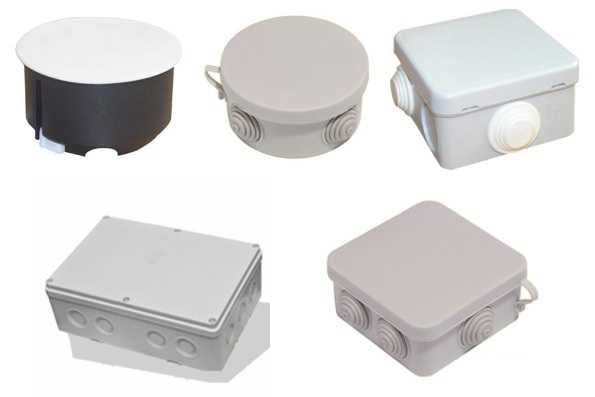
The shape of the junction box can be round or rectangular. There are usually four conclusions, but there may be more. The terminals have threads or fittings to which it is convenient to attach a corrugated hose. After all, it is in the corrugated hose or plastic pipe It is more convenient to lay the wires. In this case, replacing the damaged cable will be very simple. First, disconnect it in the distribution box, then from the consumer (socket or switch), pull it and pull it out. Tighten a new one in its place. If you lay it the old fashioned way - in a groove, which is then covered with plaster - you will have to drill into the wall to replace the cable. So this is the recommendation of the PUE, which is definitely worth listening to.
What do distribution boxes generally provide:
- Increased maintainability of the power supply system. Since all connections are accessible, it is easy to identify the area of damage. If the conductors are laid in cable channels (corrugated hoses or pipes), replacing the damaged section will be easy.
- Most electrical problems arise in the connections, and with this installation option they can be inspected periodically.
- Installing junction boxes increases the level fire safety: everything is potential dangerous places are located in certain places.
- Requires less money and labor than laying cables to each outlet.
Wire connection methods
Conductors can be connected in the box in different ways. Some of them are more difficult to implement, others are easier, but if implemented correctly, they all provide the required reliability.
Twist
Most popular with craftsmen way, but the most unreliable. It is not recommended by the PUE for use, as it does not provide proper contact, which can lead to overheating and a fire. This method can be used as a temporary method, for example, to check functionality assembled circuit, with mandatory subsequent replacement with a more reliable one.
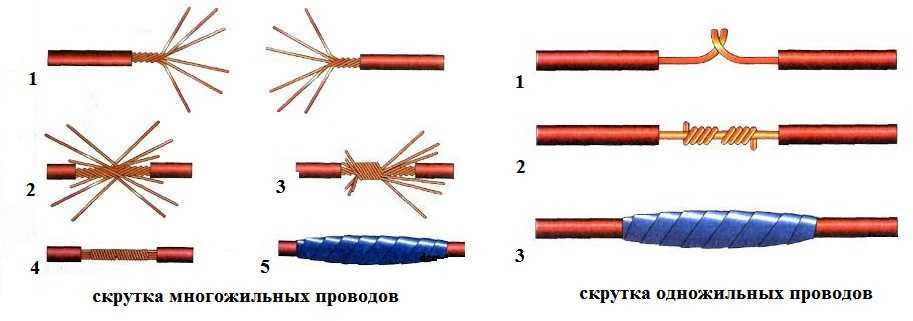
Even if the connection is temporary, everything must be done according to the rules. The methods for twisting stranded and single-core conductors are similar, but have some differences.
When twisting stranded wires, the procedure is as follows:
- the insulation is stripped to 4 cm;
- the conductors unwind by 2 cm (item 1 in the photo);
- connect to the junction of untwisted conductors (pos. 2);
- the veins are twisted with your fingers (position 3);
- the twist is tightened with pliers or pliers (pos. 4 in the photo);
- insulated (insulating tape or heat-shrinkable tubing placed before the connection).
Connecting wires in a distribution box with one core using twisting is easier. The conductors, stripped of insulation, are crossed and twisted with fingers along their entire length. Then take a tool (pliers and pliers, for example). In one, the conductors are clamped near the insulation, in the second, the conductors are intensively twisted, increasing the number of turns. The connection point is isolated.
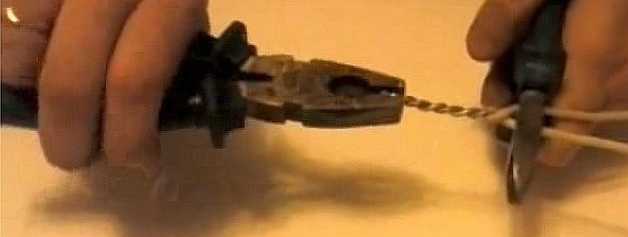
Twist with pliers or pliers
Twist with mounting caps
Twisting is even easier using special caps. With their use, the connection is more reliably insulated and the contact is better. The outer part of such a cap is cast from flame retardant plastic; a metal conical part with a thread is inserted inside. This insert provides a larger contact surface, improving electrical characteristics connections. This great way connect two (or more) wires without soldering.
Twisting wires using caps is even simpler: 2 cm of insulation is removed, the wires are slightly twisted. A cap is put on them and turned with force several times until the metal is inside the cap. That's it, the connection is ready.
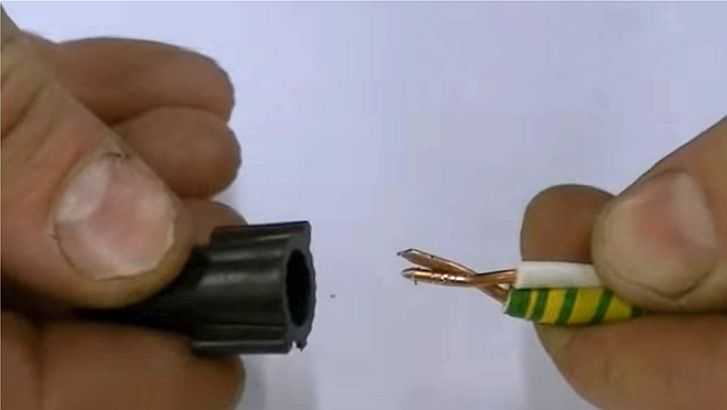
Caps are selected depending on the cross-section and number of conductors that need to be connected. This method is more convenient: it takes up less space than conventional twisting, and everything fits more compactly.
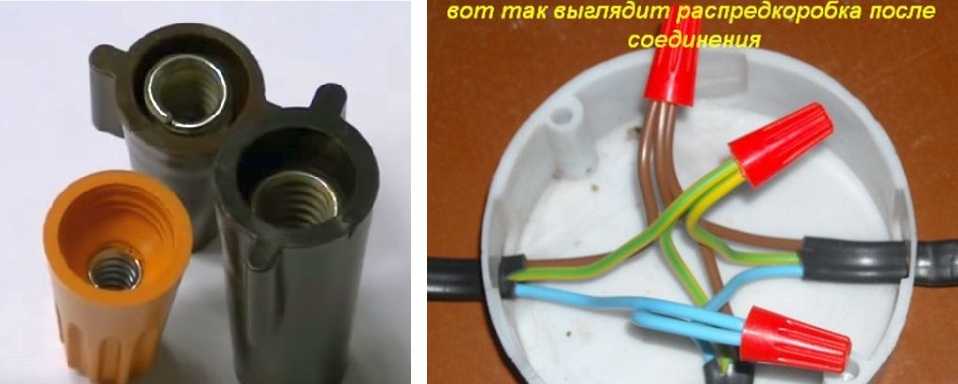
Soldering
If you have a soldering iron in the house and you know how to handle it at least a little, it is better to use soldering. Before twisting, the wires are tinned: a layer of rosin or soldering flux is applied. The heated soldering iron is dipped into rosin and passed several times over the part that has been stripped of insulation. A characteristic reddish coating appears on it.
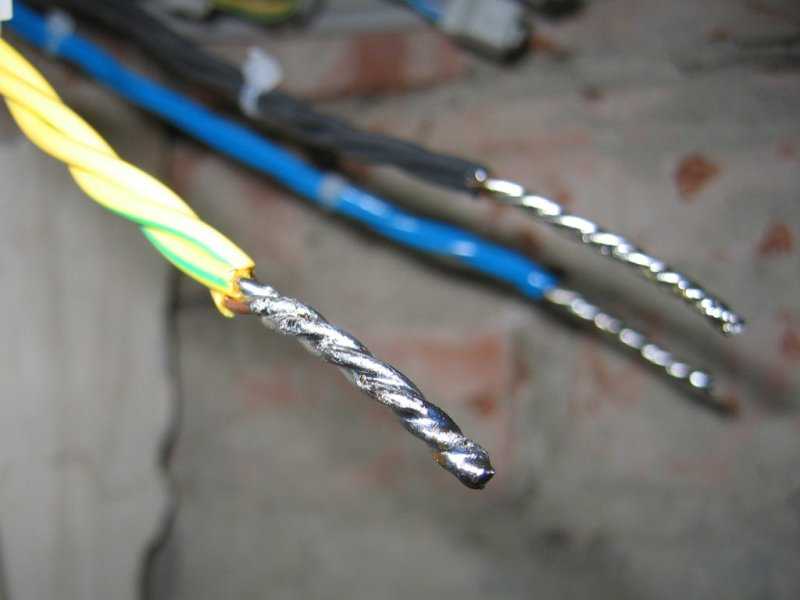
After this, the wires are twisted as described above (twisting), then they take the tin on a soldering iron, heat the twist until the molten tin begins to flow between the turns, enveloping the connection and ensuring good contact.
Installers do not like this method: it takes a lot of time, but if you are connecting the wires in the junction box for yourself, spare no time and effort, but you will sleep peacefully.
Welding wires
If available, you can use a welded connection. This is done on top of the twist. Set the welding current on the machine:
- for a cross section of 1.5 mm 2 about 30 A,
- for a cross section of 2.5 mm 2 - 50 A.
The electrode used is graphite (this is for welding copper). Using grounding pliers, we carefully cling to top part twist, we bring the electrode to it from below, briefly touch it, achieving ignition of the arc, and remove it. Welding occurs in a fraction of a second. After cooling, the joint is insulated. Watch the video for the process of welding wires in a junction box.
Terminal blocks
Another connection of wires in the distribution box is using terminal blocks - terminal blocks, as they are also called. Eat different types pads: with clamps and screw ones, but, in general, the principle of their design is the same. There is a copper sleeve/plate and a wire fastening system. They are designed so that by inserting into right place two/three/four conductors, you connect them securely. The installation is very simple.
Screw terminal blocks have a plastic housing in which the contact plate is fixed. They are of two types: with hidden contacts (new) and with open contacts (old style). In any of them, a conductor stripped of insulation (length up to 1 cm) is inserted into the socket and clamped with a screw and a screwdriver.
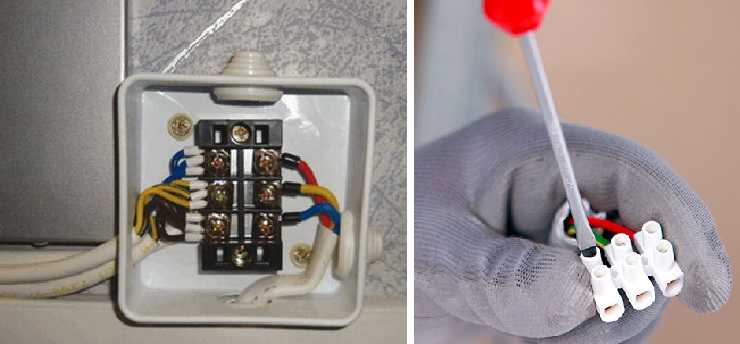
Their disadvantage is that it is not very convenient to connect them large number wires The contacts are arranged in pairs, and if you need to connect three or more wires, you have to squeeze two wires into one socket, which is difficult. But they can be used in branches with significant current consumption.
Another type of block is Vago terminal blocks. These are the pads for quick installation. There are mainly two types used:
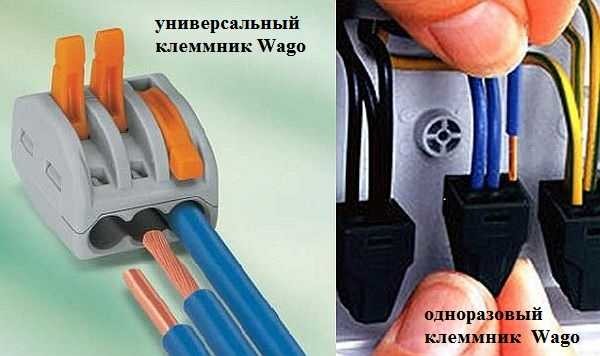
The peculiarity of these terminal blocks is that they can only be used at low currents: up to 24 A at cross-section copper wire 1.5 mm, and up to 32 A with a cross section of 2.5 mm. When connecting loads with high current consumption, the wires in the junction box must be connected in a different way.
Crimping
This method is possible if there is special pliers And metal sleeve. A sleeve is put on the twist, it is inserted into the pliers and clamped - crimped. This method is just suitable for lines with a large ampere load (such as welding or soldering). Watch the video for details. It even contains a model of a distribution box so it will be useful.
Basic wiring diagrams
Knowing how to connect the wires in the junction box is not everything. You need to figure out which wires to connect.
How to connect sockets
As a rule, the socket group runs on a separate line. In this case, everything is clear: you have three cables in the box, each with three (or two) conductors. The color may be the same as in the photo. In this case, usually brown is the phase wire, blue is neutral (neutral), and yellow-green is ground.
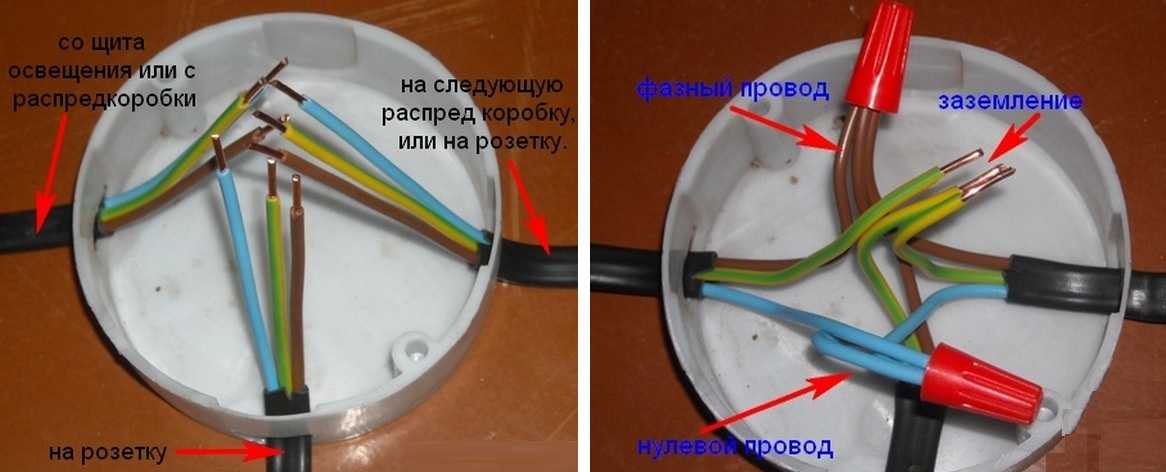
In another standard, the colors may be red, black and blue. In this case, the phase is red, blue is neutral, green is ground. In any case, the wires are collected by color: all of the same color in one group.
Then they are folded, stretched, and trimmed so that they are the same length. Do not cut short, leave a margin of at least 10 cm so that if necessary you can re-seal the connection. Then the conductors are connected using the chosen method.
If only two wires are used (in houses old building no grounding), everything is exactly the same, only there are two connections: phase and neutral. By the way, if the wires are the same color, first find the phase (with a probe or multimeter) and mark it, at least by wrapping a piece of electrical tape around the insulation.
Connecting a single-key switch
If there is a switch, the matter is more complicated. There are also three groups, but their connection is different. Eat
- input - from another junction box or from a panel;
- from the chandelier;
- from the switch.
How should the circuit work? Power - “phase” - goes to the switch key. From its output it is fed to the chandelier. In this case, the chandelier will light only when the switch contacts are closed (the “on” position). This type of connection is shown in the photo below.
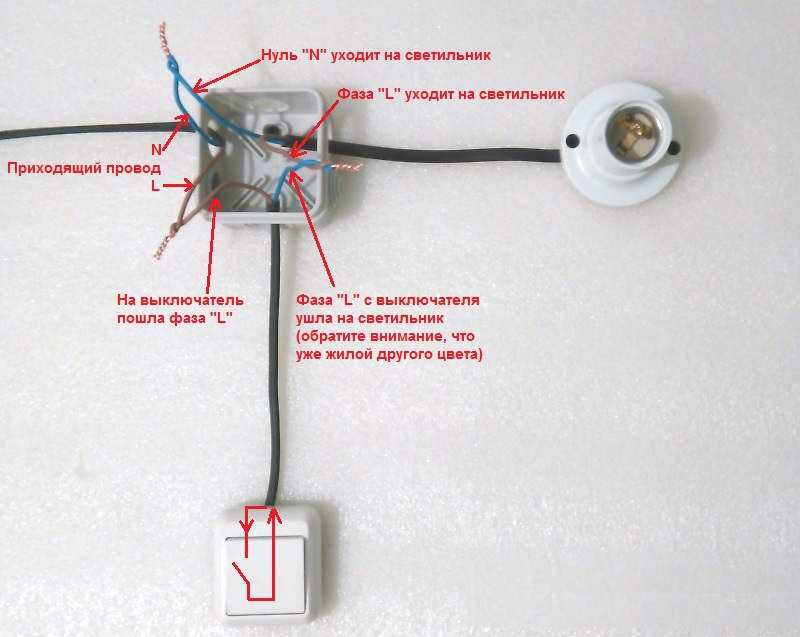
If you look carefully, this is what happens: the phase with a light wire goes to the switch. Leaves another contact, but already blue (don’t confuse it) and connects to phase wire which goes to the chandelier. Neutral (blue) and ground (if network) are twisted directly.
Connecting a two-gang switch
Connecting wires in a junction box with a two-key switch is a little more complicated. The peculiarity of this circuit is that a three-core cable must be laid to the switch for two groups of lamps (in a circuit without grounding). One wire is connected to the common contact of the switch, the other two to the key outputs. In this case, it is necessary to remember what color the conductor is connected to the common contact.
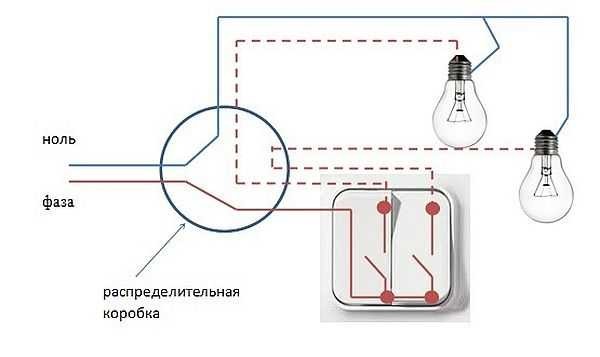
In this case, the phase that has arrived is connected to the common contact of the switch. Blue wires(neutral) from the input and two lamps simply twists all three together. There are wires left - phase wires from the lamps and two wires from the switch. So we connect them in pairs: one wire from the switch to the phase of one lamp, the second output to the other lamp.
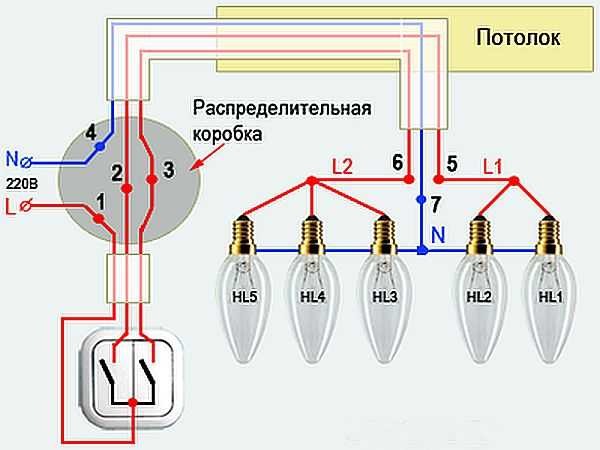
Once again about connecting wires in a junction box with a two-button switch in video format.
In this article I will talk about the most common methods connecting wires in the apartment . These methods are simple, reliable and have stood the test of time. Remember that all wires must be de-energized before connecting.
Connecting wires by soldering
Stranded wires, which are used in various household carriers and extension cords, are most easily soldered using a soldering iron. If you need to increase stranded wire, this method is also very suitable for reliable connection. For example, did you decide to rearrange computer desk to another corner of the room where there is no outlet. But the extension cord turned out to be short, and treacherously does not reach a couple of meters from the computer. In this case, having pieces of wires of the required length available, you can build an extension cord.
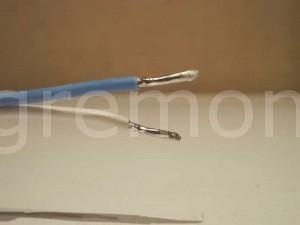
It's done like this. Trimming wires to required sizes and strip them of insulation so that one end is slightly longer than the other. This is necessary for better isolation of the connection points. The insulation must be removed carefully, without damaging any core. Use a very sharp knife or special stripping tool.
Turn on the soldering iron and let it heat up. The soldering iron tip must be clean. Dip the tip into the solder until a small drop forms at the tip. Using soldering acid, treat the ends of the wires and touch them to the heated solder on the soldering iron. The solder will immediately begin to envelop the wire in a thin layer. This process is called tinning. Having tinned the ends of all the wires in this way, place the parts to be connected on top of each other and heat them with a soldering iron. As soon as you notice that the solder has melted, remove the soldering iron and allow the soldering area to cool. This will take 2-3 seconds, depending on the power of the soldering iron. I used a 50 W soldering iron.
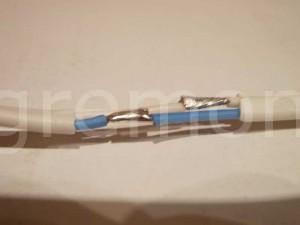
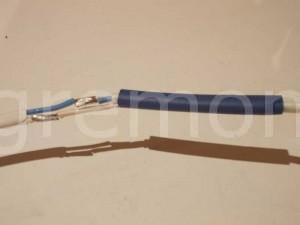
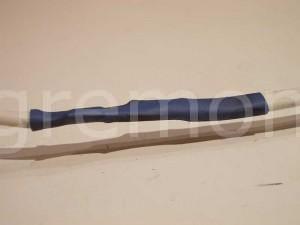
To insulate the place where the wires are soldered, you can use electrical tape or special heat shrink tubing. The tube must be put on the wire in advance, even before connecting the wires. After soldering, the tube must be moved to the connected ends and slightly heated with a lighter flame. The tube will “sit” tightly and crimp the wire.
![]()
Connecting wires using terminal blocks
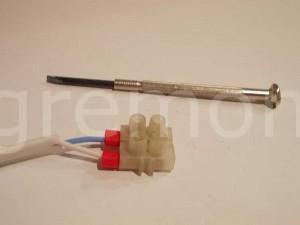
Terminal blocks are well known to everyone and are often included with purchased chandeliers, wall lamps or built-in fans. The wires in them are firmly clamped using screws and a screwdriver of a suitable size. You need to remove the insulation from the ends of the wires, exactly as much as the wire will fit into the terminal. Do not over-tighten the screws. This can crush the wire or strip the screw thread. In both cases, compound will quickly cease to be " connection «.
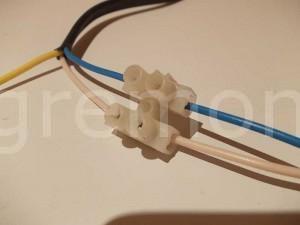

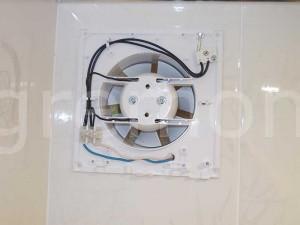
It is better to tin the stranded wire with a soldering iron before connecting it to the terminals. The wire will become stiffer and will be securely fixed with a screw.
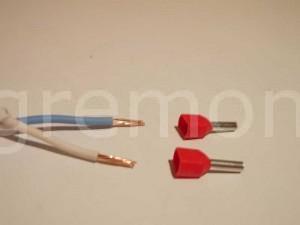
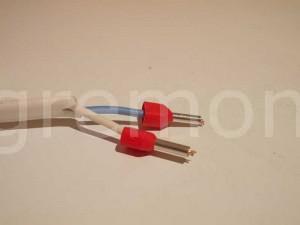
Another way to securely fix stranded wire in terminal blocks is to use special lugs. The wire must be inserted into the hole, as in the picture, and lightly crimped with pliers. After which, the tips are firmly clamped with a screw in the terminals.
Connecting wires using WAGO terminals
These terminals make it very convenient and quick connect the wires no screwdriver, soldering iron or pliers required. It is enough to insert the stripped ends of the wires into the holes with a little effort and the terminals will securely fix them. You are unlikely to be able to take the wires back out. It will take a lot of force and you will most likely damage the clamp in the process. Therefore, be careful not to mix up the wires before connecting.
