In spring, tulips are among the first to bloom in garden plots. Their multi-colored heads, similar to an inverted bell, do not please the eye for too long, as we would like. In their homeland, Central Asia, they have long noticed the similarity of the flower’s shape with an oriental headdress - a turban. This is where the name came from, albeit slightly modified.
Many people want to have this beautiful thing in their garden, but capricious plant. What are the planting and care of tulips in open ground, how to preserve their bulbs in winter - the answers to the questions will be discussed in the article.
Description of the plant
The tulip belongs to the genus of bulbous plants, the Liliaceae family. They thrive in the hot and mountainous regions of Central Asia, in the steppes and on sandy soil. Wild flowers still exist in southern regions Kazakhstan and Eastern Europe. But the most different species grow in India, Iran and Turkey.
It is a herbaceous plant with a short growing season. The structure of a tulip has the following points:

It should be noted that tulip flowers open well in the sun, and in cloudy weather and at night the buds close.
Growing tulips - planting and caring for the garden. Video:
Types and varieties of tulips
Modern classification divides all types of tulips and their numerous hybrids into 4 groups according to their flowering period. Each group should be considered in detail - this will help in choosing a variety.

Early tulips
IN this group 2 classes included:
Simple early tulips– medium-sized bulbs and stems up to 30 cm. They bloom from the end of March. The most famous variety is considered to be Duke van Tol - a low stem, about 15-20 cm, red petals with a yellow edging. 
Terry tulips– the stems are low – 20-25 cm, similar to the previous ones in description, but the petals are double, and open form the flower reaches 8 cm. Monte Carlo is included in this class. A flower with large, up to 10 cm, double buds of delicate yellow tone. Stem – up to 20 cm. 
Mid-early tulips
The presented group also includes two classes:
Triumph - bloom from April to the first half of May. The stem is strong and long - from 40 to 70 cm. The flowers are huge, goblet-shaped. The class is represented by the Blenda Flame variety - it has milky petals with pink feathers. Plant height is from 40 to 60 cm. 
Darwinian hybrids– the stem is tall – from 60 – 80 cm, the buds are large, cup-shaped, 20 cm in size. Represents it Blushing Apeldoorn. The height is no longer than 65 cm, and the bud is 4 cm in diameter. The color of the petals is orange-yellow. 
Late varieties of tulips
This group includes 6 classes:
- Simple late tulips– flowering from May to the first half of June. The height of the peduncle reaches up to 75 cm. The flowers have different colors, and their shape differs from the others in that they have a square base with rounded corners.

- Liliaceae - the shape of the flowers is pointed, elongated and curved petals. The stem is 50-60 cm high.

- Fringed - the petals have a delicate fringe along the edges. The buds look like lily flowers or are shaped like a glass. The stem grows up to 80 cm.

- Green-flowered– there are green blotches on the petals. The height of the bush is only 40-60 cm. The buds are cup-shaped.

- Parrot - the buds have multi-colored wavy petals with bright green spots. The diameter of the open flower reaches 20 cm, and the stems are 40-65 cm.

- Terry late– they are called peony tulips. Peduncles can grow up to 60 cm. The flowers are similar to peonies and have a single or two-color color.

Other types of tulips
This group includes 3 classes:
Kaufman tulips– bloom from the end of March. He has decorative leaves with burgundy stripes. The stems are low - from 8 to 30 cm. The buds are bowl-shaped, and when expanded they look like a star. Painted in one or two tones. 
Foster's Tulips– short stem and huge bud – up to 18 cm, in the form of a double bowl. They have succulent leaves with purple streaks. Flowering occurs in early April. 
Greig's tulips - leaves are painted with patterns in the form of strokes and spots of green. The buds have elongated petals, painted in red-orange-beige tones. The stem is low - no higher than 30 cm. 
Types and varieties of this beautiful flower huge amount. You should choose those flowers that take root well in your climatic conditions.
How do tulips propagate?
Usually plant propagation gardeners carry out daughter bulbs and children. Flowers are propagated by seeds only by breeders. In order for the bulbs to be well preserved, they must be properly stored and prepared for planting. When planting bulbs in the fall, already in July it is necessary to carefully separate the daughter bulb from the common root. Then it must be cleaned of dirt and air dried and stored until autumn.
How to store tulip bulbs? For a month, the bulbs should be in a place where the temperature does not exceed 20 degrees. Then they need to be stored in a place where the temperature is about 12 degrees.
If it was not possible to plant tulips in the fall, it is not too late to do this in the spring, and keep the bulbs in the refrigerator in the vegetable department until planting.
When to plant tulips in the fall?
Flower bulbs are planted in flower beds in the fall - they have time to take root and die until spring. With the arrival of warmer weather, tulips actively grow and bloom.
It takes 3-4 weeks for the bulbs to take root before frost arrives. The rooting process occurs best at a temperature of 4-6 degrees Celsius and high air humidity.
Planting dates vary depending on climate and weather conditions of this area. Typically, tulips are planted from late September to mid-October. You cannot plant tulips too early, otherwise they will begin to sprout, and in winter the sprouts will certainly freeze. But you shouldn’t be late with this either - the bulbs will not have time to take root, and in the spring they will bloom late and produce small bulbs.
Planting tulips
Planting tulips in the ground in the fall requires soil preparation and processing of planting material. Tulips love flat, sunny places, without wind or drafts.
No holes are allowed on the site, because the accumulation of water in them leads to the death of the bulbs - in the summer they can get wet and rot, or freeze in the winter. A lack of light makes the stems crooked and the buds dim. The soil cannot be acidic - in this case the buds will not open.
Long before planting the bulbs, the soil should be dug up and fed with rotted manure, compost, ash and organic fertilizers - potassium nitrate or double superphosphate. It is necessary to feed the soil 2 months before planting, otherwise problems will arise. fungal diseases. If you don’t know the proportions of fertilizers, you can buy ready-made fertilizers for bulbous plants.
Bulbs should be prepared before planting. First, they need to be inspected and discarded if they are sick or damaged. Even one infected bulb can infect neighboring shoots and soil.

Then planting material it is required to etch with a 0.5% solution of potassium permanganate, holding it in it for about an hour. You can treat them with a growth stimulator, dry the bulbs in the air and you can start planting.
Growing tulips in open ground involves planting the bulbs in a prepared flower bed to a depth equal to two to three bulb diameters. If they are large, then they need to be planted at a distance of 10 cm from each other; for small ones, 6-8 cm is enough. To plant a bulb, you need to make a small hole for this; you cannot press on it, as you can damage the delicate root cushion.
Cover the planted bulbs with soil. Before frost, lay straw, fallen leaves or peat on top. If they're coming severe frosts, cover the flowerbed with film. Saved sprouts will produce strong and healthy plants with lush flowers.
Planting tulip bulbs. Video:
Caring for tulips
They need to be looked after immediately after germination. It is necessary to dig up and destroy the bulbs that have not sprouted so that they do not infect others.
The plant loves moisture, so they need to be watered regularly. Before flowering, they need to be watered quite generously, but do not allow the leaves to become wet.
It is better to start feeding immediately after germination and it is better to use liquid fertilizers, pouring the solution directly under the root. Fertilizer is selected from nitrogen, phosphorus and potassium in a ratio of 2:2:1. At the beginning of the formation of buds, you should feed the flowers a second time, but the fertilizer should be in a ratio of 1: 2: 2.
It is necessary to constantly loosen the soil and remove weeds. It is better to do this after watering, when the ground is soft and the weeds are easily pulled out. Loosening the soil helps retain moisture and get rid of weeds.
What to do with tulips after flowering?
Withered buds should be removed so that the plant does not waste energy on producing seeds - you do not need them. Let it spend its energy growing bulbs.
Replanting tulips is required to ensure that the plant is healthy and does not degenerate into wild flower. Only selective tulip crops can be grown in one place, and then only for 3-4 years in a row. Then they need to be dug up and replanted in new soil.
Caring for tulips after flowering should continue for another 2-3 weeks. To begin with, cut off faded buds and leaves with yellowness so that they do not spoil appearance and did not lead to rotting of the entire plant.
In addition, the bulbs receive nutrients and solar energy through their leaves. It is important to know for sure whether tulips need to be trimmed after flowering? You definitely need to do this, but not at the root, but let the seed bulbs ripen. The plant needs to be watered and fertilized regularly.
This will make the plant look great next spring. After the buds wither, you only need to feed them once with mineral fertilizers for bulbous plants with a phosphorus-potassium composition.
When to dig up tulips after flowering?
After flowering has completed and the plant has been cared for for 2-3 weeks, the bulbs must be dug up and stored until autumn planting. Digging time bulbs depend on the variety of tulips and their flowering time. This usually occurs from mid to late July. You can dig up the bulbs if the tulip leaves have all become yellow and brittle, and the stem is flexible and elastic.
Protective brown scales of the bulb are visible around the stem. You can dig up the bulbs on a sunny, dry day; the soil should be dry, so stop watering the plants a week before. Bulbs removed from the soil must be dried before being sent for storage.
Many gardeners are interested in the question: Do they need to dig up tulips every year, since they are perennial flowers?
Pay attention to this material -
If the tulips are valuable varieties, then this must be done; only in this case can the uniqueness of the variety be preserved. If they are left in the ground with other varieties, they may degenerate.
It is imperative to replant parrot varieties, fringed and green-colored, every year. And simple varieties like Triumph and Foster do not need to be removed from the ground every year, but rather every 5 years. If the bulbs are not selected from the soil, they will gradually become buried and not all of them will be able to emerge from it in the spring.
Tulip diseases and their treatment
The tulips are amazing infectious diseases . Fungal, viral and non-infectious damage - results improper care. The most dangerous are infectious lesions, among which are:

Growing tulips, planting and caring for which in the open ground in autumn has its own characteristics, will delight gardeners with a variety of lush, bright buds only if all the rules of agricultural technology for this flower crop are observed. During the growing season (March-June), tulips form new bulbs, the quality of which depends on the composition of the soil, the prevention of flower damage by diseases, and storage conditions seed material, timeliness of planting and digging.
The place for it should be level, well lit by the sun, and not blown by cold winds. It is desirable that there are no depressions on the site that contribute to stagnation of water, and there is some slope to drain its excess, since if there is excess moisture the bulbs get wet, become rotten, and can freeze out in winter.
If the groundwater level is high (on clay soil - up to 40 cm, on sandy soil - up to 100 cm), it is necessary to construct a drainage system. Tulips – unpretentious plants, growing in any soil, but to obtain more intense flowering, powerful stems and large buds, the soil must contain required quantity nutrients, moisture and good air permeability.
Loam and clay soil tend to cake into dense blocks that do not allow oxygen to reach plant roots. To improve their composition and structure, add sand, rotted manure, compost, and peat. Sandy soil is also unsuitable for planting tulips: moisture passes through it, practically without being retained, and the nutrients contained in the soil leave along with the water.

The addition of organic fertilizers and clay will make this type of soil less permeable. Tulips growing on sandy soil need to be watered and fed regularly. Optimal value Soil pH – 7…8 (from neutral to slightly alkaline reaction). In tulips growing on acidic soil, the number of unopened, underdeveloped buds increases.
Adding slaked lime, chalk, etc. to the soil will help neutralize acidity. dolomite flour, a less pronounced effect will be achieved by using wood ash. When adding peat, it should be taken into account that it increases the acidity of the soil. Neutralization of pH is recommended during soil preparation, carried out 1 or 2 months before planting the bulbs.
Layer fertile soil, enriched with nutrients and providing the roots with a sufficient amount of moisture and air, should be 50 cm. The soil should be dug to a depth of 30 cm or more. It is necessary to change the place where tulips are planted, returning to the previous site after 4 or more years. Flower beds in which bulbs previously grew, which are affected by the same pests and diseases as tulips, are not suitable for growing this flower crop.
In the spring, missing warmth and flowers, we greet bulbous primroses with special tenderness and joy. The largest of...
Autumn planting of tulips
Planting material must first be prepared by carefully sorting out the bulbs, removing those affected by the disease and those that differ in appearance from others. This precaution will help protect the remaining specimens from infection. Before planting, or even better, before storing, it is advisable to sort the bulbs by diameter. This will make it easier to care for growing tulips in the future, as well as dig them up.

An important stage in preparing the material for planting is etching - soaking for 30-60 minutes in a 0.5% potassium permanganate solution. Pickled bulbs should be planted in the ground without delay, because due to the absorption of moisture they send out young roots, and if they are accidentally broken off, new ones will not grow. Instead of potassium permanganate, you can use the drug "Maxim".
Many novice gardeners are interested in the question: when is the best time to replant tulips in the fall? Define best period for transplanting or planting, you can measure the soil temperature - at a distance of 10...12 cm from the surface of the earth it should drop to 10 ° C.
When to plant tulips in the fall in the Moscow region: as a rule, this operation is carried out from the last days of September to the end of the first ten days of October. The bulbs must be transplanted in time so that they have time to take root before the onset of cold weather. Approximate dates rooting of plants is 20-30 days.


Late planting leads to poor growth of tulips as a result of poor development of roots, stem and bud. They get sick more often and begin to bloom later. A flower planted too early will quickly take root, germinate and fall under the adverse effects of winter frosts.
Planting rules and benefits of soil mulching
The video tells and shows how to plant tulips correctly. Larger bulbs (extra and 1st varieties) should be planted at a distance of 8-10 cm from each other in a row with a row spacing of approximately 20-25 cm. When positioned with the bottom down, the sprouts will sprout a little earlier, and flowering will occur at a faster rate. short terms. They are buried, like all bulbous ones, to a depth equal to the height of three bulbs on light soil and two on heavy soil.
Planting to a depth of more than 20 cm results in fewer babies that are smaller in size and more difficult to dig out. Tulips with small bulbs can be planted more densely, without gaps, since, having a smaller supply of nutrients, they germinate less well (only 60-70% of the total) and are less viable. The rows should be two-line, the size of the intervals separating the lines is 5 cm, the rows are 15 cm.
 To make digging easier, it is possible to plant children in groups of 8-10 pieces. In the winter, after the arrival of stable frosts, the surface of the earth is mulched with compost, leaves, peat or straw to a height of 5–8 cm. In the spring, after the snowdrifts have melted, mulch in the form of leaves or straw should be removed from the site.
The use of mulch has a positive effect on wintering plants:
- with a small thickness of snow cover, it protects the bulbs from the effects of negative temperatures;
- increases productivity, increases the strength of peduncles and the size of flowers;
- prevents cracking of the ground, which can damage the roots of tulips;
- increases the rate of soil thawing with the arrival of spring;
- improves moisture retention in the soil;
- impairs the germination and development of weeds.
Rules of care
Caring for tulips involves the following activities:
- Phytosanitary cleaning of plantings. With the appearance of sprouts early spring Diseased and ungerminated plants should be identified, dug up and destroyed to prevent infection of other tulips. In the future, such examinations should be regular, especially during flowering, when the color of the bud can determine whether the flower is damaged by a viral disease.
- Varietal cleaning to maintain the cleanliness of the collection. Varietal impurities are removed, and doubtful specimens are monitored.
- Feeding. It is better to use mineral fertilizers dissolved in water for this purpose. When carrying out “dry” feeding, you should avoid getting the product on the leaves of the plant to avoid burning them, and immediately water the tulips generously to speed up the delivery of nutrients to the roots. Over the entire growing season, it is recommended to fertilize 3 times; it is enough to feed small baby bulbs 2 times, since their development period is shorter. Fertilizers must contain zinc and boron, which improve the condition of shoots with buds and promote the development of new bulbs.
- Regular watering to maintain optimal soil moisture. The irrigation rate per 1 m2 is 10-40 liters, depending on weather conditions, soil composition, and moisture level.
- Loosening the soil, removing weeds. Loosening improves the supply of air to the roots of tulips and reduces the rate of evaporation of moisture contained in the soil. Removing weeds allows you to provide the plants with a large amount of nutrients, as well as protect the tulips from damage by the pests that live on them and infection with diseases characteristic of these herbs.
- Carrying out decapitation, which is the removal of the flower head. It allows you to get a larger bulb and increase the amount of seed material by about 3 times.
Features of feeding tulips

The timing of fertilizing is determined by the plants’ need for nutrients in certain phases of development. The first is carried out when the snow melts in the spring. What month is the best time to do this? This fertilizing can be done in early March in southern regions or in the last ten days in those located further north.
It is enough to scatter around the sprouts a dry mixture of fertilizers containing 2 parts nitrogen, 2 parts phosphorus and 1 part potassium. The distribution rate per 1 m2 is 40-50 g. The plants need to be fed a second time during the formation of buds, preparing a mixture in the ratio of 1 part nitrogen fertilizer to 2 parts phosphorus and potassium.
The third feeding is carried out when the tulips bloom or after it ends. In this phase, plants no longer need nitrogen, so it is enough to prepare a mixture of equal amounts of phosphorus and potash fertilizers. 30-35 g of the combined preparation are applied per 1 m2 of plot. For fertile soil, the dose should be reduced, since excess nutrition has a bad effect on the condition of the bulbs, reducing their resistance to disease.
Autumn is the most fertile time for dividing, rejuvenating and planting perennials. All processes slow down, plants...
Diseases and pests
There are many diseases (fungal, viral, non-infectious) and pests that can damage growing tulips, deteriorate the quality of flowers and significantly reduce the amount of planting material. The photo shows samples of plants affected by the most common diseases.


Gray rot. Spreads most quickly when high dampness and lowering the air temperature and landing on heavy ground. Appears as yellow-gray depressed spots on the leaves. Rapidly increasing in size, they are soon covered with a gray coating. This leads to damage to the stems and buds, deformation of the flowers, crushing of the bulbs, and the appearance of yellow-brown spots on them.
To prevent infection with gray rot, planting material must be treated with a mixture of preparations: for 2 parts TMTD, take 1 part sulfur and the same amount of ether sulfonate. To process 1 kg of bulbs you will need 8-10 g of the mixture. Growing plants are sprayed three times with 1% solution of Bordeaux mixture or euparene. Enriching the soil with magnesium and potassium also gives good results.
Root rot. Initially, the disease manifests itself as rotting of part of the tulip roots, and in case of serious damage – weak growth of the stem and deterioration in the decorative appearance of the flower. The roots become watery, brittle, and first become transparent and then brownish in color. The probability of damage increases with increasing soil moisture and warming it up to 0° C and above.
In order to eliminate root rot damage to tulips, it is recommended to replace the fertile soil layer. The substrate containing pathogen spores should be treated with a fungicide. The soil must be loose, have a porous structure, and a drainage device is necessary to remove excess moisture.
Tulips can also be affected by botrytis, soft, white rot, typhullosis, fusarium, rhizoctonia, trichoderma, and penicillosis. Viral diseases include variegation and August disease. Tulips can also be affected by non-infectious diseases: calcareous disease and gum disease of the bulbs, “blind” buds may appear and flower stalks may droop. Their manifestations on the plant are shown in the photographs presented.
 Fusarium
To pests that can cause significant harm tulips include:
- onion root mite;
- greenhouse aphid;
- onion hoverfly;
- purple owl;
- Khrushchi;
- wireworms;
- mole cricket;
- slugs, snails;
- mouse-like rodents.
Prevention and elimination of plant damage by diseases and pests includes compliance with all rules of agricultural technology, selection and storage of bulbs, disinfection of containers and tools used when working with plants, and the use of fungicides.
Digging and storing bulbs
Flower growers are often interested in when to dig up tulips and how to store them before planting in the fall. This is due to the existence of disagreements on this issue. It has been experimentally proven that annual digging of bulbs helps obtain more and larger planting material, prevents tulips from being affected by diseases and reducing the content of nutrients in the soil. The exception is small bulbs, which can be cultivated by planting in one place for two years.

When and how to dig up tulips? Digging should begin when the vegetative mass turns yellow, when, due to loss of moisture, the stem becomes flexible and can be easily twisted into a ring. At the same time, early digging of the bulbs should be avoided, which, due to insufficient development of the integumentary scales, poses a risk of damage and disease. Digging too late can result in the loss of part of the planting material. Most often this operation is performed in last days June or early July.
The excavated material is sorted according to the diameter of the bulbs, removing diseased and damaged ones. Then they are dried in the shade, spread out in a thin layer, cleaned of dirt, separated into nests, and pickled to protect them from disease.
What is the best way to do etching? According to experts, the most suitable remedy is 0.5% solution of potassium permanganate or the drug “Maxim”.
Before storing the material for storage, it is sorted by diameter. Following a number of rules will allow you to preserve tulip bulbs until planting. During the first month they should be kept in the shade, at a temperature of 23-25 ° C, air humidity should not exceed 70%. It is necessary to regularly ventilate the room to prevent damage to the material by fungal diseases.
From the first days of August, you need to reduce the room temperature to 20° C, by the beginning of September it should be 15-17° C. During this period, the frequency of ventilation is also reduced. Maintaining temperature and humidity conditions is necessary for the full formation of all elements of the future plant - children, leaves, flowers, ovaries. The condition of the bulbs should be monitored throughout the entire storage period, removing diseased and unusual look.


Tulips... Probably not more plants, the mention of which causes such a mass positive emotions. Even small children know that with the first spring sun and Mom's holiday These bright and fragrant flowers always come to the house. Scatterings of tulips enliven city squares, village front gardens and numerous country flower beds with lush strokes, pleasing the eye after boring and gray winter days.
Tulip belongs to the perennial herbaceous bulbous plants of the Liliaceae family. Its height, depending on the group and variety, can vary from 10 cm to 1 meter. The region of origin of the species is the mountainous regions, semi-deserts and steppes of Central Asia.
Is it easy to grow a tulip?
Talking about tulips, someone admires him unpretentiousness and simplicity of agricultural technology, and someone complains indignantly about constant failures in an attempt to grow this perennial. Who's right? To find the truth, let's briefly look at the structure of the tulip and its life cycle, and also turn to the roots of its origin.
If you approach growing tulips from the point of view of a person knowledgeable in the botanical features of the tulip, then you can easily identify your mistakes, eliminate them and make sure that growing a healthy tulip is very simple.
What you need to know about tulip bulbs - myths and reality
The figure below shows the structure of a tulip bulb.
- Due to the fact that the plants are renewed annually from the buds inside the bulb (numbers 3 and 5 in the figure), they can delight gardeners for many years. The bulb itself lives a little more than 2 years: the first year - inside the “matryoshka” - the mother (number 5), and the second year - on its own.
- Sometimes novice flower growers complain that the bulbs are “over-pollinated” and the flowers change color. As you can see, young bulbs have nothing to do with pollination of the flower; their appearance is a vegetative process occurring in the soil. Below we will try to consider the true reasons for the change in the original color of the tulip.
- Another interesting point: in young bulbs (which do not bloom in the first year), a shoot-stolon grows down from the bottom, at the end of which a daughter bulb is formed. This is connected with another mistake of flower growers who, having discovered new bulbs deeper than they planted them, believe that the tulip is supposedly “pulled” deeper by its roots.
- In some types of tulips, such stolons grow intensively not only downwards, but also to the sides (Foster's tulips), and at the end of each shoot there is a young bulb. And for some, the appearance of stolons is rare, so getting an extra bulb the right variety- problem.
- It must be borne in mind that when planting flowering bulbs, children are formed at the level of the mother plant and no deepening occurs.

- 1 – covering scales (dry, brown);
- 2– storage scales (juicy pulp inside the bulb, a source of nutrients);
- 3 – buds of daughter bulbs (the closer the bud is to the center of the bottom, the larger the “daughter”);
- 4 – bottom;
- 5 – bud of the replacement bulb (the one that will replace the old plant);
- 6 – flower primordium;
- 7 – leaf primordia.
How a tulip develops
Like a typical ephemeroid, the tulip has clearly defined dormant and growing periods. The time when a replacement bud and daughter bulbs are laid between the storage scales is the dormant period, which is very important for further development plants.
Many people believe that from the moment a new bulb is dug up until spring, the plant remains unchanged, but this is far from the case. Take a look at the picture.
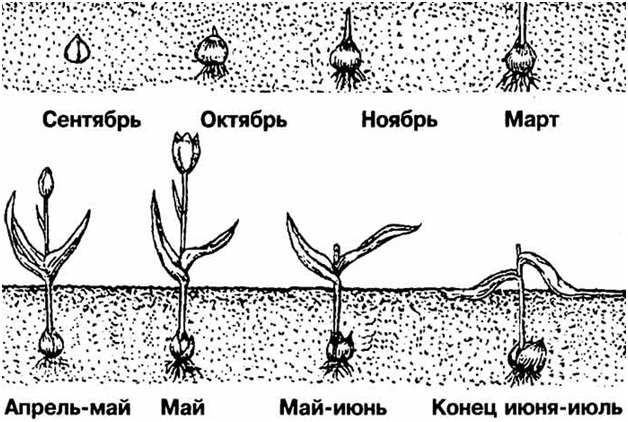
After planting in October, roots begin to grow intensively along the edges of the bottom, developing up to 0.5 m in depth, and in November, a young shoot is thrown out almost to the surface of the earth. Thanks to this super-readiness of the plant, we can admire the early spring flowering of tulips and other primroses.

Let's move on to the rules for growing tulips.
Incorrect steps when caring for tulips
How do you usually plant tulips in open ground in the garden of an ordinary summer resident?
- The bulbs you like are bought at the garden center, without taking into account the height of the adult plant and the timing of its flowering.
- Bulbs are planted at a time convenient for the gardener - sometimes very early or too late.
- Planting is carried out without taking into account the size of the bulb - both large and small parsing - at the same depth and at a close distance from each other.
- The place intended for tulips is sometimes insufficiently lit due to the close proximity of buildings or fences.
- Planting is often done without proper soil preparation - digging to the required depth and without applying basic fertilizers and fertilizing.
- To place tulips, they choose various inconvenient areas, including places that are flooded in the spring, and with high groundwater levels.
- After flowering, the green foliage of tulips is cut off due to loss of decorativeness.
- The bulbs are not dug up or divided for a long time.
Is this a familiar situation? Under no circumstances should this be done. What is the correct algorithm for caring for tulips?

Planting and caring for tulips - how to do it right?
The optimal time for planting is when the soil temperature drops to 9-10 C. Usually in the middle zone, this time begins in mid-September. Planting of tulips is completed by mid-October, so before frost the bulbs have time to take root well and adapt to wintering. It is important not to forget to disinfect the bulbs before planting in open ground in a solution of Vitaros or Maxim!
It happens that for some reason the gardener does not get around to placing the children in a timely manner. Don’t be upset - you can use three ways to “attach” the bulbs.
- Despite the timing, plant tulips in the ground until the end of November, slightly increasing the planting depth (up to 20 cm). After watering, mulch the plantings with peat or dry leaves. The likelihood of winter plant loss in this case decreases.
- Use the bulbs for early spring forcing on the windowsill, having previously consulted special tables on the timing of cooling and setting for germination.
- Store tulips in a cold basement all winter, and in early spring plant the bulbs in the warmest part of the plot, where the soil has thawed a little. Tulips may bloom in this case, but the flowering time will shift closer to summer.
How to choose the right place
Tulips are children of mountains and semi-deserts. You shouldn’t forget about this when planning a location for the breakdown. spring flower garden. Only with good lighting will the plant take on the color and shape corresponding to the variety.
With a lack of sun, the peduncle will be curved, the flower will be small and partially deformed. An insufficient amount of nutrients will be deposited in the storage scales, which can lead to the appearance of weak replacement bulbs, and then to a complete loss of the variety.
The place for planting should be dry, without prolonged stagnation of moisture (however, regular watering during drought must also be ensured). If the bulbs are left in damp soil for a long time, they become infected with fungal and bacterial infections and die.
If the soil is dense and clayey, be sure to add raising agents - peat, sand, vermiculite.
Another important addition is that the predecessor in the garden bed (in the flower garden) should not be classified as a bulbous plant, otherwise there is a high probability of viral or fungal diseases.
At what depth are tulips planted?
When planting tulips in the ground, as when planting many ephemeroids, they are guided by the rule of height of 3 bulbs. From the bottom, count three times the size and dig out landing hole exactly that depth. For tulips this value is usually 15 cm. A little sand is added to the bottom to drain the area of the bulbous bottom. Young children are planted in accordance with this rule at a shallower depth.
If the bulbs are excessively deepened, the flower does not grow so large, and the children are small and bloom weakly.
What interval is maintained when landing?
Bulbs located next to each other should be at a distance of at least 2 sizes (10 cm) from each other. The larger the bulb, the farther apart they are planted, otherwise the plants, competing for light and food, are quickly crushed.
To organize a group, very effective planting of tulips, dig one common hole, fill it with fertilizers and arrange the bulbs evenly.
Nowadays, tiered flower beds have become very popular, when hyacinths are planted as the bottom layer, and smaller bulbs of poultry, muscari or chionodox are laid on top of lightly sprinkled tulips.
Location in the flower garden and neighboring plants
First of all, you need to decide on the composition of the composition in which the tulips will be included. If early spring flowering is envisaged (for example, with muscari or early daffodils), then select early varieties that go well together in color - contrasting or monochrome (one shade). Usually, double yellow varieties of tulips look good with bright blue muscari, and with solar daffodils- white and bright red.
Late-blooming tulips are selected in combination with groundcovers that are rampant at this time - arabis, phlox splayed, parsley, as well as forget-me-nots, bergenia and late daffodils.
If annuals are planted in place of faded tulips, then in this case special baskets for bulbous ones are used. These plastic nets are convenient because plants that have lost their appearance can be easily moved to a secluded place for the bulbs to ripen.
Tulips are often planted with perennials with powerful foliage (hostas, paniculata phlox, meadow geraniums). Growing by the time the tulips dry out, they perfectly decorate the unsightly appearance of the bulbous ones.
Video "Planting tulips."

Fertilizer
To ensure a quick and friendly start in the spring, for autumn digging apply fertilizers with a predominance of potassium and phosphorus (“Autumn Fasco” or slow-acting granules (for example, “AVA”).
in spring tulips should be fed with urea solution, and in the second half of May with superphosphate. Fertilizing is combined with watering or carried out after rain.
Watering
During the growing season and flowering, tulips require sufficient soil moisture, but without waterlogging, which can result in damage to plants by various diseases.
In addition, excess moisture leads to cracks appearing on the bulbs, which, of course, deteriorates the quality of the bulb and, subsequently, the plant; moreover, such a bulb is stored worse.
Lack of moisture depletes the plant, it produces smaller and less beautiful flowers, and also produces fewer daughter bulbs.
Therefore, the correct watering regime is important. Tulips are watered infrequently, up to 3 times during the growing season, this applies even to the southern regions. But at the same time, each watering should be plentiful, water consumption is approximately 50 liters per 1 sq. meter. The water should reach a depth of 30-35 cm, where the roots of the bulbs are located.
The myth about “cross-pollination” of tulips
The most common complaint among beginning flower growers is: “I have everything beautiful tulips cross-pollinated and became common.” This was discussed above when they said that cross-pollination of one variety with another does not in any way affect the cloning of the bulb’s children through vegetative propagation.
However, the fact that over time the gorgeous parrots, lilies, fringed varieties for ordinary simple ones - it is obvious, and it happens very often. What's the matter?
And the problem, as a rule, is the elementary laziness of summer residents, coupled with a lack of knowledge on tulip agricultural technology. Its most important rule says: in order for plants to always be beautiful, powerful and consistent with the variety, they need to be:
- dig up in time,
- disassemble,
- store and store correctly
- replant in due time.
Digging up tulips and storing
Dig in time
This means that you need to wait until the outflow of nutrients from the leaves into the scales occurs, a replacement bulb and children are formed. As a rule, this period occurs at the end of June - beginning of July. If you are late, the nest will fall apart and many babies will be lost; if you dig it up earlier, the new bulb will not have time to ripen. How to find the golden mean? Use the old Dutch method: if the tulip stem has lost its fragility and easily wraps around your finger, feel free to dig!
Disassemble
This means sorting by bulb size and grade. As a rule, simple tulips(especially red ones) are very stable and unpretentious, produce a lot of stolons with children and literally crowd out the weak and pampered ones, which are modern varietal specimens. Hence the myth of “cross-pollination”. As soon as the gardener begins to mark the best varieties with beacons and dig them up in time, spring will immediately begin to be colored only with his favorite flowers.
Store correctly
The dug up and sorted bulbs are placed in lattice boxes and dried for 2-3 days under a canopy. Then they are laid out in 2 rows, interspersed with newspapers, and sent to a moderately warm (25 ° C) and ventilated place (attic, barn). There they will be stored until September, periodically subject to review and rejection of dry and rotten children.
Plant in due time
Let us repeat once again that when planting tulips it is important to observe correct timing listed in the section “When to plant tulips”

History of a flower
Among the ephemeroids grown in our gardens (as plants with short term growing season) tulips confidently occupy a leading position. Not a single early-flowering perennial can compete with them in flower beauty, variety of shapes, and unpretentiousness.
Europe has been admiring this magnificent plant for just under 500 years. Trial batches of tulips brought by Byzantine merchants to Vienna in the 26th century quickly gained recognition among European flower growers. Obviously, traders, purchasing scatterings of bulbs in their homeland - the territory of present-day Kazakhstan, did not even imagine that this product would be more promising than spices and silks.
The flower-tulip fever that swept through Holland, France, and Italy at that time testified to the extreme popularity of the new perennial. She raised the poor to the crest of wealth and plunged the rich into the abyss of bankruptcy. The craze for tulips has given rise to hundreds of new incredible shapes and varieties, from the mysterious “black tulips” to the fantastically unusual parrot and fringed ones.
The Netherlands has still remained true to its love for these beautiful bulbous plants and is a confident leader in sales around the world, offering planting material in millions of quantities every year.
Blooming tulips with a fragrant, delicate aroma create a magnificent spectacle, and given the low maintenance requirements, endurance and rapid reproduction of the perennial, they place this crop among the most versatile and sought-after among flower growers.
This article describes in detail not only the features of growing tulips in open ground, but also presents their varietal diversity, with descriptions and photos of tulips. We can say with confidence that even a novice gardener can choose a variety and grow tulips in his flowerbed. All you need is desire, a little patience, and the result will not take long to arrive.
Tulip flowers, description
Central Asia is considered the birthplace of tulips, where the flower got its name due to its resemblance to the headdress of the people of the East “turban”. They first began to cultivate this crop back in the 11th century, in Persia. It is believed that tulips were first brought to Europe in the 16th century, to the Vienna Garden. Soon, the flowers arrived in Holland, where their real flowering began. Speculation in the bulbs of these beautiful flowers in those days sometimes reached fabulous proportions.
And only in the 17th century did tulips come to Ukraine and Russia, where wealthy people grew them. In the 19th century, many countries began to actively cultivate tulips various varieties, but Holland is still considered the leader in growing this flower crop on an industrial scale. For example, every year the country exports more than 600 million planting material - tulip bulbs.


Tulip (lat. Túlipa) is a representative of perennial bulbous plants from the Liliaceae family. Refers to herbaceous plants - ephemeroids, that is, those that have a short growing season at the most favorable time for them.
It is in early spring that these perennials impress with their beautiful flowers: large, regular, often single. There are also multi-flowered varieties of tulips, where from 2 to 12 flowers are collected. Both simple and full (double) types of tulips are known. The color of the inflorescences amazes with a variety of tones: from snow-white, yellow-orange, purple to dark red, violet and purple-black. The shape of flowers also varies and can be cup-shaped, goblet-shaped, oval, peony-shaped, star-shaped and others.

The fruit of tulips is a triangular capsule with flat seeds. The development of an adult tulip from a seed takes from 3 to 7 years.
The tulip root is presented in the form of a bulb. The outer surface of the bottom of the bulb is covered with adventitious roots, which die off by the end of the growing season. Tulip bulbs are capable of forming hollow stolons - modified underground stems on which daughter bulbs are formed. Every year there is a change of generations of bulbs, when young bulbs appear in place of the faded ones.
The perennial stem is erect and cylindrical, growing in height from 10 to 90 cm, depending on the species. The leaves of tulips are fleshy, smooth and wide, with a bluish, waxy tint.
Garden tulips have more than 80 species and about 10 thousand varieties.

Varieties of tulips
Due to the huge variety of varieties, a certain classification of tulips was approved and a register of their varieties was compiled. This classification involves division into 4 groups, in which another 15 classes are distinguished. The classification is based on the difference in the timing of flowering of tulips, shape, color of flowers and other distinctive features.

Group I “Early flowering tulips”
The group is represented by varieties with the most early dates flowering, which begins in early May and lasts about 15-30 days. The tulips in the group are low-growing and easy to force.
- 1st class
Simple early tulips: the stem is low, the peduncle is stable (25-40 cm), the flower is large, has a goblet or cup shape, bright red and yellow flowers. Used for early forcing and planting in pots.
Varieties: Golden Olga, Golden Harvest, Ibis Mon Tresor, Demeter, Cooler Cardinal.

- 2nd grade
Terry early tulips: stem height no more than 30-35 cm; fluffy double flowers, warm shades(red, yellow, orange), bloom for a long time. The plant is actively cultivated as a potted crop.
Varieties: Electra, Madame Testu, Murillo, Schunord.

Group II “Medium-blooming tulips”
The most common group of classic tulips with medium flowering periods among gardeners. A wide range of colors, large flower size and the strength of tall stems allow these varieties to be actively used for cutting. Tulips reproduce easily: the mother bulb actively grows with a mass of children in July.
- 3rd grade
Tulips of the Triumph series: peduncles are strong and tall, reaching a height of 40 to 70 cm. The flowers are large, cup-shaped or goblet-shaped, of various colors (from white to dark purple).
Varieties: Crater, Golden Eddie, Snowstar.

- 4th grade
Darwin hybrids: the height of the peduncles varies from 60 to 90 cm, large inflorescences are usually painted in a rich red color. Varieties of other shades of red, even two-color ones, have also been developed. They are distinguished by their endurance and ability to reproduce intensively. Plants serve as excellent material for cutting and forcing.
Varieties: Big Chief, Apeldoorn, Vivex.

Group III “Late-blooming tulips”
The group presents the most exotic varieties of tulips late dates flowering.
- 5th grade
Simple late tulips: strong, tall (60-80 cm) varieties, have large flowers with blunt petals. The color of the inflorescences is rich in a palette of various shades: from snow-white to coal-black, from light pink to deep burgundy. There are also two or three-color varieties. They practice cultivation for cutting and late forcing.
Varieties: Georgette, Dillenburg, Bacchus.

- 6th grade
Lily-flowered tulips: unusual, elongated goblet-shaped, flowers with bent sharp petals outwardly resemble a lily flower, peduncle height is about 40-70 cm, the color of the inflorescences is varied and multi-colored. Plants are used for cutting, and low species are used for late forcing.
Varieties: Red Shine, White Triumphant, Gisella.

- 7th grade
Fringed tulips: large bowls of flowers are decorated with needle-like fringe along the edges of the petals. The fringe can be the same tone as the petals or have a contrasting color. Unique decorative qualities fringed tulips are made up of unusual, exclusive varieties. The color of the inflorescences varies: from white and yellow to chocolate and purple. The plant reaches a height of 50-80 cm. The fringed flowers remain fresh for a long time, which predetermined their use as a cut crop.
Varieties: Exotic, Maya, Burgundy Lace.

- 8th grade
Green-colored tulips: the backs of the petals have a distinctive green shading. Unusual flowers have a strong peduncle and are actively grown in gardens, parks, lawns,
suitable for cutting. The average height of tulips is from 30 to 60 cm.
Varieties: Samurai, Hollywood, Artist.

- 9th grade
Rembrandt's tulips: have complex coloring of the petals, as if applied by an artist's brush. The flowers are large, with streaks on a white, red or yellow background. The height of the peduncle reaches 40-70 cm. The class is widely used for planting in open ground and for cutting.
Varieties: Black Boy, Montgomery, Pierrette.

- 10th grade
Parrot tulips: varieties of tulips whose flowers resemble colorful parrots. Along the edge, the petals are wavy and rugged, and the petals themselves are folded and corrugated. The flowers are large, decorative, and when opened reach about 20 cm in diameter. The shades of the petals are very multifaceted (black, white, red and others). The plant has tall and strong peduncles, convenient for cutting.
Varieties: Discovery, Black Parrot, Fantasy.

- 11th grade
Terry late tulips: a plant up to 50 cm high, striking with incomparable flowering. Often the flower stalks cannot support the weight of bright peony-like flowers of various colors and break. Used for forcing and cutting.
Varieties: Livingston, Eros, Nice.

IV group “Species and botanical tulips”
These hybrid tulip species are especially beautiful. They are characterized by variegated leaf color, large buds, and low peduncles. This group of tulips is frost-resistant and can be easily grown in open ground, even in harsh winters.
- 12th grade
Kaufman tulips: low-growing (15-25 cm) varieties with early flowering periods. The flowers are large, elongated, and when opened they form a kind of “star”. Varieties of various colors, often two-color. The leaves are distinguished by purple patches.
Varieties: Diamond, Lady Rose Orange Boy, Crown.

- 13th grade
Foster's tulips: large flowers of a slightly elongated shape (up to 15 cm) with short peduncle 30-50 cm. The inflorescences are painted in bright red and red-orange tones; there are yellow and pink varieties. The leaves are slightly wavy with occasional purple streaks.
Varieties: Zombie, Patience, Copenhagen.

- 14th grade
Greig's tulips: low-growing class (20-30 cm) with large flowers, the petals of which are slightly bent back. Shades of inflorescences are red, leaves are speckled. Popular in landscape design.
Varieties: Zampa, Plaisir, Yellow Down.

- 15th grade
Botanical tulips: wild species, usually low-growing, with early flowering periods and varied colors.
Varieties: Schrenk, Gesner tulip.

Interesting fact
The crowning triumph of breeders can be called the black tulip, on the breeding of which about 400 thousand dollars and many years were spent... The appearance of this type of tulip dates back to 1986 and is due to the Danish breeder Gert Hageman.

How to choose a tulip variety?
The choice of a specific flower variety depends on the timing of flowering, external characteristics and the intended planting location (open ground, greenhouse or pot).
So, for planting tulips in pots, low-growing varieties are better suited, and for growing in a flowerbed or in a greenhouse - any.
Flower growers select the best varieties of tulips for their site with different flowering periods: from early flowering to later cultures. Thus, a picturesque picture of the continuous flowering of different varieties of tulips from April to early June is created on the site.

Planting tulips
Planting the tulips you like on your site is not at all difficult, but for a successful result, you must follow certain rules of agricultural technology.

Selection and preparation of bulbs
It is better to purchase tulip bulbs in advance, before the start of the planting season, best from the end of July to September. This is because it will be more difficult to find quality bulbs during the planting season. In spring, old bulbs from last season are often sold.
When choosing bulbs, preference should be given to whole, undamaged specimens, with thin, golden-colored skin (small, shallow cracks are allowed).
If the bulb is too large, with thick dark brown scales, it will be quite difficult for the roots to germinate. It is better to choose young, healthy, medium-sized bulbs, without mold or other defects. At the same time, it is important to take into account that large bulbs have a high ability to reproduce.
When purchasing, you need to check the bottom of the bulb. On a quality product, root tubercles are visible, from which roots will subsequently grow. There is no need to purchase bulbs with soft bottoms, sprouted roots or rot.
Tulip bulbs can be purchased in garden stores, and in online stores. Planting material purchased on the market does not guarantee varietal compliance and, as a rule, does not have a quality certificate, although it attracts with a low price.
Before planting, purchased tulip bulbs are stored in a cool room, separate from others (sick bulbs can infect healthy ones).
Before planting, the bulbs need to be thoroughly inspected to identify and remove contaminated material. The bulbs are sorted, cleaned of excess husks and disinfected for half an hour in a 0.5% manganese solution.

Time and timing of landing
IN natural environment tulips grow in the steppes and mountainous regions of Central Asia. In the spring they turn into real flowering carpets, and with the onset of heat they fade. The bulbs continue to develop and go deeper into the soil. In the fall, young roots appear, and in the spring, after winter dormancy, the tulips bloom again.
When is the best time to plant tulips?

Planting tulips in autumn
Autumn is the most optimal time for planting tulips. Planting time also depends on the growing region and its microclimate.
In central regions, bulbs are planted in mid-September. And in the southern regions the dates are shifted until early October. The approximate temperature for planting bulbs is +10°C.
The roots of the bulbs form in about 3-4 weeks. Therefore, when planting, you should take into account the upcoming weather conditions.
If you plant tulips too early, their rooting process will be delayed and there is a risk of the bulbs becoming infected with fusarium. Also, when warm weather The bulbs can germinate in the fall, and the resulting frosts will destroy them.
Planting too late is also not advisable. Due to low temperatures root system may not develop, and the bulbs will be more susceptible to rotting or freezing. Preserved tulips with damaged bulbs bloom poorly and are not suitable for further planting. Therefore, in case late landing, you need to cover the area for the winter with sawdust or leaves.

Planting tulips in spring
Tulips planted in the spring are slightly behind in development and bloom much later than those planted in the fall.
In order to speed up the flowering process, before planting, the bulbs are left in the refrigerator for a day, after which they are washed with a solution of potassium permanganate and then planted in open ground. Such manipulations need to be done before April, when it finally gets warmer. If frosts are still expected during this period, the tulip bulbs are first planted in a special container, and only when a stable positive temperature occurs are they planted on the site.

Choosing a location and preparing a site for tulips
- Choosing seat, give preference to good illuminated, protected from drafts and wind, area.
- An area that is too wet or close to groundwater is not suitable. Excessive moisture and stagnation moisture may lead to rotting of the bulbs.
- The development of tulips also depends on soil selection. The culture prefers loose, fertile and well-drained soil. Loams and sandy loams enriched with humus are ideal. The plant loves a neutral and slightly alkaline soil environment.
- In spring, organic matter must be added to the soil. fertilizers(rotted manure, wood ash or compost). Prepare the soil 1-2 weeks before planting by adding 5-6 kg of rotted manure per m2, 2-3 kg of peat and 50 g of nitrophoska.

Agricultural technology for planting tulips
- When planting tulips, special furrows or separate holes are made, depending on the method of planting and placement in the garden bed.
- The bulb is pressed into the bottom of the furrow or hole and sprinkled with earth.
- The average planting depth is 10-15 cm (considered to be three times the height of the bulb), and depends on the size of the bulbs and the type of soil. On light soils they plant deeper than on heavy soils. Small bulbs - children, are buried in the ground only 5-7 cm. If you plant the bulb very deeply, then there will be much fewer daughter bulbs on it.
- The row spacing is maintained at about 20 cm, between the bulbs - 10 cm.
- You can also use plastic baskets for planting tulips. The bulbs are carefully laid out at the bottom, thus placed in the prepared hole and sprinkled with earth on top. Thus, flower bulbs are not lost in the soil, and they can be dug up at any time.
- After planting tulips, you need to water the area and, to avoid cracking the soil, it is advisable to mulch it with peat or sawdust.

Features of growing and caring for tulips
In order for the abundant flowering of tulips to please others for as long as possible, it is necessary to provide the plant with proper care. Tulips are an unpretentious crop that requires minimal attention from the grower.
Watering
The tulip is a moisture-loving plant, but its short roots are not able to independently absorb moisture from the deep layers of the soil.
This means that timely watering of plants is an important condition of agricultural technology. The frequency and abundance of watering is adjusted depending on the composition of the soil and weather conditions. It is enough to ensure that the soil does not dry out.
The main condition is to ensure generous and systematic watering during the period of budding and flowering of tulips. Watering during flowering will significantly increase its duration. The plant needs to be watered for several weeks after flowering has ended.
The crop should be watered at the root, avoiding contact with the leaves, which can lead to sunburn.

Feeding and fertilizer
For life cycle several tulips are made fertilizing:
— at the beginning of emergence of seedlings;
— during the period of bud formation and flowering;
- after flowering.
- The first application of fertilizer - nitrogen - is carried out when seedlings appear. Nitrogen fertilizing stimulates the growth of tulips.
- The next feeding is carried out during budding and directly during the flowering process. Complex mineral fertilizers containing phosphorus and potassium are applied.
- The third time, tulips are fertilized with potassium and phosphorus immediately after flowering, at a rate of 30-35 g/m². To enhance the development of daughter bulbs, you can also add boron and zinc.
Tulips prepared for winter forcing need to be provided with a sufficient amount of calcium and magnesium in the soil.
Tulips love wood ash, which alkalizes the soil, enriching it with valuable minerals.

Weeding and loosening the soil
In a flower bed with tulips, loosening is carried out regularly, especially after watering, to avoid the appearance of dry crusts and cracking of the soil. This agricultural technique helps preserve moisture and enrich the soil with oxygen. Also be sure to remove it on time. weeds. Mulching the soil – great alternative weeding and loosening.

Diseases and pests of tulips
The greatest damage to tulips is caused by various types of rot, fusarium and a viral disease - variegation.
- Tulips can become infected fungal diseases– gray, white, soft, root, wet rot, especially during a rainy spring. The following preventive measures are important: good soil drainage and compliance with the necessary agrotechnical requirements when planting and storing planting material. If infected, tulips are treated with a fungicide and transplanted to a new location. In case of defeat gray mold, small yellowish-brown spots appear on the leaves. Gray rot can be prevented by sprinkling the bulbs with sulfur or etching them with a TMTD solution. The seedlings are sprayed with 1% Bordeaux mixture or 1% euporene. If on the roots of tulips appear brown spots– the plant is infected root rot.
- The disease is fusarium, spreads through the soil. Signs of damage: slow growth of the crop, reduction in bulb volume. Treating the soil with special chemicals helps fight fusarium.
- Signs viral disease — variegation are light green or light stripes (strokes) on leaves, buds and petals. There is no treatment as such, so the affected plants along with a lump of earth are destroyed, and the resulting hole is filled with a strong solution of potassium permanganate. As a preventive measure, before cutting each flower, you need to disinfect the pruning shears.
Among the pests that are dangerous for tulips are mole crickets, onion root mites, purple cutworms, snails, slugs and mouse-like rodents.
- In the fight against onion mite apply heat treatment to the bulbs by immersing them in boiling water for 3-5 minutes. Having discovered a pest during the growing season, tulips are sprayed with 2% keltan or rogor solution. If all of the above methods fail, the tulips are destroyed.
- For mole crickets, slugs and snails You can use traps: rags, pieces of planks or slate are laid out on the site, under which pests like to crawl, after which the insects are collected and destroyed daily.
- For extermination bear, Jars of water are buried in the ground (not to the very top). When an insect falls into the water, it can no longer get out of the trap.
- Regarding rodents, They often use mousetraps or treat tulip bulbs with red lead or kerosene. To repel mice, daffodils and hazel grouse are planted in the area next to the tulips, the bulbs of which are poisonous to rodents. In the fight against rodents, they also use poison, which is buried next to the tulips.

Caring for tulip bulbs
The life cycle of tulips is as follows: in the summer, after flowering and wilting (usually in July), the bulbs are dug up to be stored until autumn. In September-October they are planted again in the ground, where they overwinter. In spring, the bulbs sprout and the tulips bloom. In the summer, when the leaves turn yellow and begin to dry, the process is repeated again.
When should you dig up tulips?
It is important to dig up tulip bulbs in a timely manner!
Digging them up too early, for example right after flowering, reduces the bulbs' ability to reproduce. Late harvesting when the soil is waterlogged threatens cracking of the bulbs.
Remove the bulbs with a shovel, simultaneously loosening the soil. Small bulbs are separated from the mother bulbs and dried in a dry place.
Why do you need to dig up tulip bulbs?
Considering the susceptibility of plant bulbs to various diseases, pest attacks, negative impact moisture or temperature changes, tulip bulbs should be dug up and sorted annually. If this is not done, then every year the bulbs will go deeper into the soil, the flowers will become crushed, and the stems will become thinner. The mother bulb will produce fewer and fewer daughter bulbs, reducing the natural reproduction process. In addition, remaining in the soil in the summer, the bulbs are more susceptible to infection by various diseases.
How to properly store bulbs?
After the plant’s growing season ends (the leaves begin to dry out, the stem becomes elastic), the bulbs are dug up, the soil and excess husks are removed, and stored in dark and ventilated place. During storage, the temperature is lowered every month from the original 25 °C to 16 °C.
Planting material can also be stored in special plastic mesh containers, with a mesh bottom, or in ordinary cardboard boxes. Good aeration will help keep the bulbs dry and prevent infection with any diseases.

Caring for tulips after flowering
So that tulips do not waste energy on forming seeds, but increase the mass of bulbs, wilted flowers cut off immediately, leaving only the leaves. The more leaves remain, the more nutrients the bulb can receive.
After the end of flowering of tulips, one should not completely forget about the plant: it needs additional feeding potassium-phosphorus fertilizers and regular, gradually decreasing in volume, watering for another couple of weeks.

Preparing tulips for winter
Before the onset of frost, in order to protect the bulbs from frost, the beds are mulched with peat or sawdust with a layer of 5-7 cm. Early flowering varieties of tulips are especially susceptible to low temperatures, need additional cover with spruce branches.
In the spring, after the snow melts, the cover and mulch are removed from the ridges, the earth will warm up faster, and the tulips will bloom earlier.

Tulip propagation
Tulips reproduce by seeds and vegetatively, using daughter bulbs.
Seed propagation is practiced by breeders in order to develop new varieties, since the daughter plant does not retain the varietal characteristics of the parent individuals. Such tulips bloom only after 5-6 years, and at first the flowers will be inconspicuous, and only in 8-12 years the peak of decorativeness begins.
Propagation by daughter bulbs is the simplest and easiest method, in which the varietal characteristics of tulips are completely preserved. The smallest tulip bulbs are separated and planted in a separate bed in the fall, and covered for the winter. They are grown for 1-2 years to obtain large, full-fledged specimens. They are dug up every summer, just like adult flowering bulbs.

Transplanting tulips
Tulips grow in one place for an average of 3-4 years. Rare varieties require annual replanting to preserve valuable varietal characteristics.
Following all the rules of agricultural technology allows you to maximize the time of growing a crop in one place.
If the tulips develop well and bloom profusely, they do not need to be replanted. Only in case of suppressed growth, deformation in the development of buds or petals, or if there are signs of disease, does the plant require replanting.

The use of tulips in landscape design
Easy to care for and available in a variety of colors and shapes, tulips are one of the most common and favorite flowers for both ordinary people and professional flower growers.
The culture is widely used in the design of flower beds, mixborders, rockeries, and planted in vases and pots. Tulips look wonderful in separate groups and in combination with other plants.

The variety of shades and shapes of tulip inflorescences allows you to create various spectacular color compositions. They are planted along sidewalk path or just on decorative flower bed— the tulip looks great in any variation.

Tulips are also used for forcing or cutting. Cut tulips remain fresh in water for up to 2 weeks and give beautiful spring mood to others. The subtle delicate aroma only enhances the overall pleasant experience. Truly, “tulips”, “delight” and “holiday” have become synonymous words with modern life.

The color palette of tulip flowers is very diverse and multifaceted. Shades of white and black, yellow and scarlet, purple and pink are impressive and pleasing. Flowers individual varieties sometimes they seem fabulous and extravagant (parrots, lily-flowered, terry, green-flowered).

Within the same variety, tulips bloom very amicably. Therefore, in park area, plants are often planted in groups or areas in order to maximize their decorative value, allowing people to admire this unforgettable spectacle.


Tulips combine harmoniously with other spring bulbs: daffodils, irises, hyacinths, and scillas.

Tulips look especially tender and original in garden flowerpots and fancy pots.

Now, having become familiar with the secrets of growing tulips, everyone will be able to grow these beautiful flowers, which are rightfully considered a real decoration. garden plot or balcony. A freshly cut bouquet will give you a lot of positive emotions and impressions.

Tulips are associated with the arrival of spring and the beginning of a new gardening season. It is impossible to imagine the holidays of March 8, St. Valentine without these beautiful flowers that can give spring warmth and a sea of good mood.
Without a doubt, it’s time for tulips - a bright and unforgettable period of real impressions and positive emotions!

Tulips, photo


Video: “Growing tulips - planting and caring for the garden”
Video: “Proper planting of tulips”
In early spring, when the queen of flowers is just throwing out timid and uncertain buds, magnificent tulips hatch from the ground, just freed from snow cover, and begin to stretch their juicy and tender shoots towards the spring sun. With their incredible beauty and purity, as well as their special unpretentiousness, these flowers have won more than one heart of a true gardener. They flaunt everywhere, in city parks and squares, in the gardens and flower beds of true flower growers. However, planting and caring for tulips will still require some attention from you, as well as knowledge, so that the flowers grow healthy, strong, fragrant and pleasing to the eye.
Magnificent tulips: planting and care at home

Today, tulips are truly popular and sought-after flowers. They can be found in the spring both in private homes and in public flower beds, since caring for tulips is quite simple and affordable, and the results cannot but amaze the imagination, because there are many types of these beautiful spring flowers. It was Dutch breeders who bred such a variety of tulips, and natural weather and climatic conditions made it possible to grow flowers in unlimited quantities.
Interesting
The fashion for growing tulips has been traveling around the world for quite a long time, and it began in Holland, where there are entire fields planted with such bright, but at the same time, seemingly unremarkable flowers. However, the homeland of tulips is much further south, namely in Persia, from where the flowers came to Turkey much later, and from there to Europe. In the sixteenth and seventeenth centuries, just a few tulip bulbs could buy an estate with a stable and a barn.
It is remarkable that tulip flowers, planting and caring for which became the topic of our article, are named after the Persian headdress, which is called “turban”, since it was customary to decorate its front part with this flower. Tulips belong to the lily family and reproduce by bulbs. Plants can be varied in height, from very short, elongated centimeters to twenty, to half a meter and even more. The inflorescences have a bell-like shape, they can be double and plain edges, and there’s definitely no counting of their colors.
Many people want to grow these unpretentious flowers in their gardens and front gardens, but despite their special vitality, tulips still require some attention in order to annually delight their owners with beautiful and strong inflorescences. Some gardeners complain that their neighbors grow beautiful flowers, but theirs, in almost the same soil, grows weak, small and sickly. In order for your plants to always be full of strength, you must first figure out how to care for tulips, how to plant and water them, when to do this, what nuances and subtleties to take into account.
Growing strong and healthy: how to care for tulips, choosing bulbs

Whatever one may say, planting and caring for tulips must begin long before you can actually plant them in open ground. And in general, first you need to acquire plant bulbs, which you will definitely purchase before the planting season itself begins. That is, it makes sense to take care of choosing the most beautiful colors and shapes that suit your opinion, not in the spring, but long before that, for example, in mid-July, August or September, with the desired planting next year.
There really is a rational grain in this, since during the planting period it will be difficult to select high-quality material, and you, as an inexperienced beginner, can easily be given old bulbs that have been culled at a very decent cost. Moreover, the bulbs may even be old, such that they simply were not sold last summer and autumn, and this is already a lottery, since no matter what care you provide them, the result will always be in doubt.

- The skin of the bulbs should be quite thin and also have a beautiful, slightly golden-brown color.
- There may well be cracks on the surface of the peel, this is not at all scary, they will not affect the quality of the plants.
- Pay attention to the integrity of the bulbs; they should be strong and elastic, and not dried out and wrinkled, like dried fruit.
- It is better not to buy dark brown, fairly dense onions, as it will be difficult for roots to sprout from them, and you may lose the plant.
- Also, do not buy tulip bulbs with mechanical damage, spots of rot or mold, this is simply wasted money, and in some cases, one diseased plant can become fatal for your entire flowerbed, infecting its “neighbors.”
- As for the sizes, it is better to set aside the largest and smallest onions and take a medium-sized one, so there is a better chance of growing healthy flowers.
If you want to grow strong tulips, you need to start caring for them immediately after purchase. You will have to strictly ensure that you never damage the planting material, because it is very fragile and vulnerable. The surface of each onion must be sufficiently dense and also clean; among other things, it should not be completely light, but have an average weight. Also pay attention that there is no rot or sprouted roots on the bottom, that is, in the lower part, they can ruin the whole thing.
Easy cultivation and care: tulips in open ground, planting dates

It is worth understanding that from the right choice bulbs will largely depend on the result, that is, how your flower will grow, whether it will please the eye with active flowering, or will simply disappear, barely throwing away a few lettuce leaves. To begin with, you need to choose the right timing for planting flowers, so as not to regret later about lost planting material. This is very important, otherwise you won’t be able to grow beautiful flowers that will delight the eye with lush blooms for a long time.
In order to understand, you need to understand that in the natural environment these flowers grow in rather arid conditions, on fairly rocky soil, bloom in early spring, when the soil is filled with moisture, then fade, but the bulbs continue to live, becoming more and more rooted in the ground, and By autumn they sprout additional roots for comfortable wintering. Only after the winter cold, when plants skillfully accumulate a colossal amount of nutrients and useful substances, can tulips bloom in nature; this is the mechanism that experienced flower growers use.
Hardy Dutch tulips: planting and care in spring

Despite the fact that breeders are constantly working to develop new varieties of tulips, and are also engaged in increasing their endurance and vitality, they are still quite tender plants who do not really like changes and transplants. Moreover, spring is not at all the best time to plant or replant these flowers.
It is clear that most likely the plants will not die, but they may grow weak, sickly, susceptible to pests, and they can bloom much later than their counterparts who have not experienced such stress. However, experienced gardeners know exactly how to trick plants, thus speeding up and bringing the flowering of tulips closer.
- Place the bulbs in the refrigerator before planting, for about seven to eight hours, and ideally, simply leave them overnight.
- In the morning, the bulbs will need to be washed with a weak solution of potassium permanganate, after which they can be planted in open ground.
- The main thing is to do all these manipulations before the end of March, but if you don’t have time, it’s better to postpone the procedure until the fall.
Naturally, if in your region at the end of March there are still very persistent frosts, then it is better to plant the flowers first in special pots or containers, and only when the soil has finally warmed up, replant them.
Autumn planting and care: bush tulips and more

Real experts in their field, experienced and competent flower growers plant such magnificent flowers as tulips exclusively in the autumn, as this has the most favorable effect on the plants. The exact time of disembarkation will depend on weather and climatic conditions, however, in the middle zone it is most often customary to do such things in mid-September and early October. Monitor the ambient temperature and if it stays steadily at around seven to ten degrees Celsius, this means it’s time to plant tulips.
You should not plant bulbs ahead of time, as this can lead to disastrous consequences. Firstly, your garden bed may simply become overgrown with weeds, which you cannot remove so as not to damage the newly planted plants. But this is not so bad, because, secondly, tulips can lose their strength and get fusarium from long-term rooting.

Also, you should not miss the deadline, since the bulb may not have time to take root well, get sick and disappear, and if it blooms in the spring, then next time such material will no longer be suitable for planting. In practice, caring for tulips in the fall consists of observation after planting; you cannot help the flowers with anything else, so it is better not to interfere with natural processes.
Planting, growing and caring for tulips: when to dig
It is important to understand that it would be optimal to pickle those tulip bulbs that you have grown yourself in a weak solution of potassium permanganate, approximately half a percent, before planting them in open ground. As for the planting material that you purchased in a specialized store, it is already completely ready for planting. However, you can consult the seller about what to do.

- You can plant tulip bulbs using the square-cluster method, by digging holes for each plant using a scoop or hoe, you can make special beds, and for large planting areas, simply lay the material on the surface, with a distance of approximately ten centimeters between the bulbs.
- After planting, all bulbs should be evenly covered with a small layer of soil. To choose the optimal depth, multiply the height of the planting material by three. That is, small tulips will be close to the surface, and larger ones will be somewhat deeper.
- Tulips can be planted in shapes in a flowerbed, creating entire compositions; for this it is advisable to use different varieties. It makes sense to plant tall flowers closer to the center, and smaller ones to the edges, then all the flowers will be clearly visible.
- Having sprinkled the bulbs with fertile soil, it doesn’t hurt to mulch them with a mixture of humus and peat so that they don’t freeze during the winter cold.
That's all autumn work the tulips will be completely finished, and they will definitely not need any more care for now. Until spring, the plants will develop independently, take root, sprout, and in the spring they can be freed from the weeds that will definitely appear, and enjoy the gorgeous flowers, so touching and delicate, but at the same time strong and beautiful. All that remains is to find out how to care for tulips after flowering, and you can safely take on this task, especially since, as you can see, there is nothing complicated about it at all.
Ordinary red-scarlet tulips can grow quietly in a garden bed for three to seven years, and do not require any replanting. However, varietal flowers will not tolerate this; they demand special attention, therefore, in mid-June, when there are no flowers for a long time, and the leaves have withered and dried up, the bulbs need to be dug up, cleaned of soil and excess husks, and then dried in the shade. Planting material should be stored in a place where good ventilation, and the temperature remains within twenty degrees Celsius. By autumn, the bulbs can be planted in the ground again so that in the spring they bloom at the right time.
Tulips have bloomed in the garden: care after flowering, fertilizers
You should definitely understand that if you want to get large, strong and healthy plants and flowers, you will have to tinker, since you definitely can’t do it without bait and fertilizers. First, once the sprouts have broken through the soil, nitrogenous fertilizers will be needed in order to stimulate foliage growth. Then it’s worth choosing complex mineral compounds, which are available in abundance on the market, and when tying buds, those that contain potassium and phosphorus are suitable. When the flowers begin to bloom, you can add some other mineral complex; it also won’t hurt at all.

- Care must be taken to ensure that the plant does not get burned during feeding. To do this, it is better to dilute the compositions with water and water them in cloudy weather, during, before or after rain.
- These amazing plants bloom extremely quickly, but there is no need to stop watering. For two or even three weeks you need to water the flowers in the same way as during the growing season.
- All pedicels with buds after flowering must be very carefully removed, for example, simply broken off, and then the plant will devote all its unspent energy to the formation of bulbs.
- Leaves should never be picked or cut off if you want to harvest a good harvest of bulbs.
It is clear that you cannot dig up tulips until a certain date, and therefore you should definitely think about what plants will cover the yellowed leaves of the plants at a time when it is better not to touch them. Among other things, many gardeners grow tulips in the ground in special containers, which they then dig up and leave the bulbs to ripen in some less noticeable place, it makes sense to also think about a similar option.
