Homemade bread in the oven - how to bake delicious bread at home
5 (100%) 3 votesI baked my first homemade bread in the oven according to the simplest recipe: flour, water, yeast, salt and sugar. When I took out the ruddy crust, my pride knew no bounds! Even though it turned out lopsided, it rose and baked perfectly. For me this is the most important thing, and we’ll add beauty later. Inspired by the first success, I repeated the recipe for homemade bread a couple more times and took up loaves with cuts, round loaves, and bricks. But I want to tell you and show you how to bake delicious bread in the oven at home according to a basic recipe. Because it’s better to start getting acquainted with bread baking with the basics in order to understand what to do and why and what will come of it.
Homemade yeast bread in the oven. Recipe
If you have bread baking experience, feel free to start cooking, but I advise beginners to first read the tips and recommendations under the recipe.
Basic bread recipe. Once you master it, you will be able to bake delicious bread with various additives. For example, aromatic, with sesame, Provençal herbs, give it different shapes. The recipe will also help you out during fasting - uneatable wheat bread is baked without eggs and milk, and butter can be removed from the ingredients. Lean yeast dough is prepared in water, kneads very easily, the bread turns out fluffy and tasty.
Ingredients
For homemade yeast bread we will need:
- warm water – 250 ml;
- sugar – 1 tbsp. l. without slide;
- salt – 1 tsp. without slide;
- wheat flour – 480 g (180 for the dough + 300 for the dough);
- fresh yeast (cube) – 15 g;
- Sunflower oil – 3 tbsp. l.
How to make homemade bread in the oven
Let's start preparing bread dough by preparing the ingredients. We measure out the required amount of yeast, making sure that it is suitable (expiration date on the package). Add salt and sugar. Grind all the ingredients to a liquid paste using a spoon or spatula.

We heat the water and test it with our hands. Warm until you feel a pleasant warmth. Add warm water to the yeast and stir.

Add sifted flour. Stir and get rid of large lumps.

The thickness of the mass will be medium, like pancake dough.

Cover the container. Place in a warm place for 30-45 minutes or longer. The ripe dough will rise several times and become holey with a sour smell.

Stir the dough, releasing carbon dioxide and making it liquid again, so that after kneading the yeast can raise the dough again.

Sift the flour, add not all at once, but in parts - this makes it easier to bring the dough to the desired density. Immediately add about 250 grams.

Make a hole in the flour mound and add sunflower oil to make the dough more elastic and the baked goods delicious.

Mix everything with a spoon until you get a thick, loose ball of dough. Add a little flour to a board or table, lay out the dough and begin to knead it, rolling it away from you and pulling it towards you. Wrinkle the back of your hand with smooth but strong movements.

After a few minutes, the dough will no longer be so rough and sticky, it will become denser, drier and easier to knead. Knead for another ten minutes. At the end of kneading, you will feel how air bubbles seem to burst under your palms, the dough is soft and plastic.

Roll the dough into a bun, like the one in the photo. Trim and sprinkle with flour.

A small saucepan with a round bottom, bowl, or cauldron is suitable for proofing the dough. Cover with a towel and sprinkle thickly with flour.

Place the dough sprinkled side down, leaving the top smooth. If there is no flour, the dough will stick to the towel and you won’t get a beautiful kolobok. We wrap the edges of the towel over the bun, put the dough in a warm place to rise twice.

The dough for yeast bread should rise to the edge or slightly higher. There is no need to knead the dough. Turn on the oven and leave it to warm up to 180 degrees.

When it heats up, very carefully turn the bowl with the dough over, placing the bun on a baking sheet lined with paper. We try not to damage the dough, it is very tender. I cover the bowl with a baking sheet and turn it over. The dough comes out easily, does not knead, all you have to do is remove the towel from the bun.

Place the baking sheet on a medium level and bake homemade yeast bread for 35-40 minutes at 180 degrees. The crust should turn golden and golden brown.

Remove the delicious bread from the oven and cool on a wooden board or wire rack without covering it with anything.

Slice the warm or cooled bread and serve.
I am sure that your first yeast bread will turn out great, because now you know how to bake delicious bread in the oven at home and you will certainly want to consolidate your success. I have collected simple and tasty ones in the appropriate section, there are a variety of them, all with detailed descriptions and tips.
Now traditions are being revived, and homemade bread baked in the oven at home is again perceived as a symbol of the comfort and homeliness of the housewife. In a house where it smells of fresh baked goods, it is warm and calm, they are waiting for you, there you relax and forget about all your problems. And the taste of homemade bread cannot be compared with store-bought loaves! The bread may not be in perfect shape, but you baked it with love, put a piece of your soul into it, and such bread will definitely be delicious.
Which flour to choose for bread
For the first time, I advise you to choose the simplest bread recipe at home and bake delicious wheat bread. Other types of flour require certain dexterity and skills, but wheat flour dough is very easy to work with. It contains a lot of gluten, so the dough rises well and can be given different shapes - roll a loaf, a bagel, bake a loaf, a brick.
If you add whole grain flour, the dough will rise less, but this bread will be healthier. The dough with the addition of corn flour will be bright yellow, crumbly to the touch and heavy. It rises easily, but you can’t leave it for too long; it may fall off in the oven if it’s left for too long. It’s best to leave rye bread recipes for later; rye flour is capricious and unpredictable. There is no gluten in it, so the dough hardly rises and baking such bread is a real art.
Wheat flour comes in different grades: premium, first, second and coarse. They differ in the degree of grinding and gluten content (the more gluten, the better the dough will rise). Usually a flour mixture of different varieties is sold, so it is generally accepted that unlabeled flour has an average percentage of gluten (25-28%). Types of flour with markings are valued higher, but also cost more. They contain 28-30% gluten.
As such, the concept of “grade of flour” does not imply the quality of the product, but its intended purpose for a specific use. For example, butter dough is made from the highest grade, but for bread it is better to use the first or second grade. The baked goods do not go stale for a long time, they come out with a delicate porous crumb, are tasty and hold their shape well.
Why sift flour?
Flour can contain not only debris, bugs and worms, but also various additives that manufacturers do not skimp on. For example, starch. During storage, it cakes and sticks together into plates. By sifting flour, you remove all impurities from it, break up lumps and saturate it with oxygen. Any baked goods made from sifted flour turn out more fluffy and soft - tested from my own experience. Buy a fine-mesh sieve or a special sieve mug and your homemade bread will always be fluffy.
Preparing bread dough
There are two types of bread made at home - sponge-based and straight-bread. Dough is a liquid dough made from flour, liquid, yeast and sugar. It is easy to prepare. Yeast is diluted with water and sugar, flour is added, and the mixture is left warm to ferment for at least 30 minutes, but usually takes about an hour. Readiness is determined by volume, appearance and smell. Yeast, interacting with sugar, releases carbon dioxide, which raises the batter. Ripe dough will increase in volume, become loose, and a sharp sour smell will appear. But the main sign of readiness is that it will begin to settle, as if to fall through - this means it’s time to knead the dough.
How to knead the dough
Flour and butter are added to the dough and bread dough is kneaded. You need to knead the dough until the bun is soft and smooth, about 10 to 20 minutes. At the first stage, the dough will be rough, dense, wet, and will tear when stretched. As you knead, certain processes occur in it, the state of the gluten changes, the dough becomes soft, elastic, and stops sticking to your hands. After kneading, the yeast dough is proofed to increase in volume. After one or two hours, the dough becomes fluffy, smooth, and easily takes the desired shape when molded.
Bread forming
You can bake homemade bread in the oven in different shapes: round, oval, loaf, brick. First, the dough is kneaded by hand to release carbon dioxide, then rolled into a bun or placed in a rectangular, round shape or on a baking sheet, where it is allowed to rise again. In some cases, immediately after kneading it is placed in the mold. There it fits, and then it goes into the oven. In order not to explain for a long time how to do what, I suggest watching a video on shaping round bread.
How to bake bread in the oven
The oven needs 15-20 minutes to preheat. Usually bread is baked at a temperature of 180-200 degrees on the middle tier. The first ten minutes it rises, then the crust thickens and there will be no rise. The door should not be opened at first, so as not to disturb the temperature regime; the cold air may cause the dough to settle. Too high a temperature is also undesirable - the bread may tear at the top or sides. Cooking time and temperature depend on many factors, so it is better to follow the recommendations in the recipe, and in the future you can rely on your experience and intuition.
Happy baking! Your Plyushkin.
No store-bought bread can ever replace homemade bread baked with your own hands. We put our energy and all our love for our household into homemade bread. I really love baking bread and, even having acquired a bread machine, I still prepare bread, kneading it with my hands, and bake it in the oven. Being a busy person, I try to find bread recipes that can be prepared in a relatively short period of time. This time I offer you the recipe quick homemade bread, which I tried quite recently, but have already baked three times. The bread is very soft and airy - I highly recommend it!
Ingredients
To make quick homemade bread we will need:
warm water - 210 ml;
dry yeast - 1 tsp;
wheat flour - 320 g;
sunflower oil - 30 ml;
sugar - 1 tsp;
salt - 0.5 tsp.
Cooking steps
Mix dry ingredients: sift flour, add salt, sugar and yeast.

Knead into a soft and pleasant dough. Since flour comes in different densities, its quantity may be slightly larger. I ended up with 20 grams more than in the recipe. Grease a bowl with oil and place the dough in it for 30 minutes, covering with a lid or film.


Homemade bread cooks quickly enough and turns out very soft with an ideal crumb structure.
 Bon appetit!
I usually bake bread with either fresh (“wet”) yeast or dry granulated yeast, which must be mixed with water. This time there was neither one nor the other in the house. That's why I baked with fast-acting yeast. They must first be mixed with flour, and only then add water and everything else. In addition, the dough with this yeast does not need to stand for a long time; one rise is enough. I had yeast on which the dough did not need to be left to stand at all - I kneaded it and baked it right away. It turned out well. What I mean is that with dry yeast you need to carefully read what is written on the package.
But honestly, I like regular, wet yeast best.
In Ksyu Putan's story about how she learned to bake bread, she found an interesting recommendation to first put the bread in an open oven. When the bread has risen and set into a crust, close the oven and bake as usual. I've never done this before and decided to try it out immediately. The result was excellent. This is the first time that wheat bread has worked out so well for me. Therefore, I recommend this method.
I made two loaves from the amount of dough indicated below.
One - with the addition of nut butter, and then sprinkled sesame seeds on top.
The second is with the addition of olive oil, hard cheese (Grana Padano) and dry oregano (oregano). I added the cheese like this: cut the cut loaf crosswise quite deeply, pour grated cheese into the cuts, and lightly seal them, but not completely.
Recipe:
Premium wheat flour - 500 g + 50-100 g
Dry instant yeast - 7 g (1 sachet)
Water - 320 ml
Sugar - 1 tsp.
Salt - 1 ½ tsp.
Mix yeast with sugar and flour (500 g), let stand for 5 minutes. Then add salt and warm water. Knead the dough, cover with a damp towel and let rise (about 40-50 minutes).
Then knead the dough, adding more flour if necessary.
It should be elastic, slightly sticking to your hands.
Cut it open and make a cross-shaped cut.
Place in an oven preheated to 220 ºC, do not close the door.
When the bread has risen and the crust has set (about 10-15 minutes), close the door and bake for another 20-30 minutes.
You can spray the crust with water during the process. I didn't, but I buttered the bread.
The finished bread makes a dull sound when tapped on the bottom.
If you are not sure that it is ready, you can periodically remove it and knock))
Let cool. Store in cloth.
And I also want to ask the distinguished public.
I caught myself thinking that I buy ready-made bread less and less: homemade seems tastier and more enjoyable. But, on the other hand, bread baking is already acquiring almost industrial proportions.
In this regard, the question is: is it worth buying a bread machine?
Who bakes in it, please respond.
Like it or not? Is it useful to you or not?
I am not a fanatic of “manual” work, and if there is an opportunity to make it easier, I will always use it. Thank you in advance.
Good afternoon, our readers. Today we will prepare bread at home, namely in the oven. Almost any homemade baked goods are very tasty, especially if you cook them with love.
Homemade bread in the oven turns out very fragrant and tasty. When I tried to cook it for the first time, everyone at home and guests were delighted, and the taste was significantly different from store-bought.
Moreover, in stores sometimes they prepare such bread that it is almost impossible to eat. Sometimes we have this kind of unsuccessfully purchased bread that sits around for a long time and ends up being used either for crackers or for the dogs to enjoy.
Bread turns out great in home bread machines, it’s convenient, especially since now you can buy such a stove for every taste and color, as they say. But you can do without it, for example, prepare homemade bread in the oven.
Many, as far as I know, cook this way and benefit in many ways compared to store-bought bread, but let’s not wait too long, I have selected for you several simple but very tasty recipes for homemade bread, including one of my favorite and constant recipes.
Homemade bread in the oven.
This is one of the simplest recipes, I started using it myself. It may not be perfect, but if it works out, the bread is very soft, tasty, crispy...
And the most important thing is that the quality of bread depends on the flour, I just learned from experience that different manufacturers have different quality, and the bread turns out different. It’s better not to skimp on flour and use what you know best.
We will need:
- Water - 1 glass (boiled);
- Flour - 3.5 cups;
- Vegetable oil - 3 tablespoons;
- Salt - 1 teaspoon;
- Dry yeast - 0.5 sachet;
- Sugar - 2 tablespoons.
From this quantity we get 2 small loaves.
First you need to sift the flour; sift 3 cups into a separate bowl. Make a hole there and add sugar, salt and yeast (1/2 sachet).
 make a hole in the flour
Mix everything thoroughly.
Then we make a hole again and pour in vegetable oil and boiled water at room temperature.
 mix liquid ingredients
Now knead the dough. First with a spoon, then with your hands on the table. Knead for about 15-20 minutes. As you knead, add a little flour so that it does not stick to your hands.
 kneaded dough
The resulting dough should not stick to your hands.
Now put the dough in a container, or a pan, cover it with a lid or towel and put it in a warm place for at least 1 hour.
When the dough has risen, you need to knead it thoroughly.
 knead the dough again
Now we form the loaves. Divide the dough into 2 equal halves and use your hands or a rolling pin to form the loaves as you see fit.
First, roll out a rectangle, then roll it into a roll. We pinch the edge well and from the sides too.
 roll it up
Prepare a baking sheet by greasing it with vegetable oil. We place our loaves on it and lightly press down with our hands. We place them at a great distance from each other.
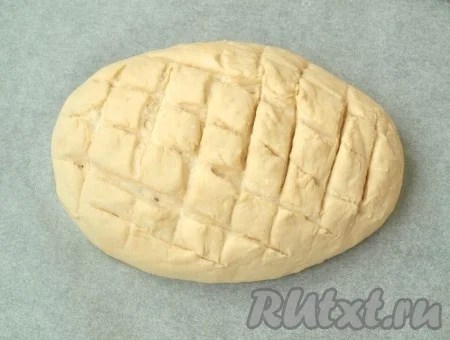
We make several oblique cuts on top with a knife.
 make cuts on top.
We leave our loaves to brew for 45 minutes. During this time they will increase in volume.
 the loaves are steeped
Preheat our oven to 200 degrees. Before putting the loaves in the oven, brush the tops with regular boiled water to make the crust more golden brown.
Now put the homemade bread in the oven. Bake for 30 minutes, then reduce the temperature to 180 degrees and bake for another 10 minutes.
Then we take out our loaves and moisten the top with some water so that the crust is softer.
 lubricate with water.
That's all, the bread is ready, you can cut it and serve it. Bon appetit.
Homemade bread according to video recipe.
It’s practically the same here, all the steps are absolutely similar, only slightly different proportions of ingredients. We tried exactly this recipe and it turned out very tasty. We will not duplicate the top recipe, but simply invite you to take a look, maybe it will be easier to perceive.
Ingredients:
- Flour - 600 g;
- Salt - 1 teaspoon;
- Sugar - 1.5 teaspoon;
- Dry yeast - 2 teaspoons;
- Vegetable oil - 4 tablespoons;
- Warm water - 300 ml.
Homemade bread in the oven Ciabatta.
Interesting name, but I used to think it was just a different type of bread. It turned out that this was ordinary homemade bread in the oven, with yeast or sourdough. And this dish is Italian, that’s how it is.
 Ciabatta in section
In general, almost everything is the same as above, only different proportions of ingredients and a “cake” shape. But it’s actually delicious, and the crust is so crispy and pleasant, so try it, you’ll definitely like it.
We will need:
- Flour - 400 g;
- Dry yeast - 1/2 teaspoon or 2.5 ml;
- Water - 300 ml;
- Salt - 1 teaspoon.
I would like to note that we do not add sugar, but it still turns out very tasty. Then we tried sugar (1.5 teaspoons), it turned out sweeter. Here it’s more convenient for you, without sugar you liked it better.
Sift the flour into a separate bowl, where we will knead the dough.
Add salt and yeast to flour. Mix everything thoroughly.
Now add water, but first 250 ml, stir, then look at the situation, adding a little more water. It turned out that there was a little water left, I did not add it so that the dough would not turn out liquid.
Now we cover the dough, I covered it with cling film, and leave it for at least 7 hours, but no more than a day. This is convenient, so you can knead the dough in the morning and continue in the evening or knead in the evening and continue in the morning.
 leave the dough for at least 7 hours
After the time has passed, the dough has risen, continue. Sprinkle the table with flour, being careful not to let the dough stick to the table when we take it out of the bowl.
 risen dough
Take the dough out of the bowl and sprinkle plenty of flour on top too, then make a small rectangle with your hands, pressing lightly.
 make a rectangle from the dough
Now we fold it into an envelope and make a rectangle again. And so on a total of 3 times. As a result, there should be a rectangle on the table. This is how puff pastry is usually kneaded.
The dough is sticky, so sprinkle flour in those places where it sticks to the table or hands.
After 3 folds, we twist the rectangle into a roll and fold the edges to the bottom.
 roll it up and fold the edges.
Now place our bread on a pre-prepared baking sheet covered with parchment and sprinkle a little flour on top. Then use a knife or blade to make three cuts.
 make cuts
Leave to proof for 1.5 - 2 hours, covered with a towel. The dough should rise by 2 times.
After 2 hours, put our bread in the oven, preheated to 170 degrees, to bake for 50 minutes.
 put it in the oven to bake
After the time has passed, without opening the oven, increase the temperature to 215 degrees and bake for another 15 minutes.
Then we take out our bread and grease the top with water, as much as possible, so that the crust softens.
 brush the bread with water
Cover with a linen towel and leave the bread to cool, about 1 hour. Then you can serve it to the table.
But it also happens that the bread doesn’t turn out well, it rises well and quickly, but at the end of the second proofing or at the beginning of the baking cycle, the roof-dome of the bread falls off.
There are the following main reasons:
- High yeast content in the dough.
- Increased moisture content in the dough piece, failure to maintain the flour/liquid balance.
- Incorrect timing of first or second proofing. This factor is called “dough over-proofing”...
- Opening the oven door while baking...
Homemade bread without yeast.
Sometimes, for health reasons, you cannot eat baked goods that contain yeast. Then the real salvation is yeast-free bread. Everything is just like in the old days.
 yeast-free bread
The only downside is that this process is long. But there are more advantages. Firstly, the bread turns out much tastier. Secondly, there are a lot of useful microelements.
We will need:
- Rye flour - a little more than 1 kg;
- Vegetable oil (preferably refined) - 4 tablespoons;
- Salt - 1 teaspoon;
- Honey (sugar) - 1 tablespoon;
- Water.
It is best to start cooking in the morning. You will need a large glass or ceramic container.
Pour in 100 ml of warm water (brought to a boil and cooled). Pour 100 grams into water. rye flour. Stir until smooth.
Cover with a cotton napkin. Place in a warm place. It is advisable not to use metal - even stir with a wooden spoon or spatula.
After a day, add water and flour (100 each) to this dough. Leave it warm again.
Repeat on the third day.
Fourth day - time is coming to an end. Pour in 500 ml of water and add enough flour so that the dough resembles thick sour cream. Leave for a day.
The next morning you need to separate ¼ of the part - this will be the so-called “grove”, which can be used for further baking of bread (repeating the procedure of adding portions of flour and water). Add salt, sugar and vegetable oil to the rest of the dough. Stir first with a wooden spoon and only finally with your hands.
Grease a baking sheet with oil. Form a loaf. Place on a baking sheet. Leave for three hours to rise.
Baking time is about an hour, depending on the individual characteristics of the oven.
We described the recipe quickly, of course it takes a long time, but it’s worth it. Soon we will describe in more detail the process of making sourdough and bread using it. Sourdough is also different, so stay with us, subscribe and be one of the first to learn the recipe for making homemade sourdough bread.
That's all for us, leave your comments below, also join us in Odnoklassniki, bye everyone.
Updated: October 8, 2018 by: Subbotina Maria
Recipe adapted from the book "My bread, The revolutionary no-work, no knead method", by Jim Lahey.The book describes a truly revolutionary method, not without thorough kneading, as the title of the book suggests, but rather a technique for baking bread. I have never encountered this technique in any of my many culinary sources of inspiration and training. The method is really wonderful!

The whole point is that the bread is baked for the first half hour in a confined space, in a saucepan or kettle. It is best for this pan or kettle to be cast iron and heavy. So that the lid fits well and the dishes maintain the temperature well.
Usually, in bread recipes I always indicate that when you put the bread in a preheated oven, pour a glass of water onto the bottom baking sheet in the oven, which is also preheated. In order to create steam during the first baking time. It is needed so that the bread rises better, so that the crust takes longer to form. And also to ensure that this crust is rough and crispy.
Here, in an enclosed space, the moisture from the dough settles on the walls of the dish and does not evaporate so quickly, generating steam in a simple and hassle-free way. Simply brilliant!
Homemade bread is best eaten that very day. On the second day it is also tasty, but not as good as the first day. Is there anything better than homemade bread made with your own hands with great love?

1 loaf
Ingredients
- 400 grams of wheat flour
- 1 tsp
- salt
- 1 tsp
- Sahara
- 15 grams of fresh yeast
Cooking time: 2 hours

Total cooking time: 16 hours
1) In a large bowl, mix flour, salt and sugar. In a small bowl, dissolve the yeast in water. Pour into the flour and knead into a homogeneous dough using a wooden spoon or a stand mixer, stirring for about a minute. The dough will be quite liquid, like bread dough, and sticky.

2) Cover the bowl with the dough with cling film and leave at room temperature for about 14 hours, at least 12 hours, up to 24 hours.
3) Spread a linen kitchen towel on a flat surface and sprinkle generously with rye flour. Place the dough on a towel and shape it into a ball, tucking the edges of the dough towards the center. Leave the formed loaf on a floured towel and sprinkle more flour on top. Cover the dough with the edges of the towel and leave to rise for 1.5 hours.

4) Half an hour before baking, preheat the oven to 250ᵒC, inserting a cast-iron pot or pan with a lid in the middle.
7) Remove the bread from the oven and leave it in the bowl for a couple of minutes. After a couple of minutes, transfer the bread to a cooling rack.