We will find out how to properly insulate a loggia or balcony, decide on the method and materials, and talk about laying electrical wiring.
Apartments with additional space, which is a loggia or balcony, have a greater advantage in the eyes of owners of apartments without these premises. But how are these same loggias and balconies used? In the summer you can put a light table and chairs there, breathe fresh air, or simply stretch clotheslines and dry washed clothes.
How to insulate a loggia or balcony
- Glazing of the loggia
- Insulating the loggia floor
- Electrics on the loggia
With the onset of the first cold weather, balconies and loggias become places for storing various unnecessary belongings; with the first frosts, they allow you to do without a refrigerator and store perishable food without any problems. But square meters of living space are expensive today - why do we forget about “orphan” premises that can easily be converted into living rooms using modern insulating materials? Without delaying until “tomorrow”, we begin to insulate the loggia and balcony - the guide is in this article.
Questions that need to be resolved before starting work on insulating the loggia
First of all, you need to decide on the purpose of the future insulated room, whether it will be a study, a children's room or, for example, a room for sports training. To a large extent, this choice will depend on the size of the loggia, and to a greater extent on its width - if it is less than one and a half meters, then it will be too narrow for a study. The purpose of using the insulated loggia in the future depends on the layout of the electrical wiring, the positions and number of electrical outlets, and lighting fixtures.
Important: completely abandon the idea of combining a loggia and an adjacent room by removing part of the wall between them!
This is the external wall of the building, which means it is load-bearing; no additional expansion of the opening in it, except, perhaps, the removal of the frame and door frame (if the loggia is located behind the kitchen), is strictly forbidden! News channels periodically contain reports about the partial destruction of entire entrances in multi-story residential buildings due to the fact that the owner of one of the apartments intended to increase the living space by demolishing part of the load-bearing wall - don’t even think about it!
The reason why loggias freeze seriously in winter is due to the large glass area of this room - after all, it was designed by architects for a clothes dryer, and not for a living space. It would seem that there is nothing complicated here - cover part of the window opening with brickwork or facade plasterboard with a layer of insulation between its panels and the problem is solved.
But not everything is so simple - from the position of official government agencies, reducing the glazing area of the loggia is an interference in the architectural appearance of the building, and therefore is not allowed. Glazing the balcony is another matter; it is permitted because it reduces the risk of fire from an accidental cigarette butt from the upper floors. In recent years, supervisory government agencies have not responded in any way to these very interventions in the “architectural appearance,” but this does not mean that they will not continue to pay attention - it is better not to make serious changes to the existing glazing of the loggia.
Heat loss through the glazing of the loggia can be significantly reduced by installing modern double-glazed windows and carefully sealing the joints between the new window frames, as well as the frames and adjacent walls.
It is necessary to think about heating the loggia - if after insulation this room will be used as a full-fledged room in which a person is present for a long time, then there is no way to do without it. The idea of installing a heating battery powered from a central system on the loggia is tempting, but this is prohibited by municipal legislation.
The reason for the ban is this: when designing the building and its heating system, loggias were not taken into account, so installing a heating battery in these rooms will lead to a lack of temperature in the system to heat other apartments. As you can see, this is not a matter of heat theft at all, and your attempts to include the loggia area in the total heated area of the apartment are guaranteed to be rejected by all authorities.
Installing a water radiator on the loggia is allowed only if your apartment has an individual heating system, that is, it is heated from a boiler installed in it. The only option left is to heat the loggia with electric heaters - infrared, convection or using electric underfloor heating.
Preparing the loggia (balcony) for insulation
At this stage, the loggia room is completely cleared of everything that is stored in it - after cleaning it should become completely empty. The existing wooden frames with single glazing will then need to be removed as they will need to be replaced with modern ones. If the balcony has a metal fence, it needs to be cut off (you will need a grinder), instead of the old parapet, lay out a new one, made of light ceramic bricks or foam blocks.
The new parapet can be raised a little higher than the old fence, but not excessively - change the “architectural appearance”. Completely remove the floor covering of the loggia, but if it is tiled, you can leave it by cutting out part of the tile for the brick parapet outlet.
Measure the dimensions of the free opening above the parapet, and you need to remove them using a building level - with the same heights on opposite sides, there may be a serious horizontal difference, i.e., opposite points may be at different heights from the horizontal floor level. Measure the corners and take dimensions from each of the walls, ceiling and floor, make a drawing with these dimensions - it will come in handy.
Glazing of the loggia
Depending on the purposes of insulation and the temperatures of the cold season, new frames can be with one glass or with double-glazed windows of two or three glasses with a heat-reflecting film inside. The frames themselves can be aluminum, wood or plastic reinforced from the inside with a galvanized metal profile.
A glazing opening measurer will give you measurements and recommendations for glazing the loggia; he will also perform all measurements - take into account at least one window in the total glazing area for ventilation of the insulated loggia in the future.
Warn the measurer that you need free vertical areas between the outer frames and the wall about 70 mm wide on each side, i.e. the frames on the sides of the glazed skylight should not be located close to the walls.
Subsequent insulation of the walls of the loggia will require attaching a layer of insulation, a metal profile or a wooden beam to them and subsequent finishing cladding, so the walls will move slightly inside the loggia - if you install double-glazed windows close to the walls, then the side profiles of the frames will be “recessed” into the insulated wall. In the free areas between the frames and the wall, a beam will be installed and two layers of insulation will be laid (before and after the beam).
When installing new glazing, require the contractor to install a strip on the outside - a special plastic tape, its width can be from 30 to 70 mm. And one more thing - despite the adhesive layer on the back side of the strip, you should attach it to the frame using short screws with a pitch of 500 mm, because over time the glue will dry and the strip will certainly come off.
Insulating the loggia floor
There are two main ways to do this: lay the insulation directly on the floor, lay the main covering on top; Place the logs, insulation and subfloor base on top of them, and the main covering on top. If it is possible to simplify the task and not raise the floor on wooden logs, we lay only roofing felt, glue its joints with sealing tape and, if the height of the floor to the threshold of the loggia door allows, lay the base of the floor from chipboard or OSB boards, impregnated with drying oil and further drying. In this case, we will not lay insulation, since there is no room for it.
Penofol or Penoplex are most often used as a heat and vapor barrier in the process of insulating a loggia or balcony; the first insulation consists of foamed polyethylene, the second - from extruded polystyrene foam. Having good thermal insulation characteristics, easy to use and virtually waste-free, both of these materials are not recommended for use in residential premises.
The reasons are as follows: despite the declared flammability classes, according to which these insulation materials do not burn and do not support combustion, their manufacturers are being dishonest - “Penofol” and “Penoplex” smolder well, releasing a significant amount of carbon dioxide and carbon monoxide. It is better to protect the residents of the apartment and the entire house as much as possible from such consequences of fire by using only mineral wool-based insulation.
So, to lay an insulated floor on a loggia we will need: roofing material, which is enough to cover the area of the loggia floor with a slight overlap on the walls; a roll of self-adhesive tape-sealant of the “Guerlen” type; wooden beam 50 mm wide for placing logs; rolled mineral wool with a thickness of 50 mm; flooring for the base of the floor (sheets of chipboard, OSB 20 mm thick); finishing coated floors (linoleum, laminate).
The floor surface is cleaned of debris and dust, and roofing felt is laid on top of it in one layer. The joints between sheets of roofing felt and between the roofing felt and the adjacent wall are covered with self-adhesive sealant tape. Logs are installed on top of the roofing material in increments of 500 mm, and the timber under them is selected with a height that will allow the plane of the new floor to be brought to the level of the door threshold. When determining the height of the timber for the logs, take into account: the thickness of the roofing material (usually 5 mm), the thickness of the slabs under the floor base, and the thickness of the finishing floor covering.
The logs are aligned to the building level and connected to each other by bars of smaller thickness. The logs should not be properly fastened at this stage - their structure will have to be disassembled for treatment against rotting. To obtain a perfectly horizontal floor surface, you will need to place small support boards under the joists; they should not be attached to the floor, as the roofing material will be damaged.
In the design of some balconies, the slabs that form the floor are sloped towards the side of the fence to remove rainwater - differences of up to 90 mm horizontally between the inner and outer sides of the floor slab are possible. Take this into account when setting lags.
After bringing the upper plane formed by the logs to a horizontal level, it is necessary to disassemble the entire structure and treat the timber with oxol drying oil to protect it from rotting. After waiting for the drying oil layer applied with a paint brush to completely dry, we assemble the logs again, this time we need to fasten them together with the greatest care. The slabs chosen for the base of the floor also need to be covered with a layer of drying oil on both sides and along all ends.
Having completed the treatment with drying oil, drying and placing the logs, we proceed to laying the mineral wool insulation, for which it needs to be cut into blocks according to the size of the compartments between the installed logs. Mineral wool is easily cut with a regular joiner's saw; while working with it, you need to wear a bandage or a respirator - small particles of mineral wool will break off and rise into the air when cutting and laying.
At the next stage after laying the insulation, the base plates are installed on the joists and secured to them with wood screws. Further work on the flooring is stopped at this stage - first it is necessary to complete the insulation and finishing work of the ceiling and walls. During work on the ceiling and walls, the surface of the rough floor base is covered with two layers of PVC film, secured along the contour with masking tape.
Insulation of the walls and ceiling of the loggia - the initial stage
Inspect the surfaces of the ceiling and walls for cracks and falling plaster, tiles, unstitch all weak seams, then fill them with foam, seal the top with sealant tape.
Nand the next stage is the installation of wooden beams with a cross-section of 40x50 mm (pre-treated with drying oil) on the walls and ceiling. The beam is placed across the walls and ceiling in increments of 500 mm, the installation begins at the junction of the planes of the ceiling and walls, i.e., at the junction points, the beam is attached to both the ceiling and the wall, close to each other. To fasten the timber, concrete screws are used with a pitch of 300 mm.
At this point, work on the walls and ceiling temporarily stops - then it’s the turn of the electricians.
Electrics on the loggia
As a rule, the old electrical wiring of a loggia is represented by a 2x1.5 aluminum wire in a common braid, designed for the simplest lamp with one 100 W lamp. For a full-fledged living space, such wiring is not suitable at all - we will install a new one.
First, you need to find out where the junction box is located in the room closest to the loggia - this issue should be clarified with an electrician at the local housing office or get a wiring diagram for your apartment from this office. If for some reason you don’t want to contact the housing office, then you can run new wiring from the electrical outlet closest to the loggia, drilling a channel from it to the wall between the loggia and the room, then drill a hole through this wall. For a detailed description of this process, see our article.
For wiring to the loggia, you can use an aluminum cable, for example, APPV 2x2.5 or 3x2.5, if grounding is expected (in residential buildings, most often there is no grounding). You can use a VVG 2x1.5 copper cable - it will be better. The electrical cable must be placed in a PVC corrugated hose designed to completely prevent fire from a short circuit.
Accordingly, the channel for laying the cable must have sufficient width and depth to accommodate the corrugated hose (a corrugated hose with a diameter of 16 mm is suitable for one cable). In turn, the drilled hole in the wall to the loggia must accommodate a metal tube through which, according to the rules for electrical wiring, the cable to the loggia is passed.
At the exit from the hole into the loggia room, the cable is again threaded through the corrugated hose and inserted into the internal installation box - the place for it is determined and prepared in advance; to secure it, it is necessary to install a wooden embed (a board of sufficient size) and secure it to the wooden sheathing.
It is most convenient to place the junction box on the wall separating the loggia from the adjacent living room, 250 mm from the existing ceiling (without insulation and finishing). A corrugated hose with an electrical cable inside is threaded between the wall and the beam attached to it; if necessary, holes slightly larger than the diameter of the corrugated hose are drilled in the areas where the beam and the wall meet. Holes are drilled in the embedded boards for the electrical cable outlet.
Decide on the installation locations of electrical sockets and switches, the installation location of the lamp(s), the heating device hung on the wall - at each installation point of electrical installation products and electrical appliances mounted on the wall, it is necessary to install mortgages to which these electrical appliances will be attached in turn.
The cable in places where electrical installation products are installed and in junction boxes is brought out to a greater length than is actually necessary - 70 mm, which will make it possible to replace the electrical device in the future if necessary. In no case should the exposed ends of the wiring extend beyond the electrical installations and junction boxes!
Important: all switches and sockets mounted on an insulated loggia must be for external installation only.
Important: connect the electrical cable supplying power from the living quarters to the loggia with the cables supplying power to sockets and switches in a junction box only through the DIN rail of the terminal block - no twisting!
Having finished installing the electrical wiring, turn off the general power supply to the apartment and connect the loggia wiring in the junction box of the living room or in the outlet to which the channel was drilled. Connection in any version (junction box or socket) is made through a terminal block (DIN rail).
Please note that direct contact of copper and aluminum cables when twisted will cause heating of the aluminum wire, which can lead to a fire - the mediation of the terminal block with steel contacts will eliminate heating and the threat of fire. Use the terminal block in any case, even if the apartment wiring is made entirely of copper cable. If there is no DIN rail in the old junction box in the room, purchase and connect the electrical cables through it.
So, all work on laying electrical wiring to the loggia is completed - turn on the power supply to the apartment and make sure that all electrical installations have power. Next, we seal the grooved channel in the living room and again begin to insulate the loggia.
Insulation of the walls and ceiling of the loggia - continue
Let's return to insulating the walls and ceiling of the loggia. The beam is already fixed, it’s time to lay mineral wool and vapor barrier, you will need knitting wire. We cut the mineral wool into blocks of width equal to the areas between the timber on the walls and the ceiling; we begin laying it from the ceiling - you will need an assistant.
The tools you need are a construction stapler with 12 mm staples - we use them to fasten the end of the binding wire to the edge of the beam, lay the insulation and hold it with the wire, bringing it out between two adjacent wooden blocks in a zigzag manner, securing each sharp corner with a stapler staple.
Having finished laying the insulation on the ceiling, we move on to the external walls - the wall between the loggia and the living room does not need to be insulated, because it is already “warm”, but the timber is attached to it in the same way as on the external walls. Therefore, try to place electrical installation products on this particular wall - it will not need to be insulated and covered with a vapor barrier film, which means there will be no difficulties with placing insulation under the embedded board for an electrical outlet or switch.
A vapor barrier film must be placed on top of the insulation, slightly stretched and secured - it must be applied to the surface, secured to the top beam and then along the perimeter of the walls (ceiling). Installation of the film should begin from the ceiling plane. In the areas where the walls and ceiling meet, it is necessary to overlap the film fixed to the walls by approximately 50 mm. In those places where electrical installation products are located, the film is slightly cut and wrapped around the cable going to the product, i.e. the electrical cable is pushed through it.
Important: installation of a vapor barrier film is mandatory, otherwise the wooden beam will rot and the mineral wool will sag under the influence of moisture penetrating in the form of steam from the room. Water vapor will be formed due to the high pressure inside the room and will be attracted to the external walls, the partial pressure outside of which is lower due to the lower temperature of the cold season.
Finishing of walls, ceilings and floors
The walls and ceiling can be finished with various coatings - plastic or MDF panels, plasterboard or lining. For flooring, you can use laminate, linoleum, or save money and simply cover the base of the floor with two layers of varnish or paint.
The final covering should begin with the ceiling, then the floor covering and only after that the wall covering. After installing the floor covering, its entire surface should be covered again with PVC film to protect it from damage during wall covering. A hole is cut in the wall covering in the area where the wiring box is installed; in the places where electrical installation products are installed, only holes are cut for the electrical cable - I remind you that all sockets and switches must be externally installed, i.e., protruding completely above the plane of the wall covering.
After finishing the cladding of the external walls of the loggia, the sockets and switches are connected to the cable supplying power to them and mounted in their places.
Work on insulating the loggia ends with the installation of the plinth and, in the case of sheathing with plastic or MDF panels, butt strips on all edges and corners formed by the wall and ceiling coverings.
If you intend to replace the existing loggia door with a new one, then its installation must be carried out before laying the logs or the base of the floor and before installing the timber on the walls.published
Subscribe to our Yandex Zen channel!
If you have any questions on this topic, ask them to the experts and readers of our project.
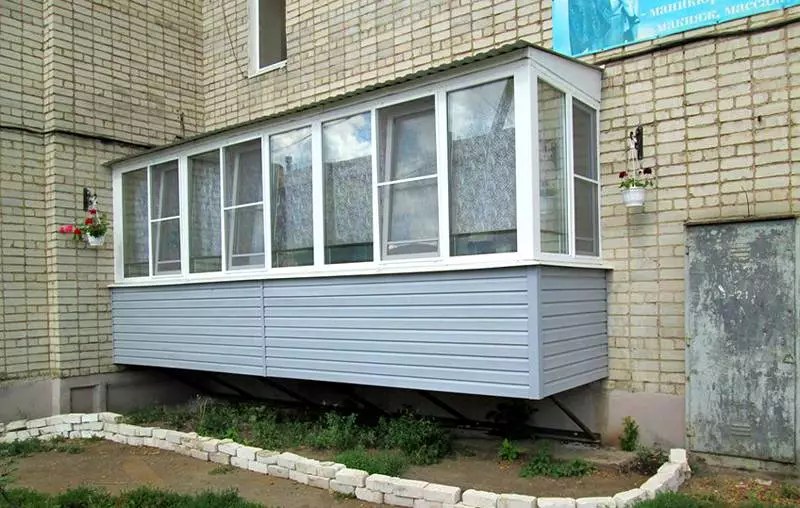
Using the balcony all year round will increase the usable area of the apartment. Creating a comfortable microclimate is possible if you take into account the rules and recommendations of experts on insulating a balcony with your own hands. In our article we will look at the repair using the example of a loggia with the following dimensions: 7.5 m in length, 1.16 in width and 2.9 in height. Step-by-step instructions and photographs in progress. The renovation took 2 weeks, the budget was 40 thousand rubles, the year of construction was 2013.
- Using the example of Moscow
- . The most useful things from youtube
Necessary tool
- Screwdriver and electric drill;
- Construction stapler, level;
- Scissors, knife;
- Marker, laser tape measure;
- Hammer;
- Putty knife;
- Gas-burner;
- A special gun for glue or polyurethane foam;
- Containers for mixing components;
- Scotch tape (painting and reinforced);
- Rags, sponges, etc.;
- Drill attachments that can be used to stir construction mixtures.
Materials (what to buy)
- Structures for glazing of premises;
- Material for organizing the waterproofing layer (foamed polyethylene);
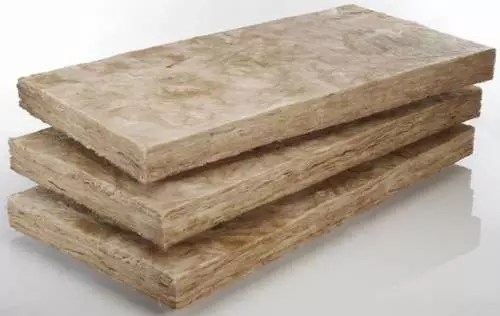
- Insulation (mineral wool 70 mm thick);
- Wooden logs to level the floor and create a reliable foundation (50x50);
- Sheets of plywood (10 mm);
- Glue, metal tape;
- Tile for wall cladding in two shades;
- Laminate (thickness 12 mm).
Insulation instructions using a live example
Let's consider a simple repair option that most apartment owners resort to:
1. Preparing the balcony before renovation
On the eve of glazing, you need to carefully check the space and eliminate chips, cracks and gaps.
Depending on the size of the flaw, polyurethane mastic, polyurethane foam, and sealants are used. To organize a convenient seal, use a special gun designed for applying polyurethane foam.
The space is insulated with double-glazed windows made from PVC profiles.
Glazing a loggia, or replacing old windows with new double-glazed windows is a mandatory stage of work to protect the space from heat loss.
Other materials for glazing are also used: wood, aluminum and metal-plastic. Elements of window frames must be treated with paint and antiseptic substances. The wooden structure of the windows is not airtight, has a low level of thermal insulation and an inconvenient opening mechanism. Aluminum windows are a durable option, they are comfortable and reliable, but the level of heat loss is quite high.
It is better to give preference to PVC window frames, which also contain aluminum, but the internal formwork does not consist of metal.
PVC windows are resistant to moisture and sudden temperature changes. Such frames are easy to use, sealed and have a low level of thermal conductivity.
Masking cables in the wall for connecting an air conditioner.

2. Raising the floor level and thermal insulation
Waterproofing the floor with penofol.

Most often, the materials at the base of the floor and walls are concrete and brick, which strongly absorb moisture and vapor. In order for the heat insulator to retain its properties, a waterproofing layer should be installed. Instead of penofol for waterproofing, you can choose roofing felt or special impregnation. Penofol is laid overlapping, the sheets are connected to each other using a gas burner.
Creating a frame from slats (50x50).

Floor lathing for subsequent installation of mineral wool.


Wooden logs are used for the construction of the sheathing. The frame elements are fixed together with self-tapping screws using a screwdriver. The pitch of the slats directly depends on the thermal insulation material.
Typically, the distance between the slats is 50 cm, however, to lay a soft heat insulator, the pitch of the frame elements should be reduced.
In order to eliminate cold bridges in the structure, you need to carefully organize thermal insulation around the perimeter. We place mineral wool between the elements of the mounted frame. We fill the joints with scraps of heat insulation and polyurethane foam.
Mineral wool laid in the cells of the sheathing on the floor.

During the work, a mistake was made - due to the different dimensions of the heat insulator (70 mm) and the height of the bars (50 mm), spacers had to be made.

Raising the floor to the threshold level - 20 cm.

Installation of plywood sheets on the sheathing frame.

When laying, the plywood sagged 10 mm, so it is better to choose more durable sheets, for example 20 mm chipboard or OSB.
3. Insulation of walls and installation of window sills
We begin the construction of a frame to create a window sill from metal elements. This frame will allow you to insulate a parapet made of gas blocks.

We do the electrical installation for lamps and other devices in advance.

We fill the metal frame with insulation, after which we sheathe the gypsum board structure.

Proper insulation of the parapet on the advice of experts:
- Impregnation with special hydrophobic solutions;
- Fixing penofol using a construction stapler, aluminum tape, or glue;
- Filling joints;
- Installation of the second layer of thermal insulation;
- Vapor barrier. A special membrane is suitable for organizing the layer.
Then we protect the other walls of the room from body loss. To create a reliable glazing structure for a loggia, insulating the parapet and floor is not enough. Basically, a balcony parapet is made from a material with good strength and thermal insulation (foam blocks, gas blocks), but such a fence does not protect the insulation from moisture.
Mineral wool was also chosen for thermal insulation of other walls.

In addition to mineral wool, other types of insulation will also fit in its place: extruded polystyrene foam (penoplex), foil-coated polyethylene (penofol), polystyrene foam or polyurethane foam (PPU). The basis of all of the listed heat insulators are polymers, which are treated with foam compounds.
The insulated parapet is sheathed with gypsum boards.

Covering the gypsum board base with ceramic tiles.

We ensure the evenness of the tile laying using special elements - crosses.

Alternative types of finishing are: PVC panels, wooden lining, wallpaper, block house.
In this example, the ceiling surface was not insulated. On the one hand, the apartment is located on an intermediate floor (11 out of 19) and there is no direct threat of exposure to precipitation, however, heat loss will occur through the floor slab, even if the neighbors above have a well-insulated floor.
If we are talking about insulating the loggia of the upper floor, in this case the ceiling slab can be protected by installing a roof. The canopy is constructed with a slope to allow rainwater and snow to drain away.
4. Installation and connection of sockets
We install a socket with a light control function.

To install a socket in the wall, you need to drill a hole.

5. Finishing the room
We cover the floor with laminate and the walls with tiles. Flush joining was not successful as a result of the work.

In order to compensate for the deflection of thin plywood, we choose a laminate with a thickness of 12 mm.
The shortcomings of the repair in a real example are the lack of finishing coating.
A small piece of ceramic tile is missing. 
There were also not enough tiles.

In this corner with finishing flaws, a cabinet is planned, which should hide most of the visible defects.
In order to avoid a shortage of material, you should think about everything in as much detail as possible on the eve of work, drawing up a diagram based on the actual dimensions of the room. It is better to purchase the material with some reserve.
We decorate the window sill with ceramic tiles.

Installation of plinth on the loggia.

Trimming the threshold with tiles.

When raising the floor to the level of the threshold, it is better to use one material in the finishing, so the surfaces will be more harmoniously combined with each other.
During the repair process, a gap formed between the window sill and the glazing structure, to eliminate which it is necessary to use special internal corners.
The photo shows a sample of the outer corner that was purchased by mistake.

The result of masking the gap with the outer corner.

The room after laying tiles, laminate and creating a black stretch ceiling with five spotlights.

In the future, a cabinet will be installed in this part of the balcony.

1. Advice from an experienced specialist
A range of insulators used to create a warm space on the balcony. Features of various insulation materials. Practical recommendations for creating a reliable design.
2. Master class on installing a waterproofing layer
Details of installing waterproofing on the balcony. Laying ceramic tiles.
.Despite their small size, comprehensive modernization of these parts of residential buildings is a complex task. To find out how to do it yourself, step-by-step photos must be supplemented with detailed descriptions of work operations. Information about modern materials will be useful. It is necessary to find out how the new premises will be equipped. Finding the right answers to these and other practical questions will be easier after reading this article.
Read in the article
Insulating a balcony with your own hands: step-by-step instructions for preparatory work
In domestic climatic conditions, open balconies can be fully used for no more than a few months a year. They are blown by cold winds, filled with rain and covered with snow. After the implementation of the project, the necessary protection will be created. Even if you choose the most economical option, the insulation characteristics of the property will improve and costs will decrease. After deep modernization, you can actually increase your living space at relatively low cost.

Preventing Mistakes
Some important details should be noted at the beginning to avoid making wrong decisions:
- Excessive “frugality” can subsequently transform into additional expenses. If you install cheap frames without, or use insufficient quality and finishing materials, the desired result will not be obtained. Subsequent alterations are additional costs.
- The wrong choice of technology is also accompanied by troubles. It is necessary to carefully study the nuances of the methods to ensure that they can be realistically reproduced on your own. To carry out the most complex work processes, you can invite specialized specialists.
- Standard ones cannot be installed on the balcony. Some municipal governments prohibit changing the color of exterior surfaces, installing frames, or other externally visible changes.
Important! It should be ensured that the project does not violate the requirements of applicable codes and regulations. If such a structure is not officially approved, it will have to be removed at your own expense and a fine will be paid.
Formulation of the problem
After a detailed study of thematic materials, final conclusions will be drawn. But already at the first stage it is necessary to formulate general requirements and note the following important details:
- Even a small modernization increases the weight of the structure. It is necessary to take into account the increase in loads on the load-bearing frame and plan a specialized inspection. In some situations, a separate engineering calculation will be required.
- If the door block remains, there is no need to make increased demands on the insulation characteristics of the balcony. Otherwise, they should be no worse than in .
- A home computer network is being installed in the new premises. We need to decide on the equipment of the balcony.
- It is advisable here to make the floor the same level as the room, without thresholds or steps.


This figure shows that if desired, you can increase the existing area. But we must remember that such structures significantly increase the load on the building. They must be approved in the manner prescribed by law, since significant changes to the initial design are expected.
Important! A simple freehand drawing is better than no documentation at all. Based on it, it is easier to prepare a list of components, materials, tools and other necessary products.
How to insulate the floor, walls and ceiling on a balcony: choice of materials
If appropriate opportunities exist, it is better to install insulation on the outside of the walls. This will help move the dew point towards the street. The likelihood of moisture penetrating into the main building structures will be reduced. This will prevent their destruction and mold. The available volume of the balcony will be rationally used.

It is easier to carry out installation operations inside yourself. Therefore, only relevant techniques will be discussed further. To find out how to insulate a balcony with your own hands with detailed step-by-step photos and instructions, you need to correctly decide on.
| Image | Name | Advantages | Flaws |
 | Expanded clay | Low cost; good filling of complex shaped volumes with granules; maintaining integrity over a long service life; non-flammability. | High moisture permeability, which is accompanied by loss of insulating properties. |
 | Mineral wool | Durability of modern products; resistance to high temperatures; high quality butt joints. | Low strength; deterioration of the structure and increase in thermal conductivity when water enters. These materials must be additionally protected from mechanical damage and increased stress. |
 | Styrofoam | Reasonable prices; ease of processing; smooth outer surface; light weight. | Low strength, flammability. To improve resistance to open flame, special additives are used, but the corresponding materials are more expensive. |
 | Foamed polystyrene boards | High strength of products with a sufficiently high density; ease of installation; resistance to moisture; durability. | Relatively expensive factory-produced materials from well-known manufacturers. Difficulty filling internal volumes without creating empty spaces. |
 | Polystyrene formed at a construction site from several liquid components | It has all the advantages of slabs, but in addition it fills all cavities of any shape. | The total cost is higher, since special equipment must be used. |
 | Foamed polyethylene with a layer of metal foil (penofol) | Small thickness; long-term preservation of good consumer characteristics; moisture resistance. | High price. |
For your information! The insulation system will be effective if insulating materials are installed on the external wall, floor, and ceiling.


How to insulate a balcony with your own hands: step-by-step photos, window installation
| Drawing | Description of actions |
 | Taking into account the characteristics of a particular balcony, they create reliable support for the frames. If necessary (as in the example picture), install additional metal supports. The production of such products is entrusted to a specialized enterprise. |
 | It's easier to work with assembled frames. They are installed sequentially. After precise leveling using a building level, the cracks are filled with construction foam. |
 | If it is necessary to install double-glazed windows directly on site, beads with seals are inserted carefully. To avoid damaging the fragile plastic, use a wooden hammer and damping pads. |
 | Next they install Wooden frames deteriorate due to weather and natural influences   Polymers are used to create hinged and sliding systems, curved and rectangular frames. If necessary, apply painting and lamination. Article |
Any intended year-round use of the balcony space requires its insulation, of course, if you do not use the balcony as a freezer in winter. A study or “closet” for storing preserved goods, a winter garden or a place for secluded relaxation... How to insulate a balcony with your own hands to achieve your plan?
The sequence of actions for insulating a balcony consists of the following steps:
- studying the condition of the balcony and drawing up an action plan
- strengthening the parapet - creating a supporting structure,
- exterior decoration,
- glazing,
- thermal insulation,
- sealing,
- fine finishing.
Work Sequence Planning
First of all, examine the condition of the balcony, both from the street side and from the apartment side. And it doesn’t matter that you have already been on this balcony hundreds of times - a new look at the balcony from the point of view of repairs will allow you to see what was previously invisible and study the insulated surfaces.
Make a work plan. Let this be a preliminary plan, but it will allow you to decide on the purchase of necessary materials, ordering double-glazed windows, etc.
When solving the problem of how to insulate a balcony with your own hands, you will definitely need information about the basic insulation techniques. Don't limit yourself to just this article. The more you know, the more different repair opportunities will open up to you.
Important! The next stage of your actions should be the “total eviction of the inhabitants” of the balcony. After all, an uninsulated balcony is usually a place to store many unnecessary things.
Strengthening the parapet
Since you are planning to insulate the balcony, you should take care of a reliable base for installing the glazing frame. A standard “Soviet”-built balcony parapet has a parapet in the form of a thin, low metal fence, which in itself is quite strong, but the quality of its fastening in the balcony slab often leaves much to be desired.
But even if it is fastened well and is able to withstand the weight of the glazing frame, it is not possible to secure the frame to the parapet properly.
The fact is that the standard parapet actually runs along the edge of the concrete balcony slab. And if you install a frame on such a parapet, then to secure it you will have to drill the top slab almost at the very edge, which will inevitably lead to “splits” of the latter.
In order to properly secure the glazing frame on all sides, including from above, it is necessary to shift the frame installation plane inside the balcony by a few centimeters (5-7cm) relative to the edge of the top slab. You can check the need for such reconstruction using a plumb line.
This will occur to the detriment of the usable area of the balcony, but will allow the frame to be securely fastened for its many years of “life.”
Attention! It is unacceptable to attach the frame to polyurethane foam, since over time (1-2 years) it is destroyed under the influence of the sun and wind loads on the plane of the windows.
This design can optimally be made from 50x70 mm timber. The option of using gas blocks is not entirely acceptable, since they will create an additional weight load on the balcony slab, which, combined with the heavy structure of the glazing frame, can lead to the collapse of the balcony.
External finishing of parapet and side walls
It is necessary to decide on the external decoration of the parapet. Carrying out such work before glazing will provide you with a lot of convenience for installation, such as siding. You can view a lot of materials about the implementation of such work outside the format of this article.
Briefly, from such a material as siding, we can say that it belongs to the group of PVC profiles. This is a frost-resistant and weather-resistant finishing material used for outdoor work.
The profile design ensures ease of installation, which must be done especially carefully on a balcony. The consequence of unscrupulous and illiterate installation of siding is wind-torn strips that cannot be easily put back in place.

Video: main points in installing siding
Be careful! When installing siding, IT IS STRICTLY CONDITIONAL FOR HEALTH to lean over the balcony parapet to install the external finishing material. All work on securing the siding can and should be carried out through the grille of the balcony fence. And for work safety, use a mounting belt with a chain and carabiner.
Video: “Errors when installing siding”
External finishing of the balcony can also be made with plastic lining or corrugated sheeting.
Glazing a balcony to insulate it
Having decided to insulate a balcony with your own hands, you will not skip the stage of glazing it. Glazing of the balcony can be carried out along the entire perimeter of the parapet or partially, making the side walls and the side parts of the front side “blank”. I hope you have already realized that glazing requires a serious supporting structure, the presence of which will guarantee the longevity of the balcony window frame. As glazing today, the best option in the price-quality comparison are metal-plastic windows. Their wear resistance and durability, together with proper installation, firmly keep such windows in a leading position in the building materials market.
To insulate balconies, you can use single-chamber (there is a possibility of freezing in winter) or double-glazed windows (ideal, but heavier).

It is advisable to choose five-chamber profiles for frame structures from reliable manufacturers.
Read more about choosing a glazing option in the article “Insulating a loggia.”
Balcony insulation
How to properly insulate a balcony after glazing? Now we are talking mainly about internal insulation, since “carrying out “insulation” work outside at height with your own hands is highly not recommended - contact high-altitude specialists.
How to insulate a balcony from the inside? And what is the best way to insulate a balcony inside?
All materials and technologies used must meet the following criteria:
- insulation for the balcony must be non-flammable;
- calculate the permissible load on the base of the balcony, especially in the case of erecting supporting masonry from foam concrete or aerated concrete (a balcony is not a loggia);
- the insulation must have a minimum thickness with maximum heat-insulating properties - the balcony area is not unlimited;
- take care of an additional heat source on the balcony, remembering that it is legally prohibited to place central heating pipes and radiators on balconies.
It is possible to properly insulate a balcony only with mandatory insulation of the supporting parapet, floor, ceiling and right and left side walls. On a small balcony, it will be effective to use effective thin insulation materials, for example, penofol, penoplex.
Stages of creating a thermal insulation layer
When choosing a method for insulating a balcony with your own hands, you should decide on the choice of thermal insulation material. How to insulate the inside of a balcony? What insulation is best for a balcony? Basalt, mineral wool, polystyrene foam (FLAMMABLE!) are suitable. The optimal choice may be expanded polystyrene foam, which is resistant to moisture, temperature changes, aggressive environmental influences and, at the same time, has high thermal insulation qualities.

Before installing the insulation, the installation plane must be carefully waterproofed from external moisture. For these purposes, a waterproofing film (up to 200 microns) or foamed polyethylene (4-10 mm) is used. Installation is carried out using double-sided tape, staples, foam, glue - the choice of method depends on the base. The joints of the sheets are carefully taped.
The thermal insulation layer must be covered with a vapor barrier layer. This could be foil penofol. This material is placed with the foil side facing the inside of the room - this will create an additional heat-reflecting layer.
Attention! In the case of using cotton insulation, a necessarily recommended element is a vapor barrier layer, which is designed to prevent warm steam from entering the vapor barrier layer from the side of the room.
Some ways to insulate a balcony with your own hands
- What material to insulate a balcony with?
- As we have already mentioned several times, you can insulate a balcony with various thermal insulation materials. Let's look at some individual insulation methods.
Balcony insulation with polystyrene foam (expanded polystyrene)
Polystyrene foam, also known as expanded polystyrene, is also a heat insulator that has low thermal conductivity due to its structure, saturated with large air “bubbles”. Available for use in the form of slabs with a thickness of 50-150 mm. Slabs up to 100 mm thick are suitable for us.
The advantages of insulating a balcony with polystyrene foam include the hygroscopicity of this material, that is, its resistance to moisture.
“Steps” in the process of insulation with polystyrene foam:
- deep priming of balcony surfaces;
- installation of slabs with a special adhesive composition;
- additional fastening of slabs with umbrella-type dowels;
- we fix the vapor barrier layer (for those who are meticulous about the task at hand - all others can get by);
- we reinforce the surface with fiberglass mesh secured with an adhesive solution;
- we putty, plaster, paint, etc.
 Foam plastic - as insulation on the balcony
 We insulate using penoplex
Penoplex or extruded polystyrene foam is a better, but also more expensive material for insulating a balcony. Penoplex slabs with a thickness of 20-100 mm often have a stepped protrusion at the edges, which makes it possible to obtain a better connection when joining the “quarter” or “tenon-groove” type.
At temperatures down to “-25 o C”, a 40 mm insulation layer is sufficient. In “frosty” climatic conditions, a layer of penoplex 50-70mm is required.
When insulating with Penoplex, we proceed as follows:
- waterproof the surface on which we will mount the foam boards;
- We install the slabs “end-to-end” (Required!);
- if the slabs will be plastered in the future, then they need to be fixed with an adhesive compound + we do a “control” fixation using dowels - umbrellas, and in the case of other decorative finishing - it will be enough to simply fix the slabs with dowels - “umbrellas” (5-8 pcs. per stove);
Note! If the front wall of the balcony is made of foam blocks or other “solid” material, then for installation on it (also on the side and ceiling surfaces) of Penoplex you should not make a wooden or other sheathing. Compared to the thermal insulation properties of penoplex, wood is the worst thermal insulator. Therefore, the sheathing will simply create “bridges” of cold, which will be very inappropriate. For subsequent installation of drywall or lining, the lathing is made on top of a vapor barrier layer laid on polystyrene foam. The resulting air “pockets” will play the role of additional heat insulators.

Balcony insulation with mineral wool
If, in response to the question of what material to insulate a balcony with, you say mineral wool! Well, this is an option, but far from the best. Because in the debate “which insulation is better for a balcony” we have almost come to the dominant answer - Penoplex. And wool with a small thickness will not provide a sufficient thermal insulation effect, but will be a little “difficult” to install when eliminating gaps between its slabs.
But, “the owner is a gentleman”!
We'll tell you how to insulate a balcony from the inside with mineral wool:
- We remember about waterproofing the surface and, of course, carry it out;
- carefully and carefully glue the sheets of cotton wool onto the surface (without pressing them) with a minimum gap;
- after the glue has dried, we additionally secure it with umbrella dowels;
- and again vapor barrier - here it is MANDATORY!
- then installation of reinforcing mesh or battens and decorative finishing.
Note! When insulating the floor, working with mineral wool will be much easier. It is laid between the joists on a waterproofed surface. The top is covered with a layer of vapor barrier and rough floor material.

Additional heat sources
If your insulated balcony is not integral with the room, but is isolated from it by a window and a balcony door, it will be useful to install an additional heating device on it. The best option would be to use electric heating devices: convectors, oil or ceramic radiators. A heat source power of 1 kW will allow you to set the required comfortable temperature on a balcony with an area of up to 4 m2. . For a larger balcony area, it is recommended to use two heat sources with a power of 1 kW each for more uniform heating of the entire volume and walls of the insulated balcony.

Today materials for organizing “warm floors” have become available. The power consumption of a heated floor made using an electric heating cable for a standard balcony (up to 4 m2) will be approximately 1 kW.
Read about this in more detail in the article “Installation of heated floors under tiles.”
If you use an individual heating system, consider water radiators on an insulated balcony.
And so!.. You’ve already read a lot about how to insulate a balcony with your own hands! Read also in other sources! After all, you can still insulate a balcony from the inside with clapboard... And with liquid insulation...

Now all that remains is to decide on the best option to insulate the balcony inside, or choose several in order to calculate how much it costs to insulate a balcony.
Yes, still! Entrust the balcony glazing process to a “pro” - why risk expensive structures, as well as people and cars moving under your balcony.
Independent connection and insulation of the loggia is a whole story with additional construction, complex technologies and a sea of paperwork. And with an unpredictable result: it happens that after all the work, the insulated wall sticks out from under the glazing, the window handles are too high, and condensation drips from the ceiling. We will tell you how to make a loggia a full-fledged part of the apartment and not regret it!
Mistake 1: reconstruction and redevelopment without permission
Even if you do not want to demolish the wall between the apartment and the loggia, but only want to insulate the space outside the window, it is better to notify the BTI representative of your intentions - so that later you do not have problems, for example, with selling the apartment if there are inconsistencies in the technical passport of the housing.
InMyRoom tip: glaze the balcony using sliding double-glazed windows with aluminum profiles - and thus equip a summer unheated loggia. This measure will still add space (for example, for storage), and there will be significantly fewer drafts from the balcony. No permit is required for such glazing.
Error 2: moving the radiator to the loggia
If you have received permission to rebuild, then you are unlikely to plan to pull off such a trick. But in any case, be aware that it is not allowed to extend the pipes for the radiator and the battery itself outside the outer wall of the building. The heat loss on the loggia is too great; if the pipes are not insulated correctly, they can freeze, and accidents are possible; For the heat supply of recently uninhabited meters, one would have to pay an additional significant amount after individual recalculation. One way or another, the batteries are not transferred to the loggia - remember this at the design stage of the insulated balcony.
InMyRoom tip: An electric floor heating system or an oil radiator will help you - it can be attached to the wall in the same way as a regular battery.
Mistake 3: installing frameless glazing
Frameless sashes look great - when closed they have a smooth surface, sometimes not disturbed even by edges. In addition, the doors are conveniently assembled “into an accordion” without taking up the space of the loggia. However, this solution is not suitable for an insulated balcony: single glazing and gaps between the panels cannot protect against the cold. In addition, dirt and dust quickly accumulate on them, fingerprints remain and the mosquito net does not attach.
InMyRoom tip: Take a closer look at the latest developments - for example, thermally insulated tilt-and-slide windows. But the best choice for glazing a warm balcony remains PVC double-glazed windows with good old hinged doors. In fact, they do not take up much space - they can only be opened for ventilation, and opened twice a year to wash the glass outside.
Error 4: remote glazing on brackets
In an effort to increase the area, or more precisely, the volume of the attached loggia, apartment owners build a frame for glazing with a projection of several tens of centimeters. A wide canopy appears along the upper perimeter, on which snow constantly accumulates, and in the off-season rain loudly beats on it. The most important thing is that a glass growth appears on the facade, which spoils the appearance of the building.
InMyRoom tip: an alternative is possible only within the framework of façade uniformity. If your house has entirely open balconies (or they should, in fact, be so) - you should give up the idea of joining or even just glazing. And improve the loggia with green plants.
Mistake 5: insulation in one layer
To create an insulated loggia, the parapet and walls are duplicated with masonry made of foam blocks 70–100 millimeters thick - this material has excellent thermal insulation properties and frost resistance, so some believe that there is no need to additionally insulate the walls and parapet lined with foam blocks from the inside. In fact, masonry of this thickness can freeze.
InMyRoom tip: add either extruded polystyrene foam panels or stone wool slabs to the insulation cake.
Mistake 6: neglecting vapor barrier
It is especially dangerous if you use mineral wool as insulation - without a vapor barrier material it will become damp and ruin the walls and floor on the balcony, and neighbors may find condensation on the ceiling of their loggia. Inside an outdoor building room connected without a vapor barrier, condensation will certainly appear instantly.
InMyRoom tip: even if you only use polystyrene foam or other foam materials for insulation, nothing will stop you from adding a thin layer of vapor barrier film to them. For mineral wool, such an additive is an absolute must-have!
Mistake 7: Overusing sealant without protection
Seams with bubbling foam are a perfectionist's nightmare. Aesthetically unattractive, they also threaten to spoil the climate in the apartment: the fact is that the foam of polyurethane sealants does not tolerate direct sunlight and moisture. And without proper protection, it quickly collapses, opening previously sealed gaps and cracks to drafts and street noise.
InMyRoom tip: Carefully process the “foamed” seams - cut off excess sealant, sand the material with fine sandpaper and cover with putty or acrylate paint (it is better to use both options). If you don’t have putty or paint on hand, take special mounting tape - but keep in mind that paint will not adhere well to such seams.
Mistake 8: Improper floor design
Do not try to make the floor perfectly flat using a thick sand-concrete screed, which will subsequently be covered with a solid layer of tile adhesive and then ceramic cladding. It is dangerous to overload the ceiling. It’s better to insulate the floor using ultra-light materials (let’s immediately agree that in this example we are not talking about a heated floor system).
InMyRoom tip: There are many recipes for insulating a loggia floor, but they all essentially boil down to using soft insulation directly on top of concrete slabs (you can use penoplex or mineral wool). Then it is recommended to put a second layer of insulation - and be sure to apply waterproofing (lay hydroglass insulation with an overlap of more than 15 centimeters). You can make a thin screed on top - and many craftsmen simply lay plywood if there is no significant slope on the balcony: the plywood is thin, light, smooth, and on top of it, in a warm and moisture-protected loggia, you can lay both carpet and laminate. Error 10: inattention to the little things
This error occurs normally in absolutely everyone. But the most common punctures can be eliminated in the bud:
- when glazing, plan and discuss the height of the handles, as well as the material, thickness and method of installation of the window sill board (if you decide to add a window sill to the frames);
- figure out whether a mosquito net is needed and how it will be attached;
- the gaps between the parapet and the floor slab that do not reach the ceiling or the glazing plane of the wall will need to be filled and completed. Determine what materials and tools will be needed - and carry out the work before insulation begins.
InMyRoom tip: If the insulation pie on the walls turns out to be quite thick, take care of additional profile extenders so that the wall does not protrude far from under the glazing.