Hello my dear visitors and readers!
Since I’m used to always installing the OS from a USB stick, I decided to make a detailed article describing this aspect of the work in more detail, including all kinds of programs. Today I will tell you how to prepare a flash drive for installing Windows 7, using all the available software that is on the Internet. The material will be voluminous and interesting! Let's go!
What kind of flash drive do you need?
So, let's first figure out which medium is best for us. Since we are dealing with the seven distribution kit, it is important for us that it fits on our media. Therefore, we will initially discuss the volume. It must be at least 4 gigabytes. I always advise you to take an 8 GB device for these needs, so that Windows fits, and several software, and drivers are also on a flash drive. It is convenient to work with such a map even through the rufus program.
They are inexpensive, especially if you choose the right characteristics and brand, so I advise you to choose such flash drives.

USB type. Today, technology has stepped far forward and laptop manufacturers offer us computer models no longer with two standard USB 2.0, but with two additional USB 3.0. The differences are precisely in the read and write speeds. In old standard connectors of the second version, writing occurs at 21 megabits per second, and reading at 34 megabits per second.
But the new 3.0 is much faster. They record on them at a speed of 30 Mb/sec. but reading is 68 MB/sec. That is, on modern ports and media we can work faster, and push files there, and then transfer them to the hard drive when installing Windows. This is very convenient; it allows you to quickly create an installation device in ultraiso.

Now let's look at the manufacturer. The most expensive flash drives in the Russian Federation from Sony, Samsung and Apacer. Yes, they are of very high quality, have a modest minimalist design, but there is no particular desire to shell out one to one and a half thousand wooden ones for them.
At the same time, Prestigio, Silicon Power, Pretec and PQI are cheap, but the quality of the media leaves much to be desired. Such devices live for 1-2 years, and then they slowly die, and at the most necessary moment, your mobile container may simply not be identified as a laptop.
I advise you to choose companies such as Transcend, ADATA and Kingstone. They are quite cheap and have excellent quality. Well, the design from these companies is amazing.
Distribution
Since we will be making a bootable mobile hard drive with an operating system, we will need the most maximum Windows.
For old cars worth downloading 32-bit version.

For powerful computers 64-bit version.

If you don’t know what to download, then here is the link to the torrent client program. Let's go and click here.

Then scroll down and click here.

After downloading, click on this downloaded file.

In the window that opens, click this rectangle.


Then this agreement will come out, just click further and that's all.


Everything is in the same spirit, we continue the installation with this button.
Check all the boxes and click the green rectangle.

Now do the same thing, check the boxes, press the button.

The installation of the software itself should include checking the hardware of your computer.

Then we just finish.

This is what the working interface of the program looks like.

Burning a USB flash drive via Windows 7 USB/DVD Download Tool
Download the utility you can here.
So, open the program and find through it our downloaded image with Windows and click next.

Now we choose what we will write, a flash drive or a blank. Since we have a mobile device, we click USB device.

We insert the card, select it in the software and click continue copying.

In the pop-up window, confirm with the button “ Yes».

We are waiting for the files to be written.

That's it, the device is ready.
Burning a flash drive via WinSetupFromUSB
Here we look carefully.
- We choose our medium. Do not confuse this with an optical drive.
- You need to tick the boxes as indicated in the figure. Make no mistake, otherwise the computer simply won’t see the flash drive.
- In this position, set the path to the downloaded Windows image.
- Press start.

If everything went well, you will see this picture.

Burning a flash drive via UltraISO
Download UltraISO you can here.

So, we always run the software as administrator.

Then we press the open button and find our image.

Then click on bootstrap and then select this position from the list.

Here we set our flash drive, then the recording method and click record. There is no need to format it, since the media will be completely erased anyway.

After the final, you can use the flash drive as bootable media with Windows 7.
Burning a flash drive via UNetBootin
Download the software you can here.

We run the software as administrator. In the interface that opens, set Standard-ISO and select our operating system image.

After pressing the button OK the process itself will begin.

In the end, you will be asked to immediately restart the laptop or simply exit the program.

The device is ready.
Recording via the command line
No matter how strange it may seem to you, you can also create a bootable USB flash drive in the operating system itself via the command line. This is how it is done.
If you write through Windows 7, then press start and open the command line with the right button as administrator.

If you decide to work in the tenth OS, then enter the required command in the search and again open it as an administrator.

In the black window we write the command from the keyboard diskpart.

Now type one of these commands - “ list disk», « list volume" And " list partition", which will help you see the available logical drives on your laptop.

Now enter the commands as in the figure below. Everything is in order and exactly as in the picture.
Be careful, patient and vigilant.

That's it, the flash drive is ready, all that remains is to install the distribution kit on it
For this download from here archiver 7-zip. Let's launch it.

In the working window, select the image with Windows, click on extract archive from the top, then select the media itself and click OK.

That's it. This is how a flash drive is made via the command line.
Creating a flash drive in Rufus
Download it yourself software In fact, the rufus program writes a flash drive much faster than all the software described above.
And so we open our Rufus. In the first line, select the device. In the second section, we set the recording method to be the same as in the picture. We leave the file system as it is. We tick the three lowest ones. Click on start.

A warning window like this will pop up. We agree with him and go further.


Everything is ready.
Recording via WinToBootic
Download the program from here. Then we open it. The flash drive will determine itself, we need to check the quick formatting box and press this button.


The process of creating a boot media will begin. As soon as it is completed, you will see this window.

Done, you can use the flash drive.
Recording via WinToFlash
Another small popular utility is WinToFlash. You can take it right here. Download and open. We see this interface and click this huge green check mark.

Since we have already downloaded Windows in an image, we simply select this bottom item in the menu.

Now select the image and the flash drive itself. Again, I warn you, do not confuse it with an optical drive.

A window like this will appear asking you to familiarize yourself with the license. Just click here.

That's it, the recording process has started. You have to wait until it's over.

As soon as everything is over, press exit.

Everything is ready.
Additional settings
You have created a flash drive, what next? Now you need to configure booting through the BIOS. Well, or via UEFI, if you have a re-flashed macro chip. Otherwise, the computer simply will not be able to see your device, and installing Windows will be impossible.
Here is the video . It will help you figure out what and where to poke in the system so as not to harm your computer.
Conclusion
This is where I will end the article. As you can see, you can also create a flash drive without programs, but it will take more time. I tested all the methods myself, everything works one hundred percent. The only thing I want to warn you is that none of these methods work on MacBooks, since all the software is intended only for the Windows operating system from Microsoft.
Do not forget to copy files from the flash drive, if they are there, since when formatted they will disappear irrevocably and you will not be able to restore them.
Share this useful article with your friends on classmates, Facebook and other social networks. Subscribe to my blog updates and then you will always be aware of the publication of new materials. All the best to you and see you again, my dear readers and aspiring programmers!
The Windows installation process can hardly be called something complicated. However, there are many myths circulating among PC users about this incredibly difficult process. While installing an operating system from a disk may seem like something traditional, performing exactly the same actions from a flash drive terrifies many. Mainly due to simple ignorance that the USB input can be used as a full replacement for a CD\DVD drive. There can be a huge number of reasons for this:
- Initial lack of a disk drive (netbook, ultrabook).
- Drive failure.
- Disk failure.
- Infection with a virus that prevents the device from reading disks, etc.
Having and installing Windows from a so-called bootable USB flash drive can be a full-fledged replacement for a boot disk.
- Preparing the computer for installing the operating system.
- Preparing a USB drive.
- Changing BIOS settings.
- Installation of the operating system itself.
Each stage has its own nuances and features. Therefore, we strongly recommend that you read the article carefully to the end, or better yet, print it out or download it to your mobile device.
Windows installation can be complete or partial. It depends on what goals you plan to achieve by reinstalling it. Full formats both of your disks (the one on which the OS is located and other additional ones) if you have them, of course. Partial allows you to reinstall only system files. It helps if you accidentally deleted system files or folders (for example, win 32 or *.dll files), but you simply do not have the time or opportunity to transfer all the information from your computer.
If you plan to perform a partial installation of Windows (and you have 2 disks, “C” and “D”), you can move all the important information to a disk that is not a system one. This is quite easy to do.
How to find out which drive the OS is installed on
To understand which of your system drives the operating system is installed on, just open the Start menu and launch “My Computer”. Or go to your computer settings from the shortcut on your desktop. After you start the “computer”, you will see all the hard drives that you have, as well as connected flash drives. Where Windows is installed, a small win icon will be drawn.

If for some reason this method does not work, then there is another way to find out the location of the OS on the computer. To do this:

To avoid this need in the future, try to install the operating system on the “C” drive, and also create an additional directory for storing files.
Copying files
After you have determined which of your drives is the system drive, you can, if necessary, copy all your information to an additional drive (in my case, it is drive “D”). It is advisable to carry out this procedure in advance before installing Windows. Especially if you have a habit of not organizing your files. Therefore, immediately check the main directories related to the system drive C; by default, this includes:
- Desk.
- Library (images, documents).
If you are going to carry out a partial reinstallation of the OS, then create a new folder on an additional disk and copy all important files there (do not try to copy installed programs, they will not work anyway!). If the OS installation from a flash drive is complete, then copy your data to other USB drives, external hard drives and cloud services.
The main thing a computer is used for is storing information. Therefore, the most important thing here may be saved passwords, details, and so on. Don’t forget to write down all important logins and passwords (as well as files for WebMoney Keeper) from your browsers, because after reinstallation this information cannot be returned. Of course, if your computer is completely new and you just want to install a different version of Windows, then there will obviously not be important information on it.
Driver preparation
As a rule, some of the drivers are included in the operating system distribution itself and are installed along with Windows. Sometimes it happens that they are installed incorrectly or are completely absent from the installation package itself (it is assumed that the user has a disk with all the necessary drivers).
The main thing that needs to be provided is the presence of a fresh network driver. It is necessary for the correct operation of the Internet and Wi-Fi adapter. Therefore, it is not necessary to download absolutely all drivers to an additional disk or flash drive. If you have a network driver, you can easily download the rest from the Internet.
Preparing USB media and BIOS
Therefore, this article assumes that you have already created a bootable USB flash drive and are ready to install Windows itself. However, to start this process, it is not enough to simply insert a flash drive into a USB port.
By default, the BIOS settings are set in such a way that if there is a disk in the disk drive, the computer will boot from it. If, when Windows boots, there is a flash card in the USB input, then this fact is ignored by the system, and loading occurs as usual.
How to enter BIOS
To change the boot priority of devices, just go into the BIOS and set the necessary parameters. To do this:
- Insert your bootable flash drive into the USB port.
- Restart your computer.
- Immediately after the screen turns on, press the button to enter the BIOS settings (most often this is delete).
If you did everything correctly, you will see the BIOS main menu. It looks something like this:


If you pressed the delete button several times, but the BIOS did not appear, then perhaps your laptop or computer model uses a different default key to call up this menu. To find out exactly how to enter the BIOS from your computer, use the search or random dialing method (try the F2, F12, Escape, etc. buttons).
Changing BIOS settings
After you manage to get into the BIOS, you need to change the boot order of the devices. Control in this menu is carried out using the “arrows”, the “confirm” key - “enter”, back - backspace or escape. Once you open the BIOS, the control buttons will be marked on the screen.
The next thing you might notice when you get into the BIOS is that it is not Russified. Therefore, to change the boot priority of devices, you will need to know the simplest terms in English that will help you find and correctly change the necessary parameters. So follow these steps:

After you correct the necessary parameters, you can exit the BIOS menu. However, do not forget to save all changes made. Therefore, when exiting, be sure to select Save and Exit.
Installation does not occur
Insert the bootable USB flash drive into the USB port and reboot the device. An inscription should appear on the screen prompting you to press any button to boot the system from a flash drive or disk. If such a boot screen does not appear and the computer starts up as usual, then you may have configured the BIOS incorrectly, or you forgot to save the changes you made. Therefore, open the BIOS again, and then make the necessary changes again. If you are sure that you have configured the BIOS correctly, then the problem may lie in the image itself, the flash drive, or even a faulty USB port. In this case, you may need another USB drive or wine distribution.
Installing Windows 7
After the required loading screen appears, follow the system’s recommendations and press any button to continue the installation.
It should be immediately noted here that depending on the version and build of your win operating system distribution, the settings of various parameters may differ slightly. There may be additional settings or the absence of those that will be mentioned in the article. In any case, don't worry about it. If you encounter such a situation, then just carefully read the information that win offers you to choose and mark the parameters you need. As a rule, for such cases, the Windows 7 system explains that in the future all the parameters you select can be changed or offers a choice of “default” settings (if you don’t know what to choose).
The first thing you will be asked to select is the operating system interface language, date and time settings, and keyboard layout. After selecting the settings you need, click the “next” button.

An information screen will appear on which you can familiarize yourself with the reinstallation procedure in detail, after which you can click “install”.
 The Windows 7 installation wizard will prompt you to select one of the operating system versions. It all depends on which image distribution you copied to the flash drive. If you initially downloaded win 7 Home Edition or Professional from the Internet, then this window will not appear. If you have downloaded a collection of various packages, then from the list select the one for which you have a license key (it can be found in the laptop box or on the back cover). If you cannot find it or are in doubt, you can enter this information later, within 30 days. Therefore, select the required version and click “next”.

Read the license agreement in detail, accept its terms and continue installation by clicking “next”.

Win 7 will prompt you to select an installation type:
- Partial (updating system files, saving information on an additional drive “D”).
- Complete (all user information will be permanently erased).
Depending on the purpose of installation, select the desired item. If you are in doubt about making a decision, you can find more detailed information in the “decision help” menu. In principle, further actions will not be much different. The article assumes a complete installation of Win 7, then we will consider the parameters that are equivalent for the selected “full installation” item.

Then you will be asked to select the disk on which the Windows 7 operating system will be installed. Select the desired one with the right mouse button and click on the “disk settings” line.

Select the partition in which Windows 7 will be installed and click “Disk Setup”. If you have never installed an operating system, then this is where you may have difficulties.
Hard drive setup
Usually, in addition to the main disk partitions that are visible to the user (the so-called drives C, D, etc.), there are so-called hidden partitions. This is especially common with new laptop models. Usually the so-called recovery system is located here, which allows you to return the operating system settings to factory settings. There may also be a special section created by win 7. It is necessary for setting up the encryption of system settings data. Therefore, it is better not to change this parameter during OS installation. And if the need arises, then change it using third-party utilities.
In the same “disk setup” menu, format each partition.

This procedure will remove all custom settings. But since you have previously saved all the important information, this procedure is absolutely not scary. The data formatting procedure must be carried out without fail. Therefore, we confirm the removal of all data from the computer.

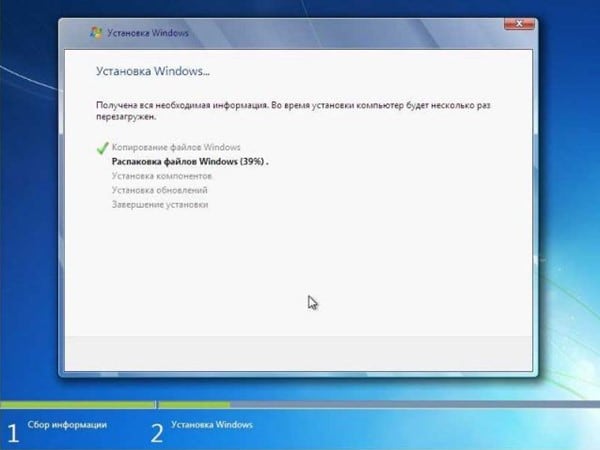
After the system completes the removal, you can exit the disk settings menu and click “next”. Automatic unpacking will begin.
Configuring operating system settings
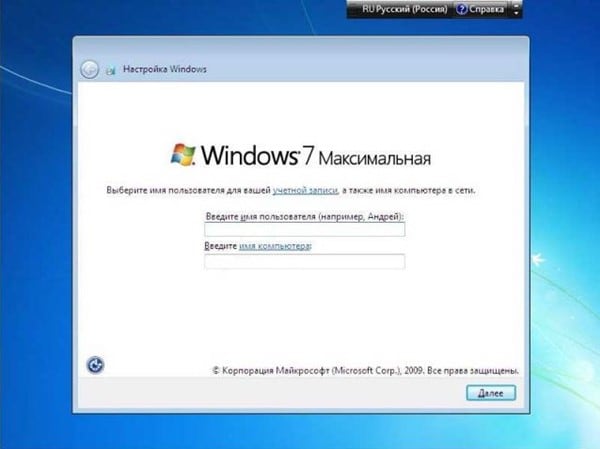
After the system finishes installation, you will be prompted to enter your computer name and username.
Here you can also configure other administration settings (password, additional accounts).

Then you will be asked to enter the license key (depending on the distribution build, this item may be missing altogether).

Now select windows security settings. Check the top line to automatically check and install updates.

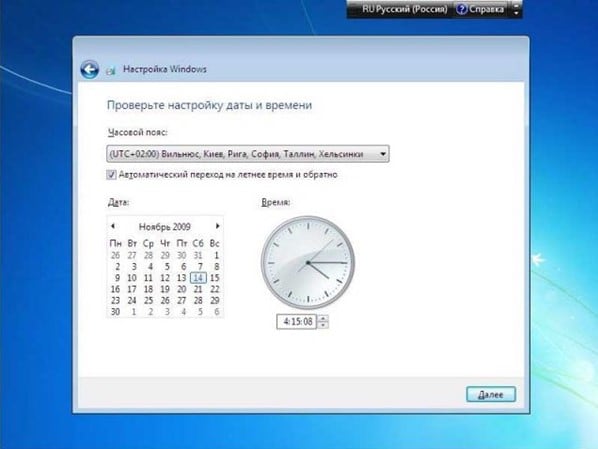
The next item is setting the date and time (time zone). Here you can enable or disable the automatic transition of the system to summer or winter time. Plus, you can always change your time zone settings at any time.
If the win 7 distribution had built-in network drivers, the computer will automatically detect the network connection and prompt you to select security settings. Otherwise, this window simply will not appear.

Sometimes there is a need to update or reinstall your operating system. And there are several ways: you can turn to specialists and, by paying money, get a new OS, or you can do it at home. However, not everything is as simple as it seems at first glance.
Preparing to reinstall Windows
Before installing Windows from a flash drive, you should complete a number of preparatory measures:
- search the Internet and download a suitable OS image;
- cleaning the computer and saving the necessary files;
- writing the finished image to a bootable flash card;
- setting settings in BIOS.
Each of the above points is important and must be implemented in exactly the same sequence as indicated.
Finding the right operating system
You can find absolutely any Windows image on the Internet, regardless of bit depth and visual design. But here, too, there are several important nuances that you need to know before installing Windows from a flash drive to your computer.
Firstly, the build quality. It is preferable to use official assemblies, without unnecessary mods, utilities and programs. The “cleaner” the version, the greater the likelihood that it will install without problems and subsequent crashes.
Secondly, an equally important aspect is the visual design of Windows. You need to choose an image on those resources where the characteristics of the OS are described in detail and at least a few screenshots are attached.
Thirdly, depending on the technical characteristics of the computer, you need to select the bit depth and level of Windows. For example, how to install new Windows from a flash drive if the RAM on the PC is only 2 GB? You should definitely choose either the Home version or the Professional version, and even then it’s a stretch. In addition, many early applications are not supported by x64 bits, so it is better to turn to x32 for help.
Well, if we talk about the choice of the operating system itself - from XP to Win 10, then it is at the discretion of the user. Each OS has its own advantages and disadvantages:
- Windows XP. The good old “piggy” is optimal for work PCs. Supports most special programs and is not demanding on hardware characteristics. Minus - it is not supported by the developer and conflicts with new models of PCs and laptops.
- Win 7 (Win 8). The undisputed leader in the Windows family. It is convenient, visually attractive and supports absolutely all applications. Suitable for both home use and corporate networks. Minus - will soon be officially discontinued by the developer. As for Windows 8, it is a modified “seven” with a simplified interface. Minus - it has a large number of bugs and worse visualization.
- Win 10. The latest OS, combining the best from previous builds. Compact, with pleasant functionality and appearance. Minus - conflicts with the performance of many applications, utilities and drivers, plus - increased license checking.
The choice is personal, but you need to understand that Win 7 will not be installed on a device with 1GB of RAM. More precisely, it will install, but it will be impossible to work on a PC due to constant processor overload and lack of physical memory.
On the other hand, the latest laptops will not be able to accept Windows XP due to the lack of suitable device drivers and performance conflicts.
Preparing your PC for reinstalling Windows
So, the desired image has been downloaded and is waiting for its turn to be installed. However, you should remember that installing Windows from a flash drive will simply delete all data on the system drive. Therefore, you should be concerned about the safety of files that the user will need in the future.
There are several solutions you can choose for this:
- transferring data to another logical drive, if any;
- saving the necessary files to removable media (DVDs and CDs, flash drives, external hard drives);
- copying files to cloud storage (Yandex, Mail, etc.).

Important! Situations arise when a computer or laptop has just been purchased, and there is only one system disk on it. For the PC to function properly, it needs to be divided into several partitions.
Yes, this is a very important point when the equipment has only one working section. But it is highly not recommended to leave it in this state, since unexpected problems in the form of viruses or a technical failure will lead to complete loss of data. Therefore, it is very important to know how to install Windows from a flash drive on a laptop with one working partition.
Partitioning the hard drive into several partitions
Most assemblies contain special programs (for example, Acronis or Paragon) that make it possible to split the hard drive into several partitions.
Optimally, the system disk should be made with a capacity of at least 100 GB (if, of course, the hard drive has a large volume), and only then the remaining disk space should be divided at your discretion (there can be several logical disks). For full functionality, 20-30 GB is enough, but it’s better to take it with a reserve.

Finding out how to install Windows from a flash drive, or more precisely, how to set up hard drive partitions, is not a problem now, fortunately, there are a lot of detailed instructions on the Internet.
Separately, it is worth considering SSD drives. It is better to leave them in their original form, since in this way they can ensure maximum performance and speed of data exchange.
Preparing a bootable flash drive
The next important step is to create a bootable flash drive, with which the OS will be installed. To do this you will need the following components:
- recording utility;
- ready-made image;
- flash drive with a minimum capacity of 8 GB.
Recognized leaders among programs that can easily cope with the task of installing Windows from a bootable flash drive are, of course, Ultra ISO and Rufus.
Their operating principle is similar:
- the media is selected (the flash drive must be inserted);
- select the image to be recorded;
- ready.
The flash drive is formatted and the writing process begins.
For information! Simply copying a Windows image to a drive will not work, since there will be no sectors responsible for automatic booting, which works as a licensed disk.
However, there is a certain imbalance when choosing a recording program. If a problem arises, how to install Windows 10 from a flash drive, then it is better to use Ultra ISO or Astroburn, and in cases with Win 7 or Win 8, you can also use Rufus.
A brief overview of the best programs for creating a bootable flash drive
Perhaps the most common and easy-to-use program that solves the problem of how to install Windows from a flash drive to a laptop or PC.
At the first stage, select the “File” - “Open” menu, after which the path to the already downloaded distribution is set.
At the third stage, the media on which the recording will be performed is selected (the flash drive must be inserted). Please note that all data on the media will be formatted, so if you have the files you need on it, you should copy them to another location.
And lastly, press the “Burn” button, after which the application will begin mounting the bootable flash drive. That's it, you can start installing Windows.
The next leader is the Rufus program.
Its undoubted advantage in deciding how to install Windows from a flash drive is that there is no need to install it on a PC. It runs from a shortcut and takes up very little hard drive space.
By analogy with Ultra ISO, you first need to select the device to record to. Then the desired OS image is selected. That's all, you can press the “Start” button. Oh yes, one more important nuance - the “Create boot disk” option must be checked in the settings.
WinSetupFromUSB closes the TOP 3 programs.
This is a rather interesting program that works on the same principle as the previous two. First, the location where the system image will be written is selected, then the option that determines what type of OS will be written is checked. And finally, the image itself is selected.
Burning a bootable flash drive without using third-party programs
There is another method, although not as popular as those described above, which will tell you how to install Windows from a flash drive. We are talking about using the command line.
First, launch the command line using the Win+R combination. The word cmd is entered in the line.

So, the line is running, you can get to work. Although we should immediately make a reservation that if there are doubts about whether it is possible to install Windows from a flash drive in this way, then it is better not to use it, but to turn to special programs.
- Selecting a disc to burn. To do this, enter and then activate the section for working with all kinds of disks. By entering the list disk command, you can see all active disks and their capacity. To use the desired partition for work, enter the command select disk * (where * is the number of the selected partition).
- Cleaning the disk for recording. To do this, use the Clean command. Here it is important to make sure that you select exactly the disk on which the OS image will be written. Otherwise, the integrity of the system may be damaged.
- Creating boot sectors and disk labels. The create partition primary command creates the primary partition on the flash drive (by default it occupies the entire free space of the media). And using assign letter=* (* is a letter of the Latin alphabet for the volume label).
- Activation of the section. The following procedures are aimed at how to install Windows from a flash drive via BIOS, i.e. so that the flash drive is displayed correctly in the initial settings. To do this, enter the select partition command indicating the number of the selected disk, as well as active - to activate it.
- Formatting. The last step left is to format the flash drive. You need to enter format fs=ntfs quick. That's it, the flash drive is ready for recording.
Now you need to exit the command line - enter exit. At the last stage, you need to find the source image and unpack it using any archiver to the desired flash drive.
BIOS setup
You only need to enter the BIOS to enable initial boot from a flash drive.
The user should not have any questions about how to install Windows from a flash drive via BIOS. Almost all PCs and laptops have a function to call the startup menu, which is called up with the F1 to F12 button (depending on the device model). If you can’t call this option, then you need to go into the BIOS at the very beginning of Windows boot (the same variable keys - F2, F12, Del, Esc), go to the Boot menu, and then set USB:CD- as the primary boot method ROM.

Then you need to press F10 and the Enter key. After the computer restarts, data will begin loading from the flash drive.
By the way, different models of BIOS firmware have different menus. And most importantly, you need to remember that the shell is very fragile and the slightest incorrect change can lead to a complete malfunction of the PC.
Nuances of installing Windows 7 and Windows 8
The most popular operating system today, Windows 7, is quite easy to install. But if you are in doubt about how to install Windows from a flash drive to your computer, you should follow these steps.
When the OS installation menu appears, you need to select the partition in which it will be installed and format it. After which the installation will be performed automatically, only occasionally requiring user intervention (for example, entering the PC name or time zone).
The same is true for Win 8. This system is even easier to install; it is important to first clean the system disk, since several operating systems (new and existing) can create a conflict both at the level of drivers and internal applications, so you may need to reinstall Windows from a flash drive.

It is important to note that when you start the PC, the message Press any key to boot from CD or DVD should appear. If it is not there, then the BIOS settings are not configured correctly and you will have to go back to check.
The installation of Windows from a flash drive itself does not last long - from 20 to 40 minutes. Depending on the assembly and the presence of additional components (main programs and drivers), this time may vary either up or down. But if Windows is installed for more than an hour and a half, then it is better to roll back the installation and start over, having first formatted the system disk and checked it for errors.
As a matter of fact, installing Windows 7 from a flash drive at home will save not only time, but also money. After all, technical failures occur quite often for most users? Mainly due to poor quality builds and improper use of PC functionality.
Installing Windows 10
But with the latest version of the popular operating system, things are not going so smoothly. And the reason lies in three Latin letters - GPT. New PCs and laptops are already being produced with such a technological interface for the hard drive. When creating a bootable drive, pay close attention to the “Select” item - high-quality programs provide a choice between MBR and GPT.

By the way, Windows 10 has a special utility called Media Creation. It itself offers the ability to record a boot image on removable media, so figuring out how to install Windows 10 from a flash drive is not difficult.
Of course, before installing Win 10, you should think about its shortcomings. For example, it can cause serious crashes and glitches in the operation of some applications. Especially those that she herself considers unlicensed.
Well, if you still need to install Windows from a flash drive, the instructions advise:
- The best utility for Win 10 is Astroburn. It writes an image in a few clicks, automatically checking the integrity of sectors. In the absence of this utility, you can use Ultra ISO;
- if there is no license key, then you need to select the appropriate item during system installation;
- if the computer’s hard drive is in SSD format, then it is not necessary to split it into several partitions - everything is at the discretion of the user;
- If the hard drive size is more than 2 TB, you must use GPT partitioning. Only in this case will the system use the entire volume.
Otherwise, the installation process is virtually no different from other systems.
This material is dedicated to installing Windows operating systems from a USB flash drive. Many skeptics still claim that this is impossible, and if it is possible, it is very difficult, but the very existence of this material proves the opposite. Installing Windows XP, Vista, 7.8 from a flash drive is much more convenient than from a disk, since a flash drive does not require a disk drive, is better stored and is much more portable than a floppy disk.
As you know, you can install Windows using a disk in two ways: through a running system by running the installer from the disk in My Computer and through the BIOS. From a USB flash drive you can install any Windows in the same way.
Installing Windows from a USB flash drive via My Computer
So, let's start with the simplest thing, installing Windows via a USB flash drive from the My Computer window. In order to install the operating system in this way, we need a working OS, a computer on which we will install Windows (In order to record the system installation on a flash drive), a USB flash drive and Windows XP, Vista, 7, 8 itself, which we will install, or rather her image.
Now we need to prepare the flash drive by recording the OS on it. You need to not just copy the system files to a flash drive, but write them in a special way using the UltraISO program. So let's get started:
1. Install the UltraISO program and open it.
2. Select the Boot tab >> Burn hard disk image
3. In the window that appears, select the flash drive where we will write the installation, the image file and check that the recording method is USB-HDD+. When everything has been checked, click Record and wait until the recording finishes.
After successfully recording the OS onto the USB flash drive, let's begin the actual installation of the system. Go to the flash drive and run the setup.exe file, which should be in the Windows files, in the root of the flash drive. After launch, a window should appear in which we select the Windows installation. The normal Windows installation will begin, which is described in detail, and there is no point in describing it again. After rebooting, the computer will continue the installation until it is completed.
The disadvantage of installing through My Computer is that you cannot format the disk on which a running operating system is currently installed. If this does not suit you, proceed to the point below.
Installing Windows from a USB flash drive via BIOS
This is a more labor-intensive installation compared to the first one, via My Computer. First, prepare a flash drive by copying the Windows operating system there, as described in the previous type of installation.
Having prepared the flash drive, we need to prepare the computer to boot into the BIOS to install Windows XP, Vista, 7, 8. Restart the computer. While the first graphic images appear on the screen, usually the logo of the motherboard manufacturer, press the DEL button on the keyboard until the settings screen appears. This is the BIOS. Now find the Boot tab, and if your BIOS background is blue, look for Advanced BIOS Features in the left column and use the arrow keys to hover your pointer and press ENTER on your keyboard. Now the following window should appear with the computer boot parameters.
If you have a gray BIOS, you may immediately see the boot order that we need, or a choice may appear where you find Boot Device Priority and hover over the pointer and press ENTER. If you did everything correctly, the boot order of devices on your computer should be displayed. Set it so that USB is first, CD/DVD Disk is second, Hard Disk is third.
The value names may be slightly changed from what is written, but you should understand. When the boot order is as described, press F10 on your keyboard, then ENTER. We just set the boot order so that the flash drive boots first, then the floppy drive, and then the hard drive. This is a completely harmless option, which after installing Windows does not need to be returned to its previous state.

If you have a blue BIOS, put it in First Boot Device - USB-HDD, Second Boot Device - CDROM, Third Boot Device - Hard Disk or HDD-0, then press F10 and then ENTER.
After everything is done correctly, the computer should reboot. We wait for a message to appear on the screen, something like “Press any key to boot from CD or DVD...”, then press any button to start installing Windows, which is described in detail.
If you want to install something other than Windows using a flash drive, the essence of the steps will be exactly the same. However, if you want to install one of the Linux distributions, you can use programs that will make recording the OS installation on a flash drive even easier. Such programs include Linux Live USB Creator and uNetBoot. These programs are also an excellent replacement for UltraISO, which was discussed above.
Let's see how to install Windows on a computer from a flash drive I’ll explain how I launched the Windows installation on my computer for the first time, not from a disk, but from a flash drive. I did this myself for the first time and after searching various information on the Internet I was able to reinstall WindowsXP to Windows8 on my computer without any additional help. Anyone can install Windows, as long as they have the desire and a little patience. If you doubt your capabilities, then it is better for you to turn to specialists or those familiar with experience. To be honest, the information found on the Internet is slightly different from the one I used to reinstall Windows on my computer, especially the BIOS settings from which the installation flash drive is loaded, and therefore I decided to write an article about it with attached screenshots, maybe it will be useful to someone.
To install or reinstall the Windows operating system on a computer, we will need a flash card with a recorded image of bootable Windows, if you have not already done so bootable USB flash drive you can do this by following this link, it’s not at all difficult, the main thing is that you have a memory card and a Windows installation image. Now if you have prepared a bootable USB flash drive, you can start installing Windows, but before that, save all valuable information and files as we will format the disk on which Windows will be installed.
To begin with, we restart the computer and during the boot process we see something like this picture somewhere on the monitor.
At the same time, until the loading progresses, press the Del key on the keyboard to go to the BIOS menu and configure the computer to start booting from our flash card with the Windows installation. A window will open where we select the line Advanced BIOS Features and confirm with the Enter key.

In the next window, select the line, then in the same window a menu will open to select which disk the computer will start from when turned on. We need install Windows from a flash drive and therefore check the box next to it and save the BIOS settings by pressing the F10 key. After saving the BIOS settings, the computer will reboot and start booting from our bootable flash card.

After we have completed the above steps, the installation will begin from our bootable memory card.
1) At the very beginning of the installation, we need to select the language of the operating system to be installed, select the one we need; I already showed Russian by default, I left it as is and proceeded to the next step by clicking on the next button.
2) Step two, select install.
3) Accept the license agreement, check the box and click on the next button.
4) Select the Windows installation type, here I chose from scratch and clicked sample string, this method does not update the existing operating system but installs it from scratch. I like it better this way and this method definitely shouldn’t be buggy, which is what we are looking at in this article.
5) Select the disk on which we will install Windows from our flash drive. It is advisable to select a disk and format it so as not to be confused in the future about where everything is located. The disk that you select to install Windows will be formatted, but still save the most valuable information and files on some separate media, just in case. further
6) Windows installation begins on the specified computer disk, and we will see the installation process itself on the computer screen. Successful installation processes are marked with a green checkmark; do not leave your computer until the installation is complete. Typically, installation time depends on the version of Windows being installed; it can last half an hour or one hour.
7) After successful installation of all items except the last one, “complete installation,” the computer will reboot. Attention!!! during this reboot you need again get into BIOS settings otherwise the installation process will start over again. To get into the BIOS, we do everything we did at the very beginning, that is, we return the BIOS settings to their previous state, so that the boot starts not from a flash drive, but from the computer’s built-in disks. We configure it as it was before the change, change it to and save everything as written at the beginning of the article. (If you didn’t have time and the computer rebooted completely, then you can cancel the new installation and configure the Bios) After this, the computer will reboot and after loading, the process of completing the Windows installation will continue. Do not remove the flash drive until the operating system is completely installed.
8) After successfully installing Windows from the memory card, select a name and color. You can change them later in the settings.
9) Configure auto-updates and other parameters can be left as they are or changed. If you need to change, select the settings and change as you want further.
10) Choose a name and password, you can change it later.
11) Your computer is preparing to start.
You have now completed installing Windows on your computer via a USB flash drive, congratulations!
In this way I reinstalled WindowsXP to the new version of Windows8.
- I hope this article helped you how to install Windows on your computer using a USB flash drive.
- We will be glad if you leave a review, comment or addition to this article and help others with your good advice.
- If you have useful tips or articles, you can post them on our website on a separate page where the author of the article will be indicated, or you can create a topic on our forum and thereby benefit those who are looking for the necessary information for themselves.
- Thank you for your responsiveness, help and useful advice!