For the majority of city residents who grow vegetables in suburban areas, the problem of preserving what they have grown through back-breaking labor has always been and remains the “topic of the day.” For garage owners, the issue was resolved by retrofitting the basement under the garage; the rest had no choice but to make a cellar in the courtyard of the house or on a nearby site. The most economical and resourceful summer residents, instead of digging earthen cellars, preferred to install or make a caisson, no matter whether it was metal or concrete, the main thing was that it was more reliable and durable than brickwork.
What's the point of using a caisson for a cellar?
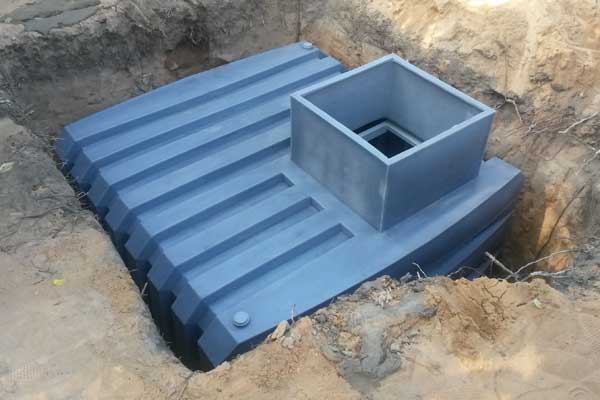
A caisson is a container with an entrance hatch in the ceiling. The volume of the container may be only a few cubes, but this is quite enough to load the crop you grow with your own hands into it.
Most often, three types of caissons are used to arrange a cellar:
- In the form of steel containers welded from sheet metal in the shape of a cube or parallelepiped;
- In the form of a monolithic plastic container with an entrance hatch;
- A free-form room made of concrete rings or cast from reinforced concrete.
The technology for installing a caisson container in the ground required significant physical effort on the part of the owner of the future vegetable storehouse, and to install a concrete caisson for the cellar, you will have to use a crane. The question automatically arises - why such difficulties in converting a cellar from a brick-lined storage facility into a sealed container in the ground.
Important! The main advantage of using a caisson as a cellar was the high tightness of the container and good protection from penetrating moisture.
The construction of a homemade cellar from a caisson is much inferior to the concrete basement of a garage, and even more so a house installed on a full strip foundation, with a concrete floor and durable waterproofing. Any underground space not built using monolithic technology is doomed to serious problems with groundwater, regular flooding and seepage. In a damp cellar, vegetables rot much faster, but most importantly, the walls of the room are affected by fungus and microflora, which can destroy stocks in a few weeks.
Caisson device
The most popular among owners of autonomous cellars are steel and plastic containers. In addition to high quality workmanship, such structures have additional advantages:
- The vertical entrance to the container allows you to enter the cellar directly from the premises of the cottage, house, or place it at a minimum distance from a residential building;
- The injection molded plastic or welded thick iron of the caisson walls is absolutely inert to the effects of any chemical reagents used for disinfection and disinfection of the cellar premises;
- A relatively simple technology for installing steel and plastic containers into the ground to a depth of at least 2.5 m. It is enough to dig a pit and arrange a support cushion for the caisson.
The concrete version is much more complicated; it has to be assembled from separate sections - rings or cast from reinforced concrete into reusable, adjustable formwork. In addition, the concrete mass of the walls requires good compaction. If the concrete is laid in violation of the technology, the caisson can siphon through cracks, cracks or defects in the casting, through which moisture will still enter the cellar room. The rough surface structure often serves as a good “shelter” for pathogenic organisms.
Plastic and iron caissons do not have such problems, but this does not mean that the concrete option is worse. In practice, the advantages and disadvantages of each model appear depending on the conditions in which the cellar will be located.
How to install a caisson for a cellar with your own hands
The rules for installing a plastic or polyethylene ready-made container for a cellar are largely similar. It is necessary to decide at what depth the plastic or steel caisson tank will be located, and at what specific location it is planned to build the cellar. The amount of preliminary preparation and auxiliary measures for insulation and waterproofing of the caisson depends on this.
Construction of a cellar under the house
The light weight of the plastic container of the caisson allows you to install it yourself, without even resorting to the services of a company that manufactures caissons for the cellar. If the dimensions of the doorways in a house or country house allow a round plastic container to be squeezed through, then you can make a cellar directly in the underground, or remove a hatch and inlet in the kitchen or hallway.

The dimensions of individual polymer caissons can reach a length of more than two meters and a diameter of up to one and a half meters. For a small vegetable storage under the house, it is enough if the container is installed at a depth of two meters. But for a “home” cellar, you will need to calculate the excess of the caisson head above the ground level so that the entrance with the hatch is at floor height.
Making a cellar from a metal coffered container under the house is much more difficult. The dimensions and weight of the steel box make it possible to somehow install a welded container in a pit in the courtyard of a house or during the construction phase of a building, but in a finished house you can forget about such experiments. In this case, the steel caisson container is either assembled by welding from steel sheets, or, which is more advantageous, cast from reinforced concrete.
In any case, when installing a finished caisson tank or its phased assembly in a pit pit, three main problems will need to be solved:
- Providing waterproofing;
- Installation of insulation;
- Preventing deformation of the caisson container and providing additional measures to enhance rigidity.
Important! If the house stands on a shallow strip foundation, the foundation pit for installing the caisson tank will need to be strengthened and, possibly, reinforced with reinforcement or brickwork to prevent the soil adjacent to the foundation strip from crumbling and subsiding.

The use of a polypropylene container as a cellar is ideal for buildings and structures on stilts or a pile-grillage foundation. If the entrance to the caisson tank is located inside the building and is at least one and a half meters away from the outer contour of the grillage foundation, special insulation means in the form of sheets of expanded polystyrene may not be used; clay padding of the walls is sufficient.

For soils with a high level of groundwater and severe watering during spring-autumn floods and rains, additional measures will be required to prevent the possible “floating up” of plastic containers under groundwater pressure.
Digging an open pit for a caisson cellar
The caisson container for the future cellar should be installed no closer than one and a half meters from the foundation of the building. Otherwise, the weakened cushion of the foundation tape will sag, and ultimately may lead to the formation of cracks on the walls. The best place to install the caisson for the cellar will be the highest point on the site.
The deeper the pit for the cellar, the higher the quality of storage. Ideally, the floor in the cellar should be located at a depth of at least three meters. This means that the caisson capacity must be at least 3.2-3.5 m high. With dimensions of 1.5x2 m and a height of 2 m, the volume of the pit will be more than 9 cubic meters, and the depth will be at least 3 m. In the finished pit, the gap between the soil and the wall of the caisson tank should be at least 30 cm.

Before using an excavator to dig a pit for a cellar, it is necessary to establish the real groundwater level at the site of the future cellar. It may be that the water is relatively close to the surface. Therefore, according to the completed markings for the installation of the caisson - cellar, wells are drilled, from which the actual water condition can be determined. If a broken well is intensively filled with water, when installing a caisson, you will need to install a powerful drainage system, but in the meantime, install a drainage pump in the well and begin digging a pit.
For “dry” soils with deep aquifers, the bulk of the earth and rock from the pit can be removed with an excavator. In the last half-meter of soil, experts recommend making a pit - a deeper section with dimensions of 50x50 cm. It is made to install drainage if suddenly the clay bottom breaks through an underground spring. In this case, the drainage pump will again save the situation.
Clay extracted from the pit should be preserved and thoroughly cleaned of impurities of turf and stones; it will be useful for making a water seal and insulation.
Installing the caisson body
Before installing the steel caisson, a layer of waterproofing is applied to the external walls, especially the bottom of the future cellar. The metal container is pre-cleaned of rust and treated with a primer. It is best to cover the body of the future cellar with a roll of two-layer waterproofing, for example, glass roofing material.
A steel caisson container, regardless of size and weight, can only be installed in a pit using a winch or hanger.
Important! Despite the external strength of the welded structure of the cellar, it is enough to drop the caisson container from a small height onto the ground once for a crack to form in the most vulnerable place - the corner welded joint.
The bottom of the pit for the caisson must be filled with crushed stone and sand, after which it is carefully compacted. It is recommended to lay geotextile fabric between layers. Along the contour of the cellar, a drainage pipe is embedded in crushed stone, which is led separately through a pit to the surface. Sometimes the drainage is replaced with a welded bottom fitting, through which water that accumulates under the floor of a steel or polypropylene cellar can be pumped out.
Most often, the caisson container is installed on a cast concrete base slab, at least 150-170 mm thick, with two layers of reinforcement. The cellar body is attached to anchor bolts embedded in the thickness of the concrete base. This installation is more expensive, but guarantees stability and the absence of vertical subsidence of the cellar. For polymer containers, this is also a way to prevent floating in conditions of severe flooding with groundwater.
After leveling the caisson and settling the container, a water seal is made from grated clay. The space between the walls of the pit and the caisson container is filled with small portions of clay, which is compacted for a very long time and thoroughly with mechanical or electric vibrators. To form a water seal, the clay must absorb moisture and expand. Most often this happens during the first rain. Water seeping into the drain is removed with a pump or drained through the internal fitting. In a couple of weeks, the clay fill will turn into a dense waterproofing material.
The dimensions of the pit around the upper half of the container are expanded by 50-70 cm and successively filled with a mixture of expanded clay and clay. The top layer, 20 cm thick, is covered with a layer of wet clay and compacted successively in several passes. As compaction progresses, the mass is added and compacted again. A concrete screed reinforced with a composite or steel mesh is made around the entrance to the cellar.

How to build a concrete caisson cellar
A more labor-intensive, but much cheaper method would be to build a cellar from concrete rings used to make septic tanks and caissons for wells. Despite a certain prejudice, such a cellar has a number of advantages:
- The durability of a concrete structure installed in the ground to a depth of more than two meters is significantly higher than that of steel and polymer ones;
- A concrete caisson cellar can withstand significant lateral and bottom loads from water or heaving soil. Where welds and polypropylene walls are crushed into trash by water and ice, reinforced concrete rings can withstand even double overload;
- The size of reinforced concrete rings with a height of 90 cm ranges from 100 cm to 220 cm. Thus, a cellar made of rings will not look like a pipe, as is often the case with plastic caissons.
The disadvantage of a concrete cellar is the need to use a crane. The bottom cup is laid first, then the rings are sequentially installed and tied with reinforcement.

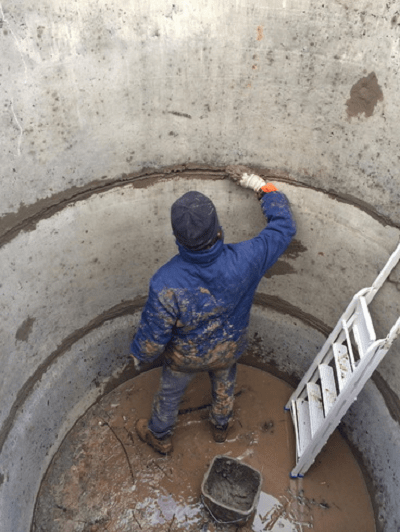
For your information! The most vulnerable point of a concrete caisson is the joints between the rings. Therefore, the joints are carefully sealed with expanding concrete, after which they are sealed with additional sheets of waterproofing.
Each ring, bottom and top plate with the entrance are treated with mastic waterproofing. At the entrance to the cellar, a steel frame is installed and a hatch flap made of steel reinforcement, boards and expanded polystyrene foam is hung.
Conclusion
In any case, building a cellar from a caisson justifies the investment; the structure is more durable and strong, provided there is normal ventilation and insulation. Brick buildings and dugouts have at least three times less service life, so within a couple of years after construction they require restoration.
When constructing an autonomous water supply for a country house, the well needs protection from sand, soil and surface contaminated water entering the pipe. Let's consider the procedure for performing work on assembling and installing the caisson, moreover, in several versions using different materials.
To prevent contamination from entering the aquifer, restraining the walls of the well from collapse and protecting water supply equipment from freezing in winter, the well is equipped with a caisson.
There are ready-made metal and plastic caissons on sale, differing in shape and size, but you can build a caisson yourself, using other building materials.

Caisson design
In order to suit its purpose, the caisson design must be:
- hermetic;
- strong and tough;
- have an insulated lid;
- have dimensions sufficient to accommodate equipment, instruments and the possibility of servicing them.
In this case, the shape of the device can be one- or two-stage, with a base in the form of a circle or square.

A passage under the water-lifting pipe is provided at the bottom of the caisson. The side wall is equipped with passages for home and street water supply, electrical cables, and in some cases, ventilation openings with pipes extending above ground level. When using thin-sheet materials, the base, side surfaces and cover must be reinforced with stiffeners. In the upper part of the caisson, an insulated cover is fixed on hinges. Steps are mounted on the vertical surface for quick and easy access and maintenance of the equipment, and handles are attached to the lid.
Making a caisson with your own hands
The choice of materials for a caisson is primarily influenced by: the complexity of installation, the availability and price of materials, as well as the availability of experience working with them.
At the first stage, earthworks are carried out. It is necessary to dig a pit in such a way that the exit of the casing pipe is not in the center of the caisson, but is slightly offset. This makes it more convenient to locate and maintain equipment installed in the tank. The bottom of the pit should be 0.5 m below the soil freezing level, and its width should be slightly larger than the outer dimensions of the caisson, 150-200 mm on each side to create a sandy insulating backfill (for thin-walled caissons - metal or plastic).

The internal dimensions of the chamber without installing a pumping station in it can be 1x1 m (Ø 1 m), with equipment - 1.5x1.5 m (Ø 1.5 m). The thickness of the walls depends on the selected material and its strength characteristics.
Simultaneously with the preparation of the pit, a part of the earth is selected for channels for laying a water supply to the house and to the taps on the plot.
Caissons made of reinforced monolithic concrete
The walls must be reinforced with reinforcement, taking into account the height of the structure and the cost of constructing the well. It would be quite a shame if a collapsed wall caused serious damage to the home's water supply. Since it is much easier to make flat formwork, monolithic caissons are most often made square at the base.
To work you will need:
- cement, preferably not lower than M400;
- crushed stone;
- clean sand;
- reinforcement with binding wire or reinforcing mesh;
- waterproofing material for walls;
- lumber for formwork;
- heat-insulated cover or materials for its manufacture;
- concrete mixer, construction tools.
 1. Sand cushion. 2. Concrete base. 3. The walls of the caisson are made of monolithic concrete. 4. Hatch neck. 5. Stairs. 6. Caisson cover
Pouring the base plate
The base slab may not be reinforced, but along its perimeter it is advisable to lay a row of reinforcement with vertically fixed rods to connect the walls with it for reliability. You need to move on to the second stage when the concrete has set sufficiently so that you can walk on it. If the groundwater is located below the level of the bottom of the caisson, the base slab does not need to be filled with concrete, but simply compacted the soil and poured a layer of sand and crushed stone.
 1. Support stakes. 2. Formwork panels. 3.Sand preparation. 4. Concrete. 5. Fittings
Knitting reinforcement
The earthen walls are covered with waterproofing material, which prevents the soil from crumbling and does not allow the walls to subsequently be washed away by melt or irrigation water. Along the perimeter of the caisson, reinforcement is tied at a distance from the waterproofing equal to half the thickness of the wall. It is enough to install the vertical rods in one row every 0.4-0.5 m, welding them to the concrete foundation embeds and tying them with reinforcement with adjacent rods. If rods are placed in the base for the entire height of the caisson, then only horizontal ligation is required after 0.4-0.5 m. The height of the reinforcement should be sufficient to attach a horizontal reinforcement frame of the floor to it.
Preparation of panels for formwork and installation
It’s easier to prepare formwork panels of given sizes in advance than to hammer in nails in a cramped space. If the panels are ready, you need to lower them into the pit and fasten them from the inside along the line of the reinforcement frame at a distance equal to half the thickness of the wall, fastening them together. In places where communications pass, sections of pipes are laid or a rectangular channel is fenced with boards. If the embeds are not made (for example, due to the difficulty of sealing the formwork), the wall will subsequently need to be punched with a hammer drill until the concrete is completely petrified. If you want to embed steps into the walls, you need to worry about the embedded structures before pouring.
 1. External formwork of the caisson walls. 2. Internal formwork of the caisson walls. 3. Spacer bars. 4. Concrete
Pouring concrete walls
It is better to fill the walls to the very top in one go, or at least in one day. Calculate in advance the required amount of solution and ingredients for its preparation. This way you can avoid horizontal seams in the caisson structure. When filling the formwork, you need to periodically compact the layers or bayonet them in depth with a rod, releasing air bubbles.
After the solution is poured, you need to install a temporary canopy over the construction site to protect the walls from precipitation. In hot weather, the concrete surface should be slightly wetted to avoid cracking. You can move on to the next stage after 7-10 days, after the concrete walls have dried.
Filling the floor
After removing the formwork, a shield made of boards is laid on the walls, in which there is a fenced hole for mounting the cover, as well as passages for the ventilation pipe and street water supply. The pipes are inserted into the holes and secured. The shield is covered with a layer of waterproofing material, and on top of it, at some distance from the surface, a reinforcement frame is knitted and secured to the wall rods. To ensure clearance between the frame and the waterproofing, you need to place several stones under the reinforcement. Concrete is poured and allowed to harden.

Hatch installation
The formwork is being assembled to install the metal structure of the lid. A purchased cover or one welded by hand from sheet and profile steel is installed in the formwork and filled with concrete mortar. The formwork is removed, the inside of the lid is insulated (for example, with polystyrene foam). The surface of the caisson, except for the hatch, is covered with waterproofing and covered with a layer of soil to the ground level on the site.
Some useful theory in the video:
Brick caissons
Brick caissons have a similar design. Excavation work and pouring the floor are carried out in the same way as in the previous case. If a base slab is not constructed, a strip foundation slightly wider than the walls is installed under the walls and covered with a layer of roofing material.

The walls, and, if necessary, the bottom of the caisson, are made of brickwork. They are laid out at some distance from the ground to provide insulation from sand, broken brick or crushed stone. Each row of bricks should be laid, controlling the horizontal level and carefully applying and leveling the cement mortar so that there are no voids left in the masonry. At the point where the channel for the water pipe passes, an embedded structure is embedded in the masonry.
The covering and installation of the cover are carried out in the same way as for a monolithic concrete caisson.
Steel caissons
Metal caissons can only be assembled by welding to ensure tightness. The materials used are carbon sheets coated with Kuzbass varnish or stainless steel with a thickness of 3-10 mm. Before work, you need to decide on the dimensions, draw the future structure (with holes, stiffeners, feet, sling loops and, if possible, detail it for ease of manufacture. You can use a corner, channel or gussets as stiffening ribs.
If you can inexpensively purchase a pipe with a diameter of 1-1.5 m of the required length, it will serve as an excellent basis for creating a cylindrical caisson. It’s easier to weld a tank with a square base from sheets yourself.

At the first stage of production, sheets are cut for the bottom of the walls and the top of the caisson, including the hinged lid. Since the sheet is quite thick, it is very difficult to cut it with a hand tool; cutting it with welding or a hacksaw for metal takes a long time. A good option: ask for the metal to be cut when purchasing according to the dimensions of your structure.
When welding, try to make the seams as efficiently as possible, and then treat the entire surface with an anti-rust agent and open the inside with a suitable varnish, and the outside with bitumen mastic.
Excavation work is no different from previous options. It is impossible to lower a heavy structure into a pit on your own; you will need to rent special equipment or install a block, traction from a car and an assistant to guide the caisson to its intended place.

After installing the metal structure on the base plate, water supply is connected through the holes in the walls, all joints are welded, and the lid is insulated. The cavity between the caisson and the earthen walls must be filled with sand, and fertile soil must be laid on top.
Installation of caissons from reinforced concrete rings
The caisson made from reinforced concrete rings at all stages, except for the walls, is made in the same way as from monolithic concrete, but the walls of the structure are made up of ready-made elements. Time and effort are saved, but laying the rings will require the use of special equipment with lifting equipment. Concrete rings are stacked on top of each other in a solution of waterproofing cement mixture. Before installation, it would be correct to prepare a concrete base, especially if due to melt water in the spring, the high water in your area can rise high, lay waterproofing on the bottom and walls of the pit, and then secure the edges to the neck of the structure. Sand filling is carried out around and the hatch is installed, similar to that described above.

Installation of a plastic caisson
Plastic caissons made of polypropylene or polyethylene are installed similarly to metal caissons, but the connections inside the structure to the pipes are sealed not by welding, but by an assembly coupling. It is recommended to fill the cavity between the outer side surface and the earthen walls with concrete mortar for greater strength of the structure. After the concrete has dried, the “shoulders” of the tank are covered with soil. Sometimes the entire volume around the caisson is concreted.

A caisson for a well is a sealed structure in the ground above a well, up to 2 m deep. The caisson is made of plastic, brick, concrete rings, metal and concrete. Caissons come in cylindrical, rectangular and square shapes.
Inside the well caisson there is:
- Pressure gauge and other automation.
- Filters.
- Pump.
- Expansion tank.
Why do you need a caisson for a well?
The caisson is made to protect the well and water injection equipment:
- From freezing of water in pumping equipment in winter.
- From groundwater ingress.
- From strangers.
- From getting into the well, and therefore into the water, frogs, mice and various insects.
How to make a caisson for a well - getting started
First you need to decide what material the caisson will be built from.
Then the following:
- Dig a hole around the well, approximately 2 m deep, and the diameter should be 20-30 cm larger than the diameter of the caisson itself.
- The hole is dug of such a size that all the equipment for the well will fit; there should only be a hatch outside.

How to make a caisson for a well from concrete rings
To make a caisson for a well from concrete rings, do the following:
- Fill the bottom of the cylindrical pit with concrete mortar.
- Let the concrete completely set and dry, and then clean the bottom and wash it of any soil that has fallen from above.
- We measure the height of the concrete ring and spread the same height in the hole with concrete mortar, and then install the ring.
- After the 1st ring, install the 2nd and the next ones in the same way.
- If soil falls from above when installing the rings, remove it and throw it up.
- After installing the concrete rings, we cover all the seams with concrete mortar.
- On the upper concrete ring we make a structure out of bricks, a kind of well, so that the height of the hatch is 15 cm higher above ground level. This is necessary to prevent melt water from flowing inside.
- We close the well with an insulated hatch.

How to make a concrete caisson for a well
We make a concrete caisson like this:
- We dig a hole.
- We install formwork in the pit.
- Then we install a grate in the hole made of reinforcement.
- We treat the bottom and walls with concrete mortar, leaving holes for pipes and electrical cables.
- We build a brick cap on top and close it with an insulated hatch.

How to make a caisson for a well from brick
This caisson is not suitable if there is close groundwater in your area. It can let water in.
A brick caisson can be made in two ways:
- The brick fits tightly to the wall.
- The walls of the pit are larger in size than the caisson, and the space between the caisson and the pit is filled with soil.
At the top, the caisson narrows, protruding above the ground, and is covered with an insulated hatch.

Plastic caisson for well
Plastic caissons are the most common now. These caissons are made of plastic, 2 cm thick, in different colors.
There is no need to build a plastic caisson; you buy it ready-made and install it in the pit.
Advantages of plastic caisson:
- Light weight - you can install it yourself, without a special crane.
- Low price.
- Durability.
- Does not require insulation.
- Sealed - groundwater, if close to the surface, will not get inside.
The plastic caisson has only one drawback - it is not rigid enough, which can lead to its deformation under the influence of external factors.
But this problem can be solved quite simply: we cover the perimeter of the pit with cement mortar, let it dry, and then lower the plastic caisson.

Metal caisson for well
We make a metal caisson with our own hands:
- A metal caisson is made from a sheet of metal 0.5 cm thick using a welding machine and a hacksaw.
- First, the cylinder is welded. Holes are left in it for the cable and water pipe.
- Then the bottom is welded to the cylinder, cutting out a hole and equipping it with a special sleeve to make it easier to install the caisson on the casing pipe in the well.
- The top of the cylinder is equipped with a narrow neck with a lid.
- The finished caisson is painted with oil paint on the top and inside to protect the metal from corrosion.
Installation of a metal caisson:
- Before installing the caisson, the casing pipe is cut flush with the ground.
- Having lowered the caisson on the beams, they put the sleeve on the casing pipe, and then hermetically weld it to the bottom.
- The metal caisson is installed in the hole so that only the hatch protrudes to the surface by 10-15 cm, the rest is buried in the ground.
- The metal caisson and the lid inside need to be insulated.

Now you know how to make a caisson for a well yourself so that your water supply works as well in winter as in summer.
When building dachas and country houses, every owner faces the problem of installing communication systems. This applies not only to gas supply, but also to water supply. Various systems and equipment are used for their installation. Today we will talk about such details as caissons for wells and consider step by step how to install them correctly.


What is it?
A caisson is a special chamber that is designed to equip the wellhead at a level below the surface of the earth. Such elements are installed above the water intake in order to achieve the most convenient access, as well as for further installation of special equipment intended for water supply to the house/dacha.


Peculiarities
Initially, caissons were intended for various work under water. They were a closed chamber into which water did not penetrate. The shape of such objects, as a rule, was round or square. Currently, the main feature of the caisson, which is its waterproofness, has remained unchanged. However, today the range of its applications has become wider. For example, caissons are rightfully recognized as useful elements of autonomous water supply.
If you want to use water from your own well all year round, you cannot do without a high-quality caisson (or a special well adapter). It is possible to install it yourself, although this is not as easy as it might seem.

As a rule, homeowners turn to specialists for this. However, if you decide to do everything yourself, then it is extremely important for you to follow the instructions and not neglect any of the installation stages.
Caissons are characterized by tightness, which protects the well head from groundwater. This feature plays an important role because it protects household members from the flow of liquid from the neighbor’s sewer when the tap is turned on. This is due to the fact that the end of the well casing does not intersect the ground surface, but is located at a depth of approximately 2 m. It is in this place that groundwater is located.
This depth of the well head is explained by the freezing of the soil (its depth is approximately 2 m). Of course, in this matter a lot depends on the area in which the house is located. In addition, the appropriate depth of the head is also necessary so that in winter the water comes out of the taps without freezing. With this design, the equipment itself is also reliably protected from destructive freezing.


Externally, the caisson looks like an ordinary iron barrel or a box with a neck. Meanwhile, the neck of such elements is closed with a special hatch cover, supplemented with warm foam sheets.
Round caissons are common these days. Such products have a diameter of 1 m and a height of 2 m. The dimensions of these objects are explained by the fact that the well is located at a depth of 2 m, and in order to have access to it, the caisson hatch is brought to the surface of the earth.
Today, caissons are made from different materials, but the most common and reliable are those made from iron. Such units are not afraid of mechanical damage or temperature changes, but are susceptible to corrosion and therefore require high-quality protective treatment. In addition to iron ones, there are also brick, concrete and plastic models of caissons. Each of them has its own distinctive features.


Device
The construction of the caisson is quite simple. This element is a sealed container made of one of the suitable materials. At the bottom of this unit there is an inlet for the well casing, and on the side of the caisson, as a rule, there are inlets intended for water supply pipelines.
At the top of such items there is a special hatch, which is necessary to provide access to repair work and maintenance of equipment present in the interior of the tank.
In the changing and harsh Russian climate, high-quality caissons supplemented with insulating materials are especially relevant. This can be not only the above-mentioned foam, but also foamed polymer.
The usual caisson design is a cylinder with a cross-section of 1 m and a height of 2 m. The last parameter is due to the fact that it is optimal for protecting the internal filling of the caisson from the effects of low temperatures.
As for the well head, it, like the entrance to the pipeline, should be located at a level below freezing of the soil. As mentioned above, the appropriate depth of placement of the bottom of the unit primarily depends on this parameter. The diameter of the caisson must be such that all the required components can be easily accommodated in its interior and there is additional space for carrying out certain work required by the regulations.


Inside the camera there are the following components:
- pump and its automation;
- shut-off valves;
- expansion tank;
- filter;
- pressure gauges.

Materials
Caissons are made from different materials. Different copies have different performance characteristics and features. Let's look at them in detail.


Metal
Units made of metal are especially popular among consumers. In essence, such a device is a large metal box with welded bushings for the passage of communications. As a rule, the caisson is made from sheet material - its optimal thickness should be 3-4 mm. Experts recommend giving preference to reliable and durable stainless steel units. If you do not want to buy a steel caisson, then you can purchase an aluminum structure.
Metal caisson units are famous for their reliability, strength and durability– these characteristics explain the demand for such models. In addition, both experts and home craftsmen claim that such caissons are installed quickly and easily.
You can make such a unit with your own hands, but to do this you need to have the appropriate tools and also have certain skills. If you are not confident in your capabilities, it is better to contact experienced specialists.


Despite the fact that welds are in most cases of good quality and reliable, they can crack when the metal is deformed. For this reason, even those caissons that are made of high-quality stainless steel must be additionally waterproofed. There are devices made of ferrous metal. It is also very important to waterproof them well. However, it must be taken into account that even if the insulation has been fixed as tightly as possible and does not allow moisture to pass through, it cannot be regarded as a complete waterproofing protection of the unit.
The quality and service life of the caisson largely depend on the thickness of the metal from which it is made. Thus, inexpensive devices with thin walls can only be installed on dry soil. As for more complex heaving soil, a model with walls having a minimum thickness of 5-7 mm is suitable for it. Otherwise the caisson may be crushed.


If you decide to install a steel caisson, then you should take into account that it has an impressive weight, so installing it alone will be problematic. It is recommended to hire a crane for this.
Brick
According to experts, a brick caisson is one of the most successful and practical options. Most often, this design is used by home craftsmen who construct these units with their own hands. Of course, this device is also quite complex in construction, but its durability will pay for all the money and energy costs of a home craftsman.
For a brick structure, you need to pour a foundation. It is recommended to prepare a tape base as this will work best. The future foundation does not have to be filled with concrete - you can fill the dug brick trenches with fragments, crushed stone or sand-cement mixture.


Plastic
No less popular today are caissons made of plastic. According to many people, such units are not the most reliable and durable. However, this is not the case with sewer and plumbing installations on the market today.
Currently, caissons are made from the following types of plastic:
- polyethylene;
- fiberglass;
- polypropylene.

Plastic caissons are popular because they have many positive qualities, including:
- Plastic models do not require complex and regular repairs. They are also easy to maintain.
- Plastic caissons have a long service life (on average 50 years), despite their apparent lightness.
- Such units have good thermal insulation performance. They are not afraid of temperature changes. In cold regions, such models need only be supplemented with an insulating shelf.
- These devices are inexpensive. The price of plastic itself is not high, so products made from this material are affordable for most consumers.
- Throughout their service life, plastic caissons do not lose their quality characteristics. Moreover, this factor is not influenced by either significant loads on the system or harsh environmental conditions.


- These units are also characterized by increased tightness. During the installation of such caissons there is no need for coating and fixing waterproofing materials.
- Plastic structures are lightweight, which makes them lighter and more flexible in installation.
- These designs have a body without seams, which makes them more reliable and durable.
The main disadvantage of plastic caissons is their susceptibility to deformation. Such defects may appear if the container is located on land with high groundwater levels.
To protect the plastic unit from damage, it is recommended to supplement it with concrete. To do this, a concrete ring with a thickness of 10-15 cm is installed around the container.


Made from concrete rings
Not so long ago, the most popular were caissons made from concrete rings. Such designs are made quickly and simply, and as a result they are reliable and durable, as evidenced by reviews from homeowners. Caissons made from concrete rings are also good because they are assembled at a specific place from standard materials, so even a home craftsman can handle them. Options made from concrete rings are not afraid of heaving soil. Of course, a lot depends on the correctness of the installation work. If you made mistakes when constructing such a caisson, over time the soil may move the concrete parts.
It is also worth taking into account the fact that such constructions require high-quality waterproofing, since concrete itself allows capillary moisture to pass through it. In addition, structures of impressive mass may shrink over time.


Dimensions
Currently, structures made of metal and plastic are considered the most popular because they have good performance characteristics.
Thus, popular metal containers are produced with the following parameters:
- 1200x1200x2000 mm, while the wall thickness of such products is 3-10 mm;
- 2000x1000 mm with walls having a thickness of 3 to 8 mm;
- 4000x1500x2400 mm with a metal thickness of 3-10 m.
Plastic caissons for wells have other dimensional parameters:
- 950x2000 mm – the wall thickness of such models is 10 mm;
- 1240x2100 mm/1500x2500 m with 25 mm walls;
- 2000x2500 mm - the wall thickness of such options is 40 mm.


The choice of a well design of suitable dimensions depends on the distance of the water intake from the house, as well as the availability of free space on the existing site. Today, caisson models called “Triton-K” and “Triton K-1” are in great demand. Such products are produced in mini format and are made of low-density polyethylene.
Installation
Self-installation of a caisson cannot be called a simple process - not everyone can handle it. However, this does not mean that it is impossible to do such work with your own hands. Below we will consider step by step how to install various caissons for a well yourself. The installation procedure for caissons made from different materials is approximately the same. However, it is very important to take into account some features and nuances so that the installation of the container is successful.
The pit for this container must be larger than the caisson itself, at least 30 cm. Thanks to this, the unit can be placed more accurately. In this case, it will be possible to correct the coincidence of the borehole pipe and the sleeve for its passage. In addition, in this way you can additionally insulate the walls of the device or make them stronger, which is necessary for plastic containers.


Please also take into account that the casing pipe must be cut taking into account the subsequent height of the chamber floor. The bottom of the pit should be covered with a sand cushion (the thickness of this layer should be at least 20 and no more than 30 cm).
The sand backfill must be placed under water for additional compaction. It is necessary to pour a concrete slab with steel reinforcement on a sand bed. It is permissible to pre-install anchor bolts in it in order to securely secure the caisson with their help. However, in this situation there is a high probability of errors. It is better to first install the container in the desired place, and then drill holes for fastenings on the plate.
Currently, you can find self-expanding and wedging types of fasteners in stores, so you can easily purchase suitable options. Next, we’ll take a closer look at how to install popular variations of caissons, taking into account their features.
Made from concrete rings
The installation of such a structure is in many ways similar to the technology for installing well rings, only in this case the depth is shallower. The concrete rings are fastened to each other with special steel plates. Such details are necessary in case the soil shifts. As for the seams remaining between the individual rings, they are covered with a cement composition or reinforced (that is, coated with a special cement mixture without sand and other additives).
Concrete will allow water to pass through, although not too much. For this reason, it is extremely important to waterproof the walls of the structure in a timely manner. For this, you can use materials such as roofing felt or polymer film. But experts recommend using reinforced waterproofing or glass insulation.


Concrete easily tolerates low temperatures and is not subject to freezing, but its standard properties are not enough, so the structure will need additional insulation. In this situation, it is important to consider that the insulating material should not absorb water. Otherwise, it will be completely useless. Also, the insulating layer must resist soil pressure, since too soft raw materials can be strongly compressed by it.
Experienced craftsmen recommend insulating caissons with denser and slab materials. For example, it could be foam glass, but it is very expensive, so it is rarely chosen. If you want to purchase a more affordable option, then you should take a closer look at extruded polystyrene foam. The cheapest insulation for a concrete caisson will be polystyrene foam. It is pliable to work with, and flammability will not affect its quality in any way while it is in the ground.

It is necessary to insulate not only the walls of the concrete caisson, but also its ceilings. Don't be afraid of this work - it's easier to do. You just need to remember that the insulating material should not extend beyond the perimeter of the container. Otherwise, it may break during shrinkage due to the weight of the structure.
Some people argue that concrete caissons do not require a bottom (that is, the rings must be placed directly on a bed of sand and gravel drainage). Thus, if condensation accumulates, it will flow into the ground. It is also possible not to cover the seam between the lower ring and the concrete base with cement mixture - this way the condensation can escape.


However, it must be taken into account that such technology cannot be used in all cases. This scheme will only work if the site has dry and high soil. In other situations, a 2 m deepening will result in the caisson being flooded every year.
The problem with condensation can be solved by installing high-quality insulation. Some craftsmen act more cunningly - they install ventilation into the structure like a cellar.
There must be a concrete base under the rings. In addition, the intersection of pipes through the walls of the structure must be insulated, as well as the entries through the foundation of the dwelling - with a cement mixture, as well as bitumen mastic.

When constructing an autonomous water supply for a country house, the well needs protection from sand, soil and surface contaminated water entering the pipe. Let's consider the procedure for performing work on assembling and installing the caisson, moreover, in several versions using different materials.
To prevent contamination from entering the aquifer, restraining the walls of the well from collapse and protecting water supply equipment from freezing in winter, the well is equipped with a caisson.
There are ready-made metal and plastic caissons on sale, differing in shape and size, but you can build a caisson yourself, using other building materials.
Caisson design
In order to suit its purpose, the caisson design must be:
- hermetic;
- strong and tough;
- have an insulated lid;
- have dimensions sufficient to accommodate equipment, instruments and the possibility of servicing them.
In this case, the shape of the device can be one- or two-stage, with a base in the form of a circle or square.
A passage under the water-lifting pipe is provided at the bottom of the caisson. The side wall is equipped with passages for home and street water supply, electrical cables, and in some cases, ventilation openings with pipes extending above ground level. When using thin-sheet materials, the base, side surfaces and cover must be reinforced with stiffeners. In the upper part of the caisson, an insulated cover is fixed on hinges. Steps are mounted on the vertical surface for quick and easy access and maintenance of the equipment, and handles are attached to the lid.
Making a caisson with your own hands
The choice of materials for a caisson is primarily influenced by: the complexity of installation, the availability and price of materials, as well as the availability of experience working with them.
At the first stage, earthworks are carried out. It is necessary to dig a pit in such a way that the exit of the casing pipe is not in the center of the caisson, but is slightly offset. This makes it more convenient to locate and maintain equipment installed in the tank. The bottom of the pit should be 0.5 m below the soil freezing level, and its width should be slightly larger than the outer dimensions of the caisson, 150-200 mm on each side to create a sandy insulating backfill (for thin-walled caissons - metal or plastic).
The internal dimensions of the chamber without installing a pumping station in it can be 1x1 m (Ø 1 m), with equipment - 1.5x1.5 m (Ø 1.5 m). The thickness of the walls depends on the selected material and its strength characteristics.
Simultaneously with the preparation of the pit, a part of the earth is selected for channels for laying a water supply to the house and to the taps on the plot.
Caissons made of reinforced monolithic concrete
The walls must be reinforced with reinforcement, taking into account the height of the structure and the cost of constructing the well. It would be quite a shame if a collapsed wall caused serious damage to the home's water supply. Since it is much easier to make flat formwork, monolithic caissons are most often made square at the base.
To work you will need:
- cement, preferably not lower than M400;
- crushed stone;
- clean sand;
- reinforcement with binding wire or reinforcing mesh;
- waterproofing material for walls;
- lumber for formwork;
- heat-insulated cover or materials for its manufacture;
- concrete mixer, construction tools.
1. Sand cushion. 2. Concrete base. 3. The walls of the caisson are made of monolithic concrete. 4. Hatch neck. 5. Stairs. 6. Caisson cover
Pouring the base plate
The base slab may not be reinforced, but along its perimeter it is advisable to lay a row of reinforcement with vertically fixed rods to connect the walls with it for reliability. You need to move on to the second stage when the concrete has set sufficiently so that you can walk on it. If the groundwater is located below the level of the bottom of the caisson, the base slab does not need to be filled with concrete, but simply compacted the soil and poured a layer of sand and crushed stone.
1. Support stakes. 2. Formwork panels. 3.Sand preparation. 4. Concrete. 5. Fittings
Knitting reinforcement
The earthen walls are covered with waterproofing material, which prevents the soil from crumbling and does not allow the walls to subsequently be washed away by melt or irrigation water. Along the perimeter of the caisson, reinforcement is tied at a distance from the waterproofing equal to half the thickness of the wall. It is enough to install the vertical rods in one row every 0.4-0.5 m, welding them to the concrete foundation embeds and tying them with reinforcement with adjacent rods. If rods are placed in the base for the entire height of the caisson, then only horizontal ligation is required after 0.4-0.5 m. The height of the reinforcement should be sufficient to attach a horizontal reinforcement frame of the floor to it.
Preparation of panels for formwork and installation
It’s easier to prepare formwork panels of given sizes in advance than to hammer in nails in a cramped space. If the panels are ready, you need to lower them into the pit and fasten them from the inside along the line of the reinforcement frame at a distance equal to half the thickness of the wall, fastening them together. In places where communications pass, sections of pipes are laid or a rectangular channel is fenced with boards. If the embeds are not made (for example, due to the difficulty of sealing the formwork), the wall will subsequently need to be punched with a hammer drill until the concrete is completely petrified. If you want to embed steps into the walls, you need to worry about the embedded structures before pouring.
1. External formwork of the caisson walls. 2. Internal formwork of the caisson walls. 3. Spacer bars. 4. Concrete
Pouring concrete walls
It is better to fill the walls to the very top in one go, or at least in one day. Calculate in advance the required amount of solution and ingredients for its preparation. This way you can avoid horizontal seams in the caisson structure. When filling the formwork, you need to periodically compact the layers or bayonet them in depth with a rod, releasing air bubbles.
After the solution is poured, you need to install a temporary canopy over the construction site to protect the walls from precipitation. In hot weather, the concrete surface should be slightly wetted to avoid cracking. You can move on to the next stage after 7-10 days, after the concrete walls have dried.
Filling the floor
After removing the formwork, a shield made of boards is laid on the walls, in which there is a fenced hole for mounting the cover, as well as passages for the ventilation pipe and street water supply. The pipes are inserted into the holes and secured. The shield is covered with a layer of waterproofing material, and on top of it, at some distance from the surface, a reinforcement frame is knitted and secured to the wall rods. To ensure clearance between the frame and the waterproofing, you need to place several stones under the reinforcement. Concrete is poured and allowed to harden.
Hatch installation
The formwork is being assembled to install the metal structure of the lid. A purchased cover or one welded by hand from sheet and profile steel is installed in the formwork and filled with concrete mortar. The formwork is removed, the inside of the lid is insulated (for example, with polystyrene foam). The surface of the caisson, except for the hatch, is covered with waterproofing and covered with a layer of soil to the ground level on the site.
Some useful theory in the video:
Brick caissons
Brick caissons have a similar design. Excavation work and pouring the floor are carried out in the same way as in the previous case. If a base slab is not constructed, a strip foundation slightly wider than the walls is installed under the walls and covered with a layer of roofing material.
The walls, and, if necessary, the bottom of the caisson, are made of brickwork. They are laid out at some distance from the ground to provide insulation from sand, broken brick or crushed stone. Each row of bricks should be laid, controlling the horizontal level and carefully applying and leveling the cement mortar so that there are no voids left in the masonry. At the point where the channel for the water pipe passes, an embedded structure is embedded in the masonry.
The covering and installation of the cover are carried out in the same way as for a monolithic concrete caisson.
Steel caissons
Metal caissons can only be assembled by welding to ensure tightness. The materials used are carbon sheets coated with Kuzbass varnish or stainless steel with a thickness of 3-10 mm. Before work, you need to decide on the dimensions, draw the future structure (with holes, stiffeners, feet, sling loops and, if possible, detail it for ease of manufacture. You can use a corner, channel or gussets as stiffening ribs.
If you can inexpensively purchase a pipe with a diameter of 1-1.5 m of the required length, it will serve as an excellent basis for creating a cylindrical caisson. It’s easier to weld a tank with a square base from sheets yourself.
At the first stage of production, sheets are cut for the bottom of the walls and the top of the caisson, including the hinged lid. Since the sheet is quite thick, it is very difficult to cut it with a hand tool; cutting it with welding or a hacksaw for metal takes a long time. A good option: ask for the metal to be cut when purchasing according to the dimensions of your structure.
When welding, try to make the seams as efficiently as possible, and then treat the entire surface with an anti-rust agent and open the inside with a suitable varnish, and the outside with bitumen mastic.
Excavation work is no different from previous options. It is impossible to lower a heavy structure into a pit on your own; you will need to rent special equipment or install a block, traction from a car and an assistant to guide the caisson to its intended place.
After installing the metal structure on the base plate, water supply is connected through the holes in the walls, all joints are welded, and the lid is insulated. The cavity between the caisson and the earthen walls must be filled with sand, and fertile soil must be laid on top.
Installation of caissons from reinforced concrete rings
The caisson made from reinforced concrete rings at all stages, except for the walls, is made in the same way as from monolithic concrete, but the walls of the structure are made up of ready-made elements. Time and effort are saved, but laying the rings will require the use of special equipment with lifting equipment. Concrete rings are stacked on top of each other in a solution of waterproofing cement mixture. Before installation, it would be correct to prepare a concrete base, especially if due to melt water in the spring, the high water in your area can rise high, lay waterproofing on the bottom and walls of the pit, and then secure the edges to the neck of the structure. Sand filling is carried out around and the hatch is installed, similar to that described above.
Installation of a plastic caisson
Plastic caissons made of polypropylene or polyethylene are installed similarly to metal caissons, but the connections inside the structure to the pipes are sealed not by welding, but by an assembly coupling. It is recommended to fill the cavity between the outer side surface and the earthen walls with concrete mortar for greater strength of the structure. After the concrete has dried, the “shoulders” of the tank are covered with soil. Sometimes the entire volume around the caisson is concreted.