Of course, the quality of workmanship, elegance or perfection of form, excellent cutting characteristics of the knife blade play a major role when choosing this tool, but no less important are the quality of materials, convenience and functional advantages of its handle.

For the mounted method, narrow shanks are suitable, onto which the handles are mounted. They can be of different shapes and sizes, which makes it possible to embody design and stylistic ideas for the appearance of the knife. The weight of a knife with a mounted handle is much less, which allows it to be used for long, energy-intensive work.
Knife handle shapes
Knife handles can have a different surface to the touch - smooth, rough, finely ribbed, depending on the material used in their production, but the most important requirement for the choice knife handles, it remains conveniently located in the hand for easy, accurate performance of various works.
Depending on the form, there are the following types of knife handles:
- straight. The most popular for making kitchen knives, they can be equipped with a pommel, but they are not versatile enough. It should be remembered that most models do not have limiters, which is unsafe for the user;
- conical Such handles can be either expanding or tapering relative to the blade. In the old days, the first option was used in the production of weapons in Muslim countries (in the Turkish scimitar dagger, Persian card), and the second was used to make dagger weapons for those who had a strong left hand. Today they have become part of a surgical instrument. They are often equipped with guards;
- concave. They fit comfortably in the hand and may have grooves for fingers, but the range of options for their use is quite limited;
- convex. The most common and convenient for various jobs. They may have forms represented by a thickened or flattened middle part. Working with the latter is a little inconvenient, since they do not always feel comfortable in the hand, and you need to get used to such handles;
- flat. Inconvenient for long-term work, since their edges are pressed into the palm, but this shape allows them to take up little space;
- persistent. Their unusual shape resembles brass knuckles and is used in the production of push-daggers and cutting tools. They have no functional value and are more of a decoration for the knife;
- curved in the shape of a hook. They somewhat resemble the curved handle of an umbrella and are used to produce piercing tools for fencing.
Materials for making knife handles
Knives can be designed with different handles, the cost of the material for which also determines the cost of the cutting tool. Knife handle made from natural, synthetic or metal bases.
Depending on the material used, there are the following types of knife handles:
- synthetic models with the addition of fiberglass. For their production, tzitel, kraton, micarta (G-10) are used. For the handles of combat knives - phenol-formaldehyde resin, bakelite linings. Such knife handles are light in weight, resistant to sub-zero temperatures and fit comfortably in the hand;
- Thermoplastic handles are made using injection molding and come in only one convex model, which explains their low cost. The materials are polyamide (PA), acrylonitrile butadiene sterol (ABS) and polycarbonate (PC);
- polyamide is durable, dielectric, does not burn and is not exposed to chemically aggressive elements. Polycarbonate is hard, resistant to deformation loads, and tolerates open fire well. ABS is composed of resin and elastomer. It is impact-resistant, reliable, fireproof;
- Thermoset plastic samples are unique in that their original shape cannot be changed. For their production, polyester, acrylic, phenolic resins and fiberglass are used, which serves as a reinforcing component. Additional G-10 overlays can be applied to such knife handles, which give the surfaces of the handles a pleasant roughness, and the variety of their colors helps to create beautiful, bright models;
- Elastomeric handles have a rubber-like feel. The surfaces of such handles have enhanced adhesion to the skin of the palm, which prevents the knife from sliding during operation;
- metal models are represented by aluminum, steel and titanium handles;
- The most ancient and popular handles are made of wood. For this purpose, walnut, beech, birch, cherry, mahogany and other valuable species are used. The original pattern of each of the listed types of wood gives the product individual beauty and shade. Wooden knife handle subject to impregnation mainly with drying oil or epoxy resin;
- handles made of antler or bone are made from the antlers of red deer, roe deer, elk, ivory and tusks. They are durable and decoratively attractive, but can be cold on the hand at sub-zero temperatures or be quite heavy, and ivory does not withstand shock well, which reduces its durability.
Sometimes there is a need to change knife handle, which was damaged or was not very comfortable to begin with (too light or heavy), or was not suitable for performing the assigned tasks (it made the hand cold, slipped in it, limited the movements of the hand). Of course, you can purchase a suitable option in a store that sells knives, or order the product on the website of an online store. But many will probably be interested in creating their own masterpiece with their own hands.
Making a knife handle- the process is interesting and exciting. In order to do DIY knife handle, you need to decide what characteristics it should have and what shape it should be.
It’s better to start by producing a comfortable handle with grooves for your fingers. A larger recess should be made under the index finger, because the main load during work falls on it, the rest should be wide and shallow in order to make it safe to work with a knife while wearing gloves in the cold. Exactly how to place them and how deep to deepen them can be determined using plasticine fingerprints attached to the workpiece. You can also make a handle for a knife straight or slightly curved shape.
Making a knife handle with your own hands
The wooden block must be ground with sandpaper or the excess sections must be sawed off according to the sketch of the selected handle to a thin piece. At its base, drill a hole to the depth of the shank, into which pour epoxy resin (diluted 100:13) mixed with sawdust.
Attach 2 brass circles with slots for the shank to the machined hole, and place a spacer made of painted cardboard between them. The diameter of these constituent elements of the future bolster must correspond to the diameter of the base of the handle. Insert the shank into the machined hole and place the assembled knife in a clamping press for a day. After the epoxy resin inside the handle has dried, remove the knife, sand and polish the handle.
Next stage making a knife handle consists of treating it with a protective material - impregnation with oil. For this, for example, linseed oil, heated in a water bath, is suitable, in which the knife handle should be completely immersed for a day.
Then you should dry the handle (preferably in the sun) and cover it with a mixture of rosin, wax and turpentine, mixed in a water bath. Final stage making a knife handle with your own hands consists of polishing it with zero-grade sandpaper.
Read 1628 times
And just for those who like to visit the site in search of interesting and useful things. Sometimes it happens that what the manufacturer offers us is not always suitable for everyday use, so you often have to use your imagination and make everything yourself, and even if you do it yourself, you will be confident in your production. This article also has the meaning of remaking a finished one, so we smoothly move on to assembly.
As usual, any homemade product requires material and something that we want to change, in this case it will be a knife. In order to assemble a knife handle, the author explains that necessary, This:
*Birch bark.
*The knife itself is without a handle.
*Clamping vice on studs with wings.
*A grinder with a medium-grain grinding wheel.
*Glue.
When all the assembly materials are ready, you can begin assembly.
First of all, the author took pieces of wood 5-6mm thick on both sides and carved holes in them that fit into the steel handle of the knife.

Then, according to the size of these pieces of wood, it is necessary to cut out a sufficient number of birch bark squares and approximately measure whether they are enough for the length of the handle.
When the required amount is cut out, move on to the next step.
We make a hole in each square of birch bark; it’s up to you to decide what to do; for a better hole, you can use a wood drill, which is slightly larger in diameter than the sleeve on the knife. We repeat this process with all the other elements of our future pen.

When all the birch bark is placed on the handles, we lightly press them together, and then soak each one with glue and let it sit for a couple of tens of minutes.


When the glue has set slightly, you can use a vice with pins to press the entire structure, having first removed it from the knife.

For further processing, you need to let the glue dry completely and when you are sure that the glue has dried, start sanding and shaping. To make grinding more convenient, you need to put our pressed birch bark back on the knife handle and, having equipped the grinder with a grinding wheel, begin processing.
Attention! All work with an angle grinder must be carried out with extreme caution and safety precautions must be observed. To begin, use a grinder to give the handle a square shape.

Then we grind it to an oval shape that fits comfortably in the hand.


Ultimately, the author gives the handle a shiny look by polishing.
All photos from the article
Nowadays, you can buy a knife of almost any configuration, but many people prefer homemade options, since they are made according to an individual project and can have any configuration. For comfortable use, it is important to make a comfortable handle, and in order for it to serve for a long time, special impregnation of the wooden handle of the knife with certain compounds is necessary, and then we will look at how to carry out the work correctly.

What you will need for work
Before starting the work process, you need to make sure that you have everything you need at hand, the list may vary, but the main components are the same:
| Knife blade | This part must be ready, since you need to see what kind of shank the workpiece has, further work directly depends on this. This element is most often ordered from specialist blacksmiths or purchased ready-made from artisans |
| Handle material | Most often, wood with an interesting texture is taken, it can be walnut, maple, oak or other options you like; the blanks should be a little larger than needed. You can cut them yourself; the cutting direction is selected so that the texture is presented in the most favorable light |
| Fasteners | This primarily includes epoxy resin, with which all components are connected. Also, sometimes rivets are required; for this, the easiest way is to use a copper or brass rod, which must have the appropriate diameter |
| Impregnation | High-quality impregnation for a wooden knife handle is also very important. For this, a special dish varnish or linseed oil is most often used, which can be purchased at any art store. |
| Tool | For work, both manual options are used - a hacksaw, a plane, and a power tool. With its help, you can carry out all the necessary operations much easier and faster. |
Important! For work, select dry wood without loose areas; only durable material with low humidity guarantees the reliability of the handles during use.

Workflow Description
Before starting work, it is necessary to determine what type of handle will be used in this case; there are two main options.
Types of handles
Everything is quite simple here:
- Mounted type options are used for blades with a narrow tang. As the name implies, assembly consists of securing the blade in a cavity that is made at the end of the handle. The advantage of such solutions is that the handle turns out to be one piece without any joints.
![]()
- Overlay options are used for blades with wide shanks; this is a more common option, which differs in that the handle consists of two halves that need to be perfectly aligned with each other to ensure the best comfort of use.
Product assembly
The work is carried out differently depending on the type of shank; first we will consider the mounted option:
- A workpiece is taken and given a certain shape, this is done using any available means - a hacksaw, a jigsaw, cutters and other devices. When you get a rough version, you need to bring it to perfection using sandpaper, but you can also use a wood sander.

- Next, a hole is drilled in the end, the depth of which should be equal to the length of the shank on the blade. If it is necessary to widen the hole, this is done using a needle file. As a result, the shank should fit freely on the handle.
- Now let's look at how and with what to impregnate a wooden knife handle; for this we use a water bath, i.e. Place a small one in a large saucepan with water, into which linseed oil is poured. The handle is lowered into it and held there until air ceases to be released from the material, after which the elements are removed, wiped and left to dry and cool for a couple of hours.

- After the handle has dried, you need to prepare epoxy resin (the instructions will tell you how to do this correctly). The composition is mixed with fine sawdust and the prepared cavity is filled with this mixture, after which a blade is inserted into it. Don’t forget to check its level position, then leave the product for a day, then you can use the knife.
Important! If epoxy resin gets on the metal surface, it can leave marks that are difficult to remove, so it is better to wrap the blade with tape or tape to prevent it from becoming dirty.

Overhead options are done a little differently:
- The workpiece is cut lengthwise into two halves. To do this work yourself, you will need to secure the wood in a vice so that you can accurately control the work process. The halves are brought to perfect condition in the same way as described above. To do this, use any tools and devices convenient for you, and the surface is brought to perfection using sandpaper.
- Next, you need to drill holes for the rivets; to do this, the handle is securely attached to the shank and drilling is done through all the elements at once, so you are guaranteed to get perfectly aligned holes.
- After this, you need to make blanks for the rivets, their diameter should match the holes, and the length should be equal to the thickness of all elements.
- The oil impregnation process is described above; you can do this after assembly, but it is better to do this in advance so that the elements are processed as efficiently as possible on all sides.

Knife handle
A high-quality knife is an indispensable attribute of equipment for any hunter, fisherman or outdoor enthusiast. There is such a wide range of hunting knives on the modern market that choosing the right model is not difficult. However, many people prefer to make blades themselves. The handle for the knife requires special attention, because it must be comfortable, durable and resistant to aggressive environmental factors.
Our article is intended specifically for those who prefer to make the tools necessary for hunting on their own. Today we decided to take a closer look at making a handle for a hunting knife and consider the main stages of this process, as well as pay attention to the materials that can be used for production.
Knife handle: characteristics and properties
The design of any knife is extremely simple, because it consists directly of a blade (blade) and a handle. When purchasing, we most often pay attention to the material, sharpness and shape of the blade, leaving the handle without attention. This approach is wrong, since an awkwardly shaped handle can nullify all other advantages of the product.
Figure 1. The shape of the handle directly affects the ease of use of the knife.
The ease of use of the knife, its maneuverability and operational efficiency will depend on the correctly selected shape and size of the handle. The selection of materials also plays an equally important role. For example, if you are going to use the tool primarily outdoors, it is better to choose a product with a handle made of durable and wear-resistant material - deer antler, wood or plastic. For home use, knives with handles made of plywood and other lightweight materials are suitable, which will help you use the knife for a long time without fatigue (Figure 1).
It should also be taken into account that the functional purpose of a knife largely depends on the shape of its handle:
- Oval: This form is considered the most convenient, since it is easier for the hand to hold such a handle for a long time. It is noteworthy that not only hunting knives, but also table knives often have an oval handle, which once again proves its convenience.
- Straight: A characteristic feature of such a handle is that it does not have any narrowing or expansion. As a rule, such handles are made in kitchen knives. A handle of this shape is not suitable for a hunting tool, since the hand will quickly get tired when working with a knife.
- Conical: may have an extension back or forward, and most often you can find the latter option. This handle has an almost ideal ergonomic shape and does not slip out of your hand during use.
In addition, some hunting knives are equipped with concave or convex handles. A striking example of the first type can be considered Japanese blades or knives that were used in Ancient Rus'. In practice, the concave shape is not very convenient, so many hunters prefer to buy knives with convex handles, since they are recognized as the most convenient and functional.
Handle mounting type
The methods for attaching a knife handle to a blade are not very diverse. There are only two of them: mounted and overhead. However, no matter what method is chosen, the production of the handle will in any case be carried out according to a template, so that the finished product fully complies with the wishes of the future owner.
Since mounted and overhead handles differ from each other in many respects and have their own design features, we will look at the characteristics of each method in more detail.
Horseback
The mounted handle is also called a "rat tail". This name very accurately explains the technology of attaching the handle to the blade of the blade (Figure 2).
A narrow shank is made on the knife, onto which, like a rod, a handle is placed and secured in any available way.
If you decide to make a hunting knife with a wooden mounted handle, you should familiarize yourself with the advantages and disadvantages of such a design in advance.
The advantages include:
- Aesthetics: mounted handles look more attractive in appearance, and they are often made from several types of wood at once to increase decorativeness.
- Practicality: This type of fastening allows you to create and attach a handle of any shape and size to the blade.
- Ease of use: Mounted handles are typically light in weight, which is an obvious advantage for hunters who have to move around a lot. In addition, such handles have low thermal and electrical conductivity, which is also an obvious advantage of their use.
 Figure 2. Attaching the equestrian model
 It should also be noted that handles with a similar form of fastening are much easier to repair. Mounted handles have only one drawback - the method of attaching them is less reliable compared to overhead models.
Invoice
Knives with overhead handles have a slightly different design. They have a wide shank that completely follows the shape of the handle. Plates (linings) are attached to it on both sides and secured with rivets or screws. As a rule, this method is used for the manufacture of all-metal or folding knives with two handles (Figure 3).
Among the advantages of the overhead handle are ease of manufacture and high strength of connection of structural elements. However, it should be borne in mind that this mounting option also has disadvantages. Firstly, there are certain restrictions on the shape and size of the handle. Secondly, the finished product weighs much more than a model with a mounted handle. In addition, knives with applied handles have high thermal and electrical conductivity. This means that you are unlikely to be able to operate such a tool for a long time in the cold without gloves.
 Figure 3. Manufacturing of the overhead version
 At the same time, the reliability and durability of such knives completely outweighs their shortcomings, which is why many hunters and fishermen prefer to use edged weapons with applied handles.
Making a handle with your own hands step by step
The simplicity of the design of the knife and its handle makes it easy to make this tool with your own hands.
For example, if you have a high-quality blade with a damaged handle, you can easily update it by making a handle from scrap materials according to the algorithm given in our article.
Required Tools
As a rule, most craftsmen make knife handles from wood, although other natural and synthetic materials are also suitable for this purpose.
Based on the selected material, the tools for the job are selected. For example, for wood processing you will definitely need special impregnations (for example, linseed oil), which will protect the finished product from moisture and other negative environmental factors.
To process the material you will also need special tools. The easiest way to process wood is with a cutter, chisel or rasp, but to work with metal you will need a special vice and abrasive stones. Power tools can also be useful for processing materials of increased strength: drills, jigsaws, chisels, etc.
Requirements for size and shape
There are no clear requirements for the size of hunting knives: everyone is guided by considerations of personal convenience and the functions that the blade will perform (Figure 4).
The optimal blade length for a hunting knife is 10 cm. With the help of such a tool, you can cut up game and use it for planing wood or other purposes.
 Figure 4. Variety of sizes and shapes
 The minimum length of the handle of a quality knife is 11-13 cm, while the width of the finished product is determined individually, depending on the personal preferences of the future owner. As for the shape of the blade, an oval or convex handle is considered optimal for a hunting knife, which ensures the convenience and efficiency of using the tool.
Types of materials used
The types of materials for making knife handles are very diverse. For this purpose, both natural materials, such as wood or leather, and synthetic materials, such as metal, plastic or rubber, are used.
The final choice of material depends on your skills, capabilities and personal preferences. To make it easier for you to make your choice, we will provide more detailed information about each type of material that can be used to make the handle of a hunting knife.
Tree
Wood is considered one of the most popular materials for making a hunting knife handle. Typically, hardwoods such as walnut, ash, birch, beech, cherry, hornbeam, oak or maple are used for this purpose (Figure 5).
If you want to make a wooden knife handle with your own hands that is not only durable, but also original, you can use exotic types of wood. Breeds such as merbau, amaranth, bubingo or zebrano do not grow in our latitudes, but they have sufficient strength and attractive appearance, and are ideal for making knife handles.
 Figure 5. Options made of wood
 If you don't have a suitable piece of natural wood, you can always use parquet pieces. This flooring is made from durable wood that is ideal for making hunting knife handles.
Of course, in some respects natural wood is inferior to synthetic materials in terms of wear resistance and durability, but it also has certain advantages. For example, this natural material is easy to process, it has a unique texture, and also provides reliable grip on the palm and allows you to work outdoors for a long time, even in severe frost.
Birch bark
A handle for a hunting knife can also be made from birch bark. This material is one of the simplest and most affordable, and working with it requires a minimal set of tools. The obvious advantage of birch bark handles is that they contain natural birch tar, which protects the finished product from moisture and rotting. In addition, birch bark has low thermal conductivity, so working with a knife with such a handle will be comfortable in both heat and cold (Figure 6).
 Figure 6. The procedure for making a product from type-laid birch bark
 To make a birch bark handle, the top layer of birch bark is used, which is cut into small pieces, glued with epoxy resin and compressed into a briquette using a vice. Thanks to such a simple design, the handle can be made in just one day. The only drawback of such a handle is that birch bark absorbs odors very well, so if you use a knife to cut game or fish, the handle will absorb these odors and it will be extremely difficult to get rid of them in the future.
Leather
Genuine leather is also a suitable material for making the handles of Finnish and other knives. As a rule, the same typesetting technology is used to produce the workpiece as for the manufacture of birch bark handles (Figure 7).
 Figure 7. Leather products are comfortable and durable
 Along with the obvious advantages of natural material - wear resistance, low thermal conductivity and comfort, and leather handles, there are also certain disadvantages. As in the case of birch bark, genuine leather absorbs odors very well, so it is usually used for making tourist or camping knives that are not used to process game or fish. In addition, if you use and store such a knife incorrectly, the leather may begin to rot and the handle will have to be replaced. Therefore, experts recommend that after each use, thoroughly rinse and dry the knife, followed by treating the handle with special protective agents for the skin or natural wax.
Plastic
Modern composites are much superior to natural materials in their performance characteristics. High-quality plastic does not absorb moisture and odors, has low thermal conductivity and fits comfortably in the hand, allowing you to wield the knife for a long time without fatigue.
However, if you decide to make a plastic knife handle with your own hands, you will be in for an unpleasant surprise. Implementing this idea at home will be very problematic, since plastic requires the use of special tools for processing, which are not always at hand. In addition, securing such a handle firmly to the blade can be problematic. Therefore, if you have clearly decided to become the owner of a hunting knife with a plastic handle, most likely you will have to buy a finished product in a specialized store.
Metal
Hollow or solid metal knife handles are not suitable for everyone. Firstly, such models have increased weight, which is not always beneficial during hunting. Secondly, a knife equipped with a metal handle cannot be used for a long time at subzero temperatures (Figure 8).
 Figure 8. Metal models are not suitable for use in cold weather
 With such obvious shortcomings, making a metal handle is considered quite simple. You just need to take a suitable piece of metal, select a template for the future handle, apply the template to the material and cut out the workpiece. Subsequently, parts of the handle are attached to the blade mainly in an overhead manner.
Rubber plastics
Rubber plastic is considered another practical, inexpensive and convenient material for making a knife handle. In addition, such a handle can be combined, for example, supplemented with elements made of leather or natural wood (Figure 9).
This material has all the advantages of synthetic fibers. It does not slip in the hand, does not conduct electric current and does not allow the hand to freeze even when working outdoors in severe frost. In addition, this synthetic material does not absorb water or odors, which is an obvious advantage if the knife will be used for cutting game or fish. Making a handle from rubber-plastic material is simple: just take a piece of material, cut out blanks of the desired size and shape from it and simply connect them together with glue.
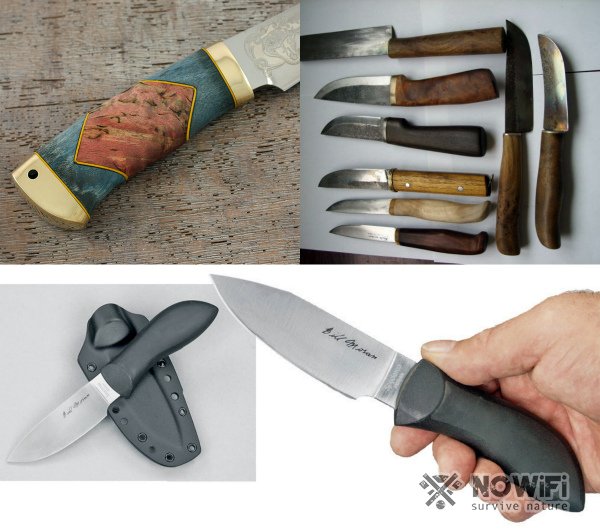 Figure 9. Products made from rubber plastic are durable and wear-resistant
 The only drawback of this material is its high flammability. Rubber plastics do ignite very quickly, so leaving them near an open fire is not recommended.
Synthetic fibers
The use of synthetic fibers to make a knife handle, first of all, involves wrapping an existing handle (Figure 10).
For this purpose, you can use Cordura, Kevlar or Dacron.
Such synthetic materials have many advantages. Firstly, they are easy to find on the open market, and the cost of the material itself is not very high. Secondly, the finished winding is highly resistant to aggressive environmental influences or mechanical damage. In addition, a worn winding can be easily replaced with a new one at home.
 Figure 10. Synthetic fibers are excellent for decorating and braiding the handles of bladed weapons.
 Another option for synthetic fibers that can be used to make a knife handle is PCB. From this material you can make a truly comfortable, practical and wear-resistant handle that will not be afraid of an aggressive environment or mechanical damage. Textolite itself does not absorb moisture or odors, does not slip in the hand during operation and is not subject to shrinkage in the heat or swelling under the influence of moisture. You can secure the handle blank to the blade using regular rivets. The only drawback of this material is its low aesthetics. Its texture is uniform, so the finished handle does not look too expensive. However, if the key role for you is ease of use, and not the attractive appearance of the product, PCB is perfect for these purposes.
Drawings
To make it easier for you to make a handle for an oval-shaped knife, we will provide you with several ready-made drawings of such a product. All you have to do is print out the drawing, apply it to the material for making the handle and cut out the workpiece (Figure 11).
 Figure 11. Finished product drawing
 At the final stage of manufacturing, you will need to drill holes for the rivets, with which the handle will be attached to the blade, and choose a direct method for connecting the knife parts.
Attaching the handle to the blade
If you want to make the connection between the knife handle and its blade truly strong and durable, it is better to use overlay fastening technology. In this case, you will need to cut two blanks for the future handle according to ready-made drawings. If you use natural wood as the main material, it must be additionally impregnated with special water-repellent compounds (Figure 12).
Be sure to pay attention to the composition of the impregnation. It is desirable that it contains natural resins that will reliably protect the handle from moisture and rotting.
When the workpieces are prepared, you can begin to directly attach them. To do this, workpieces are secured to the blade shank using screws or rivets for this purpose. It is better to give preference to the latter method, since connecting knife elements with rivets will be less noticeable and more durable.
 Figure 12. Main stages of fastening the finished product
 When the product is ready, and you want to put some design on the handle, the surface must first be degreased, and only after that can you burn or draw a pattern on it. In the future, the handle will need to be properly cared for: periodically washed, dried and additionally treated with impregnation to protect it from moisture.
Decorating the handle with patterns or ornaments will help make your knife truly unique. Here you can show unlimited imagination. You can decorate the handle using braiding, engraving, or covering it with patterns based on a ready-made sketch (Figure 13).
 Figure 13. Design options for the finished product
 If the handle is made of wood, a suitable design can be burned or painted with permanent paint. The main condition is that before any decorative treatment of the product, the surface must be degreased so that the ornament remains bright and noticeable for a long time.
Detailed instructions for making a knife handle with your own hands are given in the video.
What to make a handle for a knife from. The type of wood for the knife handle. One of the most important factors influencing the performance characteristics of wood is the type of wood, as well as its physical and mechanical properties: stability, hardness, strength, density, thermal conductivity, etc. Wood, depending on the species, has different properties, which determines its use. In addition, these properties often differ within the same variety. Do-it-yourself knife handle What to make a knife handle from (See articles about making knife handles) What to make a knife handle from. How to make a handle for a knife. How to make a mounted mounting of the handle. How to make a bolster. How to make a Swedish knife at home. Knife handle made of birch bark Knife handle made of birch bark (See article)
 Knife handle made of birch bark. I cut birch bark from a fallen birch tree in the summer, dried it, cut the blanks, drilled holes along the jig and cut out jumpers between them with a chisel. Then he collected all this on the shank of the blade, tightened it in a clamp, and put it on the radiator to dry for two weeks. Factors influencing the properties of wood of one tree species. Tree growth area. The properties of the same type of tree may vary depending on the location and growing conditions. As a rule, trees in colder northern regions grow slowly, so their annual growth rings are closer together and the wood is often denser, which makes future products more hard and durable. Age of the tree. Older wood usually has higher density. The properties of the wood are also influenced by the location of the cutting, i.e. from what part of the tree the wood was cut. It has been established that in the wood of some trees the density increases in the direction from the core to the bark, while in others it decreases. The density of wood also varies depending on the height of the trunk.
  Cutting method. There are three main methods of cutting a wooden log: Transverse - cutting the tree perpendicular to the tree trunk and the direction of the grain. Radial - longitudinal cut perpendicular to the growth rings. Tangential - longitudinal cut not perpendicular to the growth rings. It has been established that the hardness and stability of radially cut wood are slightly higher than those of tangentially cut wood. Structure In the center of the trunk, the entire length of the core is located. In coniferous trees, the core diameter ranges from two to three millimeters, and in deciduous trees from eight to ten millimeters. Wood grows around the core in annual layers of heterogeneous structure. There is early wood, located close to the core, and late wood, which is located next to the bark. Early wood begins to grow in the warm season in moist soil, and late wood forms in the fall. The early wood of coniferous trees is light and that of deciduous trees is porous. The size of the layers is determined by the age of the tree, as well as the growth conditions, and accordingly the type of tree. The wood is usually light in color, but some trees are uniform in color and others have a dark center. The core is the dark part. Sapwood is the light part of the trunk. If the wood is cut crosswise, you can see the core rays are light, shiny, sometimes invisible to the naked eye in birch and aspen, and sometimes clearly visible in beech and oak. On a whole section, the medullary rays look like strips or ribbons that are located across the fibers; on a tangential section, they have pointed ends along the fibers. The core rays have a beautiful pattern. When looking at a cross section of hardwood, you can see holes that conduct moisture. The color of wood is determined by tannins and resins located in the cells. The full color of the wood appears after finishing the surface and applying the coating. If the wood is not treated, it will constantly change color. Wood texture is the natural pattern when cut. The texture depends on the structure of the tree, as well as the direction of the cut. It influences decorative qualities. Coniferous wood has a simple pattern. Very beautiful designs on birch and larch. The density of wood depends on the type of wood. There are 3 density groups: low density (up to 540 kg/m3) - pine, fir, cedar, linden, willow, alder; medium density (550-740 kg/m3) - larch, birch, beech, oak, maple; high density (750 kg/m3 and above) - birch, boxwood, dogwood, rowan. The strength of wood depends on its density; the late layer is 2-3 times stronger than the early one. As humidity increases, density increases. With changes in humidity, the volume of workpiece parameters, such as shrinkage or swelling, changes. Shrinkage or swelling, unfortunately, leads to cracking. Any log, during the first year, goes through a stage of shrinkage, and cracking occurs over the entire surface. Subsequently, a main crack appears, which forms at the place where the annual rings change, and all remaining cracks begin to close together. Cracks in a log show the naturalness of the material, but cracks in plaster are a huge problem. Also, when choosing a material, you must take into account its mechanical properties: Hardness is a property of wood that can resist solid bodies. It depends on the density of the wood and is different in all directions. It also depends on many factors: humidity, late wood content, harvesting time. Strength allows wood to resist decay. There are several strength limits: compression, tension, bending. Spliability is the property of wood to split along the grain under load. Any properties of wood can be both disadvantages and advantages. Having learned about the advantages of wood, you can use any type of species, choosing those that are suitable for the tasks at hand. As a rule, hardwood is used to make a knife handle. Moreover, each wood carries with it only its own inherent properties, texture, structure, and it is important to distinguish different species from each other. It must be remembered that a varnished knife handle is valued less; it is not as natural as a handle made of natural wood, which retains its original appearance. Walnut wood is well processed both manually and on machines. Polishes well. The kernel of the nut has a color from light brown to brownish-gray. At the same time, the sapwood is narrow, usually light gray in color.
  Beech wood has a uniform color. Sapwood and heartwood most often do not differ in color. As a rule, beech is easy to work and can produce a high-quality smooth surface. Very often, beech is used for the handles of kitchen knives.
  Oak wood is also a popular material for making knife handles. Oak has very strong, dense wood, it is resistant to decay and mechanical stress. In addition, oak easily stains in different shades, even black. Oak wood produces a colorful, rich and unique texture. For the handles of expensive knives, naturally stained oak is used, which is thousands of years old. These handles are durable and very beautiful.
  Birch wood has a color ranging from whitish to pale brown, without particularly noticeable distinctive features, and has a straight-grained fine structure. Birch is well etched with dyes and polished. Works very well on lathes. Birch suvel is used for knife handles. A well-dried and treated handle begins to “glow” from the inside. When properly impregnated with oils, the wood becomes like amber and even a little transparent. In this case, the product has a rich and unique pattern structure and conveys the warmth of wood well.
  A rare, hard and beautiful material with a very unusual pattern of wood fibers, reminiscent of marble in appearance. It is difficult to process due to its highly curled texture and a huge number of knots. Extremely beautiful, durable, perfectly sanded and polished.
  Burl is an ideal material for the manufacture of artistic and decorative items and is used for veneering furniture. The hardness of burl is significantly higher than that of ordinary wood and is difficult to process, so products made from it are usually made by hand.
  Usually, on a fresh cut of burl and suveli, the pattern is pale and inconspicuous, so they are steamed. After drying, the tray is ready for use. As a rule, products made from burl and suveli are coated with a special compound or natural beeswax, which gives them a rich matte shade and conveys the warmth of wood well.
  Birch bark is the top layer (outer part) of birch bark. The outer side of birch bark is usually white with a grayish tint, or less often pinkish-brown. The inner layers facing the bast come in various shades - from yellow to brown. In Rus', since ancient times, birch bark has been used in construction (as a damp-resistant cushioning material), for the manufacture of household utensils (wicker birch bark baskets, boxes), artistic crafts, and as a material for writing (birch bark letters). Tar was also extracted from birch bark, which was used to protect leather, especially shoes (boots) and as wheel lubricant. Birch tar is also actively used in veterinary medicine (treatment of lichen, treatment of hooves of cattle and horses).
  In Russia, stacked knife handles are made from birch bark. Such handles allow you to use knives in field conditions in cold and hot weather due to the low thermal conductivity of birch bark and its velvety properties. The high water-repellent properties of birch bark make it possible to make knife handles without additional impregnation, and the tar content gives it some disinfecting properties, so that birch bark does not rot. Very often, exotic woods are used in handmade knives: amaranth, wenge, bubinga, ironwood and other hardwoods.