Subconsciously, we are accustomed to attributing many of the troubles that arise to force majeure circumstances, despite the fact that in most cases such events arise mainly due to our own oversight. Timely waterproofing of the floor in the bathroom and toilet is just one of the key measures that can protect your budget in cases of annoying leaks. This is especially true for apartments in multi-storey buildings, where subsequent repairs to the neighbors’ homes below in the event of a water leak can cost a very decent amount.
Methods for waterproofing floors
Today's construction market offers a wide range of high-quality waterproofing materials from domestic and foreign manufacturers. But when choosing, first of all, you need to focus on the purpose and type of waterproofing that suits your requirements, since various modifications differ significantly in cost.
Work related to waterproofing the bathroom floor is carried out in two classical ways: coating or pasting. The second option, which involves the use of roll-film waterproofing materials, is rarely used today when renovating apartments, since it has some disadvantages along with complex execution techniques. This method is especially not suitable for bathrooms with a raised threshold (such are still found), since roll waterproofing raises the floor level by approximately 3-5 mm, depending on the type of roll. Therefore, based on the ratio of work efficiency - price - quality, a coating waterproofing mastic is most suitable for the floor of a bathroom and toilets, which will be discussed later.
Question about waterproofing bathrooms
Before moving on to the details of moisture protection, it is worth considering one important issue: when to start waterproofing floor in the bathroom, before pouring the concrete screed or after? It’s curious, but even among seasoned professionals there are still no clear opinions on this matter. Some recommend starting work before screeding, considering the best option in subsequent steps to lay tiles in the bathroom on a leveled concrete floor that has excellent adhesion (adhesion).
Others categorically deny the outdated technology, in their opinion, preferring to do everything the other way around, i.e. according to the principle: screed - waterproofing - laying tiles, citing the fact that in the event of a leak, the protected concrete mass is not saturated with moisture, as in the first option , without subsequently releasing dampness, unpleasant odors, and sometimes mold. Everything is true, if it weren’t for the really controversial issue about laying the tiles directly on the waterproofing through a thin fastening layer of tile adhesive (max: 1 cm), which definitely does not contribute to the durability of the tile covering.
But there is also a third way, which, in our opinion, is the most reliable and correct in all respects in achieving a truly high-quality result.
Preparatory work:


Main stages of work
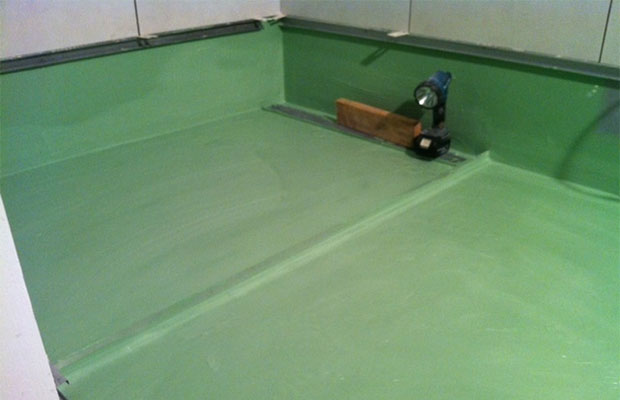
1. Apply coating waterproofing to the entire prepared area, observing the technique of continuous application, not forgetting to coat the walls (from 20 to 50 cm). Typically, three layers are applied, using a wide brush and a paint roller during the work, with a 24-hour interval for drying each layer. The stages of the process are shown in the photo:


 Final waterproofing of corners
 2. Next, on the dried waterproofing we apply a layer of a special primer filled with coarse quartz sand - Concrete contact DV Feilal or a more expensive analogue - Concrete contact Stenotek KR with powerful adhesive properties.

3. After a day, on such a “hybrid” coating, we again set the beacon profile to the required height (usually 1.5 cm is enough, but no less) and fill it with self-leveling floor Vetonit 5000, pulling the solution along the beacons as a rule.
4. We wait at least 5 days necessary for the final drying of the final self-leveling floor, then apply a primer Glims, maintain the prescribed drying period - about 3 hours and lay the tiles on the cement-adhesive mixture Vliesenkleber or Litoflex.
Thus, between the tiles and the insulating waterproofing on the base screed we will get a high-strength cement layer of about 3 cm (self-leveling floor + tile adhesive), capable of withstanding significant loads without damaging the tile cladding.
Types of coating waterproofing
As previously mentioned, coating (liquid) waterproofing has many advantages over rolled analogues. In addition to application efficiency, the compositions in question have high adhesion, resistance to aggressive environments and high temperatures, which is especially important for showers and bathrooms.
Let's look at the most popular types of coating waterproofing for floors in this class:
- Cement-polymer - a practical universal mixture that provides waterproofing of floors, walls and roofs. However, due to the emergence of combined protective compounds with better performance characteristics, this type is used less frequently today.
- Bituminous- quite economical waterproofing, known since the construction of socialism. This modification is divided into cold and hot types, and the first is undesirable to use in contact with an acidic - alkaline environment, i.e. with concrete. Hot bitumen is considered more versatile, since it is a high-strength plastic material that can retain water well. But due to its readiness to work only when heated to 160C, it is better to refuse bitumen in apartment renovations.
- Bitumen-polymer – enjoys special sympathy among experienced craftsmen. Thanks to its components - latex filler, plasticizers, as well as organic solvents based on bitumen, mastic has excellent adhesion to concrete along with outstanding strength characteristics. One of the well-deserved brands for wet rooms - Aqua Mast
- Acrylic- water-based waterproofing of the latest generation. Unlike bitumen, it is odorless, absolutely environmentally friendly, and has increased ductility and strength. Prominent representatives in this line - Feidal Flachendicht And Hydro-Buffer.
In conclusion of the publication
Despite the apparent ease of waterproofing floors in bathrooms and bathrooms, you should not experiment in this area of work without skills. After all, there are many “underwater reefs” that experienced craftsmen and finishers sometimes sense at the level of intuition. Don’t forget - properly done waterproofing can save you from unnecessary expenses.
Both during the construction and renovation of a bathroom, preliminary waterproofing of the bathroom floor under the tiles is very important, especially if there are rooms below and you want to avoid their flooding in the event of a possible communications failure. Let's look at a number of materials that are commonly used for this purpose.
Why is waterproofing done under cladding?
Imagine that during water procedures a certain amount of water splashed out of the bathroom onto the floor and in such a situation ask yourself whether waterproofing is needed in the bathroom under the tiles. There are no floors that are completely impervious to liquid; there are often gaps at the joints between slabs and minor cracks near communication pipes passing through the floors. Accordingly, water will easily seep down, and if this happens in the apartment, the decoration of the neighbors’ premises may be seriously damaged. Well, in a private house, the damage will be caused to you, which is also unpleasant. Waterproofing will prevent this from happening, and with high thresholds you will have enough time to react before the water rushes into the hallway.
Flooding the rooms located on the floor below, water can flow through the channels made for electrical wiring and cause a short circuit and, as a result, a fire.
But flooding is not the only problem that can arise from frequently getting wet floor tiles. Seeping between the seams of the cladding, where the tile grouting is not done well enough, water begins to gradually saturate and then destroy the concrete, regardless of whether it is treated with soil or not. Therefore, it is advisable to first carefully coat concrete surfaces with coating mixtures or special films in order to isolate them from possible moisture ingress. Water can get under the tile even with good grouting, in places where it adjoins communications or along the edge of the cladding along the walls. In this case, dampness will be an ideal environment for the appearance of mold, which is harmful to both building materials and the health of residents. Waterproofing can solve this problem too.
How to use waterproofing correctly - main treatment areas
It is necessary to protect not only the floor, but also partially the walls from moisture penetration. As a rule, the most problematic areas are those corners of the room where the baseboards are located, that is, along the perimeter walls. Therefore, when treating with waterproofing, it is recommended to cover vertical surfaces at least 10 centimeters, and preferably 0.3 meters upward. However, there are areas that require special attention. In particular, in places where pipes pass through ceilings, be it water supply or sewerage. Waterproofing should be applied especially carefully around communications. If it is a mastic coating or a paste-like plaster mixture, then in several layers.
It is also necessary to waterproof the walls of the bathroom where the plumbing will be installed so that water does not get under the tiles. It often happens during water procedures that your hand accidentally clamps the faucet tap and the stream hits the wall. It is in such situations that moisture flowing down the tiles can get under the cladding where it is not made particularly well. Therefore, it is recommended to cover with waterproofing the entire area where water may accidentally or inevitably, such as when turning on the shower, get in. This is 50 centimeters to the sides and up from the sink, 0.5 meters to the sides from the bathtub and from it up to the ceiling. You should not bypass the water closet, since condensation often accumulates on the tank, and the possibility of a leak cannot be ruled out.
Materials used as waterproofing
If you are planning to protect your bathroom ceiling from penetrating moisture, you have quite a large choice. Today, there are several types of waterproofing materials: coating mastic compositions, paste-like plaster polymer-cement mixtures and films for pasting in roll format. There are also separate penetrating compounds that, after drying, close microcracks and voids between grains in concrete, providing a sufficient degree of moisture resistance. As a separate material, we can mention sprayed waterproofing made on the basis of liquid rubber.
Among other things, special aqua panels are used as an additional insulating coating, which cover the floor and, partially, the walls. Any of the listed materials is already applied or glued on top, which provides multi-layer waterproofing in combination with primers for concrete surfaces. Coating compositions are made on the basis of mastics, including bitumen, and also latex is used as the main component, in combination with it or separately from it, very fine rubber crumbs are added. A number of roll materials also have a bitumen base. Cement compositions are necessarily supplemented with plasticizers, often polymer. Let's take a closer look at the existing options.
Mastic compositions - varieties, features of use
Compositions for coating surfaces can be applied with a roller or brush, that is, their consistency is quite liquid. These are so-called mastic waterproofing mixtures, which are produced on the basis of bitumen resins or polymers. There are compositions with latex as a plasticizer. It is quite easy to treat floors and walls with them, they have excellent adhesion and often there is no need to even specially prime the surfaces, just clean them from dust and dirt. Some mixtures can only be used with an organic solvent.

A special mesh with a hydrobarrier strip is laid on top of the coating in the corners, and it is better to choose options specifically for the corners, after which another layer of mastic composition is applied. This provides the most reliable waterproofing.
The main requirement for such coatings is that they should be used to cover the floor and walls with moderate air humidity and at a temperature of 20 degrees or higher. This is a definite disadvantage, since it is necessary to create certain conditions for work. Cold makes these mixtures hard and brittle, especially if the curing process occurs at low temperatures. Another drawback is that the applied waterproofing takes a very long time to dry, especially since the layer must be quite thick. The advantages of such compositions include a fairly low price, which allows them to be used in large volumes of work. In addition, they are easy to find on sale, and the choice is quite extensive.
Polymer-cement compositions - use cases, advantages and disadvantages
The simplest solution is to make a concrete screed by adding it to the building mixture, but this option still will not solve the problem with joints near the walls, where you need to leave some gap when pouring. Therefore, special paste-like compositions based on cement with the addition of polymers or other plasticizers are much more effective. This is dry waterproofing for the bathroom in paper bags, which need to be diluted with water, after which a thick paste is obtained. Its advantage is that cement provides strength after drying, and polymers, penetrating into any cracks and microcracks, create a film to isolate the ceiling from water.

Like mastic compositions, cement mixtures are available and very inexpensive. This is their main advantage. In addition, another advantage is the ease of processing surfaces with mixtures; a regular spatula is used for this. The polymer-cement composition is diluted to the consistency of thick sour cream, after which it is applied in portions to the floor and walls and smoothed. It is more convenient to treat areas where pipes pass through the ceiling with a brush, rubbing the mixture into the cracks. The composition begins to harden within 5 minutes, but for the polymerization process to be completely completed, at least a day must pass before further finishing can begin. Such a long drying time is a significant drawback.
Rolled waterproofing - a small analysis of existing options
Perhaps the fastest way to handle the treatment of the floor and walls in the bathroom is with the help of special films or other materials sold in rolls. Among them there are those that are applied by heating, or self-adhesive. The second type is more convenient; it is enough to remove the special protective coating to reveal the adhesive layer. The most affordable option is built-up materials with bitumen impregnation, such as roofing felt and roofing felt, which need to be heated with an open flame, for example, with a gasoline or gas burner, until the mass on the back side becomes sufficiently sticky. The main disadvantage of this type is a pungent odor that does not disappear from the room for a long time. Also, the disadvantages include fragility. The main advantage is low cost.
Self-adhesive materials are in some ways more convenient because they do not require much effort. As already mentioned, the protection is torn off and that’s it, you can carefully apply it to the surface. However, difficulties arise when covering the places where communications pass. It is not recommended to cut the membranes, and if you press them as they are, folds may form. As an option, you can combine films with mastic compositions, this will allow you to isolate difficult areas well. Bituminous ones only need to be heated to form neat joints, so it is difficult to judge which bathroom waterproofing under tiles is more convenient and which is best to use. But self-adhesive roll materials have an undoubted advantage - they are very durable, and in relation to the quality the price does not seem too high.
When overhauling bathrooms or bathrooms, a question always arises. How to properly carry out the necessary waterproofing work?
Which will affect both walls and floors. Why is this necessary? In such a room there is always excess moisture; it is in the air, on the surfaces of the walls and floor, and furniture.
Also, the very specificity of this room is associated with the need to carry out such work. Communication pipes are a place where their sealing is broken and water leaks, which can accumulate in places inaccessible to simple visual inspection and subsequently penetrate further, causing destruction to walls and relationships with neighbors. And in such a situation, a good barrier to water is needed, and it is the waterproofing layer that can become such.
Over time, if you do not take any action, this moisture will destroy what you created. Some people believe that ceramic tiles themselves provide excellent protection against moisture penetration into walls. Actually this is not true.
Between tile seams, cracks and chips, through all this moisture can penetrate into the concrete base of the walls and floors, as a result they become saturated with water, which contributes to the appearance of mold and fungi. Which further destroys home comfort, contributing to the appearance of unpleasant odors and diseases caused by mold and fungi. Therefore, waterproofing of the bathroom floor and walls is necessary.
So what does the waterproofing of a bathroom in an apartment consist of? The most important element of this design is a layer made of moisture-resistant materials under the concrete screed. Using high-quality materials and following installation technology will create reliable and durable protection for the walls and floors in your bathroom.
Today, the building materials market can offer a huge variety of various means for creating waterproofing protection. Let's look at those that have gained the most popularity among builders and customers:
- Bitumen mastic. It is laid in several layers, creating an effective barrier to moisture.
- Sheets or rolls impregnated with bitumen mastic. They allow installation to be carried out in such a way as to cover the lower part of the walls.
- The mixture is based on a cement-polymer mixture. Walls, ceilings and floors are processed in several layers.
- Creating protection against moisture penetration using liquid rubber. A very effective method.
- Penetrating waterproofing layer.
When installing bathroom waterproofing, the use of polyethylene films of various characteristics is strictly prohibited. Since such materials do not have the necessary properties, such as vapor permeability and moisture permeability, they are also susceptible to ruptures at points of tension.
It is not always possible to invite specialists in this field to carry out waterproofing work in the bathroom. Therefore, you can carry them out yourself, having obtained the necessary knowledge in this article. But if you still have the opportunity to use the services of a construction team, then this knowledge will help you control the progress of work on creating a waterproofing layer.
So where to start? The first step is to select the required material; the best combination would be to use bitumen mastic and rolls impregnated with bitumen. This combination will give the desired effect and create a barrier against moisture, preserving your bathroom walls and floor and prolonging the life of the finishing materials you use.
Advantages and disadvantages of using bitumen-based materials
There are a number of advantages:
- operational reliability;
- long service life;
- low costs for carrying out the work.
Some disadvantages of using this method:
- many stages in work;
- specific smell;
- use of a concrete base as a screed;
- long period of work.
But all these disadvantages can easily be overcome by creating high-quality and durable waterproofing.

The procedure for creating waterproofing
When buying an apartment in a new building, the question of creating a waterproofing layer in the bathrooms most often does not arise, because it has already been installed by the construction company that was engaged in the construction of the house. We will consider the procedure for carrying out major repairs in a house that has been in long-term use and where the waterproofing of the bathroom, namely in the room, has become leaky and has become unusable.
First, you need to completely remove the floor covering, the old waterproofing screed and clean up the remains, exposing the concrete base.
Having reached it, we will begin the construction of a new multi-layer waterproofing barrier consisting of the following layers:
- priming the concrete base using special impregnations;
- the waterproofing layer itself;
- creating screeds from cement or special dry mixtures;
- the actual flooring, ceramic tiles or other material.
Step-by-step waterproofing:
- The concrete base, cleared of remaining dirt, is subjected to wet cleaning to remove dust, then it is thoroughly dried and only after that it is coated with a primer material. This is done so that the subsequent layer of moisture insulation has excellent adhesion to the concrete. Therefore, you should not neglect this stage when carrying out work. Which primer should I choose? In principle, you can use any of all manufacturers, which guarantees its deep penetration into the concrete layer.

- The construction market also offers a number of special primers, which, in addition to their basic qualities, also have some waterproofing properties. Why does this happen? This primer contains certain polymers that penetrate the concrete structure and fill all pores and microcracks, then they harden and create partial protection for the penetration of moisture into the concrete. It is important to remember that the use of such a primer cannot replace the creation of the actual hydraulic barrier based on bitumen mastics.
- After the primer has completely dried, we begin applying the first layer using bitumen mastic. This layer should be thin, and it is applied using a special construction brush. You should start from the junction of the floor and the wall, then covering the entire surface of the floor with a layer of mastic, while not forgetting to create a so-called boot on the walls of about twenty centimeters. In places where communications pass, special seals are installed, most often rubber. They should also be covered with a layer of mastic, covering approximately ten centimeters of the surrounding surface. The next step after we have applied the mastic and allowed it to dry completely is laying the soaked rolls, it should be done in this order. The strips are applied overlapping each other, as well as covering the wall to the level of the mastic layer. It is not allowed to create a seam at the junction of the wall and the floor, since in the future it is in this place that a gap will form and through it moisture will begin to penetrate into the concrete.
The joints of the roll strips are treated with bitumen mastic to prevent further leakage of water under the sheets. For better joining of sheets and deep penetration of mastic, they can be heated using a burner.
- When making holes for pipes in sheets, adhere to the following rule: they should always be smaller in size and fit like a side onto the pipe; this can be achieved by using a torch, heating and stretching the edges, trying to lay them tightly on the pipes. For the time necessary for complete drying and hardening of the bitumen mastic sheets of the roll, moisture, dust and debris must not be allowed to come into contact with it.
- After this, you can begin pouring the screed and forming the floor to install the final covering. The most popular material is ceramic tiles of different sizes.
To install it in the bathroom, it is better to use a special moisture-resistant glue and use grout with moisture-repellent properties for the seams.
The coating method is based on the use of materials consisting of cement-polymer mixtures, polyurethane or rubber. This method of creating a hydrobarrier guarantees long-term protection against moisture penetration.
The peculiarity of using such compositions is the following:
- the first layer is applied to the surface parallel to the wall;
- after it dries, the next layer is applied, but perpendicular to the previous one;
- Now you can start laying the tiles.
The use of special compounds with waterproof properties. One of these materials are compositions that can be used to paint walls and floors.
Remember that such a layer will retain its qualities only for five or six years.
This penetrating mixture is applied to concrete surfaces; it penetrates into the concrete itself, covering it with a film and filling all voids.
At this stage, work begins to create waterproofing for the bathroom floor. Now it is necessary to move on to work on protecting the walls from destruction by moisture. The places most susceptible to its destructive influence are the sections of walls connecting to the shower stall or bathtub.
Some features of waterproofing bathroom walls
To form a waterproofing layer on the walls, special cement-polymer mixtures should be used; only in this case can the required level of protection be achieved.

Because bitumen-based materials flake off over a period of time. When carrying out work, pay primary attention to the corners of the walls and the passage of communications. Sealed waterproofing tapes are laid at the junctions of the walls, and rubber gaskets in the form of cuffs are placed at the places where the pipes exit.
Before starting work on waterproofing the walls, they are also treated with primer solutions. Then a layer of waterproofing is applied, into which a reinforced mesh can be laid. It will serve to strengthen both the layer of polymer mixture and the layer of glue on which facing material, ceramic tiles, or other materials will be installed in the future.
Bottom line
Proper execution of the work and adherence to the technology for creating a waterproofing layer will help to avoid operational problems in the bathroom. Waterproofing a bathroom is a responsible and serious procedure that requires your attention. Do not skimp on choosing the necessary material, the quality depends on it.
Waterproofing the bathroom does not bother the lucky ones who have recently purchased housing in a new house, since the necessary measures were carried out during construction. However, if more than 15-20 years have passed since the home was put into operation, waterproofing the bathroom requires a complete reconstruction. This article will tell you the dangers of ignoring the problem of moisture control, how to solve it, and whether you can do it yourself.
Possible options
Waterproofing a bathroom involves installing a water barrier that protects the floor and wall areas most exposed to moisture from dampness. There are quite a lot of places in the bathroom that require protection. The so-called “wet zones” include the area directly adjacent to the bathtub, toilet, washbasin, and areas where water pipes pass. According to the method of application, waterproofing in the bathroom is:
- Liquid, obtained by multilayer application of a cement-polymer mixture;
- Pasting, for the creation of which roll materials based on bitumen are glued to the protected surface;
- Coating, consisting of repeatedly applied layers of bitumen or polymer mastic.

The choice of material determines the types and methods of organizing waterproofing for the bathroom; financial capabilities are often the limiting factor. If, during a major renovation of a bathroom, the budget does not allow you to resort to the services of a team of professionals, high-quality installation with your own hands is possible. For those who want to carry out waterproofing work themselves, the simplest option is the combined use of mastic and self-adhesive material in the form of a bitumen-based roll.
Objectives of the hydrobarrier

Obviously, the global goal of waterproofing a bathroom is protection from excess moisture. If the work is done efficiently and in accordance with technology, it will save you from the following troubles:
- Spread of fungi and bacteria. Did you know that some types of harmful microorganisms not only spoil the appearance of the room, lead to premature wear of finishing materials, but also cause serious illnesses in the inhabitants of the house? Reliable waterproofing around and under the bathtub contributes to a healthy microclimate in the home;
- Risk of flooding neighbors. A water tap left on, a washing machine breaking down, or an inopportunely burst pipe would have caused discord with the neighbors below and would have been threatened with lawsuits if not for the timely installation of waterproofing;
- Maintaining an aesthetic appearance. The installation of a water barrier will prevent premature destruction of finishing materials, which means a longer service life and delayed repairs.
Reconstruction of waterproofing during a major overhaul is necessary and should begin with the complete dismantling of the old, worn-out layer, only then will moisture protection measures be effective.
Pasting method

Floor waterproofing is installed using the adhesive method using rolled materials impregnated with bitumen. Self-adhesive and weld-on samples are available in stores. For weld-on ones you will need a gas burner, but for self-adhesive ones you just need to remove the protective film. Materials with an adhesive layer are easier to install yourself, but their price is higher. The most affordable option is roofing felt, but there are materials that are more durable and easy to use, at a higher price category.
To perform waterproofing work using the pasting method, you must:
- prepare the bathroom: remove the old flooring down to the concrete, level it with cement, wet clean and dry;
- Prime well;
- Cut the rolled material into strips to fit the size of the bathroom, heat it with a burner and thus glue it to the concrete floor;
- After hardening, pour the screed and lay the decorative coating with your own hands or with the help of hired workers, usually ceramic tiles play this role.
Please note that during installation the sheets overlap each other by 10-15 cm and overlap the wall to a height of 20 cm or more. Under no circumstances should the joint be placed between the wall and the floor, as leaks will inevitably occur in this area.


Coating method
Laying by coating method involves applying several layers of a mixture based on bitumen or polymers. These materials have a stable consistency; they turn into a solid state in the open air during the drying process. They are applied with a wide brush in a thick, even layer on the floor surface, extending onto the walls by 15-20 cm, and all “wet areas” are also treated.

It is not recommended to use bitumen in small, unventilated rooms, since to obtain the desired consistency it is diluted with gasoline or solvent; any carelessness can lead to fire or poisoning with toxic fumes.
To protect yourself, you can use rubber-based polymer mastic. Waterproofing the bathroom floor using rubber materials is carried out after leveling, priming and dust removal. Complete hardening occurs within 6-8 hours.

Application of polymer mixtures
Special waterproofing polymer mixtures consist of almost 90% of very fine purified river sand, the remaining 10% includes cement and polymers obtained in the chemical industry. In stores, these compositions are sold in paper bags with a capacity of 5 to 25 kg. The prepared solution penetrates into every crack and unevenness of the concrete floor, hardens, it expands and becomes hard due to the presence of cement in the composition.
Laying the polymer composition is similar to applying plaster; this requires a spatula or trowel. Using a spatula, the mixture is applied to the wall, and with a trowel it is leveled and rubbed. A significant advantage of this method is its versatility; it is optimal for floors, walls, and other wet areas. Before starting work, the concrete floor should be cleaned, leveled, primed and wiped with a damp cloth. After drying, you can begin applying waterproofing.
DIY installation
Remember! Waterproofing in bathrooms and bathrooms is unacceptable when using polyethylene-based films, since they do not have sufficient strength and do not allow steam to pass through. Regardless of the choice of material, the following sequence of work must be observed:
- Dismantling the layer of worn decorative coating, screed, old waterproofing layer to the concrete base;
- Leveling the floor using cement mortar, eliminating chips, cracks and pits;
- The next stage is wet cleaning, which is necessary to remove dirt and dust. After this event, the bathroom area is left to dry;
- Applying a primer on the surface to be waterproofed for better absorption or adhesion;
- Creating a layer of bitumen mastic using a wide brush. The entire floor should be treated, including the wall and “wet areas”, joints and seams;
- The pipe insertion points should be equipped with rubber liners;
- Lay the rolled material following the recommendations. Coat the joints between the sheets with bitumen or polymer mastic. During hardening, close the room to prevent dust from entering;
- Fill the screed with a special mixture, level the floor and install the decorative covering.

At this point, the waterproofing of the bathroom floor is considered complete. The quality of the work done with your own hands will be shown by further operation. It is recommended to install a hydraulic barrier during each major renovation of a bathroom, then its service life will reach 15-20 years.
Video instructions for waterproofing