Natalia Borodkina
The master class is designed for children of senior preschool age.
This master class will be of interest to teachers and parents.
Tasks:
Arouse interest in manual labor through working with waste materials;
Develop fine motor skills and artistic and creative abilities in children.
For work we will need:

Colored paper with printed wings of butterflies and bees
Scissors
Decorative fluffy wire
Pencils or markers
A capsule from a Kinder Surprise toy with pre-drilled holes. (for a spider there are 8 holes on one side - these will be the legs, for the remaining 6 holes on one side and 2 on the opposite side - antennae)
Ready-made eyes for decoration
Colored self-adhesive paper
Double sided tape
Let's make a spider first:

1. Insert a wire into the hole for the paws and secure it inside

2. We form the wire into the position of the legs of a real spider

3. Cut out a mouth from self-adhesive paper and glue it under the eyes
4. Using double-sided tape, attach the eyes
Our spider is ready!

With acquired skills, we can easily make a butterfly:

1. We cut the wings along the contour; if desired, you can apply a pattern to them using felt-tip pens

2. In the capsule on one side we place 3 identical wires (legs, insert the end of the wire into the hole on the capsule and release it into the adjacent hole

3. On the other hand, in the same way, 1 wire.

4. We form antennae and paws from the ends of the wire.

5. Glue on the eyes, mouth and wings.
Our butterfly is ready!

Such insects can decorate indoor plants, and if you make more holes on the capsules and cut garlic into them, you will get a wonderful amulet against acute respiratory infections.
Publications on the topic:
While you are preparing dinner, or is your wife doing it and you need to keep the child busy right here in the kitchen? Take plastic Kinder Surprise containers.
Master class on making a “Chicken in an Egg” craft. This craft will be relevant during the Easter holidays and beyond. I want.
Goal: teach from waste material, create beautiful crafts. The craft is easy to make and does not require any special expenses for older children.
Hello, colleagues! This week our theme was “Animals of the Arctic”. And on this topic, the children and I completed a very interesting craft.
Christmas tree "Surprise" Kinder surprise - who doesn't know this chocolate egg wrapped in thin foil, which has captivated the hearts of children for many years.
Objectives: 1. Development of the ability to see the general characteristics of objects, the ability to distinguish and group by color (red, blue, yellow, green)..
Dapoxetine acts on the cerebral cortex, which promotes natural sexual arousal and slows down sexual discharge. According to clinical studies, the drug prevents premature ejaculation in all adult patients. That is why you can have no doubt about the effectiveness of the generic! The active substance begins to act half an hour after administration and remains effective for 2 hours.
One tablet can be taken once a day. It is recommended to take the drug with plain water. You should not drink large amounts of caffeinated drinks while taking Dapoxetine, as this leads to increased heart rate and increased blood pressure.
The tests carried out did not reveal any serious side effects when taking the medication, so you can safely buy dapoxetine in our pharmacy and enjoy a rich sex life. However, if the dosage is exceeded, headaches, nausea leading to vomiting, pain in the abdominal cavity and rapid heartbeat may occur. In this case, you need to contact your treating specialist.
Below are the main contraindications in which you should refrain from using Dapoxetine: 1. Individual intolerance to lactose or other components of the medication. 2. Severe liver pathologies (cirrhosis). 3. Heart rhythm disturbances, heart failure.
The stimulant should not be combined with the following drugs:
1. Antidepressants.
2. Psychostimulants intended for the treatment of schizophrenia and other mental disorders.
3. Medicines intended for the treatment of migraine.
4. Drugs containing lithium.
5. Preparations based on St. John's wort.
6. Strong painkillers (Tramadol).
If your doctor has prescribed you one of the above medications, you must complete the course of treatment, and only after two weeks you will be able to take Dapoxetine without fear for your health. After you have finished taking this stimulant, you should avoid taking the following medications for one week:
1. Means for the treatment of fungal pathologies.
2. Medicines intended for the treatment of HIV infection (ritonavir).
3. Antidepressants.
If you are taking any strong medications at the same time, be sure to consult your doctor before purchasing Dapoxetine. Another useful recommendation: before taking the pill, measure your blood pressure and make sure it is normal. Is there a difference between generic dapoxetine and the original drug? Some people are still convinced that a generic drug is a fake that does not deserve attention. However, this is not true. Manufacturers develop a generic dapoxetine based on the composition of the original drug; only the color of the tablets and packaging design may differ. That is why the effectiveness of the generic is no worse than the effectiveness of the original Dapoxetine, and its cost is much lower.
The shelf life of the stimulator is three years, and it is recommended to store it in a cool and dark place out of reach of children. Do not use the drug after this period, otherwise its effectiveness will be in question. Thus, generic Dapoxetine will give you a vibrant sex life and long-lasting sexual intercourse that can completely satisfy your partner! You can purchase this drug in our pharmacy at an affordable price. To order, call us by phone and indicate exactly how many tablets you would like to buy. We provide prompt delivery by courier or by mail, the timing depends on your locality.
As children, many of us wore a Kinder Surprise egg around our necks, where caring mothers and grandmothers put killer doses of garlic so that the child would not get sick. However, you can make much nicer accessories and toys from plastic eggs with your own hands. We offer you a large selection of master classes with which you and your children can make a lot of interesting things.
Most of the lessons will be very simple, so preschoolers and children of primary school age can handle crafts from Kinder Surprises. Some tutorials will be more complex and you will have to do most of the work yourself. You probably already have all the craft materials on hand, so pick something you particularly like and get started.
Crafts with plasticine
If your child is not too old, then you will like this simple master class. To make a funny chicken from a kinder surprise with your own hands, you will only need plasticine and blank plastic eyes.

If your child already knows how to work with plasticine, just show him this picture and ask him to repeat it - he should be able to do it himself. Please note that the Kinder egg has two eyes; they are attached to a small piece of plasticine. If you don’t have anything suitable, you can cut them out of paper, or you can simply draw them with a permanent marker or make them entirely out of plasticine.
Developmental rattle
You can make this craft from Kinder Surprises yourself, and your child will already play with it. This toy is good for developing ingenuity and logic. Making a rattle from an egg is quite simple.

Make a small hole in the bottom and insert either a pencil or pen, or a lollipop stick into it. You can secure it in the inside with superglue or simply push it all the way so that it goes through the entire egg.
For the educational game you will need several types of cereals of different formats: millet, rice, peas, etc. You need to pour cereal into the egg and shake it - the child will guess what is inside. This is very useful.

A Kinder egg can be painted to make the toy even more interesting. And if you don’t want to make a rattle, and you just need a regular rattle, tie a kinder with thread - it will turn out very beautiful.

Knitted animals
This master class is no longer for children: you will make knitted toys from Kinder surprises yourself. Although, of course, your child will play with these funny dolls.

Additionally, you will need thin threads or felt, as well as artificial eyes made of plastic or beads, plus any decor.
The Kinder egg needs to be crocheted from top to bottom using regular circular knitting. Try to change colors to make the toy look more colorful. However, the choice of thread depends on who you are going to make.
Take a look at the proposed ideas - they are quite easy to repeat. Try making your child's favorite fairy-tale characters or any animals.

If you don't like to knit, you can cover the Kinder Surprise egg with felt or woolen fabric. Add some decor to it and you will have a great toy.
Minions
If you have a lot of empty Kinder eggs, you can make an entire army of minions from them with your own hands - heroes of the popular children's cartoon. If your child likes these funny creatures, he will definitely appreciate their miniature versions.

To make a minion, we need to take blue and black materials, as well as an artificial eye.
You can paint the material with whatever you have on hand. This could be acrylic paints, permanent markers or even nail polish. If there is nothing like that, take pieces of fabric and glue them onto kinder surprises. If this option is also not suitable, you can stick regular plasticine on plastic eggs.
You need to shape the overalls, hairstyle, arms and legs. By the way, if you want, you can poke two holes in the bottom of the egg, insert lollipop sticks, and then mold shoes from plasticine - you’ll get a long-legged minion.
The eye can be made from pill backing and a tiny piece of black fabric and then glued on with superglue.

If you have a lot of kinders, make the whole “army” at once - it will be easier. If your imagination runs wild, you can make the leader Gru for this company.
Bees
From Kinder eggs you can make a large toy beehive with your own hands, which will be interesting for your child to play with. Additionally, you will need a sleeve or cardboard, paints, threads and a few more accessories.

Bees can be different. How to make them from Kinder eggs depends on what you have on hand. Stripes on the bee’s body can be made from “fluffy” decorative wire, black thread or thin colored tape, or simply drawn with acrylic paints or a marker.
Glue the eyes onto the Kinder egg using plasticine or glue, or you can simply draw them. The basis here can be plastic blanks, beads, fabric or paper. We make wings from paper, plastic folder or wire.
To make the honeycomb to which we will then attach our Kinder Surprise bees, we need to divide the sleeve into rings of equal width. Place 5 pieces in the center, then a row of 4 pieces on top and bottom, and then a row of three - glued with PVA or stapled, and then painted with yellow paint.
You can also make artificial paper flowers for the bees to explain to your child how these creatures turn pollen into honey and to organize an interesting game for him.
Kinder Zoo
Perhaps the most favorite children's toys made from Kinder eggs are various animals from which you can assemble a whole zoo. Take a look at this photo - you can easily make any of these heroes with your own hands!

To make a cat out of a Kinder egg, you can paint the body with acrylic paints or markers, and then make plasticine ears, paws and a tail for it.
All other animals are completely sculpted from plasticine, and the basis of their eyes are black beads. We advise you to choose plasticine for such crafts, which does not stain your hands and surfaces - now there are a lot of such options in craft stores.
Of course, these toys will not be durable (if you sculpt them on a plastic egg and do not paint the body), but it is easy to clean off the plasticine and cover the Kinder Surprise with a new layer to get a new resident of the “zoo”.
Keychain
You can make some very funny, beautiful keychains with your own hands from Kinder Surprise eggs. In this video master class you will find simple instructions with which you can easily repeat the craft.
By the way, if you are one of those who likes to ward off colds from your child with garlic, you can repeat this lesson, but make a pendant out of a Kinder egg - just insert a longer chain or thread. In addition, you can add any interesting design to the craft and make a character that your children like the most.
Choose any of the proposed master classes and stock up on Kinders! Of course, your child will really enjoy such lessons, because he will receive a delicious dessert and two toys at once: one ready-made, and the second home-made. Imagine, experiment and change any lesson to suit you.
All children love sweets, especially if you can find an interesting toy inside. Accordingly, parents unwittingly become the owners of seemingly unnecessary toy containers. However, handicraft ingenuity has found a use for them, so today we will learn how to make fun crafts from kinder eggs.

Crafts from kinder surprise
Materials for work:
- Containers of kinder eggs in any quantity (the more, the more interesting);
- Chenille wire;
- Glue;
- You can use colored cardboard, felt;
- Ready-made eyes for toys or markers and paints;
So, let's start by making a festive garland for Easter. In just a month and a half, this wonderful holiday awaits us, the symbols of which are eggs and chickens. An original garland or even a wreath made from Kinder eggs will be a wonderful addition to your holiday decor, especially since it is not at all difficult to make. We start working on kinder crafts by connecting all the containers together. We just open it and put the cap from one on the next one. This way we create a garland or wreath of any size. In this case, the author of the master class used 14 containers. We close the resulting chain into a circle and get an excellent basis for creativity.

 To make chickens we use chenille wire of various colors. We create paws from the red one, two for each container, and forelocks from the yellow one. We secure them either with glue, or by making a small hole in the container itself.

 We add a beak made of colored paper or cardboard (an ordinary small triangle), draw eyes with a marker and become the owner of a very interesting thematic wreath.

 In fact, there are a lot of ideas for creating different animals; you just need to show a little imagination and use various decorative elements to realize your plans.
 The second option is to make glowing fireflies. For them, in addition to the materials mentioned above, you will also need a small lamp that can easily fit inside the container. It should run on batteries and have a switch so that if necessary, you can extinguish the firefly.
 Next, it’s all a matter of technique - we also use chenille wire to decorate the antennae and paws, draw eyes and a mouth with markers or paints, then insert the prepared lamp into the container, turn it on, and assemble the container. As a result, your firefly is almost ready. All that remains is to add wings, which can be made from the same colored paper or cardboard, and place your product on a window or shelf.

The original can be found here and here
lookathis.ru
Making crafts from kinder eggs

Crafts made from Kinder eggs are among the most favorite among children, because you can create something unusual from the capsules. But first, the child will enjoy the taste of chocolate and find out which toy he liked. Therefore, if you have a lot of such plastic containers stored, do not rush to throw them away, but try to make something from the ideas we have proposed.
Ideas that can be implemented using Kinder eggs
The simplest DIY craft made from Kinder eggs is a rattle. To make it, you do not need to make any special efforts due to its simplicity. So, you will need to take any cereal you have in the house (rice, buckwheat, oatmeal), beans, coffee beans, hazelnuts, beads, etc. and place them in a kinder container.
 Crafts made from Kinder eggs are among the most favorite among children.
 In addition, such a craft made from Kinder eggs can be used for playing with children, guessing by the sound what is lying there. And then, finding the same sounds, collect them into groups. Then you can tie it with crochet and thread.
 Children's tea service from kinders
 Also especially popular are baby sling beads made from chocolate eggs. They, like a rattle, are filled with various fillers. To make these sounding sling beads, you will need to take the capsules and pierce each of them with an awl on both sides. Then thread the ribbon through the holes and tie with crochet and thread. You can do this with yarn of different palettes so that the child can learn colors.
 Kinder animal figurines
 An interesting idea for crafts made from Kinder eggs are various little animals that can be used for theatrical performances. Together with them the child will explore the world. They are also made by crocheting and gluing eyes from small beads, as well as body parts from felt. You can also create animals using another principle: paint their faces with acrylic paints.
 Kinder Man
 The resulting craft from Kinder eggs can be garlands. The scheme for their manufacture is similar to baby sling beads: holes are made on both sides of each capsule and a wire or fishing line is threaded through. You can decorate them using painting with acrylic paints. Wreaths on the door are made in the same way as garlands.
 Kinder flowers
 Kinder capsules for arithmetic
To teach your child to count, you can make a DIY abacus craft from Kinder eggs, using photos of real ones as a guide or making them your own. They are made very simply - capsules are used instead of wooden balls. Since children love Kinder because of the delicious chocolate and egg toys, they will be especially interested in doing simple arithmetic operations using Kinder eggs.
 Kinder chicken
 Important! For kids, you can make an abacus in the form of two strips with plastic containers strung on them, and for older children, make them like natural ones.
 Kinder decoration
 So, for the craft you will need:
- 6 dark yellow capsules;
- 24 capsules of light yellow paint;
- 3 meters of wire or 3 pieces of wooden twigs 80 cm long;
- frame for attaching slats to it;
- an awl for making holes;
- nails or screws for fastening wire;
- colored cord;
- glue.
For the base, you need to make holes in the capsules, then string them onto slats in a flowing manner - 4 pieces light, 2 pieces dark and 4 pieces clear. So, on each rail you get 10 pieces. Next, you need to secure them to the frame in a horizontal position, wrap the frame with a cord, hiding the nails with it. The result will be a strong and safe craft with which even the most angry and mischievous child can practice mathematics.
 Kinder craft idea
 Educational children's games that can be prepared from Kinder eggs
There is an interesting game “Catch the Bee”, which belongs to the Bilboke type of games. The essence of it is this: you need to hit a ball tied on a string to the stem of the cup. This game can be played by any number of children from 2 to 8 years old. It develops eye, coordination, dexterity and reaction speed.
 Cute crafts from kinders
 The rules of this game do not exclude the possibility of all its participants playing simultaneously. Then you can organize competitions in which whoever gets into the cup first wins.
However, in order to fight, you don’t have to buy it; you can make Bilboke toys with your own hands. For this you will need a plastic bottle, wire, lace, Kinder capsule, foamiran.
 Mischievous animals from kinder
 Cut off the bottle as it flows, leaving the top. Make holes in the lid and capsule with the support of an awl and thread a cord through them, tie a knot so that it does not slip through. And with the support of foamiran, decorate the resulting bowl and egg. This can be done in the form of an aquarium and a fish, a beehive and a bee, or a butterfly and a flower bed.
 Kinder bees
 The child must collect them into groups according to color and type of animal. This way he can not only study colors, but also get acquainted with various animals.
Children's crafts from chocolate eggs
Crafts made from eggs from Kinder Surprise not only develop a child’s abilities well, but also help identify unnecessary “garbage” for making something unusual. We have already mentioned a rattle craft for the little ones. You can also make a crib pendant for them, which will not only decorate it, but also serve as some kind of protection against colds. So, to make such a pendant, you need to take the capsules, make holes in them on both sides using an awl and thread a thread or rope through them. And put a few cloves of garlic and a cotton wool soaked in tea tree oil into the container itself. You can also take this pendant with you to the garden, as well as to school.
 Crafts from kinders and plasticine
 With older children, you can already make crafts from plastic Kinder eggs together. For example, you can start by making a caterpillar. It is carried out similarly to a pendant; you can connect the capsules to each other with a rope or elastic band. You can decorate the caterpillar with crochet straps or colored paper confetti by sticking them to the egg. You can make confetti yourself if you have a hole punch. As for tying, this is perhaps the most successful option, since thanks to it you can create various animals that a child can play with without fear. And who exactly it will be depends only on your imagination. You can make a fictional character or embody one of your favorite cartoon characters.
 Crafts from kinder surprises
 Important! The process of creating crafts from Kinder Surprise eggs with your own hands will bring you and your child great pleasure, especially if the whole family gathers at this task.
In addition, by learning how to make basic crafts from Kinder Surprise chocolate eggs, your child will develop hand motor skills, imagination, and will also be able to have fun on occasion without his family and friends, which will be another reason for pride for you.
 Crafts from kinder eggs and plasticine
 So, a bouquet of capsule tulips would be an excellent gift for a mother, sister or grandmother. To do this, you need to divide the egg into halves and cut out the cloves with scissors, resulting in petals, and make a stem from cocktail straws.
 Kinder airplane
 Favorite minions from kinder eggs
Perhaps the most popular children's crafts are minions, which can be made from a variety of materials, and Kinder capsules are no exception. And it’s not surprising, because these favorite characters from the Despicable Me cartoon are the same in shape as plastic containers, which makes the task of making them much easier and saves time. The only thing you have to do is put on a cube jumpsuit and glue on toy eyes. However, if the eye is not found under the hand, you can draw them with a felt-tip pen or cut them out of white and black felt.
 The most popular children's crafts are minions
 The overalls can be made from various materials that you have in your home: plasticine, fabric, paper, etc., as long as they are blue.
Hair can also be drawn using a felt-tip pen or glued on strings.
For greater realism, you can make arms and legs using gold and black plasticine.
You can choose any version of the minion craft from Kinder eggs you like, shown in the photo on the Internet, or you can come up with your own. In any case, such a craft will not leave any child indifferent. And perhaps he himself will want to bring to life his vision of this funny hero.
 Minions from kinder
 Crafts from Kinder eggs for the New Year tree
The number of original children's crafts made with your own hands from Kinder eggs includes New Year's decorations, for example, in the form of the main characters of the New Year - Father Frost and the Snow Maiden, with which you can decorate your Christmas tree. In order to make such toys, you will need:
- kinder eggs (2 pcs.);
- toy eyes (2 sets);
- PVA glue;
- napkins;
- double-sided colored paper;
- simple graphite pencil;
- ruler;
- scissors;
- needle;
- threads;
- glitter.
 New Year's toy made from kinders
 Work order:
- Attach strings to the capsules through the holes made with an awl, form a loop through which future crafts will be hung on the Christmas tree. Secure it with the support of the knot that will be inside the egg.
- Make 2 scarlet and blue rectangles from colored paper. The first will be preparations for Father Frost, the second - for the Snow Maiden.
- Make a beard from snow-white paper by cutting out a rectangle measuring 2x1.5 cm. Cut the fringe on one side of the workpiece, not reaching the edge by about 0.5 cm, twist it with a pencil. The blank for the Snow Maiden's hair is made in the same way, only the rectangle should be slightly larger than for the beard.
- Take a snow-white napkin, cut it into pieces and roll them into balls, which will be useful for decorating the costumes of New Year's characters.
- Take one scarlet strip and connect its ends with glue, forming a cylinder, which will become Santa Claus' fur coat. Then cut it 1 cm and put it on the body part of the capsule, tuck the paper inside.
- Glue the napkin balls onto the top and bottom of the fur coat using PVA glue, and attach the beard.
- Take the second strip of scarlet color, make a hat by forming a cylinder and cutting it 2/3, and then mold the top of the hat. Glue napkin balls in the place where the edge should be.
- Attach the released hat to the top of the egg using Moment glue, as well as toy eyes, nose and cheeks. Do similar actions with the Snow Maiden. Only the hair needs to be glued under the hat in advance.
- Decorate the crafts with glitter, make a bag for Santa Claus from half a capsule and scarlet paper. To do this, you need to wrap the egg in paper and tie the paper with a string.
 Snowman made of kinder and plasticine
 Such crafts for decorating a Christmas tree can also be made from large Kinder eggs.
As you can see, the scope of application of Kinder Surprise capsules is quite wide. These can be crafts for kids, kindergarten, Christmas trees, as well as educational games intended for children of any year. So, this waste material can be very useful for children's creativity.
lux-dekor.ru
Crafts for the garden.

Friends, today we will visit Olga’s dacha from Omsk.

Olga made many interesting crafts, and they all found their place on her summer cottage. Here the hen settled into her nest, and the hedgehog hid in the shade of a bush, and the grasshopper worked in the garden bed, and the magpie hid on a branch.
For her works, Olga uses, one might say, waste materials. In general, it turns out not expensive, but beautiful.
Olga made a boa constrictor from Kinder Surprise capsules. Three capsules were fastened with self-tapping screws inside. The head is made from one capsule and another half of the capsule is added to it. Gather the body onto a wire, inserting it into the middle between the fastened capsules. The boa can be of different lengths, depending on how many capsules you have. It can be secured to a tree using wire.


Olga made the magpie in two days. The body and tail were made from plastic bottles. Wire legs. Connect the bottles, giving them the desired shape. To tie the magpie, I used plastic bags. They must first be cut into strips and rolled into balls. Here you need to separately tie the body, wings, tail and tail feathers. The tail must be inserted into the cork and grabbed to the body. For the nose, take half a capsule from Kinder Surprise.


To make a snail you need a plastic ball, a small plastic container, a piece of wood and wire. Then the snail must be tied with threads made from plastic bags.


The body of the grasshopper is made from a piece of wood. A hat made from a computer disk and a bucket for flowers. Head made of plastic egg. The wings are cut out of plastic bottles. The legs are made of wire. The grasshopper is tied with a nylon clothesline.

Olga uses tape from tape cassettes and even an old non-working computer mouse for her crafts. These materials were used to make the ant. The mouse was useful for the lower part of the body, and Olga tied all the parts of the ant with cassette tape.


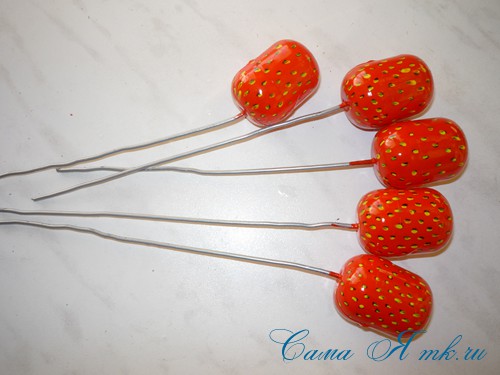
A very cute craft can be made from a green plastic bottle and Kinder surprise containers. These will be almost real delicious strawberries that can decorate your home or summer cottage. A whole bush of such luxurious strawberries with berries and flowers looks beautiful.
To make this craft we will need a lot of things:
- wire,
- cases for kinders – 5 pieces,
- green plastic bottle – 1 piece,
- scissors (for leaves you can use curly scissors),
- acrylic paint red, black and yellow,
- brushes for applying paint (medium and thin),
- green insulating tape,
- a little foam (so that it sits tightly in the pot you are using),
- a small flower pot or any suitable jar,
- a little green sisal
- candle,
- decor of the pot - optional.
So let's begin:
To begin with, I prepared a pot for planting our strawberries, which can be decorated in any available way. First we place a piece of foam inside and decorate it. I decorated it with jute rope; for children's crafts, you can use corrugated paper and other suitable materials.

Each Kinder Surprise container must be pierced with scissors or an awl and a wire inserted into this hole and bent slightly.
Close the container and so on for all 5 pieces.

These are the preparations...

Paint with acrylic paint...

The leaves must be cut with cuttings to make it easier to attach them to the stem.
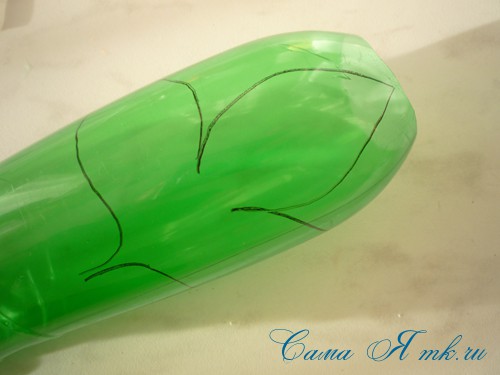

The sepal and leaf blanks can be slightly heated over a candle so that they are slightly deformed and take on a lively appearance.

We pierce the sepals with an awl or scissors in the center and put them on a wire for each berry.

Then, using green insulating tape, we wrap the stem-wire in a spiral, attaching the leaves. Insulating tape can be replaced with corrugated paper, tape or green yarn.
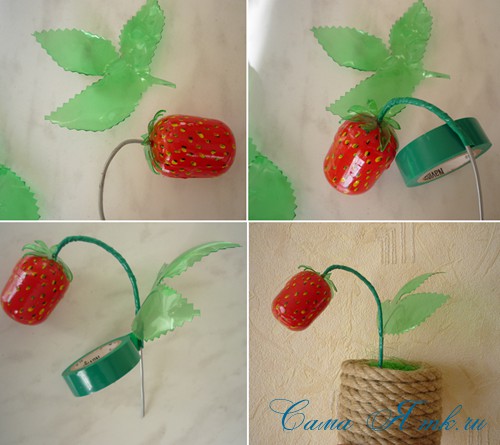
From such blanks we make a bouquet by piercing the foam in a pot with wire.
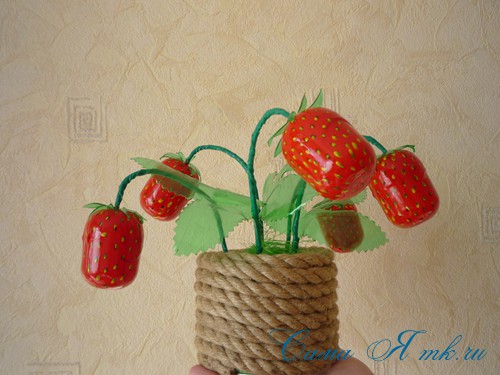
Let's add a few flowers for beauty.
They can be made from any available material; I have white felt and ready-made flower centers. You can use a white bottle or yogurt jars. We also use any suitable material as the center; you can even cut it out of a bottle and paint it with yellow acrylic paint.
We fix the flower on the wire... Depending on the material used, the wire can be slightly bent at the tip, and the middle can be glued on top of the glue. We wrap the wire stem with electrical tape and plant it in a pot.


An attractive strawberry bouquet of kinder surprises will look good both in the interior and in the garden. It can also be a wonderful handmade souvenir gift, for example, for March 8th!
Have fun creating!
I was glad to help!