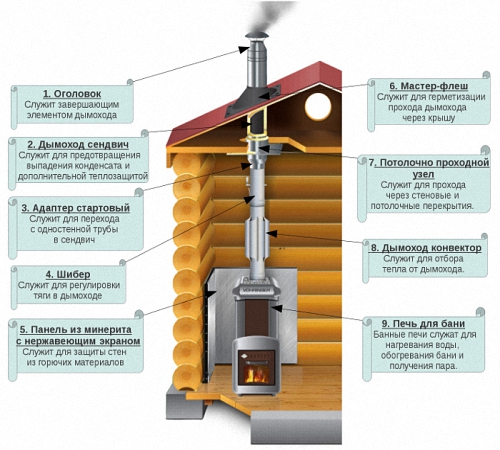
The chimney is an integral attribute of the steam room, ensuring fire safety, rapid heating, air purity and low fuel consumption. The installation of a chimney in a bathhouse should be approached with all responsibility, because in case of improper installation, the operation of the building will be impossible.
Attention! When making a chimney, you should remember all the nuances of the process, because if the draft force is incorrectly calculated, smoke will enter the room and the risk of carbon monoxide poisoning will increase.

Choosing the right chimney design is already half the success when arranging a bathhouse. All existing species can be divided into two groups.

Attention! Regardless of the chosen design, the chimney must be installed above the ridge at least 50 cm.

Key Points
Any heating device needs a combustion product removal system. Particular attention should be paid to this system when building a bathhouse - a structure almost entirely made of wood.
1. Material and shape
A brick chimney is the most reliable and safe option, but it is quite difficult to make with your own hands. Moreover, in case of traction failure, re-laying will be required, which entails additional time and material costs. For this reason, it is better to use a simpler option for a steam room - a stainless steel sandwich chimney.

Attention! To ensure good draft and minimal resistance to smoke movement, it is advisable to opt for a cylindrical design. The inner surface should be as smooth as possible - this will prevent the accumulation of soot during operation.
2. Dimensions
The thickness of the chimney walls should be at least 1 mm, the cross-section should be 14 cm. Moreover, the presence of horizontal sections longer than 1 m should not be allowed.
3. Insulation
The quality of insulation directly affects the efficiency of the chimney and the fire safety of the stove. Also, good insulation will reduce the amount of condensation formed and protect combustible materials located near the chimney.


- The chimney in the bathhouse must be carefully closed next to the combustion chamber and at the junction with the ceilings. To protect the walls, steel sheets with a fire-resistant coating are used.
- To increase efficiency, a special mesh is installed in the pipe, on which stones are poured. Warming up with smoke, they will be an additional source of heat, which will somewhat reduce fuel consumption and the heating time of the steam room.
- The chimney is carried out exclusively from the bottom up.
- Each subsequent section of pipe is inserted into the previous one, as a result of which condensate will accumulate inside the system.
- If necessary, the pipe should be easily dismantled (sooner or later it will burn out), so care should be taken to have a removable elbow.
- The chimney above the roof must be covered with a special “umbrella” to protect it from precipitation.
- If possible, installation is carried out away from the walls.

Let's consider the main stages of making a chimney in a bathhouse.
Stage 1. Base for the pipe
Mounted sandwich pipes are installed on a special base built into the furnace body. For this, a heat-resistant - cast iron or ceramic - pipe is used, which is removed above the body from the combustion chamber. A special fitting is put on top of it, to which the chimney itself is connected.
Stage 2. Assembly
As already mentioned, for a bath it is better to use a multilayer stainless steel pipe. This pipe consists of:
- outer shell made of stainless steel;
- insulation (mineral wool glued to foil);
- the core is a steel pipe coated with titanium, which is put on the fitting.
Step 1. The first section of pipe is connected to the fitting.

Step 2. The remaining segments are connected to it. For fastening, steel clamps are installed (in increments of 1.5 m, as well as at each corner connection).
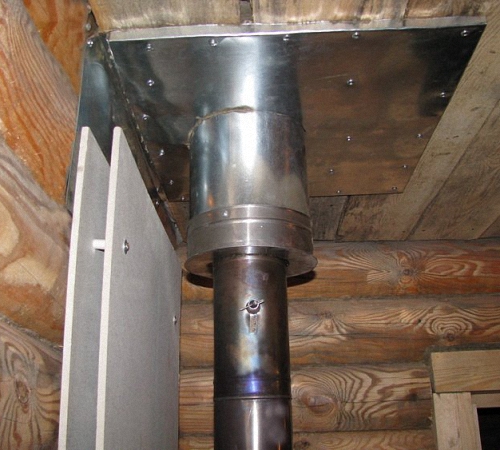
Step 3. Holes of the appropriate diameter are made in the ceiling and roof. In this case, you need to leave a small gap: in the roof - 20-25 cm, in the ceiling - 40-50 cm.

Step 4. To insulate the connections, special heat-resistant nozzles or a combination of metal sheet + gasket are used.
Step 5. To ensure heat conservation, an insulated cap is installed on the outside of the roof.
Step 6. The outer part of the pipe is covered with a protective “umbrella” or mesh.

Stage 3. Arranging a passage through the ceiling and roof
As mentioned above, after installing the chimney, you need to seal the remaining holes. This must be done strictly according to the instructions.


Step 1. The ceiling is covered from below with a sheet of fireproof material with a round hole in the center. It turns out that the pipe must be passed through this hole during installation. Self-tapping screws are used to secure the material.

Attention! The top of the ceiling does not need to be covered with anything - you just need to cover the “window” covered with a sheet with clay or cover it with granular thermal insulator.
Step 2. The roof is arranged from the outside, a head with a frame is installed. You can also install a metal sheet with a hole of the appropriate diameter on the inside of the roof, but this is not necessary.
After arranging the chimney and passages for it, construction can be considered complete.
Video - Installation of the Vulcan sandwich chimney
Common Mistakes
Often during the construction of a chimney, typical mistakes are made, which in the future will affect the efficiency of the system.
Mistake #1. Using the “wrong” materials
The use of materials not intended for chimney construction (asbestos cement, for example, or aluminum) can lead to the most dire consequences. Moreover, even brick is not always suitable for this - if the heating is gas, it will quickly collapse in an acidic environment.
Mistake #2. Combining several chimneys
If you plan to combine several chimneys, then all the necessary engineering calculations should be entrusted to a specialist.
Mistake #3. Independent change of pipe diameter
Whatever the reason for such amateur activity, before starting work you must definitely consult a professional, otherwise the efficiency of the entire system will decrease, and in the worst case, the entire structure will collapse.
Do not neglect the rules and techniques for constructing a chimney in a bathhouse. In the absence of special knowledge and skills, it is better to entrust the work to a professional stove-maker, otherwise mistakes made during installation will be very expensive.
Chimney cleaning

Bathhouses are often heated with solid fuel stoves, as a result of which soot accumulates in the chimney. If there is a deterioration in draft, but there is no visible damage to the chimney body, it means that the pipe is clogged and needs to be cleaned of soot.

- Usually, a weight with a cable or a brush is used for this, but mechanical cleaning, as you know, is impractical, because you have to take everything valuable outside and cover the furniture with rags so that soot does not get on it.
Attention! In this regard, it is better to light aspen wood in the stove - it will create intense draft and knock all the soot out.

Video - Chimney cleaning
Conclusions
That's all the nuances of building and cleaning a chimney for a bathhouse. We can only hope that the article was useful and you learned something new from it. And finally, one last piece of advice: experts recommend cleaning the chimney immediately after rain.
A correctly selected bath pipe will help you avoid many troubles associated with problems in the operation of heating equipment. Neglecting the installation of chimneys can lead to dire consequences. To protect yourself from the danger of finding yourself in such a situation, when planning a chimney layout and choosing materials for its arrangement, follow the advice of experts.
To achieve the safety of your home, cottage or bathhouse, try to operate heating equipment correctly, and install chimneys strictly adhering to fire safety rules. The information below will be useful if you are planning to do such work.
Bath pipe installation
When setting up a bathhouse or sauna, it is necessary to provide thermal insulation for the walls and other structures adjacent to the firebox and chimney.
To do this, you can use non-flammable materials with thermal insulation properties:
- basalt wool;
- basalt wool cardboard.
Materials for thermal insulation that have a foil coating are also useful. For reliability, all insulation must also be sheathed with a layer of sheet metal. When choosing it, be guided, first of all, by your taste and financial capabilities.
Copper, stainless steel, or any other metal other than galvanized steel are suitable here. The use of galvanized metal is harmful to health: high temperatures promote the evaporation of zinc, and it can penetrate into the human lungs with air, causing negative reactions in the body.

You can additionally heat the steam room using the heat generated by the pipe in the bathhouse. To do this, the chimney is wrapped in a metal mesh filled with stones. Taking heat from the chimney, the stone then releases it into the steam room, which significantly increases the efficiency of the stove.
It would also be useful to use a combustion intensity regulator (cagla or damper). This will allow you to regulate the draft in the chimney, maintaining it at the desired level. In this case, the heat will not go outside, but will be used rationally. By adjusting the draft, they achieve such an intensity of firewood combustion that the temperature in the steam room will be 70-80 degrees.
Avoid completely blocking the chimney: this will lead to smoke in the room in which the stove is located.
Choosing a pipe for a bath
When installing a chimney in a bathhouse or sauna, you need to select especially heat-resistant materials. The pipe to the bathhouse for connecting the stove must be made of AISI 321 or AISI 409 stainless steel. The presence of titanium in the steel increases the heat resistance of this type.
In addition, titanium does not allow carbon to burn out and thereby prevents intercrystalline corrosion of stainless steel. , made from these grades of steel can withstand temperatures up to 750-850 degrees, maintaining all performance indicators.
The question often arises: how to make a pipe for a bath so that it safely passes through the walls and ceilings of the steam room? The use of sandwich chimney elements with additional passage sleeves that increase the thermal insulation properties will help here. It is important to arrange the chimney in such a way that all its joints are visible. It is strictly prohibited to place them inside a wall or inside a ceiling.

Since the temperature of the gases emanating from the stove in the bathhouse is very high, special requirements are placed on the chimney here: its thermal insulation layer must exceed five centimeters.
Remember also how to properly make an iron pipe for a bathhouse on a vertical section of the chimney. The steel grades mentioned above or other reliable materials are suitable here.
If there are ventilation ducts in the building installed during the construction process, it will be sufficient to use a single-wall chimney pipe. It is placed in the ventilation duct, and its walls will serve as thermal insulation for the resulting chimney. The installation work in a ventilation duct made in brickwork is called duct lining.
Parameters and location of pipes for a bath
The diameter of the pipe for a bath or sauna firebox is selected based on the instructions included with the stoves. Most often, the recommended chimney diameters are indicated there. In the absence of instructions, the diameter of the chimney is selected based on the size of the outlet chimney pipe of the stove.
The chimney of a bathhouse stove or sauna firebox must have a height also required by the instructions. If there are no instructions, then the height is taken to be more than 4.5 m. At the same time, make sure that the upper edge of the chimney is at or above the level of the wind support line.
The chimney is an important part of the bathhouse, since it is it that transports the products of fuel combustion from the room. Each of the sauna stoves needs a chimney. Let's look at how to make a chimney in a bathhouse below.
Design features of a chimney for a bath
There are a huge number of chimneys, each of which is compared with a certain classification parameter. Among them are single- and double-circuit chimneys made of brick, steel or ceramics, etc.
Before starting work on the manufacture of a chimney, you must first study its main components.
The ideal chimney is a strictly horizontal structure through which all combustion products are discharged. Although, there are situations when the construction of such a chimney is not possible. Therefore, you have to install the chimney vertically, then horizontally and vertically again. For these purposes, you will need elbows, pipes, tees and other connecting elements, which are the main elements of the sauna chimney structure.
An elbow is a connector that ensures smooth installation of the chimney. For example, if it is not possible to arrange a strictly vertical chimney, its direction is changed by using an elbow. There is a huge selection of knees that vary in angle ratio. When the horizontal section departs from the stove in front of the chimney, an elbow or tee is also installed here.
Please note that cleaning the elbow is a rather complicated process, therefore, if possible, it is better not to use it in arranging a vertical chimney.
The use of a tee is versatile, as it allows you to easily clean ash and combustion products using special mechanisms. Inside the tee there is an element in the form of a glass, which is pulled out and cleaned if necessary.
The only condition for the correct installation of a tee is its perfect connection with the pipes. Otherwise, smoke and combustion products will enter the room, which will cause discomfort to the people in it.
If there is a wooden floor on the second floor, you will need a pipe that will protect the wood from the high temperature that is present in the chimney. To install it, you will need to make a hole, install a pipe, insulate it and connect it to the pipe. The same pipe will be needed to prevent contact of the chimney with the roof and attic.
In addition, during the installation of the chimney, you will need brackets that can hold the pipe and fix it in the desired position. The interval between their fastening is about 200 cm.
The last, but very important element of the chimney is called the roof trim. It is with its help that the tightness of the connection between the pipe and the roof is ensured. The cover prevents weather conditions, dirt and dust from entering the attic. Please note that the roof groove is a mandatory element of the chimney and should not be replaced by cheaper options in the form of sealants or home-made structures. During the shrinkage of the bath, the integrity of the bath will be compromised and all smoke, rain and snow will enter the room.
Tip: When purchasing a chimney, you should check for certificates that confirm its quality, as well as technical specifications that describe the materials from which each of the system elements is made.
Chimney pipes for a bath: features of choice
In relation to the material from which the chimney is made, it can be:
1. Made of stainless steel - this material is most suitable for making a chimney, as it is resistant to moisture, overheating and does not accumulate soot.
Advice: When choosing this type of chimney, you should clarify such a parameter as the resistance of steel to acids. Since during overheating, sulfur comes into contact with coal, and a gas of a rather aggressive type is released.
Among the advantages of using stainless steel in the chimney manufacturing process, the following should be noted:
- resistance to corrosion;
- high strength;
- affordable price;
- light weight;
- aesthetically attractive appearance.
2. Chimney made of concrete pipes - this option is characterized by low cost, durability, ability to be restored and good sealing. In addition, to manufacture such a chimney there is no need to involve specialists. When making monolithic structures, soot will practically not accumulate in the chimney.
Among the disadvantages of a concrete chimney is the heaviness of its weight, which significantly loads the building structure. Although to eliminate this parameter, expanded clay additives are introduced into the concrete mixture.

3. Pipes made of asestocement - are reliable, low cost, and have good insulation. Such pipes are not environmentally friendly, are unstable against the formation of condensation masses, soot quickly accumulates in them, so they require constant maintenance.
4. Brick chimney - characterized by a rough surface on which a lot of soot accumulates. As a result, the draft decreases; only after cleaning the chimney is the operability of the system restored. Among the positive qualities of this chimney are its attractive appearance, high level of fire safety, and long service life.
5. A metal chimney is the simplest and most affordable option, especially for a bathhouse. This chimney is characterized by high heating of the pipe, on which a special tank is often installed, due to which the water in it is heated. A fairly common option is to install a steel chimney using sandwich systems. In this case, the pipes are connected so that they are inserted into each other, and insulation is laid between them. The result is minimal heating of the outer surface and the absence of condensation.
There is an option for installing corrugated pipes for arranging a chimney. With their help, rotating elements of the system are created.
6. A ceramic chimney in the wall of a bathhouse is characterized by such qualities as high cost and practicality. The service life of such a chimney is the highest. It is resistant to intense heat, chemical influences, and corrosion. In addition, the ceramic chimney is quite smooth inside, so it does not retain either soot or ash on the walls.
The ceramic material absorbs heat well, so the outer part of the chimney does not heat up. Ideal for a bathhouse made of wood.
7. Vermiculite pipes - characterized by zero condensation formation, which means they are easy to maintain. Such a chimney is very light, cannot absorb moisture, and is resistant to high temperatures and mechanical damage.

In order for the chimney to serve its owner for many years, simple rules should be followed:
- ensuring tight fastening;
- adjustment of heating temperature and draft;
- arrangement of ventilation ducts;
- insulation;
- weather protection;
- ensuring the removal of condensate masses;
- correctly selected type of fuel;
- no overheating or hypothermia;
- regular cleaning.

How to make a chimney for a bath through the ceiling
Correct installation of a chimney requires a serious approach to this process. A poorly installed chimney has a negative impact not only on the decoration of the room in which it is installed, but also on the health of the people staying in this room. Since gases and combustion products entering the room can cause serious poisoning.
There are two options for installing a chimney:
- smoke - during the work process, a tee is required to remove condensate;
- condensate - no need for a tee.
The initial stage of installing a chimney in a bathhouse involves carrying out preparatory work related to the selection of a project for the chimney. It is advisable at this stage to use the help of specialists who will calculate the optimal pipe length that provides good traction.
Next, you should inspect the ceiling to determine the location of the chimney. It should not be directly above the beam. Choose a location for the chimney so that there are a minimum number of bends. Since soot accumulates well in horizontal areas, and as a result, traction decreases.

In the bathhouse, the chimney pipe must be assembled; if desired, this work is carried out directly at the installation site of the chimney. Clamps are used to secure all joint sections on the chimney, and support brackets will help secure the tee, if any.
The third stage is the arrangement of a chimney in the bathhouse through the ceiling. For its construction, a special cutting is required, the choice of which is carried out in accordance with the type of roof and its slope angle.
Next, the section of passage of the pipe is determined, work is done to mark it and cut out the opening from inside the room. The pipe is led outside, behind the roof. The roof sheet protects the inside of the chimney, and the cutting provides protection from the outside. To adjust the angle of inclination of the chimney, use a conical cutting section; its ends are placed directly under the roof.
On sections of the walls, at the locations of the pipe, work should be carried out to install insulation in the form of foil mats or basalt wool.
In the bathhouse, the installation of the chimney is completed by attaching the pipe to the surface of the apron and sealing it at the joint. This is how the chimney is built up to the required size. A steel umbrella will provide reliable protection of the chimney from atmospheric influences.
Areas of the chimney that are subject to corrosion should be treated with heat-resistant paint, and sealant should be used to strengthen the joints on the clamps.

1. No joints with various types of pipes. The chimney should not be adjacent to various types of communication systems.
2. It is not allowed to install horizontal sections in the chimney whose length is more than 100 cm.
3. It is not allowed to install a chimney near gas or electrical communication systems.
4. The minimum number of chimney cleanings during one season is two times.
5. The minimum length of the chimney outlet above the roof surface is 50 cm.

Features of installing a chimney in a bathhouse
Before installing a chimney in a bathhouse, we suggest studying the instructions for its manufacture using sandwich pipes for upper and lower purposes:
1. First, the pipe should be cut into two sections, which are treated with insulation.
2. From a sheet of galvanized steel, you need to cut two parts from which pipes are constructed, the edges of which are connected using rolling.
3. This sheet will be needed to cut out a metal strip that will serve as a clamp.
4. In addition, parts in the form of four rings must be made from galvanized steel, which will help close the insulation at the end sections.
5. A metal strip 0.2 cm thick and 4 cm wide is welded to the bottom of the pipe. It will serve as a pipe.
To make a chimney in a bathhouse with your own hands, you should cut out two holes that will help the chimney pass through the wall or ceiling. Please note that the chimney must pass through the central part of the hole.
Next, you will need a steel sheet, from which two sections will be made that fix the ceiling on the roof and on the ceiling. Holes should be drilled in the corner areas of the workpiece in which the fasteners will be installed.
Chimney installation instructions:
1. A hole with a diameter the size of a chimney should be made in the center of the metal blank. A casing made of galvanized steel should be installed on the pipe.
3. Place the upper one on the lower pipe and connect them together. Be sure to ensure tight connections. For secure fixation, use a clamp.
4. Install the second metal piece on the roof. The resulting area should be filled with clay, asbestos or expanded clay.
The stove in the bathhouse quickly heats the water and gives the required amount of heat if the chimney on it is made and installed according to the rules. The chimney must ensure timely exit of combustion products outside the room and protect the stove from overheating. Even a do-it-yourself pipe, created according to drawings after a thorough study of the chimney design and calculations, can perform these tasks without problems.
Functions of a chimney in a bathhouse
A chimney is a vertically installed device through which fuel combustion products are discharged from the combustion chamber into the environment. The functioning of the chimney is based on creating a draft that pushes gases to an opening in the pipe located outside the bathhouse.
A pipe mounted on a sauna stove performs certain tasks:
- removes gases, as well as smoke, soot, ash and soot, which, if the chimney is not manufactured correctly, can cover its internal walls and interfere with the removal of fuel combustion products;
- forms a draft that depends on the thickness and duration of the chimney channel and is formed by replacing warm air masses with cold ones.
Types of chimneys
Chimneys are divided into types, taking into account the material from which they were made. Therefore, pipes for removing fuel combustion products from the bath are:
- asbestos-cement (popular due to such characteristics as reliability, good insulation and reasonable price, but are not always used, as they can crack under the influence of condensation and are instantly covered with soot);
- brick (distinguished by their attractive appearance and resistance to fire, but, having an uneven surface, accumulate a large amount of soot);
- metal (considered the most profitable option, they heat up very much and therefore contribute to the rapid heating of water in the furnace tank);
- ceramic (expensive and practical, because ceramics are not afraid of intense heat, corrosion, or chemicals, and most importantly, they are characterized by ideal smoothness).
Based on their location, chimneys are classified into internal and external. The first type is a structure that is installed on top of the stove and rises to the ceiling, where it passes through the attic and roofing. And the second type of chimney looks like a pipe running along the outer wall of the building. It connects to the stove and is immediately sent outside the bathhouse.
The advantages of a chimney located inside the bathhouse include:
- low fuel consumption, which is due to the fact that combustion products passing through the pipe also heat the air in the room;
- long service life, since, being indoors, the pipe does not deteriorate under the influence of adverse weather conditions.
Among the disadvantages of the inner pipe, the following should be emphasized:
- high risk of fire;
- the complexity of the chimney construction work, because it has to be carried out through the ceilings;
- the risk of fuel combustion products leaking into the room (if small holes form in the pipe).
The main advantages of an external chimney are:
- ease of maintenance, because the pipe outside the bathhouse is easy to clean from dirt;
- no risk of fire.
The disadvantages of an external chimney are usually:
- significant consumption of firewood, since the pipe will not heat the air in the bathhouse;
- the need for careful insulation, otherwise moisture will accumulate in the structure - the result of the combination of warm and cold air masses.
Design Features
Typically, a chimney looks like a structure whose horizontalness is maintained with impeccable precision. But it happens that it is not possible to make a device for removing combustion products from the furnace absolutely horizontal, and therefore craftsmen make a chimney, which is a combination of parts in a position both horizontally and vertically. This design requires the addition of elbows, pipes and tees, which act as connecting elements.
An elbow is a connector responsible for the smooth alignment of one chimney element with another. This part is used when it is necessary to remove a horizontal section of the structure from the furnace or direct the chimney in the other direction. When choosing an elbow for arranging a chimney, you need to pay attention to the ratio of its angles, because the choice of this connector is quite wide.
The tee is a universal device, as it does not become an obstacle to cleaning the chimney from combustion products and ash. The tee includes a glass-shaped element that is easy to remove and clean. The main thing is to position the tee correctly so that it connects to the pipes without any complaints. If this installation condition is not met, the bathhouse will become smoky.
A pipe is a connecting part used when wooden floors are installed in a bathhouse or other room in the attic. Installation of such an element will protect the wood from the effects of intense heat that comes from the chimney. The pipe is also useful as a device that isolates the pipe from roofing and attic materials.
Another important component of the chimney design is the roof trim. This element is responsible for creating a tight connection between the chimney and the roof. Roof cutting protects attic floors from damage by precipitation, dirt and dust.
Size calculation
The optimal dimensions of the chimney, calculated taking into account the volume of oxygen required to support the combustion process of wood, are presented in the table:
The diameter of the chimney is determined by the formula:
Vr is the volume of air.
The height of the chimney is determined based on the geometry of the section and using a special graph.
The height of the chimney can be found by dividing the firebox area (F) by the chimney area (f) and determining their ratio as a percentage. Let’s say if the ratio of the chimney cross-section to the firebox cross-section is 10%, then the minimum height of the round pipe will be 7 meters. For a square-shaped chimney, this value should be different - 8 meters.
Thickness is an equally important indicator. Its standard value is at least 1 mm. We are talking about the most popular option, that is, a metal chimney.
Required materials and tools
To make a chimney in a bathhouse, you will need:
- pipes with a diameter calculated in advance;
- brackets that must fix the pipe in a certain position;
- clamps necessary for attaching the chimney to the wall;
- adapters with a diameter 30 cm larger than this parameter at the pipe (for connecting parts of the chimney);
- insulating material, for example, expanded clay;
- a special apron necessary for arranging the exit of the chimney to the outside;
- a head used as the tip of a channel for removing smoke;
- sealant that can withstand high temperatures.
Work on the manufacture and installation of a chimney is carried out using the following tools:
- building level used to check the evenness of the structure;
- drills;
- a jigsaw, which is used to cut holes in the roof and ceiling and cut pipes to the required size;
- screwdriver or screwdriver;
- roulettes.
Requirements for the manufacture of the structure
When preparing to build a chimney, you need to familiarize yourself with the standards that the chimney must comply with:
- If the pipe comes out of the roof at a distance of one and a half meters from the ridge, then it makes more sense to mount the structure at a height of 50 cm above the very top part of the roof;
- When the distance between the ridge and the chimney is at least one and a half and no more than three meters, it is more advisable to install the chimney at the same level as the roof ridge;
- If the ridge and pipe are more than 3 meters apart from each other, the chimney should be mounted above the dotted line, which is conventionally drawn horizontally from the highest point of the roof at an angle of 10 degrees;
- Only 1 meter of chimney should go out from the flat roof;
- The chimney, located one and a half meters above the roof, is certainly secured with guy wires.
Step-by-step guide to building a chimney with your own hands
For a home craftsman who has not gained experience in construction, it is more advisable to start making an internal chimney from metal pipes, which extends beyond the ceilings and roof. The installation of such a chimney involves the sequential installation of several elements, with each subsequent part being placed on top of the lower one.
Installation of an internal chimney includes the following steps:
- The first fragment of the pipe, to which a valve (gate) is added, is placed on the nozzle located above the stove. This element is needed to adjust the draft when burning wood and finishing the furnace;
- A hole is made in the ceiling through which the chimney will go outside. The easiest way to install a metal box into the created hole is to attach it to the floors so that it is flush with the floorboards of the attic. The chimney is passed through a hole in the box, and the metal structure is covered with a layer of expanded clay or mineral wool. To prevent a fire from occurring due to the incandescence of the metal pipe, the ceiling around the chimney is covered with asbestos sheets;
- Another hole is cut in the roofing material. To create a hole in the right place - between the roof rafters - bends are used. Roofing sheets that can deteriorate when exposed to high temperatures are covered with asbestos. The metal pipe is inserted into the hole, equipped with an elastic rubber seal and fixed in place with a fire-resistant sealing compound;
- All elements of the chimney are mounted so that it reaches the desired size, and a metal umbrella is placed on the uppermost segment, which prevents the chimney from flooding with rainwater and becoming clogged with debris. The areas where the parts of the chimney combine are covered with sealant and tightened with wide metal clamps.
Chimney insulation
When thinking about insulating a chimney, we must take into account that the heating of the chimney by the heat from burning wood and the gases emanating from it can be very strong.
Therefore, it is best to use non-combustible building materials as a material that protects the bathhouse from heat loss through the chimney. We are talking about glass wool, slag concrete slabs, fiber insulation and mineral wool. The chimney cannot be covered with heavy material that retains heat.
To prevent the chimney from cooling, you can use ready-made cylinder-shaped insulation. They guarantee perfect protection of the smoke exhaust channel and are equipped with a special foil screen. Thermal insulating cylindrical material is produced with different diameters, which means it is suitable for chimneys of any size.
To lay a thermal insulation layer, you must do the following:
- wrap the metal chimney with basalt wool or other heat-insulating material about 5 cm thick;
- secure the insulation to the required surface with steel wire;
- put a protective casing over the basalt wool and tie it to the pipe with adhesive tape.
Nuances of operation
The chimney will serve properly and will not become covered with a thick layer of soot if you follow certain rules when lighting the stove:
- You should not put firewood chopped from coniferous trees into a sauna stove, as they emit a large amount of resin that settles on the walls inside the chimney;
- It is not wise to heat a bathhouse with raw wood, because moisture vapor creates the same problem as tar;
- Burning garbage in a stove is a bad habit that leads to significant contamination of the chimney;
- To fire a sauna stove, it is best to harvest dry hardwood;
- The last portion of firewood used to fire a bathhouse should be an armful of aspen firewood, which burns quickly and produces a high flame, the tongues of which burn out soot on the walls of the smoke channel;
- The chimney must be periodically cleaned so that due to soot deposits, which, when the pipe overheats, ignites and escapes along with smoke in the form of sparks, a fire does not occur.
Chimney cleaning
When it is not possible to clean the smoke channel using chemicals or the lumen of the pipe is severely clogged, they resort to mechanical cleaning. It is carried out with special tools, opening the valve in advance so that all the rubbish flies out. Standard tools for cleaning a chimney are brushes, scrapers and long-handled brushes.
According to the rules, soot removal from a chimney is carried out from top to bottom. Having removed the blockages in the chimney, they begin to clean the smoke channel through the doors, not forgetting to remove deposits on the walls of the firebox and ash pan.
To clean the chimney, you can sometimes use dry potato peelers. When they ignite, they release substances that make the soot loose and make it easy to remove it from the smoke channel through the cleaning holes.
Manufacturing and installing a chimney is a job that requires attention to even the smallest details. By ignoring the requirements for the construction of a chimney, you can make the structure completely unsuitable for removing combustion products.
Installation of the furnace requires determining the installation location of the product and, accordingly, calculating all parameters. The dimensions and diameter of the pipe depend on the power of the product.
An important component in the construction of a bathhouse is strict adherence to the rules and standards; you need to act in accordance with the drawn up project; the slightest changes will entail consequences. It is useful to determine the diameter of the pipe while drawing up the project.
The cylindrical shape prevents soot from accumulating and allows the combustion product to escape freely. Dimensions are determined taking into account the parameters of the passage opening and height.
How to calculate diameter
The pipe in the bathhouse is not the subject of complex calculations; it can be selected using ready-made diagrams; the main thing is to know the power of the installed stove.
There are standards that must be adhered to; the parameters depend on the power of the product. Rectangular and square chimneys are calculated in proportions: 140x140 mm is used up to 3.5 kW, respectively 140x200 mm 3.5-5.2 kW, 140x270 mm 5.2-7.2 kW.
If the chimney is round, then it should not be smaller than the exit point from the stove opening, more is acceptable, less is not.
The pipe area must be at least 8 cm² for each kW of power. You can do the calculations yourself; a “bright head” and the formula for the area of a circle will help with this.
Height and dimensions
Calculating the height of the chimney depends on the elevation level of the room itself and the type of roofing material. The height of the pipe that will be located is very important.
How high does the chimney need to be raised for it to function properly?
The rules are very simple, remember them. If the pipe is 0.5 m above the ridge, then the distance will be up to 1.5 m from the ridge. The pipe is level or even slightly higher than the ridge; it is installed if it is located 1.5–3 m from the ridge.