Bath installation.
What should I do if I don’t know how to install bathtubs? There are 2 options - ask how, or come up with your own. I chose the second one. And I not only liked this option, but really liked it!
LET'S GO!
An acrylic or iron bathtub requires a frame. I have a thin-walled iron one. I wanted plastic, and a specific one, but I didn’t have time. When I thought about this frame, I felt so sick! Sales designs are somehow crummy and material-intensive. I limited myself to one 20x40 pipe under the edge and two levers.


Ceiling made of plastic panels
Towards the end of the renovation, money generally became tight)))) I calculated that a rack-and-pinion “superchrome” for the ceiling of my bathroom would cost about 4,000 rubles, but just plastic panels would cost 1.5 thousand. The difference is noticeable, after all)) But the ceiling is not a warm floor - it can be replaced later. My point is that I don't really like these panels at all. So, actually, the question is: I’m going to make a frame from PPN and PP, just like for gypsum boards. Only water for panels: WHAT AND WITH WHAT STEP???
- 26 answers
Dear gentlemen builders. I would like to know the detailed process of CORRECTLY leveling walls (reinforced concrete), with a composition such as Knauf... I’m a novice in this matter, but I want to make my daughter’s bedroom beautiful, but I don’t have a lot of money to pay professionals for the work, and there’s no guarantee that I’ll get caught good pros... So I want to find out what and how, and how much is worth a pound. Thanks in advance for the advice. The walls will be leveled for further painting with Sherwin Williams paint.
- 1,877 replies

Now we in the cities are doomed to count everything. The crazy “craftsmen” immediately rushed to teach everyone how to twist water ones. And then a “standard scheme” for installing a water meter was born, which included a valve that prevented manipulation of the device. Because of these valves, problems with boilers began to arise and moans and panicked screams rushed across the forums - “Ahtung! The pressure in the heating pad is increasing! What should I do?” If there weren't this valve, there would be no problems. And manufacturers and traders began to profit from the so-called “security groups”. But that's another topic...
- 37 replies

Hello, brothers in repair! I haven’t written anything here for a long time, and in general I rarely come in, it’s all a bit of a lack of time: either drinking, or partying, and now a new “attack” has attacked me. But knowing that, despite everything, you stubbornly do not forget me, I decided not to be a pig and tell you about my new hobby. I’ll start from afar: I have worked almost my entire adult life as an electronics engineer, moreover, as an engineer-developer of electronic and electrical devices of the widest class and purpose, and at the same time purely in the defense industry. It is clear that the scope of my amateur radio interests was limited only by my laziness, there were simply no restrictions on radio components for me, I had EVERYTHING! Well, following the trends of the amateur radio fashion of that time, my main focus was on radio receivers and amplifiers, of course, on transistors and microcircuits. I haven’t worked in this field for a long time, and I threw everything into the landfill a long time ago, but all this time I had a dream in my soul - to make a tube power amplifier, and not a simple one, but one that would make everyone gasp. But I must say that at work I spent most of my time dealing with electric vacuum devices, radio tubes, to put it simply, so this topic was very familiar to me. And then there’s this fashion for “warm tube sound”, which people are literally going crazy about. In short, a year ago I decided to make my dream come true. I immediately decided: the mainstream, ordinary tube amplifiers with an output transformer, are not interesting to me, this is not a royal matter! Shouldn't I invent a TRANSFORMER-LESS tube amplifier? Well, I well imagined the difficulties along this path, and I had some of my own thoughts on this matter, but still I decided to consult with the radio amateurs. I found a suitable group on Facebook, started publishing in it, and once asked a question
Long-term use of the faucet in the bathroom leads to gradual wear of the shower hose. As a result, water begins to flow through the chrome-plated spiral shell. At the same time, the emission of water through the shower head is significantly reduced.
The reason for this is the rupture of the rubber hose under the steel braid, and, as a rule, this occurs near the watering can. It is this place that is subject to frequent bending. In this case, you can carry out the repair yourself by cutting off the break and thereby shortening the hose slightly. If the hose ruptures in the middle, then there is no way to do without purchasing a new one.
To repair the hose yourself you will need:
- pliers;
- scissors;
- flat screwdriver.
These simple tools are probably found in every home.
First of all, you need to unscrew the shower head.
Remove the gasket and metal nipple from the end of the hose.

To remove the latter, you will need a flat screwdriver or a knife, since the nipple is tightly inserted into the body and it can be difficult to pull it out.

We move the steel braid back along the inner rubber hose and find the break point. It needs to be cut off.

The end of the hose must be heated under running hot water, otherwise it will be difficult to put the nipple back on.
Now you can reassemble the hose in reverse order.

We pull the end of the rubber hose onto the nipple, put a gasket on it, and insert it all into the metal braid body until it stops.
Add site to bookmarks
- Species
- Choice
- Installation
- Finishing
- Repair
- Installation
- Device
- Cleaning
Shower pipe repair
Apartment renovations usually affect all rooms. The bathroom is no exception; work in it ends with the installation of plumbing in the shower. Doubts often arise when choosing these simple accessories. Since the plumbing includes a mixer, faucet, watering can and shower hose. Frequent breakdowns force you to call a specialist, but in some cases you can repair parts of the shower yourself. How to repair a shower?
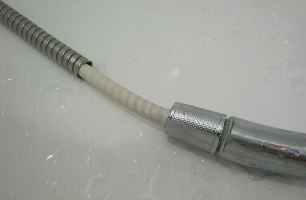
Figure 1. After a breakdown, it is necessary to cut off the defective part of the hose.
Repair of flexible shower pipe
At the moment, the quality of plumbing parts leaves much to be desired.
Cheap parts made in China are on sale. They often break and require replacement. A similar shower hose has a low price. If you take it apart, you can see low-quality rubber that cracks and leaks after a few months of use. Surely, the manufacturer of a disposable hose makes money by quickly replacing the product. But there is a problem with calling third-party specialists.
There is a way out of this situation. This is the purchase of good plumbing equipment and the opportunity to repair the shower hose yourself. Repair is not a tricky business. Let's look at what's wrong? In the case of a visible hole, everything is clear.
First you need to disassemble:

Figure 2. The notch on the flexible hose must be bent back.
- Unscrew the shower head.
- We take out the flexible part (rubber, silicone tube, flexible) and look for the part that needs to be repaired.
- After finding the breakage, cut off this part (Fig. 1).
- We put on the fitting removed from the broken part and secure it.
- After that, put on the shower head.
In order to put the tube on the fitting, you need to stretch the shower hose (insert a pencil or a stick of larger diameter into it), when the nipple enters, secure it. It will be enough to heat it with hot tap water or pour boiling water over it. The rubber will tighten and the fastening will be strong.
This is how easy it is to repair a flexible shower pipe. But there are also nuances. If you inspect the part and do not find a breakage in the form of a hole, but it is still leaking, you should completely disassemble the shower. This type of shower repair will take more time and effort. The problem may be a bad inner tube, because... Low quality rubber can crumble or burst in many places. In this case, it is better to replace the shower pipe.
If you need a quick repair of a shower tube for a short period of use, it is possible to repair a hose with a soldered fitting (disposable). In this case:
- We remove the watering can.
- We take out a flexible hose and cut off the broken part of the tube (everything is the same as in the previous case).
- Next, make a small cut and bend the cut part. Then we wrap it with plumbing tape or glue it with plastic film (Fig. 2).
- We put on and screw on the shower head and you're done.
This method is not a high-quality repair of your shower, but it is suitable for an emergency. The hose will still have to be changed.
The shower hose got loose the other day, but there didn’t seem to be any symptoms. Nothing leaked anywhere, it just took it and burst, so much so that all the water ran through the corrugation of the hose, and not a drop came out of the watering can. On the other hand, he is already more than 5 years old and perhaps his time has come to retire. I found a replacement very quickly, since a new shower hose had been lying around in the toolbox for six months already. True, its design is cheaper, the corrugation is ugly (you can see the crooked rolling), the nut for the mixer is even scary to hold in your hands, it’s almost made of tin, all thin-walled. And the nut on the watering can is generally made of plastic, in general it’s not a hose, but just a disappointment.
By the way, if you just unscrewed the corrugation (metal braid) from the end of the hose, then here it is. But this most likely applies to those cases when the corrugation was unscrewed, and not broken or unraveled somewhere in the middle.


This is the same new hose, I don’t know what kind of sharashka made it, but Potato is scratched on the package.


Gaskets are also included.

This is my old hose, this one has a more noble corrugation, the nuts are all metal, and their walls are thicker. Of course, this does not particularly affect the tightness because there is practically no pressure in this hose. But it still feels like it's a higher quality item.

We turn away the watering can. I myself do not use any wrenches when tightening this hose, so I can always unscrew it easily by hand.

We also unscrew the nut from the mixer. In my case, again with my hands. But if you cannot unscrew this nut by hand, you will have to use open-end or adjustable wrenches.

By the way, here in the photo I noted that this hose is screwed to my mixer through an adapter. Apparently the mixer is old and designed for our (USSR) watering cans, but who the hell knows, since I’m not a plumber, I’m just learning :-) In general, what I mean is that when you change the hose, take the old hose with you to shop so that the threads on the nuts of the new hose are similar to the old one. Well, or you will have to buy an adapter for the shower hose. You should also not forget about the length of the old hose, so as not to grab a short or very long hose, since the range is now huge.

Having unscrewed the old hose, screw a new one onto the mixer, do not forget about the rubber gaskets.

We do the same with the watering can, if the nut is plastic, then you should not tighten it on the watering can very much, using half-meter wrenches, since it can easily break or over time it will burst from overstrain, as usually happens with plastic caps on vials, bottles. In general, it is necessary to tighten it so that the watering can does not turn away arbitrarily during operation.


We open the water, check how it all functions and, depending on the test results, enjoy life for some more time. Well, or we get upset if suddenly something goes wrong or doesn’t flow the way we wanted :-)

DIY shower hose repair
It makes sense to read further only for those who like to repair, break, or disassemble anything with their own hands. I found in the toolkit a stub of a PVC hose, which I had long ago used as a hydraulic level when pouring the floor in the kitchen. And I decided to try to insert it into the leaky shower hose, if, of course, it fits the internal and external diameters. Moreover, I didn’t really want to throw away this shower hose because of a rotten piece of rubber, but at least there would be one more hose in reserve.


We tighten the nuts inward onto the corrugation so that they do not interfere.

Remove the rubber rings (gaskets). In general, it is not necessary to remove them, but if they are very old, petrified or fall off on their own, then you can remove them and then replace them with new ones.

Using a screwdriver, we pick out and pull out the brass bushings, sleeves, tubes, pimples, whatever is convenient for you, since I myself don’t really know what to call this part.


We cut off the old hose from these bushings using a knife or the same screwdriver.


If you don’t have a hose, then with this brass bushing you can go to the store for a new hose. To try on a new hose, so to speak, on the spot, right on this tube. Or cut off a piece of the old hose and use this sample to select a similar one. Just be sure to take into account the wall thickness of the new hose, since it will still need to be pushed inside the plastic inserts (which are at the ends of the metal holes)

This is a stub of the hose that I decided to use. It turned out to be a little narrow, but somehow, with force, I still managed to get it onto these sleeves.

But first you need to stretch a new hose inside the corrugation. We cut out the halves of the hoses, lengthwise by 3-5 cm, put the new hose into the old one, tie it tightly with wire or rope (we bend the ends of the wire so that they do not cling inside the corrugation). After that, from the opposite side we pull out the old hose from the corrugation, and at the same time we pull out a new one. Here already look at the place. If the old hose breaks into two parts somewhere inside, then you will have to use something else to pull the new hose through. And perhaps the new hose itself will freely pass through the corrugation without outside help.


We put the ends of the hose on the bushings, then press the bushings themselves into the corrugation. Actually, our new hose is already in place.

We put on new rubber gaskets or return the old ones.


We return the nuts to their place.


In general, this completes the hose repair. They say transparent hoses don’t last long and always recommend using rubber (black) ones. In this regard, I don’t even know what to say, since I already said that I’m not a plumber. I've had it on the shelf for about 7 years, and have been using it in the bathroom for about six months now, since the new Potato was dismantled after the old one was repaired. Moreover, this transparent stub of a hose was nearby, and for a new rubber one we would still have to go and look for it. In general, the counter is turned on, as soon as it goes down, I’ll immediately write a couple of lines here.
Of all the plumbing elements in the bathroom, the shower hose bears the heaviest load. Frequent bends, strong temperature changes - all this spoils the rubber core of the hose and often leads to its damage and leaks. Fortunately, most of these damages can be easily repaired on your own without the help of a professional. Here's how to repair a shower hose yourself.
Before starting repairs, it is worth understanding for yourself how the damaged element works. Its design is quite simple and consists of a rubber or silicone tube placed in a metal corrugated braid. Flanges are usually installed at the ends of the tube, and metal nuts are placed on them, connecting the hose to the mixer and watering can.
This is the standard build option. In Soviet taps, shower hoses were not reinforced with a metal sleeve, but were an ordinary rubber or plastic tube. In some modern premium faucets, instead of a metal braid, a flexible plastic shell acts as protection. But this does not change the basic design principle.
Attention! The service life of rubber cores is about 15 years. If the shower begins to leak earlier than this, it is not necessary to change the hose. It is quite possible to repair it.
The hose is leaking: how to repair?
 The first thing you need to do when you detect a leak is to determine the location of the leak. They may be:
- the connection point between the hose and the mixer;
- joint between hose and shower head;
- any other section of the tube.
Repair measures will depend on the location of the fault. The following is the simplest option, in which the leak is located near the entrance to the faucet.
The shower and faucet connection is leaking
Most often, when such a problem occurs, it is recommended to check whether the nuts at the point where the shower hose enters the mixer are tightly tightened. Even if the plumbing was installed a long time ago and there is no doubt about the quality of the work of the master, you should not neglect this stage. During use of the shower, the nuts may loosen or move. The test can be carried out without special tools, simply by twisting the connecting elements with your fingers. If they rotate, you should tighten them tighter. To do this, you can use both a gas wrench and ordinary pliers.
If tightening the nuts does not help eliminate the leak, more serious operations will have to be performed. First you need to disassemble the connection and inspect the gasket located between the nut and the mixer inlet. It may have become wrinkled or worn out. The crumpled gasket should be straightened and placed so that it fits snugly against the nut. If deformed, it can be straightened in boiling water and then cooled under a load. If the gasket is worn out or has lost its integrity, it will have to be replaced.
Important! It only makes sense to straighten and straighten rubber gaskets. If the faucet has silicone elements installed, you should not try to restore them; it is better to immediately purchase new ones.
At this stage, when repairing a shower hose with your own hands, it is also worth inspecting the plastic bushings located at its ends. The presence of burrs or irregularities on them can worsen the fit of the tube to the gasket and cause a leak. All detected defects should be carefully sanded with sandpaper or a file. If the bushing is cracked, it should be completely replaced, otherwise water will constantly leak through the crack.
When the shower is leaking near the showerhead
A leak in the shower hose near its connection with the watering can begins to be repaired using the same algorithm as at the connection with the mixer:
- check the quality of tightening the nuts;
- assess the condition of the gaskets;
- inspect the bushing;
- eliminate detected defects.
How to repair a shower hose if these measures do not help? Remove the shower head and take a good look at where the rubber core attaches to the sleeve. Initially, the rubber element fits as tightly as possible to this part. But over time, due to frequent temperature changes and water hardness, rubber loses its elasticity. As a result, gaps form near the bushing into which water begins to flow.
The extended section of the tube can be tightened and secured using a copper wire clamp. But often the clamp subsequently interferes with the installation of the fixing nuts. What can you do in this case:
- cut off the widened end of the rubber tube to a narrow place;
- remove the bushing from the cut part;
- install the bushing on the end of the hose.
Tip: To make installation easier, you can dip the end of the rubber tube in hot water.
The same can be done if the end of the rubber core is torn or cracked. If the leak is caused by a defect in the bushing itself, such measures will not help. You will have to replace it or even the entire hose.
When the leak is in the middle
 The most difficult thing to repair a shower hose is when the leak is not located at its connection with other elements, but somewhere in the metal braid. This “symptom” most often indicates a crack or rupture in the rubber core itself. Fortunately, most often such defects occur near the connection between the hose and the bushing. You can eliminate them using the methods described in the previous section of the article.
If no defects are found at the ends of the core, you will have to examine it in more detail. You need to disconnect the hose from the mixer and watering can, remove the union nuts and remove the rubber part from the braid. To check thoroughly, try running some water through it. If damage is found, do not try to seal it with glue, tape, electrical tape or other methods popular among DIYers. You need to immediately go to a hardware store and buy a new replacement hose: with such a breakdown, independent repair is impossible.