It's no secret that people, since ancient times, began to use materials that were nearby for their needs. Those who live in forested areas have long built their houses from wood, but if there is clay nearby, people create bricks from it and build brick houses. What then can the Eskimos do if they have nothing nearby but snow? Of course, build your homes from snow and ice.
Igloo, translated from Inuktitut (as most Inuit Canadian dialects call it), means “winter dwelling of the Eskimos.” The igloo is a dome-shaped building with a diameter of 3-4 meters and a height of approximately human height. They build it from what is at hand, and in the winter tundra the only building materials at hand are snow... An igloo is built from snow or ice blocks compacted by the wind. If the snow is deep, the entrance to the igloo is made in the floor, and a corridor is dug to the entrance. If the snow is not deep enough, you have to make an entrance in the wall, and an additional corridor of snow blocks is added to it.
Alone, an Eskimo builds a spacious snow hut for his entire family in three quarters of an hour. The strongest snowstorm is inaudible in the hut. The snow bricks grow together tightly, and the hut freezes over as it heats up inside. They say that igloos can even withstand the weight of a polar bear.
How can you breathe under the snow? Fine. After all, if the entrance to the needle is located below floor level, then the outflow of heavy carbon dioxide from it and the influx of lighter oxygen in return are ensured. In addition, this arrangement of the inlet does not allow warm air to leave the home - it is known to be lighter than cold air. However, for ease of breathing, a ventilation hole is punched in the vault with a needle.

As a result of heating, the internal surfaces of the walls melt, but the walls do not melt. The colder it is outside, the higher the heat the igloo can withstand from the inside. After all, wet snow loses its heat-protective properties and allows the cold to pass through more easily. Having made its way through the thickness of the block, the frost freezes the inner surface of the walls, which has begun to melt, and the temperature pressure outside and inside is balanced.
In general, the thermal conductivity of a snow dome is low, and it is easy to maintain a positive temperature in the hut; often the heat generated by sleeping people is sufficient for this. In addition, the snow hut absorbs excess moisture from the inside, so the igloo is quite dry.
Today, igloo huts are used in ski tourism as emergency shelter in case of problems with the tent or a long wait for better weather. However, polar travelers did not immediately learn how to build igloos. For a long time it was believed that only a native Eskimo could build an igloo.

Canadian Vilhjalmur Stefansson was the first to learn how to build an igloo in 1914. He wrote about this in his book and in articles, but even from them it turned out to be difficult to learn how to do it. The secret to building an igloo was the special shape of the slabs, which made it possible to build the hut in the shape of a “snail”, gradually tapering towards the vault. The method of installing the slabs also turned out to be important - resting on the previous ones at three points.
The Eskimos skillfully transform their winter settlements into a complex complex of snow buildings and, in bad weather, can visit neighboring huts without going to the surface. Rasmussen, in his book “The Great Sleigh Road,” talks about snow villages with covered passages between igloos, entire architectural ensembles erected by the Eskimos with amazing speed, and large hut-houses.

“The main housing could easily accommodate twenty people for the night. This part of the snow house turned into a high portal like a “hall”, where people cleared the snow off themselves. Adjacent to the main dwelling was a spacious, bright annex where two families lived. We had plenty of fat, and therefore 7-8 lamps were burning at a time, which is why it became so warm in these walls of white snow blocks that people could walk around half naked to their fullest pleasure.”
The interior of the igloo is usually covered with skins, and sometimes the walls are also covered with skins. Fat bowls are used for heating and additional lighting. The Eskimos cover the bed with a double layer of reindeer skins, the bottom layer being laid with the flesh side up, and the top layer with the skin side down. Sometimes old skin from a kayak is placed under the skins. This three-layer insulation serves as a comfortable soft bed.

Sometimes igloos have windows made of seal guts or ice, but even without that, the sun penetrates into the igloo directly through the snow walls with a soft light of different shades. At night, one candle lit in the hut brightly illuminates the snow-white vault, and at the joints of the bricks this light breaks through a thinner layer of snow.
Outside, in the freezing darkness of the night, the igloo glows with a web of blurry lines. This is truly an extraordinary sight. It’s not for nothing that Knud Rasmussen called the igloo “a temple of festive joy among the snowdrifts of the snowy desert.”
Igloo, translated from Inuktitut (as most Inuit Canadian dialects call it), means “winter dwelling of the Eskimos.” The igloo is a dome-shaped building with a diameter of 3-4 meters and a height of approximately human height.
They build it from what is at hand, and in the winter tundra the only building materials at hand are snow... An igloo is built from snow or ice blocks compacted by the wind. If the snow is deep, the entrance to the igloo is made in the floor, and a corridor is dug to the entrance. If the snow is not deep enough, you have to make an entrance in the wall, and an additional corridor of snow blocks is added to it.

Construction process:
1. Using a cord, draw a circle-the floor of the hut. The diameter of the igloo is determined by the number of group members. However, it is advisable to start learning how to build it from a small size.
2. The location for the construction of the igloo is selected depending on the availability of hard flooring. The slabs for the first row are cut to size 60x40x20 cm, and for the subsequent ones - slightly smaller. They are placed with the crust surface inward.
3. The slabs of the first row are installed at an angle of 20-25° and cut obliquely in order to lay out subsequent rows in a spiral with an increase in inclination per turn by about 5°. In this case, the angle of inclination of the upper rows will be about 45°, and the diameter of the hole will be no more than 50-70 cm.

4. The reliability of the igloo design is achieved by the spherical shape, the laying of slabs in a spiral and the shape of the slabs, the outer edge of which is larger than the inner one, which prevents the slab from falling inward.
5. The stable position of the slab (for example, No. 36) will be at three points of contact: along the bottom edge - two corner points (A and B), and with the previous slab (No. 35) - the upper right corner (B). A noticeable convergence of at least two of the three contact points deprives the slab of stability.

6. Before installing the next slab, it is shaped into a trapezoid of the desired dimensions. The slabs are adjusted on the wall: the side edges of adjacent slabs are trimmed so that reliable contact is achieved at all three points.
7. Finally, the slab is placed like this: first, vertically on the lower edge, then, slowly tilting it up inside the hut, achieving a tight fit of adjacent slabs at the top point (B). The desired slope is achieved by trimming the edge or lightly tapping the slab from the outside.
8. All vertical joints of the slabs of the lower row must be overlapped by the slabs of the upper row, and some slabs (for example, No. 37 and 45) overlap two joints, otherwise, with a decrease in the diameter of the spiral, the slabs decrease so much that the support points will come closer together and the slabs in the upper rows will lose stability.

9. The hole at the top is closed with a plate - after leveling the top edge of the last spiral.
10. The gaps between the slabs are plugged with pieces of dense snow and clogged with loose snow.
11. Traditionally, the entrance to the igloo is made in the form of a hole below the floor level. In our practice, the hole is arranged at floor level and closed from the inside with a backpack or curtain (material, foam mat, etc.).
Experience shows that it is less labor-intensive to build two small interlocking igloos than one large one for the entire group. In any case, beginners should ignore this advice

As a result of heating, the internal surfaces of the walls melt, but the walls do not melt. The colder it is outside, the higher the heat the igloo can withstand from the inside. After all, wet snow loses its heat-protective properties and allows the cold to pass through more easily. Having made its way through the thickness of the block, the frost freezes the inner surface of the walls, which has begun to melt, and the temperature pressure outside and inside is balanced. It is known that Finnish snipers and mountain rangers of the German Wehrmacht were trained in the skills of building igloos. Today, igloo huts are used in ski tourism as emergency shelter in case of problems with the tent or a long wait for better weather.

The Arctic and Antarctic explorer Irishman Shackleton once complained about the difficult fate of explorers of the Southern continent: “There are no Eskimos in Antarctica that we could hire, as Peary did, to build snow houses for us.” So Amundsen, according to Shackleton, although he experienced a temperature of 62 ° C during the expedition to the North Magnetic Pole, was much happier: “It should be remembered that there were Eskimos with him, who built him a snow house every night.” The Eskimos cover the bed with a double layer of reindeer skins, the bottom layer being laid with the flesh side up, and the top layer with the skin side down. Sometimes old skin from a kayak is placed under the skins. This three-layer insulation serves as a comfortable soft bed.

The igloo is a forced invention of the North American Eskimos. If the Arctic had been rich in firewood, the Eskimos might have invented wooden houses. But stingy nature provided them with only snow, albeit in unlimited quantities. The Eskimos sighed and sighed and turned ordinary snow into an extraordinary building material, confirming in the most unexpected way the original Russian proverb - the need for invention is cunning. Judge for yourself.

Snow is easy to handle. You can cut any building structures from it - bricks, blocks, panels, beams, etc. If you wish, you can build a typical nine-story house in life size with entrances, benches at the doors and even baths, toilets and gas stoves, all fashioned from the same snow. Creative possibilities here are limited only by the author's imagination. No equipment is required to carry and lift the blocks - a snow brick measuring 100x60x20 cm can be lifted by one person. Let him try to do the same with concrete! Another important detail is the complete absence of a shortage of building materials, which in the central regions is offered in unlimited quantities from November to April, in the Arctic almost all year round. There’s no need to open funds, write out orders, or stand in line—and even then you don’t have to! Take a shovel and shovel as much as your heart desires! The only negative is the impossibility of exporting to countries with hot climates.

So, the building material was found. Now I will bring to the reader’s attention the design of the dwelling itself. What kind of house is this - an igloo?
Imagine a huge cup, three meters in diameter and a little less in height, made of snow, turned upside down. Neither the wind is afraid of it - thanks to its spherical shape, the wind flow does not crush the walls, but flows around them, nor the frost. Strength? At least the three of you climb in. Eyewitnesses say that this snow house can withstand visits from a polar bear, and it weighs five centners!
Dimensions? Not limited. This is how the Danish traveler-ethnographer Knud Rasmussen describes the igloo house: “The main housing could easily accommodate twenty people for the night. This part of the snow house led into a high portal, like a hall, where people cleared snow off themselves before entering the living space. On the other side, adjacent to the main dwelling was a spacious, bright extension where two families lived. We had plenty of fat, and therefore 7-8 lamps were burning at the same time, which is why it became so warm in these walls of white snow blocks that people could walk around half naked to their fullest pleasure.”

And this is about thermal comfort. If desired, you can arrange the tropics in the igloo. In the igloo you can light primus stoves, light fires (if you are not afraid of smoke), install potbelly stoves, you can even arrange a steam bath! But how can this be? Why doesn't an igloo, heated from the inside, melt? After all, even near-zero temperatures are fatal for snow.
Very simple. Let’s say the temperature inside the igloo rises to +20°C. It was quite natural that the walls began to leak. But wet snow, as you know, loses its heat-protective properties and allows the cold to pass through more easily. Having made its way through the thickness of the block, the frost freezes the inner surface of the walls, which has begun to melt. The temperature pressure outside and inside is balanced. Therefore, the stronger the frost outside, the higher the heating the “ignule” can withstand from the inside. The walls "float"

Of course, if the temperature inside the igloo is raised above +30°C, it will start dripping from the ceiling. But this is not the biggest inconvenience: it is enough to build an improvised gable roof by throwing a rectangular piece of plastic film over a stick stuck into the walls to keep people dry. Water will roll into the corners and freeze on the snow.
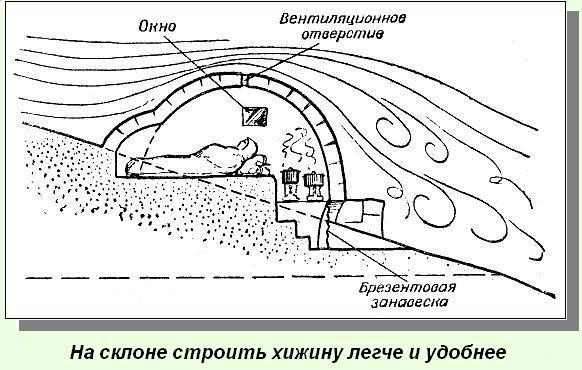
The best snow for building an igloo is considered to be medium-density snow that is slightly pressed with your foot. It is easy to cut, durable, not heavy. Most often, this type of snow is found in open, wind-blown spaces, on the tops of ridges, bare hills, near uneven terrain, near large stones, slope bends, and sastrugi. The depth of the snow cover at the site of the future quarry should not be less than 0.6-0.7 m. It is better to lay the quarry on the leeward side of the construction site, and if the igloo is being built on a slope, above the construction site, which will significantly facilitate the transportation of finished blocks (they can be will just roll down).

The quarry is a pit measuring 1x1 m and 50-60 cm deep at the edge, in the quarry pit with a hacksaw, shovels; Using a long knife, the heel of the ski cuts out brick blocks. We once used an ordinary spruce stick as a cutting tool, but the productivity in this case, of course, drops by 2-3 times. If the snow is uniformly dense in depth, it is convenient to cut narrow, vertical bricks. If only the top layer of snow is strong, the blocks are cut horizontally.
The block, cut on four sides, is separated from the snow monolith by a slight blow of the foot along the bottom edge. As the quarry lengthens, the blocks are cut on only three sides. The first 15-20 blocks, which will serve as the foundation of the future igloo, are made as large as possible, up to 100x50x30 cm.
After preparing the blocks, a circle is drawn on a horizontally trampled area using a rope compass or a long stick. The diameter of an igloo designed for one person must be at least 2.4 m, for two - 2.7 m, for three - 3 m, for four - 3.6 m. The indicated dimensions will provide the person with the greatest comfort, but in emergency cases An igloo like this can accommodate double the number of residents.

The first row of blocks is laid out along the perimeter of the outlined circle from the outside, after which it is cut diagonally along the entire length, right down to the bottom edge, to form the beginning of a spiral. The first block of the second row is installed on the resulting step. The blocks of the lower rows are laid with a 25-30 degree tipping inside the circle. The inclination of the blocks in the upper rows can reach 40-50% of the deviation from the vertical.
When building, you need to remember a few little secrets. Under no circumstances should adjacent blocks touch with their lower corners, otherwise they will end up in an unstable position. The vertical joints of blocks in adjacent rows should not coincide. It is not recommended to move the installed block back and forth along the wall, as it wears out and loses its original shape. It is better to lay brick-blocks with a more durable, crusty material inside the igloo.

The upper hole in the dome is closed with one polygonal slab or 2-3 flat ones
long blocks laid close to each other on the last row of bricks. Large cracks between the blocks can be filled with crust fragments, small ones can be filled with loose snow. The best way to see the cracks and through holes in the dome is in the evening, when a candle is burning inside the igloo.
A manhole tunnel is dug under the finished dome of the igloo on the leeward side. As with the construction of a cave, we must strive to ensure that it is located below floor level. If the igloo is standing on shallow snow, it is permissible to cut an entrance hole in the wall at ground level and close it with a door block
Inside the igloo, especially if the entrance is made at floor level, you can arrange a bed 30-40 cm high.
If you plan to build a fire in the igloo, then in the upper part of the dome you need to cut a hole with a diameter of 10-15 cm, to which you need to attach a pipe cut from a strong crust with a through hole for exhausting smoke. In this case, the fire in the igloo must be made from dry, low-smoking wood and very small in size. In case of heavy smoke, you can cut an additional window in the dome, which is subsequently closed from the outside with a block.

An igloo is one of the most reliable snow shelters, capable of protecting a person from any vagaries of the weather. Suffice it to remember that the Eskimos, living in the harshest conditions of the polar Arctic, until recently did not know any other winter dwellings at all! Having perfect snow construction skills, any Eskimo, according to Knud Rasmussen, could single-handedly build a spacious igloo that could accommodate 4-5 people in just 3/4 of an hour! Modern man, of course, cannot handle such speeds.
Even a well-equipped traveler with experience in constructing large shelters requires 1.5-2 hours to build an average-sized igloo. For beginners and those who are far from Eskimo, the result should be increased by at least 2 times. When the construction of an igloo is carried out by 2 people - one cuts and transports the blocks, the other lays out the dome - time costs are reduced by 30-35%, but no more.

In any case, the construction of igloos should begin long before darkness, fatigue, or weather changes. Saving time in such cases is unacceptable!
I'll give you a few more tips.
You should never try to build a large needle at once. The difficulty of building an Eskimo snow hut increases in direct proportion to its size. If the construction of a 2-meter igloo is accessible to any beginner, then even an experienced professional cannot always master a 3-4-meter one. In cases where a large group of people is in trouble, it is much easier and faster to build 3-4 or 10 small igloos than one large one.
A person starting to build an igloo for the first time can be advised to first build a small snow hut, 1.5 m in diameter. This will help you understand its design features, master construction technology, and eliminate many common mistakes for beginners. In case of emergency, you can always spend the night or wait out bad weather in such an experimental igloo.

You must always be prepared for the fact that the construction of the igloo will have to be repeated many times. And don’t give up and don’t despair! And work as long as it takes to build warm housing. At least twice as long as you have to stay in it.
We once rebuilt a similar snow hut seven times, spending a total of six hours on construction! The almost finished structure crumbled at the slightest touch. And I had to start all over again. And outside, by the way, it was night, -38°C, and a strong wind was blowing, with drifting snow. And we were on a bare rocky patch inside a cloud that had crawled onto the ridge. And the light bulb in our flashlight burned out, and we had to illuminate it with the fire of three cigarettes simultaneously thrust into our mouths. I really wanted to retreat then, because it seemed: it was impossible to even build a dog kennel from such a crust. But we continued to cut and place blocks. And the eighth attempt was successful. It was then that we realized that the success or failure of snow construction depends not on the quality of the snow, but on the stubbornness of the builder!
If a classic spiral igloo does not work out for one reason or another, it is advisable to carry out construction according to a simplified, non-spiral scheme. By the way, travelers very rarely build a correct spiral igloo; usually each group develops its own, simplified construction scheme for a circular igloo. To build an igloo, you first need to choose a flat area with dense and deep snow. Loose, fluffy snow is not good.

Using a rope and a knife, draw a circle that will determine the size of your home based on the following calculation: for one person - 2.4, for two - 2.7. It must be remembered that the larger the hut, the more difficult it is to build. If there are a lot of people, it is better to build many small igloos. Each Igloo brick “falls” not so much down, but sideways, leaning on its neighbor in a spiral below. In this way, you can assemble a vertical vault of large diameter if you accurately maintain the pitch of the spiral and the curvature of the hemisphere circumference, which can be conveniently controlled with a knot on a regular rope from a peg in the center of the building. Wind-blown snow is an excellent building material, like polystyrene foam. Having a long thin knife, a light duralumin plate and a hacksaw, you can use it to build a warm, cozy hut - an igloo. I was amazed at the strength of the fragile snow turned into an igloo! In the morning, leaving the place where we spent the night, we tested its strength. The snow dome could easily support the weight of four hefty men!

In a small igloo at first glance, five to seven people, the entire tourist group, are located with great comfort. When the candle is burning inside, you can read a book. When the primus burns, the thermometer under the dome shows +20 degrees. In any snowstorm, it’s quiet and warm inside... To learn how to build an igloo, I had to read a bunch of books, diary entries of famous polar explorers, tips and recommendations from tourist authorities. At first we used Berman's vague recommendations. Construction took more than 5 hours, physically and mentally exhausted 12 people, and only seven fit inside. The igloo was far from practical use: - (Here is what the famous Piri wrote in his diary: ... Two Eskimos were with me. Every evening, armed with long knives, they selected a snow blower and quite quickly built an igloo... - Meager, but very useful information. All that remains is to interview his companions :-) One day I came across William Stefanson’s amazing book “The Hospitable Arctic” (If you find it, be sure to read it!) To learn the survival techniques of the Eskimos, he lived in their tribe for six months. And then, he led a number of amazing polar expeditions. Everything in the book is laid out...

The four of us built the “fastest” igloo for seven in 45 minutes! This is comparable to setting up a tent, but of course, much more comfortable.
The initial stage of construction of a circular igloo is no different from the construction of a spiral igloo - a quarry is laid out, a circle is outlined in the snow, and the first row of blocks is laid out. Just don't cut it diagonally. It is enough just to place the last brick in the row non-standard, 30-40 cm higher than the rest. Against it, tilting it and slightly pushing it inside the circle, lean the first block of the second row, against that, in turn, another one, and so on. To prevent the installed blocks from collapsing inward under their own weight, they must be supported.

It is most convenient to work with three people - one person feeds the bricks inside, the other installs, adjusts, grinds them to the already standing blocks, the third keeps the entire unfinished row from falling. The last laid brick wedges the finished ring row, preventing it from collapsing. When working alone, the task becomes somewhat more difficult. In this case, you need to place pre-prepared blocks inside the needle. Each block installed on the bottom row, as well as any other block that is in an unstable position, should be supported from the inside with a ski or stick stuck into the snow. With some skill, you can adapt to keep the row from falling with your knee, hip, shoulder, while simultaneously installing the next block. Fixing the last brick ensures the immobility of the entire row. Due to the 30-40° tilt and extension of the snow bricks inside, the rings of the rows gradually narrow, forming a regular igloo hemisphere. You can pull out the blocks when the row is completely finished.

To do this, you literally need to saw down the joints of the blocks, millimeter by millimeter, moving them toward you, inside the igloo. With some skill, you can achieve the fact that the top row will protrude deeper than the underlying one by more than a third of its thickness. The hole remaining in the upper part of the dome is closed in the same way as in a classic igloo. The protruding corners of the blocks inside the igloo can be cut off with a saw (Fig. 196).
If the igloo dome cannot be closed, you can complete it as if building a snow hut. Place improvised beams on the edges of the walls, which are covered with a piece of fabric or plastic film. Cover the resulting flat roof with a layer of snow. In a German town with a mind-blowing name – Mitterfirmiansreut – people went even further. Here in December 2011, an entire church was built from snow and ice. The construction of such a facility was not a simple experiment. It had its own history. In 1910, a severe storm prevented parishioners from reaching the local church. Then they decided to build a temple from the most available materials. This is how the idea of an amazing snow church arose. Snow and ice turned out to be quite durable materials. During the month, the church receives a large number of parishioners. However, after this period, it begins to collapse.

In cases where it is not possible to prepare a large number of blocks, and there is enough snow
To do this, a circle with a diameter of 1-1.5 m is drawn on the surface of the snowdrift. The snow is removed from the circle to a depth of at least 1.5 m. A deep round hole is obtained. Along its perimeter, a small dome is constructed from blocks laid in rows using any of the described methods - spiral, ring. Of course, such a shelter turns out to be very cramped, but its internal volume can be increased by blasting the walls to the sides. Moreover, the largest amount of snow should be selected in the lower part of the pit adjacent to the floor, the smallest - with a wide base and a narrowed neck, closed at the top with a small dome. There is no need to fear that after construction is completed, the cut edges of the pit will not hold up and will collapse under the weight of the walls. The constructed dome, gradually subsiding and thawing, acquires solidity, due to which the pressure on the “foundation” is balanced. But, of course, you shouldn’t go overboard with undermining. The most convenient, from the point of view of organizing everyday life, and at the same time durable shelter, is where the angle of inclination of the walls of the pit is equal to the angle of inclination of the walls of the dome (approximately 40-50°), that is, in fact, one wall is a continuation of the other. But, of course, each construction is individual, and the angles of inclination of the walls depend on the strength of the snow.

Finally, if the crust has not yet compacted properly and has a layered structure, you can build a needle from flat, 10 cm or less thick, pancake-shaped blocks. To do this, the bricks are laid flat so that each top row protrudes inside the circle a third deeper than the bottom one. The row of rings will gradually narrow until they close together. The hole in the center of the dome is closed by one flat slab with a ledge at the bottom.
However, it should be remembered that an igloo built from flat blocks is not stable enough, and therefore its diameter should not exceed 1.5-2 m. Otherwise, the dome may simply collapse inward. You can increase the internal dimensions of the shelter by undermining the wall to the sides and removing a 30-50 cm layer of snow from the floor

In the mountains, on large slopes, if there is a strong crust, you can build a block semi-cave. To do this, you need to find a natural niche-recess in the rock and cover its open part with a wall of snow blocks. It is better to dig the entrance from below under the finished wall
On snowy slopes, a niche is dug using available tools and is also covered with a wall of blocks.
The described structures do not exhaust the list of snow shelters used in emergency situations. Victims often use shelters that include elements of a variety of designs. It all depends on the specific conditions of the accident and the capabilities of the victims.
Using open fires inside snow shelters poses a certain danger. Incomplete combustion of some flammable materials can release carbon monoxide into the surrounding air, which is deadly to humans.

Cold overnight in a snow shelter
Sit close to each other, trying to achieve the maximum area of contact between the bodies.
Fasten all buttons and zippers, tighten sleeve cuffs and trouser legs, and put on the hood.
Wring out wet clothes. Drink hot tea, coffee, broth. Insulate your legs and head as much as possible. There are sugar- and fat-containing foods. Mark the location of the shelter. Sit on an insulating mat. Have a tool in the shelter to clear the entrance hole.
If necessary, warm your hands with swings. Perform other physical activities to warm up your muscles.
Spread out throughout the shelter. Leaving people unattended. Undress in the shelter. Stay in wet clothes. Drink alcohol. Sleep when there is a risk of freezing. Leave open fire unattended. During construction, position the entrance to the wind. Lie and sit in the snow. Overheat and sweat when building shelters.
Rebuild the shelter at night. Leave the shelter in the dark and absolutely necessary.
Igloo, translated from Inuktitut (as most Inuit Canadian dialects call it), means “winter dwelling of the Eskimos.” The igloo is a dome-shaped building with a diameter of 3-4 meters and a height of approximately human height.
They build it from what is at hand, and in the winter tundra the only building materials at hand are snow... An igloo is built from snow or ice blocks compacted by the wind. If the snow is deep, the entrance to the igloo is made in the floor, and a corridor is dug to the entrance. If the snow is not deep enough, you have to make an entrance in the wall, and an additional corridor of snow blocks is added to it.
Construction process:
1. Using a cord, draw a circle-the floor of the hut. The diameter of the igloo is determined by the number of group members. However, it is advisable to start learning how to build it from a small size.
2. The location for the construction of the igloo is selected depending on the availability of hard flooring. The slabs for the first row are cut to size 60x40x20 cm, and for the subsequent ones - slightly smaller. They are placed with the crust surface inward.
3. The slabs of the first row are installed at an angle of 20-25° and cut obliquely in order to lay out subsequent rows in a spiral with an increase in inclination per turn by about 5°. In this case, the angle of inclination of the upper rows will be about 45°, and the diameter of the hole will be no more than 50-70 cm.
4. The reliability of the igloo design is achieved by the spherical shape, the laying of slabs in a spiral and the shape of the slabs, the outer edge of which is larger than the inner one, which prevents the slab from falling inward.
5. The stable position of the slab (for example, No. 36) will be at three points of contact: along the bottom edge - two corner points (A and B), and with the previous slab (No. 35) - the upper right corner (B). A noticeable convergence of at least two of the three contact points deprives the slab of stability.
6. Before installing the next slab, it is shaped into a trapezoid of the desired dimensions. The slabs are adjusted on the wall: the side edges of adjacent slabs are trimmed so that reliable contact is achieved at all three points.
7. Finally, the slab is placed like this: first, vertically on the lower edge, then, slowly tilting it up inside the hut, achieving a tight fit of adjacent slabs at the top point (B). The desired slope is achieved by trimming the edge or lightly tapping the slab from the outside.
8. All vertical joints of the slabs of the lower row must be overlapped by the slabs of the upper row, and some slabs (for example, No. 37 and 45) overlap two joints, otherwise, with a decrease in the diameter of the spiral, the slabs decrease so much that the support points will come closer together and the slabs in the upper rows will lose stability.
9. The hole at the top is closed with a plate - after leveling the top edge of the last spiral.
10. The gaps between the slabs are plugged with pieces of dense snow and clogged with loose snow.
11. Traditionally, the entrance to the igloo is made in the form of a hole below the floor level. In our practice, the hole is arranged at floor level and closed from the inside with a backpack or curtain (material, foam mat, etc.).
Experience shows that it is less labor-intensive to build two small interlocking igloos than one large one for the entire group. In any case, beginners should ignore this advice
As a result of heating, the internal surfaces of the walls melt, but the walls do not melt. The colder it is outside, the higher the heat the igloo can withstand from the inside. After all, wet snow loses its heat-protective properties and allows the cold to pass through more easily. Having made its way through the thickness of the block, the frost freezes the inner surface of the walls, which has begun to melt, and the temperature pressure outside and inside is balanced. It is known that Finnish snipers and mountain rangers of the German Wehrmacht were trained in the skills of building igloos. Today, igloo huts are used in ski tourism as emergency shelter in case of problems with the tent or a long wait for better weather.
The Arctic and Antarctic explorer Irishman Shackleton once complained about the difficult fate of explorers of the Southern continent: “There are no Eskimos in Antarctica that we could hire, as Peary did, to build snow houses for us.” So Amundsen, according to Shackleton, although he experienced a temperature of 62 ° C during the expedition to the North Magnetic Pole, was much happier: “It should be remembered that there were Eskimos with him, who built him a snow house every night.” The Eskimos cover the bed with a double layer of reindeer skins, the bottom layer being laid with the flesh side up, and the top layer with the skin side down. Sometimes old skin from a kayak is placed under the skins. This three-layer insulation serves as a comfortable soft bed.
The igloo is a forced invention of the North American Eskimos. If the Arctic had been rich in firewood, the Eskimos might have invented wooden houses. But stingy nature provided them with only snow, albeit in unlimited quantities. The Eskimos sighed and sighed and turned ordinary snow into an extraordinary building material, confirming in the most unexpected way the original Russian proverb - the need for invention is cunning. Judge for yourself.
Snow is easy to handle. You can cut any building structures from it - bricks, blocks, panels, beams, etc. If you wish, you can build a typical nine-story house in life size with entrances, benches at the doors and even baths, toilets and gas stoves, all fashioned from the same snow. Creative possibilities here are limited only by the author's imagination. No equipment is required to carry and lift the blocks - a snow brick measuring 100x60x20 cm can be lifted by one person. Let him try to do the same with concrete! Another important detail is the complete absence of a shortage of building materials, which in the central regions is offered in unlimited quantities from November to April, in the Arctic almost all year round. There’s no need to open funds, write out orders, or stand in line—and even then you don’t have to! Take a shovel and shovel as much as your heart desires! The only negative is the impossibility of exporting to countries with hot climates.
So, the building material was found. Now I will bring to the reader’s attention the design of the dwelling itself. What kind of house is this - an igloo?
Imagine a huge cup, three meters in diameter and a little less in height, made of snow, turned upside down. Neither the wind is afraid of it - thanks to its spherical shape, the wind flow does not crush the walls, but flows around them, nor the frost. Strength? At least the three of you climb in. Eyewitnesses say that this snow house can withstand visits from a polar bear, and it weighs five centners!
Dimensions? Not limited. This is how the Danish traveler-ethnographer Knud Rasmussen describes the igloo house: “The main housing could easily accommodate twenty people for the night. This part of the snow house led into a high portal, like a hall, where people cleared snow off themselves before entering the living space. On the other side, adjacent to the main dwelling was a spacious, bright extension where two families lived. We had plenty of fat, and therefore 7-8 lamps were burning at the same time, which is why it became so warm in these walls of white snow blocks that people could walk around half naked to their fullest pleasure.”
And this is about thermal comfort. If desired, you can arrange the tropics in the igloo. In the igloo you can light primus stoves, light fires (if you are not afraid of smoke), install potbelly stoves, you can even arrange a steam bath! But how can this be? Why doesn't an igloo, heated from the inside, melt? After all, even near-zero temperatures are fatal for snow.
Very simple. Let’s say the temperature inside the igloo rises to +20°C. It was quite natural that the walls began to leak. But wet snow, as you know, loses its heat-protective properties and allows the cold to pass through more easily. Having made its way through the thickness of the block, the frost freezes the inner surface of the walls, which has begun to melt. The temperature pressure outside and inside is balanced. Therefore, the stronger the frost outside, the higher the heating the “ignule” can withstand from the inside. The walls "float"
Of course, if the temperature inside the igloo is raised above +30°C, it will start dripping from the ceiling. But this is not the biggest inconvenience: it is enough to build an improvised gable roof by throwing a rectangular piece of plastic film over a stick stuck into the walls to keep people dry. Water will roll into the corners and freeze on the snow.
The best snow for building an igloo is considered to be medium-density snow that is slightly pressed with your foot. It is easy to cut, durable, not heavy. Most often, this type of snow is found in open, wind-blown spaces, on the tops of ridges, bare hills, near uneven terrain, near large stones, slope bends, and sastrugi. The depth of the snow cover at the site of the future quarry should not be less than 0.6-0.7 m. It is better to lay the quarry on the leeward side of the construction site, and if the igloo is being built on a slope, above the construction site, which will significantly facilitate the transportation of finished blocks (they can be will just roll down).
The quarry is a pit measuring 1x1 m and 50-60 cm deep at the edge, in the quarry pit with a hacksaw, shovels; Using a long knife, the heel of the ski cuts out brick blocks. We once used an ordinary spruce stick as a cutting tool, but the productivity in this case, of course, drops by 2-3 times. If the snow is uniformly dense in depth, it is convenient to cut narrow, vertical bricks. If only the top layer of snow is strong, the blocks are cut horizontally.
The block, cut on four sides, is separated from the snow monolith by a slight blow of the foot along the bottom edge. As the quarry lengthens, the blocks are cut on only three sides. The first 15-20 blocks, which will serve as the foundation of the future igloo, are made as large as possible, up to 100x50x30 cm.
After preparing the blocks, a circle is drawn on a horizontally trampled area using a rope compass or a long stick. The diameter of an igloo designed for one person must be at least 2.4 m, for two - 2.7 m, for three - 3 m, for four - 3.6 m. The indicated dimensions will provide the person with the greatest comfort, but in emergency cases An igloo like this can accommodate double the number of residents.
The first row of blocks is laid out along the perimeter of the outlined circle from the outside, after which it is cut diagonally along the entire length, right down to the bottom edge, to form the beginning of a spiral. The first block of the second row is installed on the resulting step. The blocks of the lower rows are laid with a 25-30 degree tipping inside the circle. The inclination of the blocks in the upper rows can reach 40-50% of the deviation from the vertical.
When building, you need to remember a few little secrets. Under no circumstances should adjacent blocks touch with their lower corners, otherwise they will end up in an unstable position. The vertical joints of blocks in adjacent rows should not coincide. It is not recommended to move the installed block back and forth along the wall, as it wears out and loses its original shape. It is better to lay brick-blocks with a more durable, crusty material inside the igloo.
The upper hole in the dome is closed with one polygonal slab or 2-3 flat ones
long blocks laid close to each other on the last row of bricks. Large cracks between the blocks can be filled with crust fragments, small ones can be filled with loose snow. The best way to see the cracks and through holes in the dome is in the evening, when a candle is burning inside the igloo.
A manhole tunnel is dug under the finished dome of the igloo on the leeward side. As with the construction of a cave, we must strive to ensure that it is located below floor level. If the igloo is standing on shallow snow, it is permissible to cut an entrance hole in the wall at ground level and close it with a door block
Inside the igloo, especially if the entrance is made at floor level, you can arrange a bed 30-40 cm high.
If you plan to build a fire in the igloo, then in the upper part of the dome you need to cut a hole with a diameter of 10-15 cm, to which you need to attach a pipe cut from a strong crust with a through hole for exhausting smoke. In this case, the fire in the igloo must be made from dry, low-smoking wood and very small in size. In case of heavy smoke, you can cut an additional window in the dome, which is subsequently closed from the outside with a block.
An igloo is one of the most reliable snow shelters, capable of protecting a person from any vagaries of the weather. Suffice it to remember that the Eskimos, living in the harshest conditions of the polar Arctic, until recently did not know any other winter dwellings at all! Having perfect snow construction skills, any Eskimo, according to Knud Rasmussen, could single-handedly build a spacious igloo that could accommodate 4-5 people in just 3/4 of an hour! Modern man, of course, cannot handle such speeds.
Even a well-equipped traveler with experience in constructing large shelters requires 1.5-2 hours to build an average-sized igloo. For beginners and those who are far from Eskimo, the result should be increased by at least 2 times. When the construction of an igloo is carried out by 2 people - one cuts and transports the blocks, the other lays out the dome - time costs are reduced by 30-35%, but no more.
In any case, the construction of igloos should begin long before darkness, fatigue, or weather changes. Saving time in such cases is unacceptable!
I'll give you a few more tips.
You should never try to build a large needle at once. The difficulty of building an Eskimo snow hut increases in direct proportion to its size. If the construction of a 2-meter igloo is accessible to any beginner, then even an experienced professional cannot always master a 3-4-meter one. In cases where a large group of people is in trouble, it is much easier and faster to build 3-4 or 10 small igloos than one large one.
A person starting to build an igloo for the first time can be advised to first build a small snow hut, 1.5 m in diameter. This will help you understand its design features, master construction technology, and eliminate many common mistakes for beginners. In case of emergency, you can always spend the night or wait out bad weather in such an experimental igloo.
You must always be prepared for the fact that the construction of the igloo will have to be repeated many times. And don’t give up and don’t despair! And work as long as it takes to build warm housing. At least twice as long as you have to stay in it.
We once rebuilt a similar snow hut seven times, spending a total of six hours on construction! The almost finished structure crumbled at the slightest touch. And I had to start all over again. And outside, by the way, it was night, -38°C, and a strong wind was blowing, with drifting snow. And we were on a bare rocky patch inside a cloud that had crawled onto the ridge. And the light bulb in our flashlight burned out, and we had to illuminate it with the fire of three cigarettes simultaneously thrust into our mouths. I really wanted to retreat then, because it seemed: it was impossible to even build a dog kennel from such a crust. But we continued to cut and place blocks. And the eighth attempt was successful. It was then that we realized that the success or failure of snow construction depends not on the quality of the snow, but on the stubbornness of the builder!
If a classic spiral igloo does not work out for one reason or another, it is advisable to carry out construction according to a simplified, non-spiral scheme. By the way, travelers very rarely build a correct spiral igloo; usually each group develops its own, simplified construction scheme for a circular igloo. To build an igloo, you first need to choose a flat area with dense and deep snow. Loose, fluffy snow is not good.
Using a rope and a knife, draw a circle that will determine the size of your home based on the following calculation: for one person - 2.4, for two - 2.7. It must be remembered that the larger the hut, the more difficult it is to build. If there are a lot of people, it is better to build many small igloos. Each Igloo brick “falls” not so much down, but sideways, leaning on its neighbor in a spiral below. In this way, you can assemble a vertical vault of large diameter if you accurately maintain the pitch of the spiral and the curvature of the hemisphere circumference, which can be conveniently controlled with a knot on a regular rope from a peg in the center of the building. Wind-blown snow is an excellent building material, like polystyrene foam. Having a long thin knife, a light duralumin plate and a hacksaw, you can use it to build a warm, cozy hut - an igloo. I was amazed at the strength of the fragile snow turned into an igloo! In the morning, leaving the place where we spent the night, we tested its strength. The snow dome could easily support the weight of four hefty men!
In a small igloo at first glance, five to seven people, the entire tourist group, are located with great comfort. When the candle is burning inside, you can read a book. When the primus burns, the thermometer under the dome shows +20 degrees. In any snowstorm, it’s quiet and warm inside... To learn how to build an igloo, I had to read a bunch of books, diary entries of famous polar explorers, tips and recommendations from tourist authorities. At first we used Berman's vague recommendations. Construction took more than 5 hours, physically and mentally exhausted 12 people, and only seven fit inside. The igloo was far from practical use: - (Here is what the famous Piri wrote in his diary: ... Two Eskimos were with me. Every evening, armed with long knives, they selected a snow blower and quite quickly built an igloo... - Meager, but very useful information. All that remains is to interview his companions :-) One day I came across William Stefanson’s amazing book “The Hospitable Arctic” (If you find it, be sure to read it!) To learn the survival techniques of the Eskimos, he lived in their tribe for six months. And then, he led a number of amazing polar expeditions. Everything in the book is laid out...
The four of us built the “fastest” igloo for seven in 45 minutes! This is comparable to setting up a tent, but of course, much more comfortable.
The initial stage of construction of a circular igloo is no different from the construction of a spiral igloo - a quarry is laid out, a circle is outlined in the snow, and the first row of blocks is laid out. Just don't cut it diagonally. It is enough just to place the last brick in the row non-standard, 30-40 cm higher than the rest. Against it, tilting it and slightly pushing it inside the circle, lean the first block of the second row, against that, in turn, another one, and so on. To prevent the installed blocks from collapsing inward under their own weight, they must be supported.
It is most convenient to work with three people - one person feeds the bricks inside, the other installs, adjusts, grinds them to the already standing blocks, the third keeps the entire unfinished row from falling. The last laid brick wedges the finished ring row, preventing it from collapsing. When working alone, the task becomes somewhat more difficult. In this case, you need to place pre-prepared blocks inside the needle. Each block installed on the bottom row, as well as any other block that is in an unstable position, should be supported from the inside with a ski or stick stuck into the snow. With some skill, you can adapt to keep the row from falling with your knee, hip, shoulder, while simultaneously installing the next block. Fixing the last brick ensures the immobility of the entire row. Due to the 30-40° tilt and extension of the snow bricks inside, the rings of the rows gradually narrow, forming a regular igloo hemisphere. You can pull out the blocks when the row is completely finished.
To do this, you literally need to saw down the joints of the blocks, millimeter by millimeter, moving them toward you, inside the igloo. With some skill, you can achieve the fact that the top row will protrude deeper than the underlying one by more than a third of its thickness. The hole remaining in the upper part of the dome is closed in the same way as in a classic igloo. The protruding corners of the blocks inside the igloo can be cut off with a saw (Fig. 196).
If the igloo dome cannot be closed, you can complete it as if building a snow hut. Place improvised beams on the edges of the walls, which are covered with a piece of fabric or plastic film. Cover the resulting flat roof with a layer of snow. In a German town with a mind-blowing name – Mitterfirmiansreut – people went even further. Here in December 2011, an entire church was built from snow and ice. The construction of such a facility was not a simple experiment. It had its own history. In 1910, a severe storm prevented parishioners from reaching the local church. Then they decided to build a temple from the most available materials. This is how the idea of an amazing snow church arose. Snow and ice turned out to be quite durable materials. During the month, the church receives a large number of parishioners. However, after this period, it begins to collapse.
In cases where it is not possible to prepare a large number of blocks, and there is enough snow
To do this, a circle with a diameter of 1-1.5 m is drawn on the surface of the snowdrift. The snow is removed from the circle to a depth of at least 1.5 m. A deep round hole is obtained. Along its perimeter, a small dome is constructed from blocks laid in rows using any of the described methods - spiral, ring. Of course, such a shelter turns out to be very cramped, but its internal volume can be increased by blasting the walls to the sides. Moreover, the largest amount of snow should be selected in the lower part of the pit adjacent to the floor, the smallest - with a wide base and a narrowed neck, closed at the top with a small dome. There is no need to fear that after construction is completed, the cut edges of the pit will not hold up and will collapse under the weight of the walls. The constructed dome, gradually subsiding and thawing, acquires solidity, due to which the pressure on the “foundation” is balanced. But, of course, you shouldn’t go overboard with undermining. The most convenient, from the point of view of organizing everyday life, and at the same time durable shelter, is where the angle of inclination of the walls of the pit is equal to the angle of inclination of the walls of the dome (approximately 40-50°), that is, in fact, one wall is a continuation of the other. But, of course, each construction is individual, and the angles of inclination of the walls depend on the strength of the snow.
Finally, if the crust has not yet compacted properly and has a layered structure, you can build a needle from flat, 10 cm or less thick, pancake-shaped blocks. To do this, the bricks are laid flat so that each top row protrudes inside the circle a third deeper than the bottom one. The row of rings will gradually narrow until they close together. The hole in the center of the dome is closed by one flat slab with a ledge at the bottom.
However, it should be remembered that an igloo built from flat blocks is not stable enough, and therefore its diameter should not exceed 1.5-2 m. Otherwise, the dome may simply collapse inward. You can increase the internal dimensions of the shelter by undermining the wall to the sides and removing a 30-50 cm layer of snow from the floor
In the mountains, on large slopes, if there is a strong crust, you can build a block semi-cave. To do this, you need to find a natural niche-recess in the rock and cover its open part with a wall of snow blocks. It is better to dig the entrance from below under the finished wall
On snowy slopes, a niche is dug using available tools and is also covered with a wall of blocks.
The described structures do not exhaust the list of snow shelters used in emergency situations. Victims often use shelters that include elements of a variety of designs. It all depends on the specific conditions of the accident and the capabilities of the victims.
Using open fires inside snow shelters poses a certain danger. Incomplete combustion of some flammable materials can release carbon monoxide into the surrounding air, which is deadly to humans.
Cold overnight in a snow shelter
Sit close to each other, trying to achieve the maximum area of contact between the bodies.
Fasten all buttons and zippers, tighten sleeve cuffs and trouser legs, and put on the hood.
Wring out wet clothes. Drink hot tea, coffee, broth. Insulate your legs and head as much as possible. There are sugar- and fat-containing foods. Mark the location of the shelter. Sit on an insulating mat. Have a tool in the shelter to clear the entrance hole.
If necessary, warm your hands with swings. Perform other physical activities to warm up your muscles.
Spread out throughout the shelter. Leaving people unattended. Undress in the shelter. Stay in wet clothes. Drink alcohol. Sleep when there is a risk of freezing. Leave open fire unattended. During construction, position the entrance to the wind. Lie and sit in the snow. Overheat and sweat when building shelters.
Rebuild the shelter at night. Leave the shelter in the dark and absolutely necessary.
A person cannot live without a cozy home that protects him from all the troubles of the outside world. And wherever he is, the first thing a person does is build a house. What a home should be like depends on the natural materials that a person can find around him. In the mountains, houses are made of stone and clay, on the plains they are made of wood, there are houses made of brick, of branches, but what can be used to make a shelter from the cruel winds in the midst of the kingdom of cold, snow and ice?
Yes, people also live in such harsh conditions. There is one northern people - the Eskimos, who came up with a wonderful house that can be built from material that is available in huge quantities in the endless snowy expanses.
An igloo is a round house that is built from turned large pieces of dense snow. In it, northern housewives managed to achieve the maximum possible comfort and coziness. Fur skins were laid out and a fire was lit. It became warm and light. The walls cannot melt from the fire, since the severe frost outside does not give them such an opportunity.
Large slabs of snow were prepared for the construction of walls. Then a circle was marked in the snow and the first layer was laid out on it. The next rows were laid with a slight slope into the house, forming an oval dome. Gaps were left between the snow slabs. They were not joined closely. The cracks were then covered with snow and sealed with a special lamp containing seal oil. The heat from the burning lamp melted the inner surface of the walls, the cold froze the water, forming an ice crust.
The door to such a dwelling was made (sawed) very low, or a tunnel was even dug in the snow. The entrance hole was in the floor and you had to crawl to get home.
The houses were made very small - a standing person could barely fit at the maximum point of the dome. This made it easier to heat the house and retain valuable heat. A hole was cut in the dome to allow the air necessary for breathing to flow in. The family usually lay down opposite him to sleep on beds made of snow blocks covered with skins.
Thus, the Eskimos built entire villages from snow. It is interesting that even in the short, cool summer the dense snow that makes up the walls does not have time to melt.
Now, of course, the igloo is becoming more of a romance than a necessity. Many modern people are happy to travel north to try to spend the night in a snow house built with their own hands..
Yarangi
From time immemorial, people have built houses to have protection from bad weather, wild animals and evil people. Where no man has gone before! And everywhere he had to build houses. Trees were used in the forest, stones in the mountains.
Have you ever seen fur houses?
Northern residents live in such houses and they are called yarangas.
The peoples of the North devote all their time to hunting and breeding reindeer, which is why it is so important for them to have houses that allow them to quickly change their place of residence. When the food needed by the herd runs out or an animal leaves, a person packs up and moves to a new place.
Would you try to transport a stone or wooden house!
This is how yarangas - small houses made of fur - arose. They are specially designed so that they can be very easily and quickly assembled, transported and set up again.
Wooden poles are placed in a circle,
creating a conical dome shape. When this labor-intensive work is completed, the poles are covered with deer skins. The average yaranga usually takes about fifty deer skins. But they still need to be processed (made) first, and then sewn.
It's not easy. Imagine how much work a woman must put into creating a family nest, because almost all the work of making outerwear for it lies on her shoulders.
She soaks the skin and scrapes off the flesh. Then the skin goes through a series of tanning procedures. Interestingly, deer skins are tanned using deer feces.
What a job! What modern city woman would agree to this!
Apply the stool as evenly as possible, fold the skin and wait until it is saturated and dry.
Well, on the other hand, where can you find other tanning agents in the Far North? And maybe it is the best of all.
Then the women scrape everything off the skins and soften the furs, vigorously smoothing them with their feet.
Cooked skins were sewn together with interesting threads. The main breadwinners in the lives of people in the North were deer. Their meat was eaten, clothes were made from their skins, and even threads for sewing skins were made from deer tendons.
At the top, unskinned poles form a chimney for the fireplace directly below.
Inside the outer dome there is another square tent, called the canopy. There is a living space here, it remains warm even in the most severe frost. The canopy was heated with a special grease lamp.
The structure of the northern house turned out to be interesting, very economical - there was no need for a lot of fuel and special super-stoves, the ancestors of the northerners simply built residential thermoses or large sleeping bags.
This dwelling turned out to be so rational that even now reindeer herders use yarangas, despite the abundance of all kinds of modern dwellings. There are no substitutes yet for what the older generations of northerners came up with.
Why doesn't the igloo melt from the inside?
The igloo is a forced invention of the North American Eskimos. If the Arctic had been rich in firewood, the Eskimos might have invented wooden houses. But stingy nature provided them with only snow, albeit in unlimited quantities. The Eskimos sighed and sighed and turned ordinary snow into an extraordinary building materialAn igloo is a domed structure made of snow blocks with a diameter of 3-4 meters and a height of about 2 meters. In deep snow, the entrance is usually located in the floor, and a corridor is dug to the entrance below floor level. In case of shallow snow, the entrance is made in the wall, to which an additional corridor of snow blocks is built. Light enters the igloo directly through the snow walls, although sometimes windows are made of seal guts or ice.
The interior is usually covered with skins, and sometimes the walls are also covered with skins. Fat bowls are used to heat the home and illuminate it.

A good tent and a windproof wall are quite satisfactory for a northern trek, but there are no special winter tents on sale.
Wind-compacted snow is much lighter than ice. This means that approximately three-quarters of the volume of bricks is occupied by air, and it conducts heat poorly. Snow brick looks like a piece of foam plastic and has high thermal insulation properties. But a hut built in severe frost must be thoroughly warmed up. When a fire is lit in a hut, its inner surface quickly melts and becomes smooth. And immediately the melting stops. This film makes the hut warmer, and it also strengthens the roof


The scourge of a winter tent is moisture. The warmer the tent, the more damp it is. The roof of the hut absorbs moisture like blotting paper, even if the hut is too hot
A hut with room temperature inside should melt, but it doesn't. Melting requires excess heat in the snow layer. The snow near the inner surface of the arch has a temperature of 0 degrees, and, in contact with warm air, does not melt, because it is sufficiently cooled through the thickness of the snow walls. Let's say cooling is slower than heating. Then the inner layer of snow begins to slowly melt, but the wall, getting wet, allows the cold from outside to pass through more easily - it removes heat from the inside faster, and the melting stops. The snow dome itself resists melting when heated from the inside. Of course, with mild frost and calm wind, a hut heated to room temperature will melt, but strong frost and wind, having tormented the skier on the way during the day, will preserve the walls of his hotly heated snow house at night

When civilization had not yet reached the Eskimo possessions, many tribes did not know a winter home other than an igloo, and were completely satisfied with it as a permanent home and overnight stay on the road. A building slab made of snow is easily cut with a knife and strengthened in the wall of the structure. Danish traveler-ethnographer Knud Rasmussen writes that an Eskimo alone builds a snow hut for his family in three quarters of an hour.
Here is one of his descriptions:
“The main housing could easily accommodate twenty people for the night. This part of the snow house turned into a high portal like a “hall”, where people cleared the snow from themselves. Adjoining the main housing was... a bright extension where two families lived. there was enough, and therefore seven or eight lamps were burning at the same time, which is why it became so warm in these walls of white snow blocks that people could walk around half naked to their fullest pleasure.