A place for books, souvenirs, and trinkets dear to the heart - this is the main purpose of shelves on the wall. Some have a collection of candles on them, some have volumes of their favorite poet, and some keep photo albums on the shelves. The important thing is that the shelves themselves should be no less aesthetically pleasing than the objects stored on them.
Making a shelf out of wood is the first thing that comes to mind when making shelves yourself. Indeed, this option is the most common.

Wooden shelves are good because of the availability and cheapness of the material, ease of processing, and the ability to experiment with design. And you can start learning how to make such creative designs with a simple and universal shelf, which will not be superfluous in the kitchen, in the living room or in the nursery, and other options for its placement can be considered.
Shelf materials:
- Wooden scraps of different lengths;
- Rope cut;
- 5 furniture panels;
- Wall fasteners;
- 2 rope rings;
- Jigsaw;
- Drill;
- Roulette;
- Pencil.
You need to make holes on the shelves (boards). They should be drilled at a distance of 6 cm from the edge, and 12 cm between each other.
Wooden scraps need to be sawn, their length can be different, but the height needs to be the same. Inside the sawn scraps, you need to drill holes for the ropes (through holes).
The lower knots of the ropes are tied first. The bottom shield (bottom shelf) is strung on them; between the shields along the edges there will be stacks of scraps as a gap between the shelves. It is better to divide all the scraps into parts, and lay out the same number of equal sections between each floor of the shelf.

The procedure is repeated, above the highest shelf on the wall the ropes are tied in knots. This must be done firmly so that the wall structure cannot be deformed either with your own hands or by any other force.
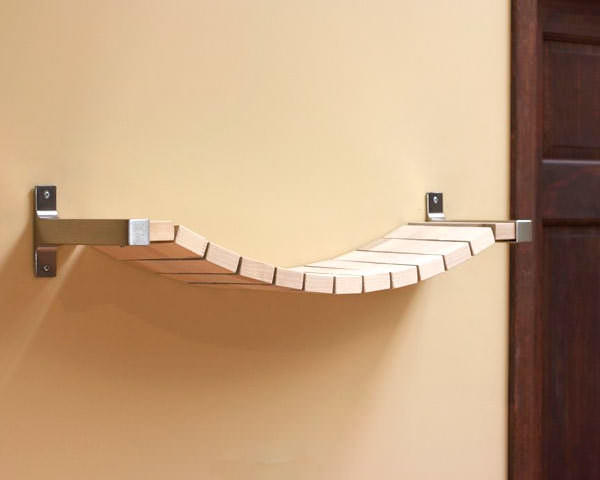
You will get a nice shelf on ropes inside stacks of scraps; you can place it in any room.
DIY wooden shelf, the simplest way (video)
Chipboard shelves on the wall
Chipboard is a particle board, a truly universal material for construction work. The dimensions of the slab and its flat surface allow you to make various designs with your own hands, including wall shelves.
Perhaps only cutting chipboard causes difficulties, since the material is impregnated with resins. The most suitable tool for working with chipboard is an electric jigsaw.


The following tips for working with this material will not be superfluous::
- For wall shelves, laminated chipboards are often purchased;
- Often, self-made shelves are covered with laminated film or paper, imitating various patterns (including natural ones);
- To easily tighten screws and self-tapping screws in a chipboard structure, you need to acquire an electric drill;
- In the kitchen, shelves from this material are often made, as they are convenient for storing containers with spices, cereals and pasta, jars with herbs collected with your own hands;
- In the hallway, such shelves serve as a place to store important household items;
- Such a shelf on the wall in the nursery may serve the purpose of book storage.
In small closets, which are included in the layout of many apartments, you can make original shelves for household needs - with your own hands, quickly and inexpensively.
Round shelves on the wall
Round cardboard shelves for the kitchen or bathroom are the rage in interior fashion. They are usually made from cardboard and plastic pipes, which are cut into circles 10-15 cm wide with a saw. The edges of the circles are sanded with sandpaper, and then future shelves are painted over in several layers.

The results are quite original round shelves, a very interesting design option for the kitchen. You can store in them:
- Kitchen towels;
- Various brushes and sponges;
- Decorative trinkets;
- Herbal bags for making your own tea;
- Other beautiful kitchen gadgets.
In the bathroom, round, unusual and very convenient shelves on the wall will also be appropriate: jars of cosmetics, towels, washcloths can also be stored in these cute shelves.
How to make a round shelf (video)
Square shelves on the wall
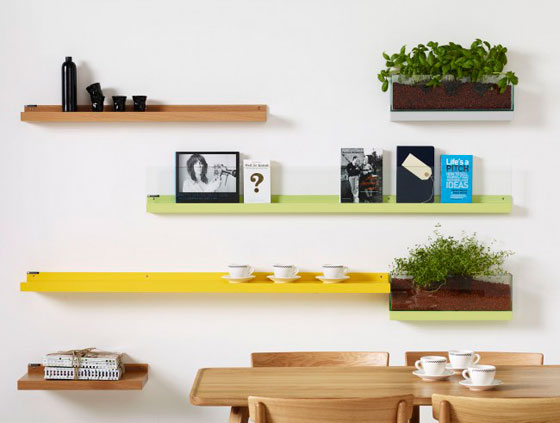
Wall compositions made from square shelves on the wall in the living room look great. Shelves of different sizes are painted in the same color, or perhaps in contrasting ones, and are combined into one wall pattern - small ones with large ones in one line, vertically or horizontally, diagonally.
Square shelves are usually small and difficult to accommodate many items. Most often these are various souvenirs, miniature vases, books.
Often these shelves are decorated with antiques and vintage items.
And to make such an interior decoration with your own hands, you can use standard materials. In most cases, wood is painted with matte bright paint and varnished. Or a self-adhesive film decorates the surface of such shelves.


Small shelves on the wall
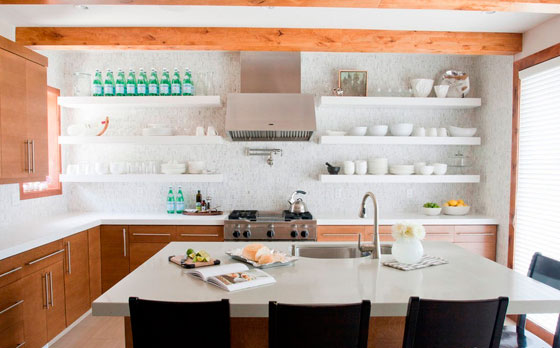
The kitchen wall often requires small shelves. They do not take up space, do not burden the interior, but emphasize the overall mood of the kitchen. A wall shelf can be used to decorate a room.
If the shelf is made for the kitchen, you can place on it:
- Bright spice jars;
- Cookbooks and notebooks;
- Canvas bags with spices;
- Beautiful dishes.
You can make such shelves from wood, plastic, glass, and even a stack of painted and glued books.
Designer shelves on the wall
Such designs are rarely used in the kitchen, yet these exquisite things often decorate the living room, office, and nursery.

Nowadays, wall shelves in the form of:
- Labyrinth;
- Asymmetries;
- Upside-down book shelves;
- Modules;
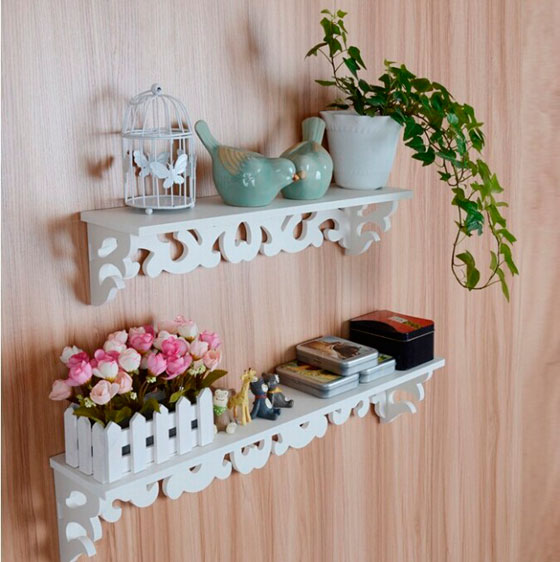
- Forged structures in Provencal style.
Some shelves seem to continue the furniture, some are like protrusions on wallpaper, so they are disguised as a wall. There are fancy shelves that are made to order; they often echo the pattern of curtains or the pattern of parquet.
DIY bookshelf (video)
Conclusion
Shelves for the kitchen, living room, or nursery - you can make all of them yourself, armed with ideas from the Internet and your own imagination. Of course, such designs will outperform their store-bought counterparts due to their hand-made origin. And in monetary terms they can be cheaper.
Examples of shelves for the home with your own hands (photo)


If you need a shelf made of wood, you can make it with your own hands quite easily and quickly. We will tell you how to do this in our review.
Preparatory stage
In order to work on the fabrication task, you will need to prepare a cordless screwdriver. It is necessary to choose a tool with a self-clamping chuck, the caliber of which is 10 mm or more. In addition, you will also need a jigsaw. In order to get smooth edges, you need to purchase woodworking saws. It’s also worth buying a miter box, which can cost around $30. A hammer drill and a set of drills for woodworking will also come in handy. To make the shelf aesthetically pleasing and even, you will need a tape measure and a marker. The process will not be possible without a spatula and brushes. You can make not just hanging shelves, but a prefabricated structure, which involves the presence of hidden fastenings.
Blanks

A do-it-yourself wooden flower shelf can be made using a wooden block with a cross-section of 40x40 mm. The final length will be determined by the number and parameters of the shelves. Prepare plywood, the thickness of which is 5 mm. Europlywood is the most acceptable option, since it is free from all kinds of base defects. Stock up on regular platband, which should have a width of 50 mm and be made of wood. As a final result, the shelves will have to be coated with paint, and if the products have defects beforehand, then you can get rid of them by applying putty. Almost no accessories are needed.
Defining parameters

A self-made wooden shelf can have any size, but in this example we will consider dimensions equal to 800x300 mm. The thickness of the material will be 50 mm. Initially, it is necessary to prepare the elements for the described shelf. For this, a block of two pieces (720 mm) will be useful; a couple more bars (300 mm), as well as plywood in the same quantity (800x300 mm).
Build process

If you make a wooden shelf with your own hands, then you should not assume that it will be just a board attached to the wall using corners, since the structure, as mentioned above, will be prefabricated. Using a pair of short and one long block, the last of which will be the front, you need to assemble the frame. To do this, it is permissible to twist it using self-tapping screws. You can take black ones, 4x80. The main condition is the need to try to make an even pairing.
As soon as the wooden shelf is turned into a U-shaped frame with your own hands, you can attach plywood to it on both sides using staplers. If there is a desire to make the structure as durable as possible, then the surfaces to be fastened in advance should be coated with PVA glue. If the adhesive composition is not used, then additional screws will have to be used.

Now the miter box comes into play. It will allow you to saw down the platband; ultimately, you should get an angle of 45 0. This will allow you to decorate unsightly ends. It also needs to be coated with glue and further strengthened with staples. Instead of such mechanical fasteners, “invisible” nails can be used; this will eliminate the need to putty the surface for a long time.
Shelf surface treatment

Once the shelf has been made from wood with your own hands, you can proceed to work on its improvement. To do this, all irregularities are covered with putty, and after drying they are treated with fine sandpaper. If the painting job involves using gloss paint, primer and sanding must be done with extreme care until a perfect surface is obtained. It is recommended to carry out such manipulations 2 times. This must be done before installing the shelf on the wall surface, since after this it will be very difficult to carry out such work.
Mounting a shelf on a wall
After you have made and painted a wooden shelf with your own hands, it should be left until the composition has completely dried, only then can you begin subsequent work. The shelf, made according to the above recommendations, is a kind of hollow box, which is open only on one side. The remaining block, which is similar to the one located in front, will complete the structure, as well as fasteners. Its fixation to the wall surface must be done using or another similar tool, since you have to ensure perfect horizontality. When working with a hammer drill, you should never allow accidental damage to electrical wiring; you should definitely remember that there may be water supply pipes in the wall, so you need to work very carefully.

A wooden mantelpiece can be made using the same principle. In order to mount it to the wall, it is necessary to fix the rear beam to the surface. It should fit perfectly into the empty shelf space. In order to ensure this, it is necessary to reduce it somewhat. This will make the installation process much easier. At the next stage, the shelf is put on the beam and strengthened through the plywood located on top. This must be done using self-tapping screws. The location of the fastener in this place will not be noticeable, since there will be something standing on the shelf.
If you make one yourself from wood, then you can put various objects on it, the total weight of which is 10 kg, but no more. Dimensions can be chosen independently, which will be influenced by the needs of the owners.
Making a shoe rack
For production with dimensions of 900x350x524 mm, laminated chipboard will be used. The entire structure will consist of a cover whose dimensions are 900x350x16 mm; walls in the amount of a couple of pieces 508x350x16 mm; stiffeners 868x508x16 mm; plinth 868x80x16 mm; bottom shelf 868x334x16 mm; drawer bottoms 868x313x16 mm; shelves in the middle 868x279x16 mm; drawer divider 313x80x16 mm and drawer wall, which will be attached to the front, its dimensions are 868x96x16 mm. The assembly will be carried out on confirmations.
Once the cutting has been completed, you can proceed to drilling holes for confirmations, dowels and shelf holders. Now it’s time to glue the edges. And at the end you can start assembling.

Initially, the side walls and stiffener are fixed. The next step is to add a plinth and a reinforced shelf underneath. Now you can install the drawers into the shelf system. Next comes the top cover, which is installed on the back wall.
The final stage
When you make a shoe rack with your own hands from wood, a photo of the manufacturing process of which is presented in the article (see above), the top cover should be fixed using door hinges. Shelf supports can be installed and a middle shelf can be installed. Holes for shelf holders can be located at different levels, this will allow you to create distances for different shoes, for example, for shoes and slippers. At this point we can assume that the homemade shoe rack is ready. But that’s not all, its surface needs to be refined, for which you can use the same processing method that was described in the case of the bookshelves above. made of wood with dimensions suited to its function, it is relatively easy to make. You can use this technique during the work process. And if you want it to be even more comfortable during use, then its top cover can be covered with foam rubber and then upholstered with thick fabric.
Handmade furniture will add personality and creativity to your home. By making, for example, wall shelves yourself, you can make your wishes and preferences come true as much as possible by choosing the desired shape, color, material and size of the product.
In addition to the fact that they will save room space, freeing it from bulky cabinets, shelves can also become the highlight of the entire interior. So let's figure out how to make shelves on the wall with your own hands.
Wall shelves in the interior
Wall shelves are an indispensable attribute in any home; they are one of the best ways to diversify the interior and save room space; in addition, they are also very functional. For example, in the living room they will serve to store books, photographs, boxes or other small items. The bathroom is the best place to store detergents and cosmetics. In the hallway, shelves on the wall are useful for storing hats, gloves and keys. In addition, you can easily make wall shelves with your own hands; this will require a little imagination and minimal specific skills. If you know how to drive a nail into a wall, then building a shelf on the wall will not be difficult for you.

Types of Wall Shelves
The variety of materials, shapes and sizes has led to the following classification of wall shelves:
- classic
This type of shelves is the most common due to its simplicity, aesthetic appearance and ease of installation. They represent a huge flight of fancy: from simple square to creative asymmetrical shapes.

- corner
This type of wall shelves differs in the method of fastening - it is carried out on adjacent adjacent walls. Most often they are installed in utility rooms and bathrooms.

- hanging
This original way of creating a shelf involves attaching a simple structure to the ceiling using cables or vertical posts.ї

- floor
This wall shelf is a floor support design. This type of product is especially relevant in hallways, as well as large rooms, where you don’t have to think about wasting space.

- open and closed shelves on the wall
Wall shelves can be designed, for example, with or without glass.

Wall shelf mounts
- reliable fixation
Fastening here is carried out using construction dowels or anchors to the walls. This type of fixation is characterized by great reliability and load capacity. The disadvantage is that if you want to dismantle this wall shelf, some problems will arise.
- removable mount
This fixation is also quite reliable, but here the fastening is done using staples and mounting hooks.
- modular or movable fixation
Here, the lower tier of the wall shelf serves as a support for the upper one or vice versa. This design allows for the most optimal use of vertical or horizontal space.
Wall shelf materials
- Wood: plywood, chipboard, MDF and others. This material is relatively easy to work with, it looks beautiful, natural and impressive, and its service life is quite long, especially if pre-processed.

- Plastic. This material is the most versatile; it can imitate both wood and stone, while eliminating their shortcomings.
- Metal. Such wall shelves will be very strong, reliable and durable, but they will hardly fit into a classic interior. In addition, corrosion can also be a problem, so metal products will require special processing and conditions.
- Glass. Transparent wall shelves will create an atmosphere of lightness and comfort in your home. Of course, it will be quite difficult to make a glass structure with your own hands, but if you nevertheless decide to do all the work yourself, then you will have to work with glass for quite a long time and very carefully, especially if various cutouts are planned in the shelf design.

Preparing to create shelves
Before making a shelf, each creator must clearly think through his plan so that the end result does not become a disappointment. Having imagined the shape of the product and its location, it would be advisable to measure the proportionality of the size of the shelf and the place where it will be fixed. After which we draw a conditional drawing of the item being manufactured and, already in the drawing, we think through every detail of it. For initial experience, it is recommended to make an ordinary shelf, which will greatly simplify the process and show the main disadvantages of its installation and manufacture, if any.
The process of making a shelf cannot be called long, but it is not short either. The most pleasant moment in this matter is completing the installation and checking its functionality. So that the finish of the work does not turn out to be a disappointment, you must clearly understand what will be on the product. Things or objects of the same volume can have completely different weights. Therefore, if you are not sure what will stand on it or you have several options that differ significantly in weight, then it would be best to create a shelf for increased loads. The reinforced construction technology is no different from the usual one, everything is the same, only you need to use more durable materials. If it is a wooden shelf, you should take thicker boards and a more reliable mounting frame.
But not every one of you will want to make a wooden shelf, since there are still many materials that allow you to create this item from them. For example, a metal shelf will outperform all possible options in terms of reliability, but creating it and creating its fastening is not so simple, since metal is the hardest of all materials to process.
Tools you may need
To create a wall shelf you will need:
- screwdriver;
- drill
- sandpaper or sanding machine;
- level;
- self-tapping screws;
- screws or small nails;
- pencil and ruler;
- brackets;
- dowels;
- of course, consumables for shelves (boards made of wood, metal or plastic).
Stages of creating a wooden shelf
Having decided to make wooden shelves, you should pay special attention to the materials, namely their preparation. For the durability and reliability of the structure, the board with which we create it must be dry, but if it’s the other way around, then at the moment of drying the object begins to warp, which will significantly affect the shape and strength. It is best to dry the board in stacks and with the help of cinder blocks located evenly on the surface of the board. If you already have a dried suitable workpiece, then it is imperative that you sand it thoroughly. This will not only cultivate your shelf, but also prepare it for the next stage. While sanding the board, it will be very easy for you to determine how well it is dried. Sandpaper that clogs quickly indicates moisture in the wood fibers.
An example of creating a shelf in the shape of a honeycomb:

1.Set the cutting angle of the saw to 30 degrees, which will be used throughout the entire project.
2. Having a figured picket fence, to make the board rectangular in shape, you cut off the decorative element and thereby prepare the first edge.
3. Turning the board over, measure 300 mm from the finished edge.
4. At the marked place, make a second cut, subsequently obtaining the first element of 15.

5.After making all 15 elements, make sure that they all match each other.
6.After this, you check the joints of the parts by simply placing a circle of them next to each other on the floor.
7.The next step will be gluing. Apply glue to the edge of the workpiece.
8.After a few seconds, press the parts for a while.

9.Now, at an angle of 90 degrees, we drill a hole with a 1.2 mm drill to prevent possible cracking and make it easier to screw in the screws.
10. Connect the elements together.
11.Assemble all sections using steps 7-10.
12.Having stacked all the shelf blocks, drill 2 holes side by side, avoiding the already screwed screws, and then twist them.

13.To install internal shelves, it is necessary to measure the distance inside and make cuts at the appropriate angle, and then fasten them.
14.At the end, you need to carefully sand the edges with sandpaper. 
After sanding comes the moment of coating with paints and varnishes. This will not only give the shelf its appearance, but also prevent the wood from darkening. Many people cover wall shelves with stain, because in this case they manage to preserve the appearance of wood, but varnish is also very popular in this matter, after which the original appearance with a shine effect is also preserved. After all the materials have dried, you can begin assembling the entire structure.
Hanging a shelf on the wall
The first thing we need is an 8 mm or 10 mm drill, with which we will drill the wall, and after that we will hammer in a dowel and screw the bracket for our shelves.
The next step is to test the strength of the bracket using the force method, which will make it clear how firmly the entire object will hold.
In further actions it will be difficult to do without an assistant. Having attached the structure to the drilled bracket, you need to center the shelf and mark the place for the second mounting hole. Then we remove the shelf and install the second bracket, not forgetting to check its strength.
At the final stage, we hang our creation on the wall and it’s ready.
In conclusion, I would like to talk about some more important nuances.
- You shouldn’t skimp on additional material, as it can play a cruel joke on you later.
- The length of the nail dowel should be at least 6 centimeters, but no more than 10
- Before installing any of your products, it is worth examining the wall, namely what material it is made of. In a brick wall it is worth drilling holes with a diameter less than the diameter of the dowel-nail. There are separate dowels for each coating, so when purchasing, it is better to contact a specialist.
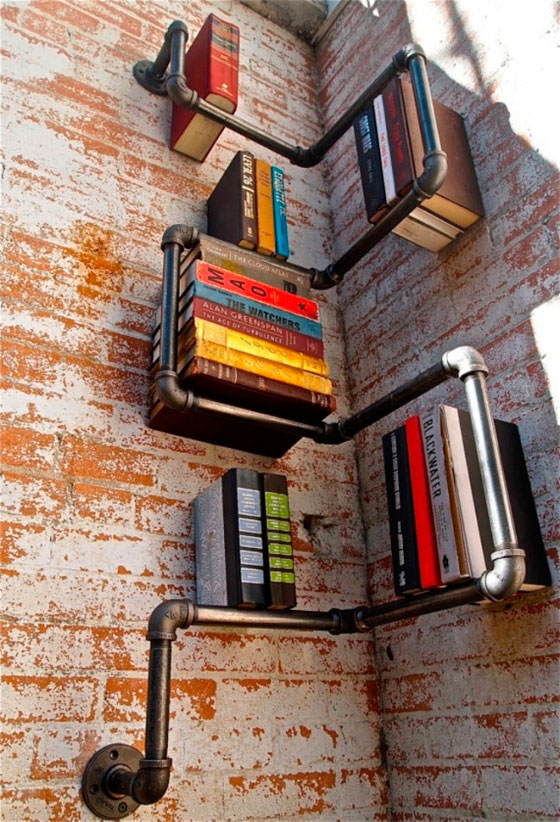
Creative wall shelves made of books
These wall shelves are very original and at the same time require minimal financial costs. To build them, you need to purchase screws, dowels, two large and one small bracket. You will also need a pencil, a ruler, an electric drill for drilling holes and, of course, hardback books. Initially, the intended location of the shelves should be marked on the wall. Then brackets are attached - at the bottom of each shelf there are two large ones at a distance of the length of a book, and in the middle there is a small one, distant from the other two by the thickness of a book. A shelf is inserted between the fasteners; it should be tightly clamped between them.

Such a shelf is unlikely to withstand large elements, but it will come in handy more than ever in a schoolchild or student’s room.
Original shelves on the wall - a second life for old things
If you want to organize an original shelf in your room, look around, you will probably find many elements that are perfect for this role. Old boxes, musical instruments, bottles or other unnecessary things can be used for personal gain.
If you love music, and you have an outdated guitar in your house, then why not hang it on the wall, and not just, but with benefit. To do this, you will need to “gut” it, but “the game is worth the candle.”

If you have a retro-style interior, then a shelf from an old TV will be just right. Having freed up all the internal space, such a shelf will become an excellent container for books and photographs.

You have old licks in the house and you don't know what to do with them. Do not throw them away under any circumstances; they will perfectly serve as wall shelves.
If you have organized a country style in your room, then a wall shelf made from a small ladder will fit perfectly into it. Yes, yes...exactly from the stairs. Only it should be placed not vertically, but horizontally. If you think through everything carefully, then no additional manipulations will be required to ensure that the items stand firmly on such a shelf.

Shelves on the wall made of fabric will look very impressive. To do this, you will need dense material, for example, tapestry or linen, wooden sticks and brackets. Sew fabric pockets, fasten them to sticks and then to the wall.
By making these wall shelves from skateboards, a boy’s nursery will turn into his favorite place.

As you can see, when creating wall shelves you can use the most extraordinary ideas and the most unusual things. Imagine, experiment, and then you can create an interior that you and your guests will never be indifferent to.
Shelves are mounted on the wall not only for the direct placement of books and souvenirs. If you choose the right design for wall shelves, they can become practical and elegant room decoration and an opportunity for you to express your creativity.
Shelves are mounted on the wall not only for the direct placement of books and souvenirs
Furniture such as wall shelves has its own classification. Types of wall shelves are combined according to installation location, materials and design. By type of installation the following can be distinguished:
- Classic wall shelves. An ordinary type that is hung over furniture (sofa, table) using standard holders. They are quite simple to make, so you can make them yourself.
- Hanging. They differ from wall-mounted ones in that they are not attached to the ceiling with chains, rope or belts.
- Angular. As a rule, they have a triangular shape, which is mounted on two walls. They can be located both on the inside and on the outside of the corner. The best option for small spaces.
- Floor shelves. They are ordinary racks or shelves with legs. They can be attached to the wall if they are narrow and unstable.
- Modes. Unusual shelves on the wall, having a variety of abstract shapes. They can not only have an original design, but also be placed at an angle to the wall.

Based on the material, wall shelves are divided into the following types:
- wooden;
- glass;
- metal;
- combined.

Options for the living room
This room is the place by which guests evaluate you. Shelves in the living room can be of any shape and size. The more unusual the design, the greater the chances of surprising guests. You can borrow ideas from interior designers or come up with your own. You can install square shelves in a high-tech style or long wooden ones, elaborate and simple, stylized in the Victorian era or country.

If you are planning to make wall shelves for flowers, it is worth considering the peculiarity of the material: it must withstand plant pots. If their dimensions are small, you can use wood or durable glass; if large, it is advisable to use metal.

The first design option for flower shelves provides for a more strict design. You can hang 2-3 hexagon-shaped hanging shelves on the wall. It is not recommended to place them on the same level; it is better to install them at a distance of 20-30 cm from each other. If there are a lot of shelves, you can install them according to the honeycomb principle, the main thing is that there are small distances between them.

The second design option features heavy, durable shelves that can support large, hefty pots. You can hang a shelf on the wall in the form of elegant forged steps. The areas of the steps themselves will serve as flower stands.

The third floral option is simpler, suggesting a cozy arrangement of small plants. Wood painted white is best suited for this.
How to make cardboard shelves (video)
Office shelves
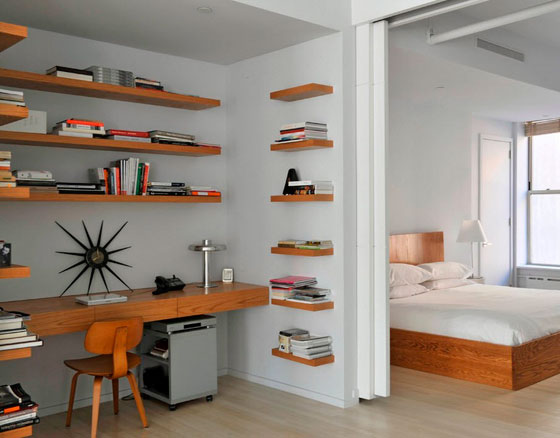
The overall interior of the work space, as a rule, should create a serious business environment. Bookshelves can be one of the elements of the proper atmosphere. In this case, it is recommended to use rectangular shelves made of dark wood. If the overall color of the interior is not suitable for this, you can use light wood. Whether they will be single-tiered or double-tiered depends on the taste of who will work in the office.

If the dimensions of the room allow, the placement of shelves above the table will be successful. This will make the atmosphere more formal.

An ideal option for an office would be to install shelves for paintings. If the images are heavy, very strong wooden mounts are necessary, as metal or glass racks will not work for the pictures. When choosing shelves, you should consider the design of picture frames. You can hang a lot of shelves or just put shelves for books, turning your office into a library.

Kitchen solutions
Installing decorative shelves in the kitchen is much more difficult, since in this room most of the space is occupied by shelves for dishes and food. In this case, you can use unusual alternatives.

The original shelves in the kitchen include hanging models that will be installed above an oblong table, if there is one in the room. You can install a shelf that will hold glasses.
Considering that there is always little free space in the kitchen, modern ideas involve installing a special pull-out rack in the narrow space between the refrigerator and the wall. Supplies that do not require keeping in a cold environment can be placed there.

Shelves in the kitchen are hung for decoration only if they take up little space. The best option would be to install small shelves for flowers above the table if the table is located against the wall.

For the bedroom
You should not place bright and massive shelves in the bedroom. Soothing, beautiful bedroom decor elements will look cozy and bring pleasant thoughts before bed. If the owners read at night, they should install simple shelves above the bed. It is advisable to use wood furniture in a light, soothing tone.

Interesting shelves for the bedroom will be glass models installed in the spaces between the windows or on the wall in the opposite place. In the latter case, glass structures can be installed in the shape of circles, when the lower shelves increase as they approach the middle and decrease as they rise to the top.

Other rooms
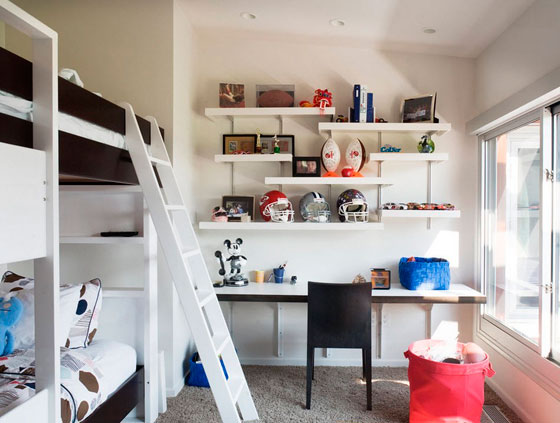
Wall shelves in the interior of a children's room should be small, but functional, possibly with drawings. Images can be made using wallpaper that is used to cover the shelves.

A shelf in a children's room will look beautiful if it is stylized with several letters. In this way, the child will learn the alphabet. Such models are equipped with partitions, so that they can accommodate both books and toys.

An original shelf on the wall in a children's room will be furniture stylized as wood. The trunk will act as a partition, and books and other things will be placed on the branches. Shelves for children's rooms are often purchased with soft rounded edges and corners so that the child does not get hurt when he accidentally hits them.

Shelves in the hallway can also have an unusual design. Wall shelves in the hallway should primarily contain sections for shoes in the lower section and upper sections for storing important small items.

It is better to make shelves in the hallway interior from dark material. The color will mask the dirt and dust of unclean shoes. Plastic trim, unlike wood, will not swell when exposed to moisture.
DIY plywood wall shelf (video)
With your own hands
DIY wall shelves are not as difficult to make as they seem. It is better for novice craftsmen to make shelves from wood. The set of tools is standard: jigsaw/saw, abrasive sandpaper, drill, screwdriver/screwdriver, screws, wood varnish and square. Before starting work, be sure to familiarize yourself with safety precautions.

It is better to make a shelf on the wall with your own hands by starting with calculations. For a book model with partitions and a top cover, you will need 6 boards: 2 x 50 cm (for the side walls), 2 x 96 cm (for the bottom and top) and 2 x 26 cm (for the partitions). Each of them is made 2 cm thick. The boards are sanded and fastened with a screwdriver. You need to make sure that all screws go in straight. When screwing in the partition boards, you should get 3 cells. You need to make sure that they are all placed proportionally. When the partitions are ready, the side walls are attached. Here you need to screw in the screws from the side, top and bottom. To ensure that they are placed correctly, it is advisable to use a special angle screw with holes, which will indicate the correct placement of the holes.

When the homemade book keeper made from boards is completely screwed in, you should remove the sharp corners and sand the entire structure with abrasive sandpaper to eliminate all imperfections. Then the shelves are completely varnished in 3 layers. Each of them dries from 16 to 40 hours. When the shelves are varnished, holders are installed at the back, thanks to which they will be attached to the wall.
Attention, TODAY only!
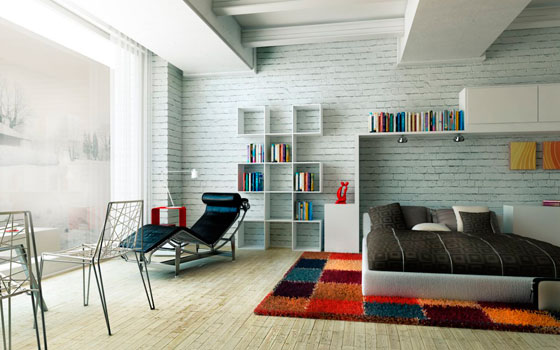
Wall shelves in the interiorThey play not only a functional role, but can also decorate a living room, kitchen and even a corridor. For some interior trends, in which the emphasis is on minimalism, decluttering,shelves on the wall in the interior- a real find.
They do not burden the situation and are not conspicuous (unless they are particularly flaunted). But the room immediately becomes habitable view - It’s cozy and comfortable.
Wall shelves are considered a primitive interior detail. Yes, you can’t fold clothes, dishes, or home textiles on them. But for these things there are furniture: wardrobes and chests of drawers.
The shelves are elegant and light. And thanks to their peculiarity (they are hung on the wall), they can be any shape and type:
- square or rectangular;
- rounded or circular;
- straight;
- tortuous;
- solid;
- on the same level;
- multi-level;
- perforated.
And this is not counting the material from which they are made: plastic, glass, metal, wood, stone.


Shelves can come in a variety of shapes
Unlike cabinets, shelves can be given any design, even the most imaginative. They look interestingwall shelves reminiscent of stone , wavy shelves or imitating an animal, object, car.


Shelves can be made of various materials: glass, wood, metal, or stylized as stone
Often designers use ready-made niches and build shelves into them. If there is not enough space, use corner shelves. You can place objects on them decor.
Hanging shelves in the room
Wall mounted shelves fit into any interior premises.
Bathroom
On the shelves in the bathroom There are shampoos and many other tubes, jars, and bottles.
On wide shelves Convenient for folding towels.
The convenience is obvious - there are no smudges on the doors of cabinets and cabinets, since everything you need is located on open surfaces.


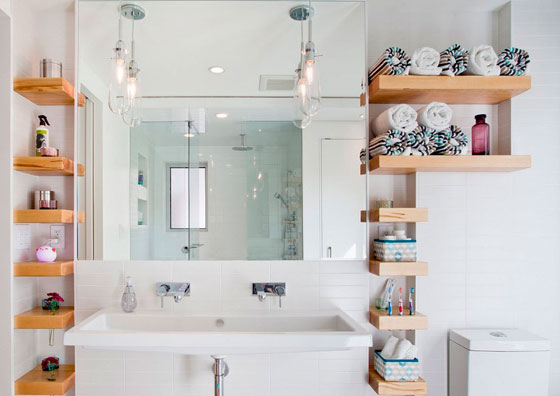
Shelves in the bathroom - a functional and aesthetic detail
Hallway
Here you can place your cosmetics, put your keys, and your phone.
They are often located next to or under the mirror.


Wall shelves can add zest to the interior of the hallway
Kitchen
It is more convenient to take jars of spices, coffee, tea, and cereals from the shelves than to dive into the closet for them every time.
Can be usedwall shelves in the kitchen interior for flowers or displaying beautiful dishes.


You can place spices, flowerpots, and beautiful plates on the shelves. And beautiful, and convenient, and affordable
Children's room
Wall shelves for children's rooms s are an excellent solution for establishing and maintaining order.
Kids toys, books , disks, and other small items are more convenient to take out from the shelves than from the cabinet. Otherwise, defeat is guaranteed.
The only condition is that the shelves must be strong, and the fastening to wall - reliable.


Wall shelves make it easier to keep your child's room organized
Teen room
This is the same children's room, only the child's interests have already changed.
On the shelves there are cups, posters or framed photographs of actors, singers, families, books, CDs, stacked magazines, and audio equipment. And anything else that the teenager deems necessary.


There would be shelves, and teenagers would decide for themselves what to place on each of them
Bedroom
The bedroom is the place where comfort is created by details.
A beautiful vase, aroma lamp, candle, books, flowerpot, various cute little things and, of course, photographs. Having shelves is a must.


Wall shelves in the bedroom look light and do not steal free space
Study or library
The very purpose of the room prompts you to think about what to put on the shelves.
The most common thing for a library iswall bookshelves. But you can put not only books on them, but also portraits or busts of writers, candlesticks, etc.
For the office - not only books, but also photographs, diplomas, framed certificates, figurines, cups and other business paraphernalia.
If this is a home workshop, atelier, then with the help of built-in or hanging shelves you can organize fabrics, magazines, accessories, display ready-made handicrafts products .


In addition to books, you can put on the shelves everything that the owner of the office considers necessary
Living room
Wall shelves in the living room interiorcan be adapted to anything. The main thing is that they are beautiful, stylish, match the interior of the room and do not weigh it down.
These can be books, collectible models demonstrating your hobby, vases, candles, candlesticks, figurines, dolls, baskets with handicrafts and much, much more.


For the living room, wall shelves are an opportunity to show guests your hobbies, photo gallery, interests and preferences.
Wardrobe or pantry
Depending on the purpose of the room, the shelves contain clothes, accessories or pickles, marinades, household utensils that are not needed at the time, tools and other items.
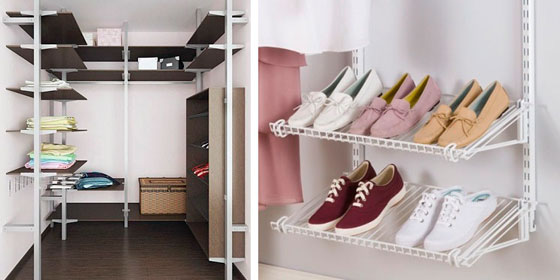
Wall shelves in the dressing room allow you to put all items in their places

It’s much easier to get supplies from open pantry shelves. And monitor their availability as well.
Corridor
“A strange place for shelves,” you say. But no. The corridor is also a functional area. Just choose the right depth of the boards.
And even better, if the width of the wall allows, make it niche . Get economical in terms of spaces a built-in book shelves or photographs, candles. You’ll save space and decorate the corridor.
Some shelves can only be decorative . Attach a long, curved branch or root to the wall and your interior will instantly transform.


Wall shelves in the hallway. Use height space
DIY wall shelf: instructions
Shelf from a twig - this is the simplest option . You can turn on your imagination, apply knowledge, skillful hands and create a masterpiece.
Let's look at one of the options for creating one. And following the example, you can already do anyoriginal wall shelves.

Variations of shelves. Complex and easy to implement

Shelf of suitcases - unusual and stylish
Stage 1. Decide on the purpose of the shelf
The choice of material depends on what will stand on it.
Yes, on glass shelves, made of plastic or drywall Do not place heavy objects. In this case, it is better to make wooden ormetal shelves.
Stage 2. Draw a sketch
Style the shelves should fit perfectly into room design . You can come up with your own sketch or be inspired by the posted photo examplesopen models shelves
Stage 3. Materials
You need to prepare:
- shelf material;
- ruler, pencil;
- sandpaper;
- spirit level, also known as level;
- nails or screws;
- hammer or screwdriver;
- drill;
- self-tapping screws;
- dowels They are selected depending on the wall material;
- glue;
- brackets;
- the drawing itself;
- varnish or stain.
Stage 4. Creating a wall shelf
We will make a wooden shelf, similar to a honeycomb in a bee hive.
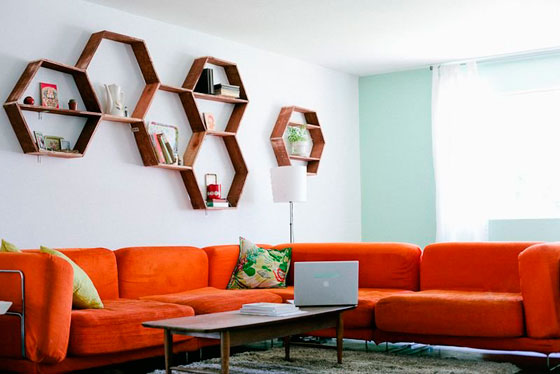
Making a shelf in the shape of a honeycomb
Important!The tree must be well dried.
You can prepare the elements yourself, but it is better to order the parts to be cut at a sawmill or from a familiar carpenter. You will need 25 parts. Narrow edges should be cut at an angle of 30 degrees. The length of each part is 30 cm. The depth is arbitrary. In order to ensure correct cutting, you should fold one cell of 6 parts. The rest of the details should be the same.
- Apply glue to the narrow edge.
- Press the parts and hold for the required time.
- Drill a hole at a right angle.
- Connect the parts with self-tapping screws.
- Lay out the cells on the floor and assemble them all with screws into a single composition.
If there is an additional shelf inside the honeycomb, you need to measure the cutting angle, the length of the shelf and order cutting of the required parts.

Glue the parts to each other

We screw the parts. This will make the shelf stronger.
Stage 5. Exterior design
First you need to sand the edges of the shelves.
Then cover with stain or varnish. These materials can be transparent or colored.

Carefully and carefully sand the edges of the shelves
Stage 6. Attach the shelf
Mark on the wall the place where it will hang design .
Drill holes with a drill.
Drive in the dowel (chop) and screw the brackets.
Check if the brackets do not fall out if you press hard on them.
Calling a family member or neighbor for help, attach the shelf to the wall, securing it to the bracket, and make a mark for the second mounting hole.
Install another bracket. Its strength also needs to be checked.
Hang the shelf on the wall.
Ready.
Using this example, it is easy to make any other shelf.