Due to the presence large quantity flowers on modern areas Information about decorative vessels for placing pots becomes relevant. Many craftsmen make floor or hanging flowerpots for the garden with their own hands to save money and add originality. It is proposed to consider several options for the design of such containers.
Product made from wooden sticks
The option of using tree branches is very economical, therefore it is actively used in design projects. Although the price of finished products is low, the aesthetic characteristics are at the proper level. Next, the technology for manufacturing this is discussed.
Materials used
- Small sticks made from tree branches will act as the main components.
- Thick rope will be required for fastening basic parts designs.
- A plastic pot will serve as a container for soil.
- Burlap will allow you to hide the main container for the earth.
- Glue will be needed to secure some components.
Manufacturing process
When the materials are prepared, you can begin to make a garden planter with your own hands. There are no particular difficulties here, so you are unlikely to need help during the work process. It is quite possible to carry out all operations by one person.
Below are step-by-step instructions.

- First, even sticks of branches approximately 20 cm long are cut. Their number may vary depending on the diameter of the pots being made.
- The components are neatly connected to each other using a tight rope that is pulled from above and below. Each fragment must be connected by a knot.
- Next is preparing plastic pot . It is wrapped in a piece of burlap. Fixation is carried out using a special adhesive composition, which has good adhesion to slippery surfaces.
- At the final stage, the fabric made from wooden sticks located around the pot directly on the burlap. The ends of the ropes are connected to form a beautiful bow.

Note!
To make the wooden canvas stick better, you can glue it to burlap.
Then the finished flowerpot can be used even in harsh weather conditions.
List of materials
- Polymer plaster to create the basic structure.
- Strips of fabric having a width of 100 mm.
- Flexible wire is needed to form the frame.
- Water-based paint for decoration.
- Acrylic varnish designed for outdoor use.
Manufacturing technology
Take a plastic bucket and place it upside down on a flat surface. A wire frame is woven along it, which is carefully removed after manufacturing. The edges of flexible elements must be neatly tucked so that the structure has an aesthetically attractive appearance.

After this, the plaster is diluted. Its consistency when ready for use is usually similar to thick sour cream. Pre-prepared strips of fabric are placed in a container with the solution. They should be left in the container with the mixture for about 2-3 minutes so that they are completely soaked.
With the help of soaked pieces, a wire frame is covered with inner and outside directly in layers. Its thickness should reach 15-20 mm. The remaining mixture is used to coat the side walls. After 12 hours the product is covered water-based paint, and only then - varnish.
Pots from a tin can
Creating a decorative element in this way makes it possible to save time and cash. The main expenses go only to the acquisition paint and varnish materials. As for the remaining elements, they can be found without much difficulty.

Feedstock
- Tin can for paints and varnishes or food products.
- Thick rope 10 m long for the hanging part.
- A primer will be required to improve the adhesion of the coating to the surface.
- Acrylic paints in the desired colors.
Sequencing
To make a flowerpot that will decorate the garden, you need to familiarize yourself with the procedure for carrying out the work.
The sequence of main manufacturing activities is given below.
- The label is removed from the tin can, after which the remaining adhesive is removed with a solvent.
- A primer is applied to the surface, which will improve adhesion to the paint and protect the base from corrosion.
- The product is coated with several layers of colored decorative composition.
- After a couple of days, an additional layer of varnish is applied to the surface of the finished pot.
- At the last stage, the rope is cut into pieces of 100 cm, and then the entire shock is collected into a knot at a distance of 150 mm from the edge.

Addition!
If necessary, you can apply a decorative design to the painted jar, which will contrast with the main background.
Contours can be highlighted with a marker.
Finally
The most discussed above simple options Even craftsmen with little experience could make flowerpots. Over time, you can learn to make real works of art, but you should start with simple and economical designs. The video in this article will help you master the basic principles of manufacturing decorative elements for flowers.
Potted and hanging plants is now at the peak of popularity in landscape design. Vases, pots, hanging flowerpots with armfuls of bright flowers decorate terraces, balconies, patios, and paved paths. Do you want to decorate your plot in the same way, but all the flowers are already planted in primitive plastic pots? There is no need to buy new, expensive flowerpots. There is an alternative: you can make original flowerpots with your own hands for the garden, and then install old pots with plants there. AND garden composition will be transformed!
Let's look at a few simple ideas For self-made flowerpot.
A simple planter can be made from small mirror tiles, which are sold in construction stores. For one product you will need 5 tiles and a glue gun.
Mirror tiles used for wall cladding, but can also be used for making flowerpots
The first tile is laid on flat surface(table) mirror side down - it will be the base of the flowerpot. The remaining 4 tiles are applied perpendicular to its sides and the joints are fastened with glue. After the glue has dried, place a pot with a plant in the flowerpot.
The mirror planter does not need additional decorations. It looks stylish in itself, and, thanks to its ability to reflect surrounding objects, it is not at all boring.

Mirrored flowerpots look stylish and expensive in any interior
Option #2 - wooden planter made of timber
This idea will certainly appeal to home woodworkers who know how to handle timber.
For an original hanging planter, you will need 24 bars 15-20 cm long. Laying them in a checkerboard pattern, they form a square box with through holes. The bars are connected with nails or self-tapping screws. Ropes are tied to the bars at the corners of the upper edge of the flowerpot and the homemade flowerpot is hung on any tree in the garden.

Wooden planter similar to hanging swing, will “hold” a whole flowerbed with pansies(violas)
Option #3 - coconut pots
Exotic flowerpots can be made from coconut shells. They will look especially harmonious blooming orchids.
To begin, cut the coconut. At one end of the nut, in the area of three dark “eyes,” holes are made with a knife. The juice is drained. Use a grinder to cut the nut crosswise. You can do this in the middle of the nut - then the output will be two flowerpots. Or closer to the end, so that a deep flower pot is formed, looking like a pot-bellied vase.
After the coconut dries, cut off all the inner flesh with a knife. Closer to the upper edge of the pots, use a drill to make 3 holes for hanging. Ropes, wire, chains or special metal hangers are threaded through the holes.

Coconut flowerpots can be left in their original form or varnished for durability
Option #4 - pots made of burlap (tarpaulin, felt)
Thick fabric, such as burlap, is perfect for making pots in a rustic country style. All you need to do is cut two pieces of fabric in the form of a semicircle or square, sew them together like a pocket and hang them on the fence. For hanging, you can use a strip of fabric sewn to the top edge of the flowerpot or wire threaded into the fabric.

Unpretentious garden annuals are planted in felt pots: petunias, calibrachoas, lobelias, etc.
Option #5 - vinyl planter made from a record
Vinyl planters were very popular during the era of Soviet shortages. Then they forgot about them - and in vain! It is impossible to find such unusual flowerpots with curved edges on sale. Therefore, after spending literally half an hour of time, you will find a truly original thing.

Planter made of gramophone record, decorated acrylic paintings
Necessary materials:
- gramophone record;
- jar, pan - for molding;
- acrylic paints;
- Thick household gloves - to prevent burns.
Execution steps vinyl planter:
- The plate is placed on a plate.
- A jar or pan of the same shape and diameter as the future pot is placed on top of the plate.
- Place the entire structure with the plate in a preheated oven for 1-2 minutes.
- The plate will very soon begin to soften and melt. As soon as this process becomes noticeable, the plate is taken out and by hand (remembering to wear gloves!) they begin to form the edges of the flowerpot around the jar installed in the center. If the workpiece begins to harden quickly, then it is placed in the oven again, softened and molding continues.
- While the plate is still soft, use a screwdriver to make 3 holes in the walls of the flower pot to install the suspension. Special pendants made of thin metal chains look the most beautiful in this quality.
- The finished cooled pot is painted with acrylic paints on the outside and, if desired, on the inside. When painting, you can do it yourself or use special templates for painting.
Option #6 - plant pots made of sticks or branches
This planter with the most natural appearance will fit harmoniously into the garden interior.

Flowerpots made of branches - an impressive design for any plastic pot
Materials used:
- branches or sticks;
- tight rope;
- sackcloth;
- glue;
- ready-made plastic pot.
Technology for making pots:
1. Even sticks, twigs, and stems of bamboo are cut into pieces of the same length - about 20 cm. The number of branches used depends on the diameter of the planned flowerpot.
2. The branches are tied together at the top and bottom to form a single web. They do it like this: tie a knot on the first branch, lay the next branch - again a knot. This continues until all the branches are connected together.
When creating a wooden canvas, two knots are tied on each branch
3. Wrap a strip of burlap onto the plastic pot you are using and secure it with glue gun.
4. A wooden sheet of branches is wrapped around a pot with a plant, the ends of the ropes are tied along the edges of the sheet.
You can tie two bow knots made of thick twine on a wooden plant pot as decoration.
Option #7 - tin planter from a jar
Spectacular hanging planters for the garden can be made from completely waste material - old tin cans, for example, from canned food or drinks.

Metal plant pot made of tin can Can be used as a garden vase for cut flowers
To make one such pot you will need:
- can;
- tight rope - 10 m;
- white primer-paint;
- acrylic colored paints.
Operating procedure:
1. Remove the label from the jar and clean off the glue.
2. Apply white primer paint to the surface of the can. It will cover the metallic color of the tin and will serve as protection against corrosion.

The jar is painted with a white primer
3. Cover the jar with several layers of colored paint, achieving a rich color. Each subsequent layer is applied after the previous one has completely dried.

Apply a layer of bright yellow paint
4. Make a decorative drawing - first draw its outlines with a marker. You can draw by hand or use paper stencils.

The stencil simplifies the execution of the planned drawing
5. The drawing is painted over with a bright color, preferably contrasting with the background. The contours can be additionally marked with a marker.

6. After the flowerpot is completely dry (1-2 days), a transparent varnish is applied to its surface.
7. Finishing touch- making a rope hanger. To do this, the rope is cut into 10 pieces of 1 m each. The entire pile of ropes at a distance of 15 cm from the edge is tied with one knot. This node will be located under the center of the bottom of the planter.
After this, adjacent ropes are tied in pairs so that the knots fall on the border of the bottom. In other words, if the diameter of the bottom of the jar is 16 cm, then the knots are tied at a distance of 8 cm from its center. At the height of the middle of the pot, adjacent ropes are again tied in pairs, and then again along the upper edge of the pot.
From above, all the ropes are tied into one large knot - the mesh suspension is ready. A tin pot is placed in it and the beauty is hung in the “had made” style on a tree branch, a nail nailed to the wall, etc.
Option #8 - swan pot made from a bottle and putty
Floor-mounted decorative flowerpot for the garden, not inferior in beauty to expensive ones ceramic products, can be made in a couple of days from available materials.

Swans made from putty - spectacular garden planter figures
To work you need to prepare:
- plastic bottle – 5 l;
- small pieces reinforcing mesh;
- metal rod;
- starting putty (gypsum);
- water;
- bandage;
- oil paint;
- sand.
Step-by-step manufacturing instructions:
1. Cut off one side plastic bottle, screw the neck with a lid.
2. Place the bottle on a flat surface and fill it with wet sand. They try to compact it large quantity sand to expand the internal capacity of the bottle.

Sand is poured into the bottle to fix the convex shape of the flowerpot.
3. Bend the rod in the shape of a two (swan neck) and secure it in the cork.

The swan's neck is made of a thick metal rod
4. Mix the putty in water, lay a layer of thick solution on work surface(pre-covered with film). A bottle of sand is placed on the solution, and excess putty is pulled up with a spatula.
5. Form the beginning of the neck. To do this, a layer of putty is applied to the neck of the bottle and the beginning of the rod.

The beginning of the neck is formed with putty, smoothing the lines with a wet brush
6. A layer of solution is also placed on the walls of the bottle with a spatula, and the surface is leveled with a wet brush.

Putty is applied over the entire outer surface of the bottle, applying a layer of up to 2 cm
7. For the wings, use two meshes measuring 15x30 cm. They are slightly bent and fixed on the sides of the pots with putty.

To secure the mesh, it is better to use plaster instead of putty - it will harden much faster, literally in 5-10 minutes
8. After the mesh is glued, apply a “feather” of putty with wet hands.

The plumage is formed with short strokes on the putty surface
9. With wet hands, spread the solution around the rod, forming a neck.

10. As work progresses, wrap the rod with a wet bandage.

The bandage serves to additionally secure and fix the putty on the rod.
11. Make a tail from a small mesh, also covering it with putty.

It is also better to use a small amount of plaster to secure the ponytail.
12. Eliminate all defects: add putty where necessary, level the surfaces with a wet brush.

13. After the putty has dried (2-3 days), the surface is cleaned with sandpaper.
14. Apply a layer of primer to the pots for painting.
15. Cover the swan with white enamel, bright colors decorate the beak and eyes.

Final decorative look the pots acquire after covering the putty surfaces with enamel
Option #9 - using the decoupage technique
Any clay, plastic or metal flowerpot can be changed beyond recognition by using the decoupage technique on it. This technique involves decorating household items appliques made of thin paper, most often from napkins. After varnishing, the texture of the appliqué visually merges with the surface of the product, becoming similar not to paper shreds, but to a beautiful hand-painted painting.

The decoupage technique allows an old pot to find new life
To make flowerpots using the decoupage technique you must have:
- flower pot– plastic, ceramic, metal;
- napkins with a pattern;
- PVA glue;
- clear nail polish;
- acrylic paints;
- brushes or foam sponges.
The process of decorating work:
1. Find a fragment you like on a napkin and carefully open it. It is necessary that the edges are as uneven as possible - then they will be invisible on the finished product.

Fragments from napkins must be torn off carefully so as not to damage the pattern.
2. Separate the top, thinnest layer from the cut fragment.
3. Dilute PVA glue in water in a ratio of 1:2.
4. Place the fragment on the surface of the flowerpot and apply it on top with a brush glue solution. Carefully straighten the fragment with your hands or a sponge and press it to the surface.

Instead of PVA glue, you can use special glue for decoupage to glue fragments
5. All other fragments are glued in a similar way to create general composition.

Floral motifs are the most popular when decorating flower pots using the decoupage technique.
6. After the glue has dried, you can add drawn elements to the composition. For example, add paint to an ornate pattern, sign the “work” with your name, or add a bright edging to a flowerpot.
7. At the end of the work, when the paint and glue are completely dry, the surface of the pots is coated with varnish in 2-3 layers.
The garden will be wonderfully transformed if you decorate it with handmade items. Greatest Satisfaction garden designer receives if you manage to combine beauty and benefit. From this point of view, the most advantageous decor is outdoor flower pots and flowerpots, which will not only decorate local area, but will also shelter your favorite flowers.
Vases made from tires
Gloomy tires rarely fit into garden design. But it’s really possible to decorate them beyond recognition. For example, imitate brickwork.
A decorative flowerpot-well is built from tires, timber and metal tiles
Unique flowerpots made from tires are made quickly.
Step-by-step instruction:
- Draw a cut line on the side of the tire with chalk.
- Use a knife to cut the tire along the marked line.
- Turn the tire over, press down on the inside with your foot, grab the edge and pull up and towards you.
When cutting with a knife, the blade should be wiped with grease or machine oil for better glide.
Cover the rubber with primer and apply the design.
For an outdoor flowerpot, oil or acrylic paints are used
For complete camouflage, apply a mesh to the tire, then thick cement mortar with sand and stick the tiles.
A tire pot lined with tiles or pebbles looks very stylish
Photo gallery: decorating flowerpots made from tires
Draw a landscape on the tire and plant hostas. A bright flowerpot in the shape of a parrot will decorate an unsightly place. Flowerpots in the form of cups look very elegant. Place a flowerpot from a tire in the shape of a teapot in dining area Flowerpot made of tires green tones fits organically into any landscape A pot made of a tire in the shape of a cup is suitable for hanging plants
Making a flowerpot from a tire - video
Flowerpots made of plastic and glass containers
Ordinary garbage will serve the purpose of beauty, for example, various containers. Plastic instantly transforms if you cover it with twine.
Any waterproof glue is suitable for gluing twine to an outdoor flowerpot.
A great option is burlap decor.
Rough burlap highlights the fragility of flowers
Branch trimmings will also reliably hide the plastic.
The branches are glued to the flowerpot with glue or tied with twine
Apply a pattern to the pots with hot glue and cover with acrylic paint.
To create a three-dimensional pattern you will need a heat gun
Or place the bottles in gift bags.
Flower pots from gift bags - quick way refurbish plastic bottles
By cutting off part of the canister, create a planter for the wall.
The surface of the canister is smeared with glue and sprinkled with sand to create the effect of a “sandy” face
Secure glass bottles to the fence and plant juveniles and sedums in them.
To trim glass bottle, wrap it up copper wire at the cut site, heat the ends with a lighter and place them in cold water
If you cut a plastic bottle in half and glue the neck to the bottom, you will get an original flowerpot.
If you paint a flowerpot with silver or gold paint, you will get the feeling that the flowerpots are metal
Flowerpot made from a plastic bottle - video
Flowerpots in the shape of funny characters made from plastic containers
Invite children to help create unusual pots.
Garden flowerpots are created from any plastic containers
DIY pig pot - video
Flowerpot made from bottles
A mini flower garden made of glass looks great. The base (bucket or tire) is coated with thick cement mortar and sand. Rows of bottles are then laid by pressing the necks into the base solution.
Think about the location of the flowerpot in advance, because it is difficult to move it
Plaster plant pots
Come into fashion environmentally friendly materials. Gypsum is famous for its best plastic properties. Strips of fabric soaked in gypsum solution are wound onto any container or wire frame until required thickness walls
When the product is dry, it is sanded, primed, painted or decor is glued to the walls.
When making flowerpots, gypsum can be replaced with putty or alabaster
Pebbles, shells, and tiles are used as decoration. If you mix gypsum with color desired color
, we get colored seams
Pot-swan
- Bird figures will add a romantic touch to the garden. For a flowerpot in the shape of a swan you will need:
- gypsum - 5 kg;
- plastic bottle 5 l;
- leg-split;
- wire;
- bandage;
- mesh for wings and tail;
- primer;
- paints (white, black and red);
- putty knife;
- brush;
emery.
Step-by-step instruction:
- It is convenient to mix plaster with a special spatula
- Cut off the side of the bottle and pour sand into the resulting container.
- Insert one end of the wire into the neck, bend it and wrap it with twine along its entire length. Apply with a spatula gypsum mortar
- a layer of 2 cm on the surface of the “skeleton” of the future bird.
- On the sides of the body, press the reinforcing mesh (wings) at an angle.
- Form the head and beak by wrapping the wire in bandage and applying layers of plaster. Smooth out any unevenness with a brush.
- Attach a tail from mesh and process it like wings.
Dry the figurine for three days, then sand it with sandpaper. Cover the bird with primer, wait until dry and paint.
Making a swan pot is not as difficult as it seems
Making a swan pot - video
Pots from a barrel
Large containers will also come in handy. For example, iron barrels are stylized to resemble human figures.
Ampelous plants that fall beautifully are planted in flowerpots made from barrels.
Or sheathed with wooden slats.
The planks are attached with a nail gun
Wooden barrels are cut in half crosswise.
You can make two flowerpots from one barrel
The cut barrel is placed on a stand so that it lasts longer
Homemade pots from a barrel - video
Pots made from unnecessary things
You don't have to throw away everything that's worn out.
Even blatant trash can be given a second life
Sometimes a pot made from old things becomes the highlight of the garden.
An exquisite flowerpot is made from a birdcage
An old umbrella will be transformed if you plant flowers in it.
To keep your umbrella decorative longer, simply place pots of plants in it.
Photo gallery: flower pots made from old things
Cut an old basketball in half Leaky watering cans are not suitable for watering, but will become a decoration for the garden Paint old colanders and plant hanging flowers in them Old flip flops and cups - a wonderful ensemble Attach scraps of sewer pipes to the wall and plant petunias in them Wrap an unnecessary hose around a flowerpot 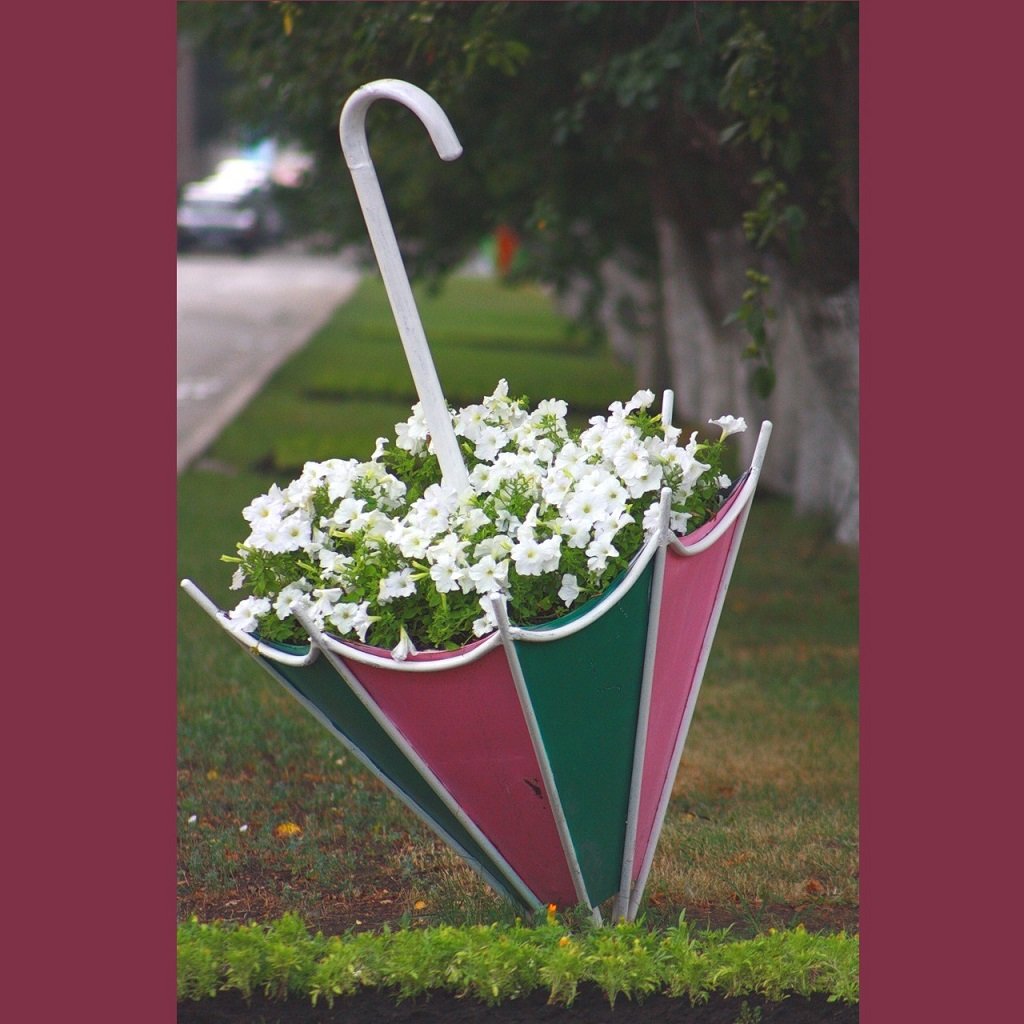 Weld a pot-umbrella from scraps of rebar and iron sheets
Wooden flowerpots
Products made from natural materials look most organic in the garden. Among them, the tree is the leader.
A simple flowerpot is made from an ordinary stump using a drill and chisel.
Step-by-step instruction:
- On the cut of the stump, drill holes around the perimeter.
- Use a chisel to remove excess wood.
- Treat the inside of the stump with stain and dry.
- Lay polyethylene inside the flowerpot and plant the plants.
You can simply place a suitable size pot inside the planter.
Coat your wood decorations with an antiseptic to prevent them from rotting.
To prevent logs from rolling, drive stops into the ground
Pots made of timber and boards
Everything that remains after the construction of the house is used to decorate the site. Stylish containers for plants are made from timber and boards.
It is better to make a wooden planter with legs, so it will last longer
Flowerpots painted in light gray color, suitable for a Provence style garden.
Drill into wooden flowerpots drainage holes
If you have scraps of wood lying around in the barn, use them to assemble flowerpots in the shape of a well, a wheelbarrow, or a bicycle.
The pot-well greatly decorates the garden
Photo gallery: wooden planters
If you put tree stumps on top of each other, you get a picturesque composition 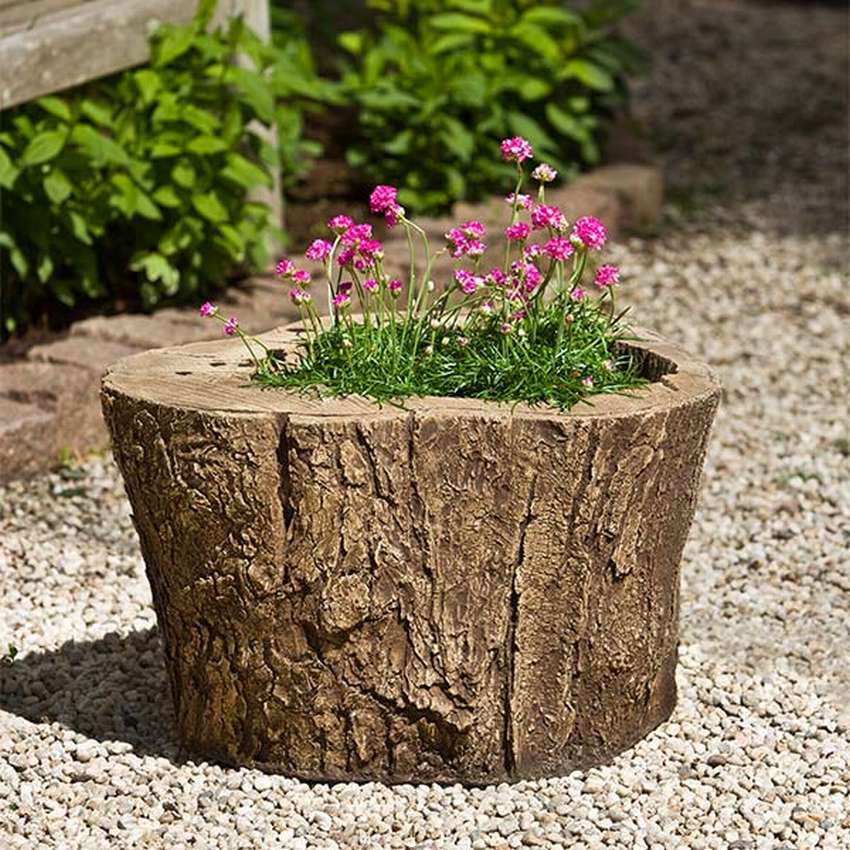 Plant drought-resistant plants in flowerpots. Bulbous plants look great in flowerpots made from a stump: tulips, daffodils, crocuses
  Please note that untreated wood will quickly lose its appearance.
  To make the texture of the wood visible, tint it with oil. Hang small flowerpots made of wood in a gazebo. A wooden flowerpot will decorate the area near the house.
The main requirement for gabion wire is durability
Any plastic container can be easily decorated with crushed stone. Screws are screwed into the flower pots, wire is wound between them, cement mortar is placed on top and crushed stone is pressed in.
A mesh of nylon thread or wire is needed so that the cement does not fall off from the container later.
Dried products are varnished.
Holes are made in the upper part of the iron cans through which twine is passed.
The flowerpot will not fall out of the fastening, woven using the macrame technique.
If the design allows, attach three chains to the top of the planter
Sometimes flowerpots are nailed to wooden slats, which is attached to the wall with dowel nails.
Hot-melt adhesive softens in the sun, so flowerpots decorated with bark are best kept in the shade
When creating flowerpots from scrap materials, take care of their durability. Treat wooden flowerpots with anti-rotting agents and drill drainage holes. Before decorating containers with stones or tiles, wrap them with reinforcing mesh so that the decorative mortar does not fall off over time.
Gardening stores sell many different objects that can decorate a garden, complementing what nature has created. But what if you don't like the banal figurines of gnomes and other "sculptures"? Do you want to show excellent European taste?
Pay attention to large pots and flowerpots, ranging from 60-80 cm in height. Did you know that these impressive objects are not only intended for planting flowers? They can fulfill many roles, the main one of which is to create a spectacular and original corner in your garden.
Where should such large and even huge pots be placed? Which ones to choose so that it doesn’t look banal? What to add to enhance the effect? How large flowerpots can fix " problem areas» in your garden and around the house? What secrets do landscape designers know if we're talking about about the patio?
Answers to all these questions, 25 best design techniques and 50 photos of large pots with examples of harmonious landscape design - in our new guide. Discover another amazing garden trick!
__________________________
First, let's talk about what you're probably most concerned about - where to place large pots and flowerpots . We found 10 interesting techniques.
1. Main entrance.
An old trick, but still effective: place two identical containers with plants on either side of the entrance to the site. And admire how your yard has been transformed! By the way, in such containers you can also grow capricious plants- as soon as the temperature drops, just bring them into the house.
 |
 |
2. Punctuation marks.
How does this relate to our topic? And so, plants in large containers can make the garden more structured, just like periods and commas do in text. They can mark a turn in the path or indicate a bench in the shade.
 |
 |
3. Like a sculpture.
Another “punctuation mark”, but in the role central element some part of the garden. Adds order and European elegance, especially if you choose a large, antique-style pot.
 |
 |
4. Point of attraction.
And the third way to define the structure of the garden is to install a large planter at the end of the path or where it forks.
 |
 |
5. Mediterranean notes.
Decorating a garden or patio in Mediterranean style- with characteristic round platforms like waves, think about how to fit large vessels or pots in unglazed ceramics in a natural tone. Add a round mini flower bed (pot in the center) or surround it with small pebbles.
 |
 |
6. Attention to corners.
Vegetation in the corners small area always appropriate, helping to give it smooth shapes. Add a large pot to one of these areas, with or without plants. This focal point is sure to attract attention and demonstrate your unique taste.
 |
 |
7. Change the proportions.
There is usually little land around the house, and all the vegetation is either under your feet or above your head. Balance this picture by adding a “middle element” - at eye level or just below (a large pot of flowers or plants). You will be surprised how much more harmonious it looks now.
 |
 |
8. Among the foliage.
Agree, it’s quite unexpected to come across a huge vessel in a far corner wild garden. Rising above the low foliage, it looks as if it had been conjured by a wizard, with treasure waiting inside.
Advice: for such areas, choose pots of soft shades of natural nature (gray, beige, green), this will enhance the charm of the “magic”.
 |
 |
9. Unconventional vegetable garden.
We have already talked in detail about. And here we propose to supplement it with a large pot-vessel. Such a tall element adds decorativeness to trivial beds.
 |
 |
10. Creative (dis)order.
Instead of accentuating a space, oversized pots and planters can create space themselves, breaking up the clutter and introducing new lines.
 |
 |
__________________________
And now - a few ideas on how choose a large pot or decorative vessel to make the impression as effective as possible.
11. With the patina of time.
A large vessel can make a wonderful focal point if it stands out from the crowd. The larger the pot, the better. Vessels that clearly show the imprint of time (patina) look especially luxurious.
 |
 |
12. Game of contrasts.
If you have a lawn or flowerbed, feel free to place large flowerpots and pots there. Right among the greenery. This will certainly attract attention and give the eyes a break from the solid green canvas. Containers can be very diverse, but they must have something in common - color, shape or material.
 |
 |
13. At the behest of nature.
Take a closer look at the landscape - perhaps there is already an answer to the question of what containers should be like. For example, like here: a heavy round vessel resembles stones in shape, and an exotic, unusual dark color The plants were suggested by the shade of the pot - black.
 |
 |
14. A piece of exotic.
Among the great variety of leaf colors blue shades are very rare. Especially in our latitudes. That's why take a closer look at bright blue containers or fashionable color teal - against a green background they will look incredibly exotic. Want to enhance your impression? Place artificial leaves or feathers inside, painted in a similar tone.
 |
 |
Do you want to stay in touch with us every day? Welcome to our Planet of Inspiration VKontakte! Take a look, scroll through! Like? Join and get inspired every day!
__________________________
Did you know that with the help of decorative flowerpots and pots you can solve the problems of the site or garden ? Find out several ways to do this.
15. Harmony does not tolerate emptiness.
Every designer knows: empty corners there shouldn't be. If you still have them, place a large container with plants there (or an empty one as decoration). A group of such containers will help disguise unsightly utilitarian items: an air conditioner module, a generator or communication hatches.
 |
 |
16. From scratch.
You may be wondering what to do with your boring white fence. Or with the wall of a barn, which offends your aesthetic feelings with its screaming emptiness.
Just imagine this surface as a canvas and yourself as an artist. And create! Place several identical, but certainly spectacular containers with greenery along the wall. Now enjoy your creation with a fashionable touch modern trends decor!
 |
 |
17. Temporary measure.
If there are still few plantings on the site, large pots with flowers and plants will perfectly save the situation and get rid of the impression of uncomfortable emptiness.
 |
 |
__________________________
Now let's talk about what to add to large pots and flowerpots or what to plant in them if you like original solutions.
18. A curious specimen.
Large forms for outstanding content. Try growing a tree with interesting branches or even fruits in a huge container. This is not at all the same as planting it in the ground - a huge pot will highlight the plant and tell everyone about its uniqueness. And all you have to do is admire this excellent specimen.
Tip: Before you plant a tree in a pot, think about its future needs. After all root system and the crown will grow, and the container may simply not withstand the pressure. Therefore, carefully study everything regarding the development of this plant.
 |
 |
19. Mexican landscape.
Have you long dreamed of some exotic landscape? Take large planters, place pots of succulents in them and fill them with gravel. Place it on a site with the same covering, and put the containers away in the house or winter garden for the winter.
 |
 |
20. Add water.
How about getting a garden fountain made from a huge ceramic vessel? You can, of course, search ready-made models. But it’s really possible to do it yourself - from big pot and a special set for installing small garden fountains.
 |
 |
__________________________
And in conclusion we suggest spectacular patio decorating ideas - also with the help of large pots and decorative vessels.
21. Magic bush.
You regret that the bushes beautiful flowers located far from your favorite vacation spot? Plant young plants in large pots and rearrange them wherever you want.
 |
 |
22. Berries at hand.
Not only flowers or herbs can grow in large containers, but also berry bushes. Find out from gardening companies which varieties are best to choose and get this “delicious” decor.
 |
 |
23. Blooming staircase.
This technique adds a sense of celebration, turning the daily climb up the stairs into an exciting event that pleases the eye. Use identical pots with the same identical contents - this will reflect your impeccable taste and professional approach to design.
 |
 |
24. Within a harmonious framework.
Very large pots with plants can provide excellent zoning individual elements patio. For example, limiting a barbecue area or becoming an interesting alternative to a garden fence. But, unlike the fence, they are pleasant to admire.
 |
 |
25. Southern European chic.
And if you have special places for dining or relaxation, limited stone walls, mark the entrance with a pair of unglazed terracotta pots. Plant beautifully inside flowering plants or bushes with picturesque small leaves like boxwood.
 |
 |
We hope this detailed guide How to use large pots, planters and decorative vessels in your landscaping will inspire you to create original garden and patio features. We wish you success in this and the admiration of your guests!
On store shelves there are many things that can help in arranging summer cottage. But not every gardener wants his garden to look like his neighbors. So that many amateur gardeners and summer residents create unusual and exclusive garden decorations, which only they will definitely have. Universal and original element When designing a natural landscape, an unusual flowerpot can be used, which can give a finished look to the garden and vegetable garden.
In order for garden planters to last for many years on your site, they must meet certain requirements: firstly, the planters must be moisture resistant, and secondly, they must not deform over time. To achieve these properties, it is enough to apply ready product ordinary varnish.
Gypsum plant pot for the garden
Probably, a gypsum plant pot is one of the most difficult products to make, since it requires not only expensive materials, but also a considerable amount of time. To create your own clay pots you will need:
- asbestos (cheaper) or polymer gypsum;
- construction or medical bandages;
- elastic wire;
- acrylic lacquer;
- water-based paint;
- colors.

Before you start, you need to select a container in which to plant the plants. For the garden, it is best to choose a large and deep container, but it is not necessary to buy a pot. You can just take a plastic bucket. Place it on a stable surface with the bottom up and braid the bucket with elastic wire. You will get a frame in the shape of the selected container. Remove the frame from the bucket.
The next step is working with plaster. To begin, prepare a gypsum solution according to the instructions indicated on the manufacturer's packaging. The consistency of the prepared solution should resemble thick sour cream. Soak the prepared bandages and pieces of fabric in the plaster solution for about 2-3 minutes. After this, layer by layer with fabric you begin to cover the frame from the inside and outside (the thickness of the walls should reach 2 cm). Leave the resulting workpiece in the shade until completely dry for 12 hours.
Most of the work is done! The last stage remains - decoration. Apply a layer of emulsion white paint to the planter, and then apply the main design you prepared. Finally, the product must be coated with acrylic varnish. That's all the work! This product is not only durable, but also does not require special storage in winter. This DIY planter can be an unusual addition to your garden.
Return to contents
Wire planter

The following flowerpot is perfect for the garden and cottage, since its main material is wire, which has the property of durability. To make such a pot with your own hands you will need:
- basket woven from wire;
- land for planting;
- sphagnum (peat moss);
- a bucket of water;
- small plastic trash bag;
- your favorite flowers.
All materials can be purchased in specialized stores, but if you do not have such an element as a wire basket, then you can make it yourself using the same principle as making a frame for a plaster plant pot.
To begin, take sphagnum moss and soak it in a bucket of water, squeeze it out and place it in the bottom of the basket. Place moss along the edges of the basket so that there is a hole in the center for the soil. Once you have laid down a sufficient amount of sphagnum moss, place a small piece of polyethylene on it with small holes made in it. This material will help partially retain evaporated moisture. Fill the central hole with soil and plant your favorite flowers. Another DIY flowerpot is ready! It can be placed on the ground, or it can be hung. To do this, take a strong rope or chain of the length you need, the ends of which must be attached opposite each other to a wire basket.
Return to contents
Pots from unnecessary junk
Return to contents
Flower pots made from old galoshes

Most likely, every gardener or amateur gardener at his dacha will have unnecessary galoshes. It’s a shame to throw them away, but they are no longer suitable for wear. You can leave them on your site as an exclusive flowerpot, but before planting flowers in galoshes or rubber boots, decorate them. To transform old rubber shoes into flowerpots, you will need the following materials:
- galoshes or rubber boots;
- scissors;
- white acrylic paint;
- colored colors.
To begin, make cuts on the soles of rubber shoes (2-3 cm). This is necessary so that stagnation of water does not form in galoshes and boots during rain or watering flowers. Then apply acrylic paint to the shoes in 2-3 layers, and after drying, paint them with different colors. You can make the galoshes plain or come up with your own original and unusual design. This pot does not require large investments, is easy and quick to make and is perfect for the garden and cottage.
Return to contents
Bucket planters
Old buckets can also be the main material for creating a DIY garden planter. To make it you will need:
- galvanized chains;
- electric drill;
- old buckets.
First, remove the ears and handle attached to the bucket. Drill three holes along the top edge of the bucket and insert three rings from your key ring into them. Thread the links of galvanized chains into the rings and hang the resulting flowerpot on the bracket. If you wish, you can decorate the bucket with twine. To do this, it should be glued to the bucket in the form of an interesting pattern using hot glue. Another interesting DIY flowerpot can decorate your garden or country house!
An old, unwanted chair can easily be transformed into an interesting and unusual flowerpot. To create it you need: an old chair with a removable seat, metal scissors, wire mesh, paint (chosen according to your wishes), geotextiles, a construction stapler, earth, sphagnum, flowers.
Start by removing the chair seat and using a stapler to secure a piece of chicken wire in its place. This will be a place for plants. Then apply 2-3 layers of paint to the chair and wait until it dries completely. Cut a piece of geotextile along the outline of the old seat and secure it to the chair in the same way as the wire mesh. Soak the sphagnum moss in water and then lay it on geotextiles, lay the soil in an even layer, and then plant your favorite flowers. Any garden elements can be combined with this flowerpot, because it is perfect for the garden and cottage, giving the area exclusivity and unusualness.