Nowadays, plants are sold in stores all year round. How to preserve these seedlings before planting in the ground?, because it is still very far away. And once in a warm place, the bush immediately begins to grow. This is imported planting material, this is normal for it.
It’s pointless to warn people not to buy it; sometimes I myself can’t resist. You need to at least know how to continue to maintain it.
Seedlings in such stores must be purchased immediately when they go on sale. Covered with wax, and even in polyethylene, the roots are suffocated. And if it’s warm in the store, the buds begin to sprout. After a month or a month and a half of storage in such conditions, there is nothing to hope for.
For example, roses. They can be planted as soon as the ground allows. Usually this is mid-April, but sometimes a little earlier. Be sure to take care of covering them from sunlight and wind with any non-woven material. There will most likely still be frosts, too, but if there is not a lot of greenery and it freezes, it’s okay. It is better not to remove the cover for as long as possible.
And immediately after purchasing a rose seedling in a box, you need to open it and look at the roots. Most likely, they are trimmed without any regret, to a minimum.
The rose should be planted in a pot in the ground, the volume of which is slightly larger than the bulk of the roots. If they are large, you can bend them a little at the very bottom, so that when planting, a lump of earth is preserved in the center, and protruding roots along the perimeter; you can then straighten them and trim them a little.
Read more about and conditions for their good survival in the future.
If you bought a blooming rose in a pot, you can wait a little until the existing flowers fade, but provided that it stands in a cool place and you do not flood it. In the pot where it grows there is only peat, but it dries out quickly and you want to water it more often. There is no point in waiting for other flowers; you need to pinch off the buds, shake off the peat from the roots and replant it in the ground.
I do the same thing with gerberas. They then bloom at my dacha in the ground all summer.
Chrysanthemums, which are also sold in abundance at this time, then grow beautifully in the country, they also need to be transplanted into the ground before planting in the ground. They grow huge by the fall, because they are treated with hormones that inhibit growth before being sold, and in the wild nothing interferes with them. They bloom in the fall, sometimes with completely different colors than they bloomed when purchased in the store. They need to be covered for the winter; they just won’t survive the winter.
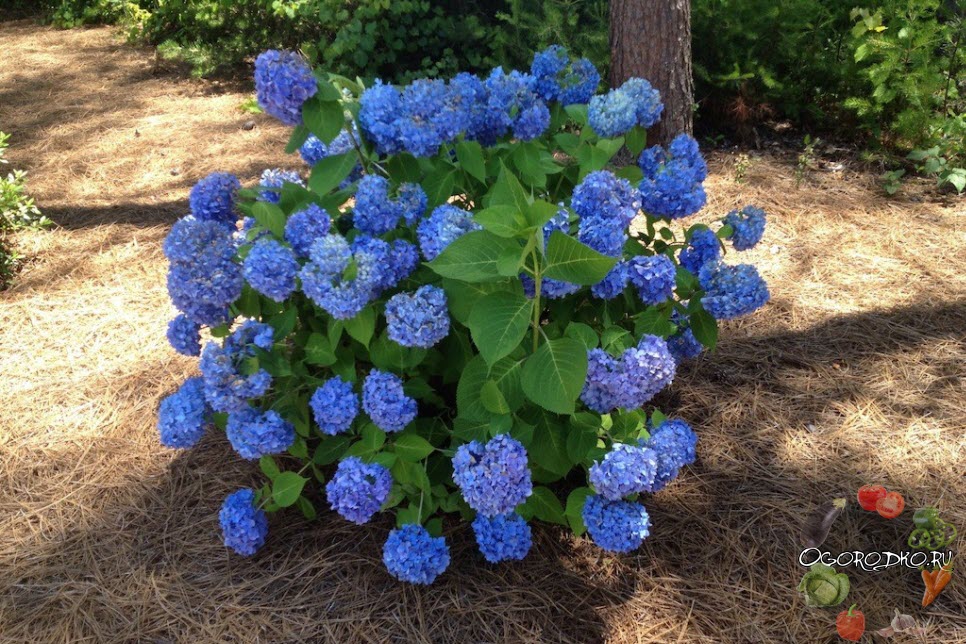
So I grew my own hydrangea, although it was only blue at the beginning, but at the dacha it blooms with pink flowers. I haven’t tried watering it with alum yet, I like it pink.
Let me clarify once again that it is necessary to plant not in peat, which is sold in the store, but in the ground. I always have humus from the dacha prepared for spring planting. I mix it with sand and purchased soil (I try to take “living soil” packages). I make sure to steam the mixture. The roots should be only slightly sprinkled with soil on top.
After planting, water the plant well and put the pot in the coolest place in the apartment. Try to water as little as possible; it’s better to let the soil dry out a little than to overwater. If the seedling allows it, and has just begun to grow, it is better to keep it in the cold and dark. If there are already leaves, you need to choose a cool and bright place.
The apartment has its own, which will certainly appear if it is in a warm place. This is a spider mite. The leaves begin to turn yellow a little, you need to carefully monitor the rose, wash the stem and leaves with cool water. The tick is very small and by the time you can see the web, it is too late. Spraying in an apartment is problematic. When it is not very cold or there is a glazed balcony or loggia, you can spray it there during the day and bring it in in the evening. The rose withstands low temperatures well, the main thing is that it is not lower than 3-5 degrees.
With clematis seedlings that were purchased long before planting, do the same as with roses. The main thing is not to overfill them in the pot. In clematis, the weakest point is the neck, the place where the roots begin to grow. It may rot. It is better not to cover it with soil at all, but if you cover it a little, then with sand. As soon as possible, take the pot out onto the glassed-in balcony. The main thing is that there are no sub-zero temperatures there. Spider mites in an apartment can also harm clematis. When planting in the ground, it must be covered from the sun and wind.
There are seedlings with an open root system. If it has wilted, the tips of the roots should be trimmed (about 0.5 cm) and soaked in a root formation stimulator for 3-4 hours (I use root). And then plant it in a pot.
Shrub seedlings are dealt with in the same way as roses and clematis.
Dahlias, gladioli and lilies are planted when the earth warms up. For us it is the beginning of May. In cold soil, tubers and bulbs can rot, the plant will suffer for a long time and grow slowly. After purchasing, they must be kept in a cool, dark place; in this case, the refrigerator comes to the rescue. When the sprouts have already grown more than 10 cm, and there is still a long time before planting, they must be planted in the ground, in pots, and exposed to light. It’s best if, when planting, you can simply knock them out of the pot with a lump of earth, then they get sick less.
Gladioli have a peculiarity - if you break the already grown roots under the bulb, new ones will not grow, this will weaken the flowering. When planting dahlias and gladioli, be sure to add wood ash.
Lilies are demanding on soil acidity. Ash must be added carefully, looking at the group it belongs to. Some groups only like slightly acidic soil (Oriental Hybrids), and ash is alkaline. And in lilies, supra-bulb roots are important for growth. When planting in a pot, you need to take this into account. The layer of soil above the bulb should be at least 5-7 cm.
20.09.2018
192 600
Hydrangea, planting and care - a beautiful shrub in the garden in 4 steps

Hydrangea, planting and care are of no small importance when growing, since an unsuccessfully chosen location and soil composition of the soil can lead to disease and poor development, in some cases, death. In addition, you need to properly care for the shrub after planting in order to achieve lush flowering and healthy growth...
Site selection and soil preparation
When to plant hydrangea? Best time to plant– spring, the moment when the earth thaws, the buds have not yet bloomed, and autumn – in the month of September. When choosing a place for an ornamental foliage plant, keep in mind that it is better to plant hydrangea in the shade or partial shade, since bright sun causes slow growth, as a result of which the inflorescences become smaller. 
Some types of hydrangea can be grown in open, sunny areas, but require plenty of watering. It is advisable to protect young shrubs from bright sun And big winds. It is not recommended to place under trees that absorb water heavily.
The soil for hydrangea should be well-drained and moist, consist of a balanced mixture of humus, leaf soil, peat chips, river sand (2:2:1:1). Regardless of the type and variety of hydrangea, remember that lime in the soil negatively affects development. The soil must be level Ph approximately 5,0 .
Planting hydrangeas in open ground
In the northern regions of the country, it is preferable to plant hydrangea in open ground in the spring; in the southern regions, including Kuban, the procedure is carried out in the fall. It is recommended to arrange a planting hole for a beautiful shrub, the dimensions of which are 0.4 m in diameter and 0.4-0.5 m in depth. When planting, be guided by the size of the root system; if it is too large, increase the volume of the hole. It is worth noting that the roots of hydrangea are quite branched.

choosing a location and planting hydrangeas with a closed root system - in the photo
It is necessary to add the prepared soil mixture into the hole and make a small mound, on which the seedling is then carefully placed and the roots are straightened, backfilled without deepening the root collar, which should be flush with the soil. A slight deepening is acceptable, but not more than 20-30 mm; too deep a planting can subsequently lead to rotting of the neck.
The soil in the tree trunk area must be compacted well. Watering hydrangeas after planting is mandatory; it is necessary that the water penetrates well to a root depth of 30-40 cm. It is better to water in a hole next to the plant.
Fertilizing and mulching as the basis of care
To retain moisture after planting in a permanent place, the hydrangea is mulched in a circle around the trunk. Mulch also inhibits the growth of weeds and protects the roots from overheating. Peat chips, wood chips or bark are used as mulching material in a uniform layer of 8-10 cm.
The mulch will decompose over time and become part of the soil, slightly acidifying it. It is best to lay mulch in late spring, at a time when the ground has already warmed up well, but is still moist.
 watering hydrangeas - pictured
In order for the shrub to grow well and delight with abundant flowering, garden hydrangea is fertilized when planting, then in the spring in the third ten days of May or in early summer - early June. Use a solution of mullein or chicken manure diluted with water in a ratio of 1:10. Don’t forget to fertilize with a complex of mineral fertilizers or add at least the most basic components - 20 grams of superphosphate, 10 grams of potassium nitrate and urea. Subsequent feeding of hydrangea is carried out at intervals of 17-20 days and ends at the end of July, so that the young shoots have time to become lignified by the winter period.
For strong and flexible shoots, decorative shrubs are watered with a weak pink solution of potassium permanganate. In addition, garden stores sell special fertilizers for hydrangea, which contain magnesium and iron, which the plant needs.

mulching hydrangea with wood chips - pictured
Paniculate hydrangea, large-leaved and ground cover mostly have pinkish, cream colors, which can be changed if desired. The color of hydrangea is directly determined by the acidity of the soil. If the soil has a slightly alkaline reaction, the flowering will be pink and crimson; on acidic soils, hydrangea blooms with blue flowers.
To obtain blue flowers in alkaline soil, the bush is watered with solutions of iron salts. To get a more intense blue color under the hydrangea, you should bury rusty metal cans.
Pruning hydrangea - continue to care
Do I need to prune hydrangeas and how to do it? In order for the care to be correct, it is necessary to remember that pruning of large-leaved, serrated, prickly, Sargent, liana-shaped, oak-leaved hydrangeas is carried out taking into account the fact that flowers appear on the shoots of the second year, which means that you need to cut off old branches and weak ones to strong buds.
Pruning paniculata and tree hydrangea involves removing old and faded shoots, which are also weak. At the same time, experienced gardeners do not recommend removing a large number of shoots at the same time; it is better to spread out the procedure for a year or two so that the plant does not lose strength and does not die from excessive cutting operations. As a rule, the main branches are not touched; only those that are bad and grow inside the bush are cut off.
autumn pruning of hydrangea - in the photo
You can prune hydrangeas in spring and autumn, but it is preferable in autumn, since sap flow slows down, and pruning will promote lush flowering in the spring. During the spring months, improper pruning can slow down growth and delay flowering. In addition, in the spring, processes in the bush begin to actively start; juice is released when pruned, so be careful not to harm the plant. In spring, pruning is best done as early as possible, before the buds swell and constant warmth sets in.
For the winter, it is carried out as usual, with only one difference - it is better not to touch young shrubs and let them overwinter without surgical intervention, otherwise you risk ruining the plant. Hydrangea, planting and caring for which is not at all difficult, will certainly delight you with its lush flowering if you suddenly decide to grow an unpretentious plant in your garden.
Gotensias: photos on the topic


So, you have purchased the seedling you dreamed of. Or you didn’t dream, but love came at first sight - and here you have it. We are trying to figure out how to save it.
Where to store seedlings?
The optimal storage temperature with roots packed in peat soil and wrapped in polyethylene is approximately 2-3 degrees Celsius. These are the conditions that exist in the vegetable compartment of household refrigerators. If you bought several seedlings, then you need to take them out of the elegant box (this is necessary to save space), check whether each seedling is labeled, and put them in this compartment of your refrigerator. The boxes can be stored separately; they will come in handy when planting, as they contain all the information about the seedlings. Some sites recommend completely wrapping the seedling in a plastic bag to prevent moisture evaporation. I believe that there is no need for this, since evaporation at this temperature is minimal, and the buds and especially the regrown shoots on the seedling can smear with such packaging. Once every 10-20 days you need to check how dry the soil in which the roots of the seedlings are wrapped is. If necessary, remove the top packaging bag and, without removing the inner polyethylene, spill the seedling with cool water. Even better is to immerse it in cool water directly with that inner polyethylene. In this case, it is necessary to ensure that the soil does not erode, but only becomes saturated with water. Continue the procedure until air bubbles stop escaping.
After this, repeat everything in reverse order: immerse the seedling in the top bag and carefully tie it with a rubber band to prevent evaporation from the roots. Place the seedling in the refrigerator.
A very good way is to store seedlings in a snowdrift. Of course, we need to take action against mice. In general, storage in snow is ideal for seedlings with unripened buds. The snow temperature at a depth of 20-30 cm is about 1-2 degrees below zero. There is no evaporation under such conditions. Before storing, the seedling is treated with fungicides (Prophylactic or Prestige) and cooled to 1-2 degrees Celsius. Then the seedling is wrapped in several layers of paper, packed in a kraft bag and in thick polyethylene. Paper in several layers creates an air layer to prevent damping and to enhance thermostatic characteristics. Polyethylene will protect from excess moisture. You can put some rodenticide (anti-mouse) product inside the plastic wrap. Place the packed seedlings in the snow and cover them with a layer of snow, choosing the most shaded place on the site for this. This method is good if there are a lot of seedlings and (or) they are quite large and you can’t count on a refrigerator.
Some experienced gardeners manage to build a similar snowdrift on their balcony. And they perfectly preserve any amount of living material until planting.
Storage in the cellar will be no worse. But in this case, before placing the seedlings in the cellar, it is necessary to cool the seedlings to 2-3 degrees Celsius, treat them with fungicides, pack them in paper and polyethylene, after which they can be lowered into the cellar.
If the seedling has large sprouts, then it can be planted in a pot and cared for like a houseplant. The only condition is to create conditions with low temperature and high illumination. Moreover, if the sprouts on the seedling are pale, then high illumination is excluded for 2-3 weeks. The sprouts should turn green. More often it happens that the sprouts turn black and fall off on their own. For example, on roses, it is recommended to break them off yourself. There is no need to be afraid of this. All plants have a 2-fold and even 3-fold supply of buds in case of spring vagaries of nature. The main thing is not to overheat, overwater or dry out the seedling.
The most stable and unpretentious seedling is. It can be stored in any of the following ways. In addition, it grows well as an indoor plant. Just when replanting, select a deeper pot so that the sun does not illuminate the soil in the pot itself - and it will successfully wait until it is planted, and will even grow quite well.
When and how to plant seedlings?
Now let’s figure out when you can plant a seedling. Of course, everything depends on the weather, which not only we, but also weather forecasters and meteorologists do not undertake to predict in our recommendations. I always feel uncomfortable with advice like “plant on April 12” or “May 5”. The earth needs to thaw and warm up.
You need to dig a planting hole in accordance with the recommendations for this type of seedlings. Naturally, when planting an apple or pear tree, it will be a large hole, up to 1 m deep. If the soil is still frozen at depth, leave the hole dug to warm up. It will stand in this form for 5-6, or 10 days - and the soil will be saturated with moisture from the rains and warm up in all layers. Next – in our way, “agronomically”: fertilizers, compost, humus, spillage...
How to preserve roots and bulbs?

Now - to the attention of those who need to preserve not only seedlings, but also perennials. In this case, storage at negative temperatures is excluded. Refrigerated storage will be preferable, although some homes have such beautiful cellars that this method will work. Storage in a cellar, which may leak from groundwater or is contaminated with mold, is excluded. In any case, treatment with fungicides against molds and diseases will not be superfluous. Some bulbs are affected by thrips. This is especially true for gladioli. Here, treatment with insecticides against this scourge will also be necessary. A very good effect is achieved by generously dusting gladioli with dolomite flour or slaked lime. Here you need to ensure that you and your household are not harmed when storing the bulbs. All treatments must be done in a separate room or in the open air. Fortunately, now there are often days with above-zero temperatures.
Many roots and rhizomes can be planted in pots. This is especially true for such “sissies” as delphiniums, aconites, and gravilates. Such planting is very desirable for daylilies and hostas. They have time to get stronger before planting in the ground and quickly acquire a good appearance. By the way, hosta leaves grown in poor light conditions have an uncharacteristic color. Only after planting in a permanent place does the hosta display all the stripes and other decorations required for this variety.
When to plant bulbs and roots?
The timing of planting perennial plants in the ground varies so much that this is the subject of a separate discussion. I suggest you carefully study the information on the packaging and read the literature on growing these perennial crops. Naturally, perennials that winter in the ground in our conditions: phlox, irises, peonies, hostas, daylilies, lilies, etc. can be planted early, after the ground has thawed to a depth of 1 m. To speed up this process, you can use the method outlined higher. Namely, dig a planting trench or hole and let it warm up.
Perennials that are removed from the site for storage for the winter - gladioli, dahlias - are planted after the soil warms up to 12-14 degrees. This is approximately during the potato planting period, only a week later. Another sign (if there are no potato grower neighbors who know the planting dates) is the flowering of coltsfoot or even dandelion.
Some perennials require planting in a pot. For example, canna can be planted directly in the ground, but then you may not wait for it to bloom. It is better to plant it in a pot in March and keep it as a houseplant. The same goes for begonia and gloxinia. These beauties also require early potting and are transferred to the ground or containers after the threat of frost has passed.
A separate question about “tailed” lilies. This is very common: in a store they offer you a lily with a long “shoot”-peduncle. Nothing wrong with that. Naturally, the store is warm and optimal storage parameters are violated. You can do this:
- Before planting, store the lily along with the shoot in the refrigerator. When planting, place it horizontally and deepen it by 20-25 cm, which will promote the formation of additional roots and rapid growth.
- if the shoot is too long, you should break it off and plant the lily as usual. In this case, you sacrificed the first (by the way, very weak and, dare I say it, miserable) flowering. By saving effort on forcing the flower, your lily will take root well and will soon delight you with beautiful blooms.
Good luck to all our customers and readers!
You can view our catalog.
Many plants find it difficult to grow and thrive in harsh environmental conditions, even with careful care. However, planting hydrangeas in Siberia is quite possible. But not all varieties of this plant can survive in such conditions. Therefore, before planting, you should carefully consider which type of bush to buy.
Types of hydrangea that can be grown in Siberian conditions
First of all, you should pay attention to where exactly the bush was grown. The most successful purchase will be those seeds or seedlings that were originally grown in the northern regions.
Two types are particularly resistant to frost: paniculate and tree hydrangea. The former have especially good stability indicators. Thus, in Siberia there are already more than 20 species of hydrangea of this type. These include:
- Limelight;
- Pink Diamond;
- Magical Flame;
- Magical Fire.
All varieties differ in their color and size of inflorescences. But plants can also differ in growth. So, for those who have a small garden, it will be enough to grow a species such as Bobo hydrangea on their plot. This variety is considered one of the shortest, and can only reach 65 cm at full height. There are also those that are slightly larger, but are still considered dwarf: Vanilla and Sunday Fresh. This hydrangea does not exceed one meter in height.
The varieties presented above do not require special care, but if you have a little free time, you can plant weaker plants, which, even if they survive frosts down to -35°, the likelihood that they will be able to continue to bloom will become extremely small.
Because of this feature, paniculate hydrangea of weak species and other varieties of this plant are specially dug up in the autumn and stored all winter in a cool room, and when spring comes, they are planted again in open ground.

How to choose the right seedling
When purchasing seedlings, you should pay attention to the fact that hydrangea in Siberia must always be in the ground, even when sold. In this case, the lump in which the roots are located should not be liquid or, conversely, too dry. Otherwise, you may encounter the fact that the hydrangea, despite proper care, may not take root and die.
It is best if the plant is kept in Siberian conditions to acquire sprouts immediately before planting begins. Therefore, it is best to go to the market or to the store for them in the spring, as soon as the last frosts have passed.

Where to plant hydrangea in the garden plot
In order for hydrangea - no matter whether it is tree-like or paniculate - to take root in the conditions of Siberia, before planting begins, it is worth deciding on the place where it will grow.
First of all, you should make sure that there will be no strong winds in the place where the plant will grow. In addition, it is adversely affected by direct rays of the sun, so the planting site should be in shadow for most of the day. The best option is if the hydrangea is located near a fence or wall of the house.
The soil at the place where the planting will take place also greatly influences how exactly the bush will grow and how often it will need care, especially when it comes to Siberia. The ideal option for hydrangea is slightly to moderately acidic soil. The components of such soil should be:
- leaves;
- sand;
- peat;
- turf land.
The most undesirable is alkaline soil, since hydrangea takes root extremely poorly in it.
Once the location has been chosen, you should begin to prepare the soil for further planting.

Soil preparation
In order for the seedling to take root, the soil must be properly prepared for planting. If planting is done correctly, the bush will require less care. First of all, you should dig a hole in the ground, which should correspond to the size of the plant.
Depending on the height, it is necessary to dig holes of the following sizes:
- for small seedlings you need a square pit, 50x50 cm;
- if the plant has already grown, then in order to be able to plant it freely, you will need a wider hole, with sides 80x80 cm.
Depending on the size of the plant roots, the depth of the hole can vary from 40 to 60 cm.
In order for the hydrangea to take root better, you need to pour 2-3 buckets of water into the hole, then leave it overnight so that all the water is absorbed.
After the hole is dug, it must be filled again, but with a special mixture, which includes:
- 2/6 - peat;
- 2/6 - fertile soil;
- 1/6 - sand;
- 1/6 - humus.
You can also mix fertilizer with them, consisting of:
- 25 g urea;
- 65 g superphosphate;
- 25 g of potassium sulfate.
In order to acidify it, you can add spruce or pine needles to the mixture and fill the entire hole with it. It is important that there is no lime in it, since hydrangea cannot tolerate it and immediately begins to die.

Planting a plant in the soil
Before you start planting, you should slightly shorten the hydrangea's roots and trim off excess shoots. So, the plant can have shoots up to a maximum of 5–6 buds.
The plant is installed in a new place and buried with soil so that the neck of the hydrangea root is at ground level. The fact is that the bush does not like it when it is in the open air, but experienced gardeners do not recommend burying it. To increase the chances of the plants taking root, it should be watered again.
In order for the plant to take root well, after planting, a mixture of pine needles, leaves and peat mulch should be placed under it. This will allow the soil to stay moist longer.
If the place where the plant was planted is not illuminated by direct rays of the sun and is reliably protected from the winds, then the period during which it will take root will be much shorter.

Hydrangea care
Hydrangeas require virtually no care after planting. But still, in order to keep the plant healthy and strong, some gardeners resort to small tricks.
First of all, this concerns watering. The soil around the bush should always be moist, because hydrangea loves water very much. You can add a little potassium permanganate to the watering can, but not more than a gram per liter. This type of care for hydrangeas in Siberia helps the plant bloom profusely.
To keep water in the soil as long as possible, the area around the bush can be covered with dry leaves and sawdust.
Care also involves regular feeding of hydrangea. This will help it produce more lush inflorescences. You can fertilize 4 times a season.
The bush does not like monotony, so you can use two types of fertilizers.
- Organic. Liquid manure may be quite suitable as an organic fertilizer. But you shouldn’t overdo it, as a large amount of this fertilizer can have a detrimental effect on the inflorescences.
- Mineral fertilizers. They are added little by little. One bucket takes 20 or 30 grams. In total, at least 2 buckets should be used for watering with fertilizers.
The fertilizer itself can be found at a store specializing in garden plants. They sell mixtures specially selected for care in Siberian conditions. 
So, planting and growing hydrangea in Siberian conditions is quite possible. But in order for it to grow and produce lush inflorescences, it will have to work a little.
If you choose the right variety and give the sprout proper care, it will be able to grow and delight the gardener for several years.
 Hydrangea is a southerner; in Siberia it is found mainly indoors, but some gardeners are able to grow this plant in open ground. Our review will tell you about the secrets of care, proper planting, and the use of hydrangea in garden design.
Varieties, varieties of hydrangea
About 35 species of this beautiful perennial plant are known. One can only dream about growing most of them in Siberian conditions and admire them in the photo. But there are many varieties of tree and paniculate hydrangea that tolerate our frosts well.

Hydrangea paniculata
Cold-resistant varieties of paniculate hydrangea
The following varieties should be highlighted here:

Tree hydrangea varieties adapted to Siberian conditions
The following varieties of tree hydrangea tolerate winter well:

Planting hydrangeas and proper care in cold climates
The best survival rate of seedlings at the age of 5 years. For their good growth, it is necessary to create a special microclimate: protect from the wind, plant in slightly or moderately acidic soil consisting of leafy soil, turf, peat, sand, and provide good lighting. Planting hydrangea correctly means:
- prepare a seat 0.5 x 0.5 x 0.5 m in the spring;
- leave a distance between bushes of about 250 cm;

Hydrangea seedling
- shorten the roots and trim the shoots, leaving a few buds;
- do not deepen the root collar;
- water generously;
- cover the soil with mulch.
Attention: hydrangea is also called hydrangia, which sounds like a “vessel for moisture.” This indicates her special love for water, so regular watering comes first.
Pruning frost-resistant hydrangea
Proper pruning is of great importance for hydrangeas. Pruning of varieties growing in Siberia is carried out in the spring before the buds begin to awaken or in the fall after leaf fall, while:

Hydrangea needs to be pruned every year.
- Remove old, mainly weak shoots, branches and undeveloped shoots.
- On strong shoots that have grown this year and coming from the ground itself, 4 to 5 buds are left.
- Stems developed on old branches are shortened to 3 buds.
Tip: An old hydrangea bush can be rejuvenated by applying heavy pruning and removing all shoots, down to the old wood.
Fertilizers and fertilizers for hydrangea
Fertilizing will make flowering abundant and long. Suitable for hydrangeas is liquid manure in moderate quantities, balanced mineral fertilizers - 25 g per 10 liters of water when watering. 3 buckets are poured under an adult bush.
During the season, 4 feedings are carried out: at the beginning of sap flow, during budding, in July, and in the fall in preparation for wintering.
Shelter and preparation for wintering
Without shelter, hydrangea will not survive the winter. Set it up like this:
- Covering material or spruce branches are laid out under the branches, the stems are bent and covered.
- Pour a 20 cm layer of peat or compost on top and cover with film or slate.

Winter shelter for hydrangea
There is another way - a frame is arranged around the bush, the plant is covered with dry leaves, and covering material is pulled on top.
Attention: you cannot completely open the bush immediately after positive temperatures appear: the plant can be destroyed by returning spring frosts.
What diseases and pests threaten hydrangea?
Hydrangea is affected by the following diseases:
- Downy mildew. It appears as oily spots on the leaves, a yellow coating on the stems and the lower part of the leaves. Timely use of a solution of copper sulfate and green soap helps - 15 and 150 g, respectively, per bucket of water.
- Chlorosis, in which leaves lose color. The reason is unsuitable soil with too much lime. The plant is watered several times with potassium nitrate (40 g per 10 liters of water), and after the last watering, also with iron sulfate (40 g per 9 liters of water).

Changing the color of plant leaves is a sign of disease
The most common pest that settles on hydrangeas is the spider mite, which causes the leaves to dry out and fall off. Destroy it with a solution of thiophos (7 g per 10 liters of water). During the forcing period, aphids may appear. Anabasine sulfate dissolved in water (20 g per bucket) will destroy it.
Use in landscape design in combination with other plants
Looking at the photo of a blooming hydrangea, it becomes clear why the other flowers fade against its background. It is beautiful both as a single plant, and in group plantings of trees and shrubs, and as a hedge, and in mixborders. It is simply indispensable for decorating gardens in a rustic style, where there are many flowers planted in beds, flower beds, and buckets.

Hydrangea in landscape design
Hydrangea is also appropriate in oriental design, in flower beds decorated in the form of flower patterns. Hydrangeas planted in containers and placed on gravel areas will give the garden a Mediterranean feel. In the English style, hydrangeas look good in the center of the flower garden next to ornamental grasses and geraniums.
Different types of plants are selected for different styles. Tree-like ones are the most suitable option for an English garden. Paniculate and liana-shaped hydrangeas fit into the village garden. Large leaf varieties do well in containers.
Surround the beautiful hydrangea with care and attention and it will respond to you with lush flowering.
Hydrangea care: video
Varieties and types of hydrangea: photos


 Is it possible to grow hydrangea in the climatic conditions of Siberia, with temperatures in winter of 30-40 degrees, or even lower? It turned out that this is a completely feasible dream.
The only thing that needs to be taken into account is the plant variety. It’s worth talking about how to properly approach planting and growing this wonderful shrub.
Choosing a plant variety for Siberian conditions
To know for sure that the plant will delight you with abundant flowering, the best option is to purchase seeds or seedlings of the plant grown in local conditions.
You need to purchase it from experienced gardeners who have been growing hydrangea on their site for many years.
Based on the experience of Siberian flower growers, we can safely say that tree-like and paniculate varieties of hydrangea can withstand Siberian frosts well.
Varieties of paniculate plants feel especially good in the local climate - more than twenty of them have already taken root in Siberia. These include such as Pink Diamond, Limelight, Magical Fire, Magical Flute. Each of these varieties has its own color and size of inflorescences.
You can also read about some varieties suitable for the cold conditions of Siberia here.
If the gardener has a small plot, paniculate hydrangeas of dwarf varieties - Sandai Fresh and Vanilla Fresh - will suit him - they reach a height of one meter. There is also the smallest species, which reaches only 60-65 cm, and is called Bobo. These varieties have been tested by local conditions and feel great in them.
You can, of course, grow other types of large-leaved hydrangea, but this is quite labor-intensive work. If you leave hydrangeas of these varieties to winter at 30-40 degrees below zero in open ground, they may survive the winter, but they will not bloom.
Therefore, every autumn you will have to dig up the bushes and put them in a cool room, and at the beginning of spring, put them out for germination and transfer them to open ground only when the danger of frost has passed.
Therefore, it is still better to choose paniculate or tree-like varieties adapted to the Siberian climate.
When is the best time to plant hydrangea and how to choose a seedling
When buying a plant seedling, you need to know that the roots must be in a coma of earth. Please note this lump - the earth should not be too dry. The plant is very demanding of moisture, and the soil on the roots must be saturated with it, otherwise the plant will not take root.
The best time to plant a seedling is spring. After the soil has thawed and the frost period has passed, you can plant the hydrangea in the soil.
How to preserve hydrangea in winter
Since Siberian frosts are famous for their strength, hydrangea must be hidden from them, securely covered.
The roots of the plant require insulation first. They need to be covered with rotted manure - this is an excellent insulation for them. You can use peat or dry leaves; they are laid in a thick layer of 10-20 cm.
When snow falls, you can also use it to insulate a hydrangea bush by covering it with a large layer of snow. It will not only insulate the bush, but also saturate it with moisture when it thaws.
It will also be useful to learn more about caring for hydrangeas for the winter.
Choosing a place to plant hydrangeas
When a shrub variety has been selected, you can proceed to determining its place of residence; in the harsh climate of Siberia, it is necessary to be especially careful when choosing a place to plant hydrangeas.
It is necessary to protect the hydrangea from the wind, so you can plant it near a solid hedge.
The plant loves light, but does not tolerate open sun. You need to find a shaded place for it.
The soil in which it will be planted is very important for the shrub. Hydrangea does not tolerate alkaline soil - the best option for it would be slightly-medium acidic. It should consist of leaves, sand, turf soil and peat.
Preparing soil and plants for planting
When a location has been chosen, you need to properly prepare the hole for planting.
- The hole must be prepared of suitable sizes and taking into account the type of soil the plant likes. A small hydrangea seedling will grow into a large beautiful bush in a few years, so the fertilized hole for it must be made rather large, it should be at least 50x50 cm in size, if The seedling is small.
For a large seedling, the hole can be 80x80 cm in size. The depth of the hole should be from 40 to 60 cm - this depends on the size of the plant root.
- 2-3 buckets of water are poured into the finished hole, and it is left overnight so that the water saturates the ground well.
- The next morning the hole soaked in water is filled with a mixture of peat and humus mixed with sand and fertile soil in proportions 2:1:1:2, organic and mineral fertilizers are added (65 g superphosphate, 25 g urea, 25 g potassium sulfate ). Pine and spruce needles acidify the soil well, so they will not be superfluous either. This mixture should completely fill the hole.
- You need to know that hydrangea does not tolerate lime, so if it gets under the roots, the plant will simply die.
- The last preparatory stage before planting is trimming the roots and excess shoots. The roots are shortened slightly, annual shoots are pruned to 5-6 buds.
Planting a plant

Make sure that the neck of the root is flush with the ground
We install the hydrangea seedling in a new home and dig it in with garden soil.
The neck of the plant's root should be at the same level with the ground; it should not be buried, but it is also undesirable to leave it completely open.
For good rooting of the plant after planting, it is necessary to water it again, then pour a mixture of leaves, pine needles, and peat mulch on top of the soil under the seedling.
After planting, until the plant has taken root, it needs to be created in comfortable conditions, protected from wind and sun.
Plant care
Hydrangea, once rooted, is considered an unpretentious plant. It requires the same care as other garden flowers, but with some special features.
Feeding the bush
In order for a plant to please you with long-term flowering and large inflorescences, it needs feeding, and it is advisable to diversify it.
Organic fertilizers- liquid manure is very suitable for hydrangea, but it needs to be fertilized carefully, since its excess can harm the inflorescences.
Mineral fertilizers added to the water when watering, for one bucket of water 20-30 grams of fertilizer, there should be 2-3 buckets.
Special fertilizers for this shrub are sold; they contain all the beneficial substances balanced specifically for hydrangeas.
The plant is fed four times during the spring-summer period:
- the first feeding is in early spring, during the beginning of sap flow;
- the second - during the development and growth of inflorescence buds;
- third - mid-summer;
- The fourth feeding is autumn, preparation for the winter period.
Watering hydrangea
Hydrangea loves water very much, so the ground around the bush should never be dry, of course, if you want to get abundant flowering of the plant.
It is good to add potassium permanganate to water for irrigation.
It is necessary to regularly mulch the soil under the bush with sawdust and dry leaves; they retain moisture well in the soil.
Interested in planting and caring for heather? We have written an article for you on this topic.
How easy is it to make a swan out of an unnecessary tire? Step-by-step instruction.
Barberry is not only candy, but also an unpretentious garden shrub -
Trimming
If you want the hydrangea bush to be well formed, it needs to be trimmed correctly and on time.
- In autumn, after flowering, it is necessary to cut off all faded inflorescences.
- In the spring, at the beginning of sap flow, all shoots of tree hydrangea need to be cut off, leaving 3-5 buds. Pruning paniculate hydrangea occurs a little differently - the main shoots are cut to the desired height, 2-3 buds are left on the side shoots.
- Old hydrangea bushes need to be rejuvenated by cutting off all branches to a stump of 7-8 cm; the growth of new shoots will not take long.
Disease and pest control
All plants are susceptible to disease and pests, and hydrangea is no exception. But in order to preserve the bush, it is necessary to carry out its timely treatment. What diseases are the most dangerous?
Powdery mildew- This is the most common disease of all types of hydrangeas. When it appears, you need to spray:
The plant is treated with a mixture of water and foundation, the proportions are 25-30 g of medicine per 10 liters;
Another method is to pour 80 g of Bordeaux mixture into 10 liters of water.
Aphid- This is another disaster for some plants, and hydrangea also falls into their number. Treatment of plants against aphids is carried out with the following composition:
Peel, chop 250-300 grams of garlic, add 10 liters of water, leave for two days, then add 50 grams of laundry soap to the tincture. You need to spray the hydrangea with this solution until it is completely cured.
Nov 18, 2013Victor Sergeev
Ajisai - “flower that looks like a purple sun”, is the name given to hydrangea in Japan. Indeed, the inflorescences of this plant, generous in its beauty, shine throughout several warm months, reminiscent of the polar star, for which it is especially loved by gardeners in different regions. Growing hydrangea in Siberia requires certain knowledge, choosing the right variety and proper care, but the effort is worth it, because with it a tamed sun appears in the garden.
Winter-hardy hydrangea varieties for Siberia
There are several dozen species of hydrangea, but in open ground conditions in Siberia only varieties belonging to two of them can winter and bloom profusely:
- tree-like;
- paniculata.
Growing other species, including large-leaved hydrangea, is possible in a pot, or if the plant is dug up in the fall and transferred to a cool room for the winter. Such bushes are put up for germination in the spring and transferred to open ground after reaching a stable above-zero temperature.
 Tree hydrangea. Photo
Among the varieties of hydrangea paniculata that have proven themselves best in Siberian conditions:
- Silver Dollar;
- Lime Light;
- Phantom;
- Pinky Winky;
- Reni / Vanilla Frez and others.
Those who decide to opt for tree hydrangea should take a closer look at the following winter-hardy varieties:
- Anabel;
- Grandiflora;
- Sterilis;
- Pink Annabelle;
- Strong Anabel.
For lovers of low shrubs, we can recommend the dwarf varieties Sandai Fresh and Vanilla Fresh, as well as the Bobo variety, reaching 60 centimeters in height. Of course, the final choice of plant depends on its decorative properties and taste preferences of the gardener.
Landing dates
Hydrangea can be propagated by planting seedlings, cuttings or layering. Planting seedlings in open ground in Siberia is possible both in spring and early autumn, when the ground is warm. It is preferable to carry out cuttings in the spring, after the threat of return frosts has passed, however, with such propagation, active flowering of the bush will occur in 4–5 years.
Choosing a landing site
Let's first figure out where to plant hydrangea, in the shade or in the sun? Hydrangea is a light-loving plant, but placement in direct sunlight is undesirable for it. The best option would be a place that is well lit by the sun in the morning and shaded in the hot afternoon hours.
To create a favorable microclimate for this shrub, protection from the winds is necessary - a fence, some kind of building, high dense plantings (hedges).
Hydrangea prefers fertile soils with a slightly acidic reaction. It does not tolerate alkali at all, which is why it should not be placed next to plants that need alkalization of the soil; this leads to bush disease.
If there is a high groundwater level in the area intended for growing hydrangeas, it is better to plant in a raised bed or flowerbed.
When choosing a seedling, you need to pay attention to the presence of a high-quality, moist earthen lump on its roots; it is better if the root of the plant is in a container or bag before planting, protecting it from drying out. Hydrangea is an extremely moisture-loving plant, and if the seedling dries out, the chances of its rooting and successful wintering are significantly reduced.
Planting in open ground
When preparing a hole for planting, it is necessary to take into account the acid-alkaline reaction of the soil in a particular area and, if necessary, acidify it. Gardeners use a weak solution of vinegar, lemon and water, and peat additives for these purposes.
 Hydrangea paniculata
The parameters of the planting pit depend on the size of the root system of the bush; for a small plant they are 50 x 50 centimeters, for a larger one - 80 x 80. On light sandy soils, loam can be placed at the bottom of the pit to better retain moisture at the roots of the plant.
Before planting hydrangea on the site, pour 2 - 3 buckets of water into the hole so that the soil is well wet. On the day of planting, the pit is filled with a nutrient mixture of humus, mature compost, and peat. The seedling is carefully removed from the container, the excessively long, damaged roots of the plant are removed, and the annual shoots are also trimmed to approximately the fifth bud. The roots of the plant are immersed in the hole, the neck is not buried, the soil is compacted and must be watered abundantly.
Since the plant is very moisture-loving, after planting it is recommended to mulch the soil thoroughly, for which you can use peat, ephedra, foliage, and any other materials.
Caring for hydrangea in the country
The main thing in caring for hydrangea is to provide it with a comfortable water regime. And if the plant may not respond to untimely pruning or lack of fertilizing, then systematic overdrying of the soil leads at least to a decrease in flowering, and often to winter freezing of weakened plants. Since in hot summers without rain, hydrangea needs to be watered 2-3 times a week, it is most convenient to arrange a drip irrigation system. This method will provide the necessary constant soil moisture without additional effort.
Feeding paniculata and tree hydrangea. In the spring, during the period of rooting and shoot growth, the plant is responsive to the introduction of nitrogen - an infusion of bird droppings, cattle manure. In the summer, before budding, it is good to feed the plant with phosphorus-potassium fertilizer - a weak solution of wood ash, herbal tinctures, the use of nettle is especially beneficial.
In autumn, the plant is pruned and prepared for wintering in accordance with the requirements of climatic conditions.
This is the second winter she has to suffer in her apartment.
But where to go if it can’t survive in the ground in winter in the Urals, there is no basement, but the room is warm...
So it blooms with all its might. This is what she looked like at the end of November.
There is not enough space in the pot, so the flowers are small.
Hydrangea
Hydrangea and gardenia bloom
Last winter I put it between the frames for the winter. It's cool there and she didn't grow - she rested.
Only in the spring did the buds begin to open.
Spring 2013
Then she put it on a warm windowsill - and she burst into growth.

I, as a caring mother, decided to feed this baby. And I almost lost it!
It turned out that she did not like the mineral food that all other indoor plants, such as gardenia, happily eat.
Within an hour after watering, I noticed that the leaves seemed to be boiled. Only those at the top remained intact.
I urgently rushed to wash the lump.
I spilled 5 liters of settled water. I just watered and waited for the liquid to come out into the pan. And watered it again. Until the water came out completely clean.
It was not possible to replant into fresh acidic soil: the entire lump was tightly entwined with roots. Here you can only rinse from an overdose.
And who could have known that she was such a sissy! After all, the concentration was very small. I haven’t read anywhere that it needs to be fed very carefully in the spring. My friends already enlightened me after I did something stupid.
I had to tear off all the burnt leaves. The two large ones still had slightly “scalded” edges around the edges.

But still she forgave me and grew the first bud.

I searched the Internet for a long time for the name of my variety and this is what I found out.
It turns out that my hydrangea is a special case. From a botanical point of view, it refers to large-leaved hydrangeas that bloom on last year's shoots.
But mine belongs to the “Endless Summer” group: unlike other large-leaved varieties, it blooms well both on the shoots of the current year and last year’s.
This is important news for me, because I have to store it in the winter in a window-sill refrigerator, where a large bush can hardly fit. But the circumcised one is fine.
So my white variety “The Bride” belongs to the same series of selection. You can cut the branches, you don’t have to cut them - it’s your choice. In any case, it will bloom every year. Which made me very happy.
I'm waiting for something like this to happen :-)

And now the leaves are already twice as large.
I moved from a liter pot to a three liter one.
Summer 2014
Instead of three branches, it now has five main branches and several side branches.
Here in the photo below is the same - in a basin with a diameter of 50 cm.
You understand that this can no longer fit between the frames :-)

But at the end of summer, I washed the leaves from dust and put them in a 50 cm basin - this is how big the bush has become.
Next spring I will plant it in the flower garden.
August 2014
She is very hot in the apartment. In order not to wither away completely, you have to add additional lighting.
But in principle, my experience proves that garden hydrangea can be preserved in a warm room in winter.
And it will even bloom with additional lighting.
I have had experience growing hydrangeas in the past. Below in the picture is a pink hydrangea that I grew from a tiny cutting.
Hydrangea cuttings
Within a year it had grown to a decent size - the main growth was in the summer.
Pink hydrangea summer 2008 G. 
But in winter it dropped all its leaves.
And since I didn’t have additional lamps at that time, it began to wither, and I threw it away.
Or it could have been saved by placing it under lamps.
And I could grow a bush like Galina’s - she grows 15 liters in a pot. Moscow region.