Priming walls, plastering, puttying are basic operations in the process of bringing surfaces to the stage of readiness for further painting or wallpapering. A simplified scheme of work is as follows: plastering, priming after plastering, puttying, sanding, coating with paint and varnish material or applying wallpaper. Puttying the walls after plastering is considered the final preparatory operation.
Even due to the fact that today plastering is provided by a wide choice of materials for interior work and exterior decoration, and having done the work, you can achieve an ideal plane (there is no question whether it is possible to putty the walls, for example, after finishing with gypsum plaster - the procedure is not necessarily included in the order performing repair work) - the financial costs of such plastering work are extremely high.
The classification of putty materials is carried out according to several criteria. The grouping sequence is determined by the key factors and properties of the putty, combining the mixtures into the following classes:
- Oil-glue. If you need the cheapest mixture, this group is suitable. It is unknown whether oil solutions will continue to have a future, since they are already considered a thing of the last century. The main disadvantage is the appearance of yellow spots through the paint layer and wallpaper.
- Gypsum cement. The materials are much more expensive. Designed for a full range of general finishing operations. Domestic products most often contain more cement than gypsum. Based on the cement and gypsum base, the main purpose of the powder was determined for the craftsmen - having covered the layer of plaster with soil, you most likely putty the walls with the composition for further wallpapering.

- Water-dispersed. Also from the category of gypsum cement, however, they are necessarily produced in a batch with an aqueous polymer emulsion, respectively, containers - buckets. The advantage is that you don’t need to study on the packaging what to do and in what proportion to dilute the putty - the product is already ready for use.

- Acrylic. After puttying with a similar composition, all the advantages of the above groups (except oil) will appear.

Workflow Stages
Surface cleaning
When walls are puttied after old plaster, old wallpaper and layers of paint must be removed. A special remover helps remove the remains of unnecessary material. After the manipulations, the walls must dry - they are left for about a day.
Drying is followed by a thorough visual inspection: missing small parts are cleaned off with a mounting knife or a thin spatula.

Relief inspection
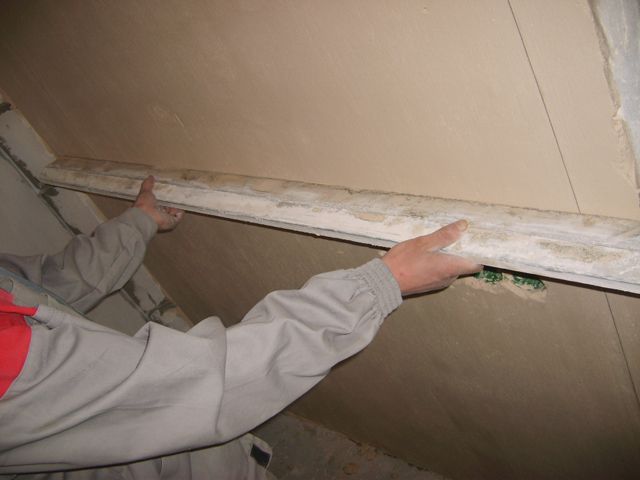
The relief plane is inspected with a flashlight, using the construction rule: it is applied to the surface, and the flashlight is shined along the wall. The smallest recesses and protrusions are obvious. Rough bumps should be beaten off on the spot with a plane or a sharp spatula, and the grooves should be marked along the contour with a simple pencil.
Related article: Features of fiberglass wallpaper for painting

Preparing tools
Before starting the repair process, the entire set of tools is carefully wiped from dust with a rag, washed with dishwashing detergent and dried with a thick cloth that does not leave fibers on the items being wiped. It is worth carefully making sure that there are no residues of solutions from previous batches on the mixer from the drill and mixing container - lumps of old solutions need to be picked out.

Preparation of putty mixture
The process of preparing the solution is not complicated:
- Fill the container with running water (a construction bucket is filled a quarter full, a regular bucket is filled a third).
- Dry powder is added little by little until the tip of the “iceberg” is above the water.
- Wait up to 30 seconds until the powder absorbs water and sag: no dry formations should remain.
- With a quick, precise movement using a drill attachment, knead for 2 minutes. (drill is preferable, but manual work is also acceptable).
- Wait 30-60 seconds..
- Repeat kneading. The consistency has been brought to perfection – the solution is ready.

Under no circumstances should the prepared solution be diluted with additional water or dry powder. We'll have to work with what we got. In case of defects, the putty composition will tolerate excess liquid; after hardening, there is always the opportunity to go over the area with abrasive and reapply where necessary.

Do not forget about the shelf life of the finished solution after mixing: it is better to mix several portions. Each portion is placed on a wide spatula with smaller ones, calculating the amount needed for one stroke.
Leveling the terrain
Small recesses and cracks are covered with a medium or wide spatula, depending on the size of the defect. Grouting is done with wide crosswise movements with the same force until a smooth surface without sagging or scuffing.

A common mistake among inexperienced craftsmen is to slowly, applying pressure, pull out the spatula. Putty of any brand is endowed with a thixotropic characteristic, which leads to rapid, correct dispersion with periodic equal force exposure from several sides.
In the video: the process of puttingtying a wall with your own hands.
Hardening of the putty layer
When hardening the putty, it is necessary to use all precautions as for hardening plaster: through air flows, direct sunlight, heat waves from a fan heater or hair dryer are absolutely contraindicated. Cracks in the wall as a result of drying are already unpleasant, but a putty layer damaged by improper drying can warp, which will only appear at the stage of wallpapering or painting.
Indoor air circulation should be adjusted to avoid drafts and temperature fluctuations. More specifically, you can open the room door, but leave the balcony door closed. For the corridor - allow air to circulate from the living rooms by tightly closing the doors to the street, kitchen and bathroom.
Instructions for use most often indicate a drying period of up to 16 hours for the coating, but in reality it is 10-12 hours. However, it is advisable to sand the layer no earlier than a day has passed: the putty will dry out reliably, harden, and subsequent operations will be easier.

Puttying under wallpaper
For the purpose of further gluing of wallpaper, putty is initially carried out with a wide spatula, covering with each subsequent layer up to ¼ of the previous one. The resulting “sausages” are not ground. Holding the spatula at an angle of 21-30 o, maintain constant pressure, which will help distribute the material in an even layer of 2 to 4 mm. The smaller the angle of inclination, the more it leads to the formation of a thick layer, the more it leads to the formation of a thin layer. However, the dependence is typical for variations in the specified degree interval; when going beyond its limits, bumps and breaks form on the surface.

The next step is drying the layer, removing beads with a jointer and abrasive and checking the smoothness using a building code and a torch. The resulting defects are eliminated: protrusions - with abrasive, recesses - with additional lubrication. It is possible that an inexperienced master can approach the wall up to 5 times until the surface becomes perfect.
At the end of the manipulations and long hardening, they go over the wall with a jointer with a mesh size range of 80-120 (with an increase in the number, the abrasive grain decreases). Initially, the entire surface is worked with circular movements, after which, loosening the grip, movements are criss-cross in order to remove the contours of circular manipulations.
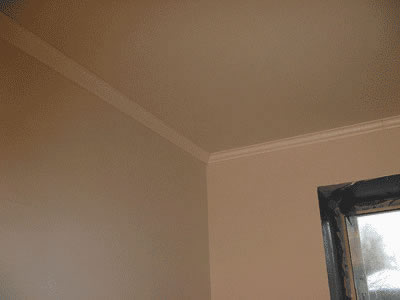
Then the wall is again checked according to the building rules with the lantern. If there are no lingering reflections from the rule, the surface is ready, after a day the walls are primed and you can start gluing.
Puttying followed by painting
The technological process is different from puttying followed by wallpapering in one operation: after final leveling and rubbing with an abrasive material, the wall is covered with finishing plaster. Particular attention is paid to the wall; if it is to be painted with enamel, in particular acrylic, then the finishing mixture must be white, durable and specially designed for this purpose.
Grouting is done with an abrasive with a fine grain of at least 150.

For mirror painting, the wall is also polished with a polishing trowel with suede material (felt and felt pieces are not suitable). A used suede cover will not cope with the task - it will have to be replaced with a new one. Also, for painting, the wall must be primed in accordance with the instructions indicated on the packaging of the material.
Related article: Technology of puttying concrete and plasterboard ceilings
The nuances of puttying corners and slopes
Inexperienced craftsmen are often recommended to apply more than the required amount of material to the corners, followed by rubbing with an abrasive product. But when it is planned to apply silicone to any area with a gun before puttying, physical costs can be reduced, while at the same time increasing the efficiency of the result.

Work plan:
- When the silicone is used up, you need to unscrew the tube, remove the residue and wipe it with a rag soaked in vinegar solution.
- During puttying, the corner is bypassed, leaving unfilled.
- When the wall is dry, you need to fill the tube with putty and slowly squeeze it into the corner crack. It is recommended, if possible, to do the procedure from bottom to top in one approach.
- Next, they work with an angled spatula, resting on the surface, similar to plastering on beacons.
- After drying, the protrusions will need to be removed with an abrasive mesh.
Instead of a silicone tube, you can use a syringe used when baking cakes. With rubber or foam pads and fixation with electrical tape, the pastry syringe is fixed in the gun like a glove.
At the corners of the slopes, the master works with an angular trowel of his choice using any of the methods known to him, knocks down the protrusions with an abrasive mesh, and checks the smoothness using the construction rules. There is no significant difference in the process of laying the putty layer on the walls and in the corners, but the corners are difficult to bring to the ideal - a professional will need to step up to two times.
Tips from experts on puttying (2 videos)
What you might need (25 photos)


Putty is one of the most affordable and fastest ways to prepare the surface of walls for wallpaper. Using putty, you can perfectly level a wall with potholes, cracks and other defects, so many people want to know how to properly putty walls under wallpaper in order to achieve maximum effect. It is much easier to glue wallpaper on smooth walls than on curved ones - the glue is absorbed evenly and the risk of wrinkling of the canvas is reduced. In addition, the putty eliminates minor irregularities that will be clearly visible under the wallpaper, especially in sunlight. In order for repair work to be carried out quickly and efficiently, it is necessary to follow some important rules, including when choosing material for puttying.
To putty the walls before wallpapering, you will need the following set of tools:
- Drill with mixer attachment. The putty mixture is most often sold in dry form, and to bring it to the required consistency it must be diluted with water. It is possible to ideally stir the composition to a homogeneous mass without lumps only with the help of such an attachment. If you don’t have a mixer, you can purchase ready-made putty, which does not require pre-mixing.
- Spatulas of different sizes. For corners and other hard-to-reach areas, use a small spatula, and for the rest of the surface, use a tool 40-50 cm wide.
- Brushes and foam rollers. These devices allow you to perform high-quality priming of walls. It is not recommended to skip this step, since a thin layer of primer ensures good adhesion between the wall and the wallpaper.
- Rule. This tool is necessary when working with uneven walls, when the putty is applied in a thick layer and the likelihood of uneven distribution of the material over the entire surface increases.
- Sandpaper. Used to eliminate transitions between layers, small bumps and depressions. Fine-grained paper and a manual sanding machine are best suited for these purposes, which makes the sanding process easier.
VIDEO TUTORIAL: All about puttying walls
Selection of material for putty work
The overall appearance of the interior depends on the quality of wallpapering, so the questions of how to putty walls under wallpaper and what material to choose will always be relevant.
Most often, the following grades of materials are used for puttying surfaces under wallpaper:


For those who have decided to putty walls on their own for the first time, experts recommend using a ready-made water-polymer mixture, which is sold in plastic packaging, has an optimal consistency and is easy to apply.
Primer as an important stage of puttying
Primer is a special composition that forms a waterproof film, so the wallpaper adheres better to the surface.

The following types of primer solutions are distinguished:
- Acrylic. Suitable for any surfaces, including concrete, cement, wood, brick, plywood and plastered. The material does not have a specific odor, dries within 5 hours and is most often used for wallpapering.
- Alkyd. Used for finishing wooden walls in country houses. The drying time of this primer is no more than 15 hours.
- Glypthal. Designed for finishing wood and metal surfaces in rooms with low humidity levels, drying in about a day.
- Perchlorovinyl. Suitable for concrete, metal, brick and plaster walls, drying time at room temperature is 1 hour.
Preparing the surface for putty
To successfully refresh the interior, you need to clearly understand how to putty walls under wallpaper, otherwise all efforts will be reduced to zero.
Before you start puttingtying with your own hands, you need to thoroughly clean the walls of grease, paint, dust, falling layers of plaster and wallpaper residues. There are no difficulties when removing paper wallpaper; to do this, it is enough to moisten it well. But situations often arise when removing old wallpaper becomes a real problem, this applies to glass wallpaper or canvases glued to drywall. If the material fits tightly to the wall and does not form voids or bubbles, you can putty on old wallpaper, but the layer should not exceed 1 mm, otherwise the hardened putty may peel off along with the wallpaper.

Important! If fungal damage and mold are found on the walls, it is necessary to treat the surface with an antiseptic solution. Sharp protrusions and bumps should be cut off with a metal spatula, and large depressions should be pre-plastered.
The final stage of the preparatory work is to apply one thin layer of primer, after which it is necessary to wait until the solution has completely dried and begin puttying.
Starting putty
Even if at first glance the walls seem smooth and need only partial processing, at least two layers of putty should be applied. For plasterboard walls, one layer will be enough, but first you should carefully seal the joints of the material.
Starting putty is intended to eliminate significant differences in walls, hide grooves and holes; the layer thickness in this case can reach 1.5 cm. For starting finishing, a special putty is used, which is intended for filling joints, sealing breathing cracks and joints of floor slabs.
VIDEO: Starting puttying of walls
Advice! To perform the starting putty as efficiently as possible, experts recommend installing a special painting mesh on the wall and evenly distributing the mixture over it.
Each subsequent layer is applied after thoroughly drying and sanding the previous one. If there are no significant defects on the walls, the starting putty stage can be skipped.
Applying the finishing layer
If the wall is relatively flat, then one finishing layer will be enough; if the surface was previously plastered, then 2-3 layers of putty will have to be applied. The drying period for each layer can be up to 10-12 hours, after which the surface is sanded to eliminate sagging and other irregularities. The final layer before wallpapering must be applied with a wide spatula, from 30 cm, in a crosswise motion with an overlap on the already treated area. In order for the layer to have an optimal thickness of 2-3 mm, and for the putty not to leave bumps and uneven edges, the spatula must be held at an angle of 25-30 degrees to the wall, and all movements must have the same pressure. After each layer, it is necessary to check the surface for evenness using a rule and a flashlight, and eliminate any identified defects with the next layer.

Another way to treat corners is to apply a little more mixture to them, and after drying, remove the excess by sanding.
Afterwards, the wall dries for about a day until the material finally hardens, after which the entire surface must be treated with sandpaper or an abrasive plane.
VIDEO: Do-it-yourself finishing putty for wallpaper
It should be noted that finishing putty is advisable for leveling old walls with significant unevenness and cracks, as well as before applying single-color paint, which makes wall defects more noticeable. In new houses, as a rule, such a need does not arise, and minor unevenness is eliminated by re-plastering. In addition, modern wallpaper is thick enough to independently hide existing imperfections and level the walls.
If there is a need to update the premises in a home, many people think about the possibility of doing it themselves. In most cases, this requires properly treating the surfaces, painting them or. The editors of the site will help you navigate difficult repair issues. We will tell you how to properly putty walls, share the secrets of the correct technology for applying working mixtures, and provide detailed instructions that will help beginners avoid mistakes.
Puttying is usually understood as the process of treating wall surfaces with finishing materials immediately before gluing or painting. If the construction mixture is applied incorrectly, as a result, unrepaired defects will appear under any decorative coating - cracks, unevenness and pits.

After eliminating the existing defects, a smooth and at the same time even surface of the wall or ceiling is achieved using putty. For these purposes, materials are used for starting and finishing finishing, which are dry mixtures of coarse and fine grinding.

It is easy to check the wall by applying a rule to it: if there are gaps, they are eliminated by applying a layer of putty. The spatula should be held at an angle of 25−30° relative to the wall. If you don’t know how to putty the walls under, you can choose a ready-made acrylic mixture and a medium facade spatula for these purposes. For final sanding of a dried wall, abrasive paper marked P-150, 180 is used.
Article
It is advisable to putty the walls in one step, that is, start and finish work on one wall in one day. If there are still interruptions in work, then the dried putty should be moistened with a spray bottle and the transition should be smoothed, capturing the previously wetted putty layer. If the old layer has dried for a long time, then you need to moisten it more generously, rolling it with a roller in advance.
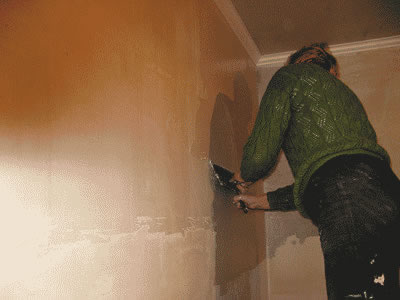
They begin to putty from the far corner of the wall, away from the battery. The first leveling layer of putty is made with coarse putty mixtures. According to the putty manufacturer's instructions, the dry mixture is diluted in a container of sufficient volume using a mixer or manually. Usually a plastic bucket or an old can with a capacity of up to 12 liters of putty or paint is used. For the first time, you need to fill the bucket with the mixture no more than half the volume. After using this mixture, it will become clear how much of the mixture to stir in order to have time to work it out before the putty sets.
The mixture is scooped out of the bucket with a narrow spatula and applied to a large spatula. And with it (a spatula) the putty is spread on the wall. The direction of spreading the putty on the wall is not of fundamental importance; it can be spread horizontally from a corner or from top to bottom, the main thing is that the layer of putty is evenly applied over the entire surface of the wall. In hard-to-reach places, putty is spread not with a wide spatula, but with a narrow one. In this case, a large spatula is used to transport the mixture to the work site (Fig. 14).
- Rice. 14. Puttying the first layer
A puttyer always has two spatulas in his hands: a wide one and a narrow one. He changes them periodically as he works. Using a narrow spatula, apply putty onto a wide one, re-smear it, and clean the working tool from the dried mixture. If necessary, a narrow spatula becomes a working spatula, and a wide spatula holds the mixture. The master removes some of the putty from a wide spatula and spreads it into the pits left after passing with a wide spatula.
After the entire corner of the wall is filled with putty, it is leveled. This can be done with a 600 mm wide spatula, but it is better to use an aluminum rule. Ideally, the length of the rule should be equal to the height of the wall. However, the length of the rule is most often not enough, so the top of the wall is puttied first, then the bottom. Why this sequence? A thick layer of putty can float, therefore, when puttingtying and leveling the bottom of the wall, the flow can be captured and trimmed.
The rule is to insert the blade into the corner of the room almost at a right angle to the base and, reducing the tilt, move it along the wall, spreading the putty into the wall. After the first pass, the remaining holes are filled with a spatula and the second pass is made as a rule, now it is immediately inserted into the corner at an angle and rubbed into the putty areas. Thus, no more than two or three passes are made in one place. Further passes can usually lead to the exact opposite result, when the tool, instead of leveling, removes the dried putty layer. To prevent this from happening, before each pass, the paint is usually moistened with water from a brush, and if the putty has dried on it, then it is washed to remove any build-up.
After the entire wall is puttied, move on to the opposite wall, and then to two perpendicular ones. By this time, the putty in the corner from which the putty began has already dried out and you can make the second part of the corner. Corners filled with putty using the rule turn out to be very even and subsequently there are no difficulties with gluing wallpaper.
If the wall is being prepared for pasting with thick wallpaper, and the plaster on it is quite smooth, then it is not necessary to putty it entirely. It would be reasonable to putty only the corners, stretching the putty to “zero” in both directions by about 500 mm. Putty the top and bottom of the wall, also stretching the putty “to zero” by 400–500 mm from the floor and ceiling (Fig. 15). Inspect the rest of the wall and fill up large gaps and sinkholes. When applying putty, go around rosette sockets, ventilation holes and other places using a narrow or medium spatula. Subsequently, they will be closed with decorative ventilation grilles or rosette covers.
 Rice. 15. If the wall is not very crooked (or you are satisfied with its evenness), then under pasting with thick wallpaper it can be puttied only around the perimeter, stretching the putty “to zero” from the corners of the walls, ceiling and floor
 Rice. 16. Puttying with a second layer
 Once the first layer has been puttyed, it is given time to dry. The dried putty is carefully processed with fine-grained sandpaper or an abrasive mesh, removing the bumps and stripes left by the tool. During the sanding process, gaps in the putty layer are revealed visually or by applying the rule to the wall. They are moistened with water or primer and puttied. Use a spatula of such a width that it is wider than the failure spot. If the failure is very large, then it is better to straighten the hole according to the rule. When the putty areas have dried, they are also sanded.
It is advisable to use the “sandpaper” with a hinge on the handle, although this tool often breaks, it transmits pressure exactly in the center and, moreover, the dust from sanding the putty is moved a meter away from the person working. Do not try to get a perfectly flat surface from sanding; the effect can be exactly the opposite; zealously sanded bumps fall through and “craters” form. Using a “sandpaper” you need to knock down the clearly visible bumps and protruding stripes left from the tool, roughen the rest of the putty, and that’s it. It is better to eliminate other defects by puttingtying individual places or applying a second layer of continuous putty.
Before the second or third puttying, the dried putty of the lower layer is sprayed with water or primer and the final puttying is done. Putty mixtures with a fine grain fraction are used, so the application of the rule here is not justified. The putty is made wide (Fig. 16), and hard-to-reach places, for example, where you need to bypass pipes, are used with a narrow spatula. Apply the putty to the wall with a spatula and immediately level it so that no streaks remain; make movements, for example, down and to the side or sideways and up/down, moving your index finger and pressing on the spatula, as shown in
Of course, it is possible to find smooth walls in apartments, but the number of such in percentage terms is still minimal. In this situation, there is only one way left - leveling with plaster and putty, which will help prepare them for further finishing. We will try to talk in more detail about how to properly putty walls for different types of finishing in the article below.
Why is this necessary?
It is not always necessary to putty the walls until they are completely smooth. For example, if you plan to decorate the surface with wallpaper, which can hide minor scratches from cleaning. Putty makes it possible to get rid of holes and cracks on the wall, level it and, if necessary, bring it to a perfectly smooth state.
In any other cases, such work must be carried out:
- It is much easier to glue wallpaper on smooth walls than on curved ones. The glue is absorbed evenly, the risk of wrinkling of the canvas is reduced to zero.
- Putty will remove various bumps from plastered walls that will be visible in sunlight, causing the surface to become pimply.
Tip: the rules for puttying walls say that if the old putty crumbles after removing the old wallpaper from the walls, it should be completely removed and the surface should be puttied again.

Preparation
Before you learn how to properly putty walls, you need to prepare the surface for work:
- Clean the ceiling and walls from splashes of mortar, paint, soot, and plaster starting to peel off.
- Degrease the surface by removing grease and wax stains.
- Apply one coat of primer to the walls and ceiling.

Work can be continued only after the soil has dried. The putty is offered in two forms - dry in bags, when the instructions on the packaging indicate the correct ratio of material to water, and ready for use in a plastic tightly closed container.
For rooms with high humidity the marking is LR, for ordinary rooms – KR. Each manufacturer has its own service life for each mixture.
Advice: do not dilute in large portions, as they set quickly. The mixture must be prepared only in clean containers.
We putty the walls
Below are tips that will tell you how to properly putty the walls with your own hands:
Prepare:
- two spatulas - up to 150 mm and up to 600 mm;
- cooking container;
- sanding mesh and sandpaper.
So let's begin:
- If you don’t know where to start putting putty on the walls correctly, then take a rubber spatula and fill in the holes on the surface with it, and wait until the work dries.
- Using a small spatula from the container, take the prepared putty and apply it to the wall in a thick strip about 20 mm thick using a large spatula. Hold the latter in the way that is most convenient for you, there are no rules in this case.

- Start from the corner to the middle of the surface, using a large spatula to move it along it in a stretching motion. Then remove the remaining mortar from the large spatula and apply it again with a stretching motion in the same place, from the corner to the middle, to remove excess putty from the wall.
- Remove the excess from the large spatula with a small one, and again stretch the solution in a strip over the large spatula. Repeat the previous steps on a new section of the wall.

Tip: apply the next layer slightly overlapping the previous one.
- Puttying the middle of the wall is carried out slightly differently at the bottom. Applying the mortar and removing it from the spatula is no different, but now the wall is puttied from the bottom up.
Excess solution is removed from the surface from top to bottom using semicircular movements:
- a small arc along the drawn strip;
- removing putty with a small spatula from a large one;
- again make a semicircular movement from top to bottom with a wide grip, etc.
Remember - apply from bottom to top, and remove excess solution from top to bottom.

Tip: if bubbles and bulges form on the surface during work, do not level anything, wait until the solution dries. Then you can sand everything down with sandpaper. Make sure there are no depressions or pits.
If the surface is very uneven, it may be necessary to putty it in several layers. Each subsequent one should be applied only after the previous one has dried, sanded and primed. The thickness of the next layer is no more than 1-2 mm.
The price of finishing putty is significantly more expensive than starting plaster, so it is not advisable to apply 3 layers to it. The best option is to pre-level the walls with plaster along the beacons.
Tip: puttying for painting implies a perfectly smooth surface after puttying and sanding.
Mixture consumption per 1 sq. m is different for each manufacturer, in addition, this parameter is also affected by other operating conditions. Usually the minimum value is indicated on the packaging. You should also check the expiration date of the product; if expired plaster can still be used, putty cannot.
Advice: for final preparation of walls for wallpaper or painting, use gypsum-based putty.
- Under the wallpaper. Check the walls for unevenness, for which use the building rule. Place it edge-on against the wall - where there is a gap between it and the tool, this means there is a defect.
Tip: putty vertical unevenness vertically (from bottom to top), horizontal unevenness – horizontally, so that the solution can better seal them.
- Do not apply a layer thicker than 5 mm, as it may not have time to dry, causing it to crack and peel. Refer to the indicator indicated on the packaging. You can properly putty the walls if you hold the spatula at an angle of 30˚.

In the photo - preliminary preparation of walls for wallpaper
- You can start the process from below or from under the ceiling.
- In corners it is more convenient to use a small spatula, moving it away from the corner.
- Sand the dry surface using sandpaper no. 80-120. You can leave small scratches, the wallpaper will hide them.
Conclusion
From the article you learned how to properly putty plastered walls so that material consumption is minimal. You also realized that straight walls in a room not only look beautiful, but are also a pleasure to work with.
Subsequent polishing also helps prepare them for final decoration. In the video presented in this article you will find additional information on this topic.