Today we very often come across working with images: photographs of people, animals or various landscapes. In addition, many people who have home printers can even create their own cards as gifts for loved ones. Often they have to make special inscriptions, which are easiest to create in special editors. One of them is Photoshop. Below, in our article, we will tell you how to make such inscriptions in Photoshop. Why did we choose this editor? The reason is that it is the easiest way to make such inscriptions, and they will look quite harmonious and stylish. Competition in this field for Photoshop is created by a simpler and more intuitive graphic editor like Paint. It is worth noting that it is not bad either, but it is inferior to Photoshop in many respects. Its main advantage is that it is very easy to learn and you do not need to learn many functions. Basically, in its simplicity lies the drawback - it is not very functional. Therefore, if you want to complicate the inscription, make it especially beautiful and unique, then your choice is Photoshop.
Before you start creating such inscriptions, you should consider some factors. Firstly, you shouldn’t just write words and whole phrases into the image - it won’t turn out very nicely and won’t fit into the overall background of the picture. Therefore, before you do anything, you should carefully understand whether such an inscription is suitable or perhaps you need to apply some special style.
If you don’t know what to do, and the desired concept doesn’t want to emerge in your head, then don’t be discouraged. Photoshop has many special tools that can help you deal with this problem. In addition to the perfect combination, you need to take into account such a factor as the readability of the inscription - after all, why make a beautiful inscription if it is not distinguishable against the general background of the picture.
Font size plays an important role in this. The inscription in a small font will not look good, and a large font can ruin the whole picture. Special toolbars will help you with this. By changing various settings, you can easily find your style for the inscription.
An equally important factor is the color of the text that you use for the inscription in Photoshop - the more similar it is to the general background, the more difficult it will be to read.
In addition to the characteristics of the inscription, the location of its placement is no less important. Try to place it on a uniform background, against which it will stand out well. The sky, water, cloud and similar objects are perfect for this purpose. This placement will make the inscription more clear and readable.
Now that we've talked about the features of placing inscriptions, it's time to talk about how to create them.
First stage, setting parameters
- First, you need to select the "Text" tool, which is on the left. With it, you can change the orientation of the text (initially it is indicated horizontal). If you need to change its location, you can right-click on the icon and select the desired orientation (for example, vertical).
- Tools that control font properties are located at the top of the panel. Using them, you can choose the boldness of what is written, make it italic, or deform the entire inscription. Most often, deformations such as an arc or a flag are used for inscriptions in Photoshop.
- After you have chosen the basic parameters, you need to place the inscription. In this case, it is necessary to take into account all the advice given above. To do this, move the cursor to the selected location and start typing. In addition to this option, you can use a more complex one - you can move a picture or inscription from a separately saved file.
- Once the text is printed, you can see what it will look like. If the inscription made in Photoshop does not suit you, then you can simply change its parameters and make it completely different. If you are satisfied with everything, then you can not change anything and simply confirm the creation. The inscription is ready.
It is worth noting that you can use slightly different fonts - those that are not specified in the standard sets of the program. In order for such a font to become available to you, you need to download it online and move it to a folder on the control panel. In addition to being used in Photoshop, these fonts will be available in other programs, such as Word.
As we have already noted, the inscription is ready, but it is not finished. What needs to be done for this? Below we will tell you how you can use the built-in editor to change the appearance of the workpiece. This stage will help give your inscription a unique and beautiful look.
Second stage, text stylization
- When we have created a blank, a template, we can begin to change it. For this we will use the layer settings. The tool responsible for this is located in the right area of the screen - “layers”. When you select it, you will need to double-click on the desired location where our text is located. You have to do everything correctly, otherwise you will end up in another context menu.
- When the desired window opens, you will find settings for each style. In addition to all this, it also indicates all the effects that apply to each of the styles. Choosing a style is very simple - you just need to check the box next to it.
- If you want to make the style better and more interesting, then you need to go to another menu, which is on the right. Here you can choose effect options, specific patterns, and even scaling.
After some training, you will get a wonderful inscription. Despite our advice, you can experiment using the built-in tools.
We hope that our article on how to make an inscription in Photoshop will be useful to you. Good luck to you!
Video lessons
Text in Photoshop is the main tool for the designer’s creative vision. Making a short inscription on a photo becomes easier if Photoshop is installed on your computer. There is a whole group of tools for creating beautiful but short messages.
Font tools
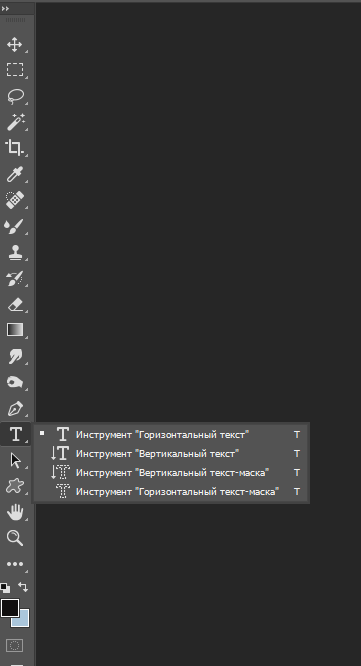
Total exists four types of instruments for working with text and creating beautiful inscriptions:
- horizontal;
- vertical;
- horizontal text mask;
- vertical text mask.
The effects applied to such layers are similar to those applied to the image:
- Filters.
- Transformation and deformation.
- Edit.
- Mask.
How to insert text in Photoshop
Open the photo or image you are interested in using the “ File" and selecting the command " Open" Before adding, you should decide on the color (default “black and white”) for the inscription. There are two ways to change the color:
- palette for choosing a unique color;
- "B" key to return to standard dialing.
On the toolbar (to the left of the workspace) select the required text tool. We will use "".
The source of the finished text is not important. In a Word document or Notepad, type the required fragment or phrase. Copy to clipboard using the keys (ctrl+c).
Select the area for the inscription. 
Paste using the combination (ctrl+m), or the paste command from the menu. After the area is filled, you can proceed to the initial editing - change type font, size, execution method (italics, bold). 
Afterwards, we agree with the chosen inscription.
Changing the font
We activate the tool with a hotkey or using the icon with the “T” symbol, which will allow you to write text in Photoshop.
By clicking the mouse in the work area (in the image), we get a new text layer in which we select the area for the font.
After entering the last letter, pay attention to editing icons, there are fifteen of them in total. The first half changes the font and size, and the second half changes the location of the text in the area, its shape (deformation) and color. The demo version includes a tool for creating a 3D font.
By selecting the " Editing"from the drop-down list we take " free transformation" With this tool you can:

Using the text warp tool, the selected object is distorted, taking on a visual resemblance to a letter ribbon.
How to create a stylized inscription
Creating stylized text is a voluminous and variable project. Use it as a starting point for further development:
- Background. In our example, this is a wall.

- Create a new layer and fill it with black. We adjust the indicator " opacity» to the desired value. The choice of parameter is determined by the characteristics of the monitor and color settings. In this case, this figure is 35%.

- Centered type the phrase: Flay. You can use any inscription and font, in the example it is “impact”.

- . Select the layer with the inscription (click with the left mouse button while holding ctrl). Save the selected area. We compress the area to a value equal to 4.

- Delete the resulting area. You should get a linear inscription. Remove selection using ctrl+c.

- Go to the menu " layer style" Choose a color.

- Choose outer glow color. Selecting the size of the shadow. And copy the layer. The same settings will allow you to create three-dimensional letters.
- With the help channel allocation create a neon light effect.

- Changing perspective using transformation. We correct the inscription.

This is how we get neon text on the wall.
How to create your own font in Photoshop
Development from scratch is painstaking and very difficult work. For a beginner in a graphics program, it is best to use specialized applications, for example, "Font Creator" or "Adobe Illustrator".
An easy way to create a unique inscription - using primitives Create the required letters from rectangles layer by layer. 
Preferably label layers so as not to get confused later. 
We save the finished text project in the format “ psd" or " jpg». 
The first saves layers and facilitates a quick return to working in Photoshop. The second is used for demonstration on social networks. For personal use or storage of the finished project, it is better to choose a format without compressing the quality of the finished image - this is “png”.
It's no secret that advertising banners, postcards and much more are designed in Photoshop. Perhaps an idea came to you and you want to create your own motivator or holiday card. The picture is selected, but you don't know how to write text in Photoshop? If you've never written in Photoshop, in this article we'll show you how to use the text tool. We warn you in advance that writing text on a picture in Photoshop is very easy, even if you don’t know how to make text in a circle.
Photoshop has a whole group of text tools. Working with text in Photoshop occurs on a special type of layer - text.
Open the image you want to write on in Photoshop. Move the cursor to the toolbar and right-click on the icon with the letter T. A group of text tools will open. If you press on your keyboard T(English), then automatically select the text tool that is the first in the group by default.

As you can see, text tools allow you to set the orientation of text writing, vertical or horizontal.
Having selected the text tool in the desired direction, click on the image in the place where you want to make the inscription. A new layer will immediately appear labeled T, that is, a text layer. You will see a blinking cursor in the image and text settings in the control panel. They are the same as in text editors like Word that we are all familiar with. Here you can select the font, size, style (bold, italic, etc.), set the color and alignment of the text, paragraph, that is, everything that may be needed to write text.

If you expand the list of fonts, then opposite each one you can see a sample of its writing in the form of the word “Sample”. This way you can easily decide on the font. The next attribute will allow you to select the writing thickness. But it is not available for all fonts.

Next is the font size, which can be selected from the list. If these dimensions are not enough, then by placing the cursor in the list box, you can enter the desired number from the keyboard. If everything in the list is too small, enter a number greater than the very last one in the list.

The next parameter allows you to select the type of text smoothing. It is used to smooth out the edges of writing and get rid of jagged edges at the ends of letters.

Here is a visual example of Windows anti-aliasing (left) and Smooth (right).

The next three attributes are alignments. They are familiar to everyone from text editors. This is text alignment to the center, right or left. The next element is the choice of color. Click on it once and select the desired color in the palette that opens.

Attribute with letter icon T, standing on an arc, allows you to specify the writing of text in an arc, in a circle, or in another shape.

Having expanded the next attribute, you will find that almost all the previous ones are collected here. In addition, you can set line and letter spacing, paragraph indentation, and everything you may need to write text. You probably know how to do this, since we have all used Microsoft Word at least once. Therefore, we will not focus on this point.

Choosing a tool "Horizontal text", click on the place in the image where you need the inscription. Select the font, color and size. Changing the font size will change the height of the blinking cursor. This will help you understand what size your text will be. Write your intended phrase. When you are finished writing, press Enter in the numeric part of the keyboard (right). You will notice that the name of the text layer has changed to the phrase you entered. If you need to correct the text, change the color of an entire character or a single character, then using the same text tool, standing on the layer with the text, click on it. Your cursor will blink again. You can select text and delete characters (erase) in the same way as in Word or another text editor. You need to move a line using the key Enter on the letter portion of the keyboard.

If you plan to write long text, set its area in advance so that it does not go beyond the boundaries of the text container. You can then change this area manually. Select the text tool. Before writing, hold down the left mouse button and drag the mouse as if you wanted to select an area. You will have a text container with vertices. Then, by dragging these vertices, you can change the size of the text container. This way your text will not run into the invisibility zone.

To move text, simply stand on the layer with it using the Move tool (called V) grab the text by holding down the left mouse button and move around the image.

To rotate text, stand on the layer with it and click Ctrl+T. This works the same way as rotating a regular layer. When the frame with vertices appears, move the cursor to the corner one. As soon as a rounded arrow appears on the cursor, start rotating the image in the desired direction. When finished, click Enter.

Adding a shadow and stroke to text is done in the same way as on a regular layer. We looked at this in previous articles. To add a shadow and stroke you need to call Blending Options(bottom panel in the layers palette, lower right corner).

In the dialog box on the right, select “Stroke”/Stroke, or "Shadow" On the right side of the window, select the desired size, color and, when finished, click Ok.

Now let's look at how to make text in a circle. There are two ways to do this. We touched on the first one slightly when we described the control panel of the text tool.
Write the text. The cursor should blink while waiting for the next character to be entered. Now on the toolbar click on the letter icon T standing on an arc. Select from the list “Text with an arc”/Wave.

Values Horizontal Distortion And "Vertical Distortion" leave in position 0 . "Bend" move it as far to the right as possible. When finished, click Ok.
Now select the text tool and click on the edge of the circle. It will turn into a text outline. You will see a blinking cursor. Start typing. If not all of the text is included, pay attention to the cross and dot on the outline. Press English on your keyboard A, the tool is activated "Outline Selection". By moving a cross and a dot along the contour of the circle, you can move the text along the circle and enlarge the line so that words that you did not find when entering are in your field of view.

Adjust the resulting text by moving the layer with it so that the inscription is around the cup. All!

As promised at the beginning of the article, making text in Photoshop is as easy as in any text editor. We wish you new ideas!
Adobe Photoshop is the product that you will definitely need to create interesting images or edit photos. Using Photoshop, you can realize your creative potential or develop your professional skills if you, for example, are a designer. Today's lesson on using Photoshop is dedicated to lettering and how to place them correctly. So:
How to make an inscription in Photoshop?
At first glance, the task of writing text on a picture or photograph seems more than simple. And this is true. To create an inscription, select the “T” icon in the toolbar. In the window that appears, you must enter the desired text and click on the empty space to attach it to the image. But what's the matter? Why don’t these letters fit into the overall background and mood of the photo? This is where the difficulties begin. The text must not only be, that is, present in the photograph, it must also be combined with the general mood of the image. But this task is no longer the easiest. However, do not become discouraged and fold your arms after the first failures. Photoshop has powerful capabilities that will help you turn your text on an image into a work of art, or simply make it adequate, and most importantly, readable.
To edit the written text, click on the area with it. Now we have the opportunity to somehow change the text itself and the letters. You can control various options using the text editing toolbar, which is located above the work area. The first section is the font. From the many proposed options, you need to choose the font that would fully meet your goals when creating the final image. In order to select a font, you need to click on the arrow next to the name of the last used font. Be careful. Only the selected printed text is edited. If the text has already been written, you need to select it to change it. Let's assume that you have decided on the font. Let's move on to make an inscription in Photoshop.
The next option is the font size, which is indicated by numbers. The higher the number, the larger the size. Try to make the inscription look harmonious throughout the image. Its size should not exceed the size of the largest objects in the drawing or photograph. However, in this case, only your imagination can dictate the rules. The next small window helps us choose how the text will be displayed. Choose different options and you will understand which character will suit your image.
The next option will help you decide on the text color. This is very important for creating the final design of the picture. The color of the letters should match the entire image, and most importantly, its idea. Now, dear reader, you can experiment on your own with the rest of the text editing functions that Photoshop offers us.
We'll talk a little about using different backgrounds when placing text on an image. It is better to place the inscription on a uniform background. This way, the text will be visible and the picture will be clear as a whole. All images of large objects, such as the sky, water, clouds, and so on can serve as a uniform background. Any text on a uniform background is clear and readable. This is how you need to make an inscription in Photoshop.
The most important tool for editing text is called up by double-clicking on the image layer, which is located in the list of layers. Using the window that opens, you have the opportunity to fine-tune the text image. There is no point in describing each of the options, since there are a huge number of them. Experiment and use your imagination. Remember that any action taken can be undone using the back arrow icon.
27.07.2016 27.01.2018
In this tutorial we will look at how to make an inscription in Photoshop.
If you want to create a card to congratulate friends and acquaintances, create logos, etc., you need to learn how to work with Tool Text (Type Tool). This tool is in layers panel looks like a letter T, the hotkey to call it is T(in English layout).
Type Tool has two input options :
Horizontal Type- the most commonly used option and
Vertical Type- quite rarely used.
You can open text input options as follows: with active Text tool, click left mouse button on the tool icon while holding it keyShift or just hold down for a few seconds left mouse button when the cursor is near the tool icon.
Let's still learn how to make an inscription in Photoshop.
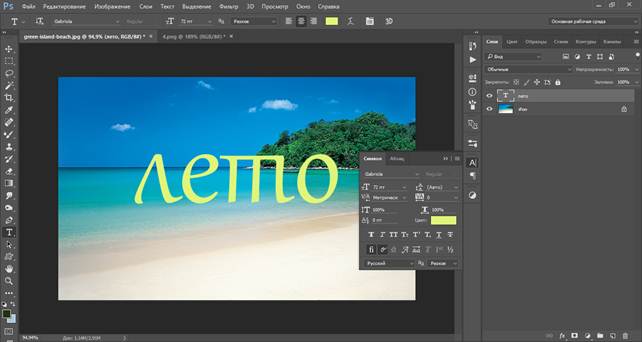
Let's open in Photoshop the picture or photograph on which you want to make an inscription. File-OpenOpen) . Choose Text Tool (Horizontal) (horizontal type), use the mouse cursor to drag out the “running ants” Text tool from the upper left corner across the entire image (this step is optional, the text can later be moved and positioned as you like, but if you initially decided to write the text in the center, it is better to stretch it) and write the text, for example, “Summer”. To apply the changes, click the checkbox in the top tool settings panel.

At the moment, the word we have written looks unsightly, but we will fix it. Let's take a look at the top tool settings panel.
1 - font. In the drop-down list you will see all the fonts installed on the system. If necessary, you can install those downloaded from the Internet and change the text font;
2 - font style;
3 - text size;
4 - font type;
5 - location (centered, adjacent to the left or right edge of the image);
6 - text color;
7 - text deformation;
8 - “Characters” panel - with additional settings for text;
9 - cancel action;
10 - application of action;
11 - 3d text.
When you open the “Symbols” panel, you will see a lot of settings, some of which are duplicated with top panel, some are unique.

In this panel you can change the distance between letters and lines, the boldness of the text, make it strikethrough or written in capital letters, etc.
Here's how the text changed after just changing the font, size, color and position:
But that's not all. You can “decorate” the text using layer styles ( Layer Style). To open the settings menu layer styles need to double click left mouse button by text layer in layers panel. The following window will appear in which you can change the settings to your liking:

You can also use ready-made layer styles - installed by default in Photoshop or downloaded from the Internet. To open a window layer styles, go to menu Window-Styles. The following window will appear:

To apply the style you like to the text, just double-click left mouse button According to the selected style, the layer with the text should be active at this moment. An example of applying a standard Photoshop style to text:

As for the vertical version of writing text, the principle and settings are the same, you just need to take into account that the text goes from top to bottom.
In this lesson you learned how to make an inscription in Photoshop. I hope the lesson was useful to you. Experiment with the settings to get your own unique text.