50 ideas and description of work for a house and furniture made of cardboard.
By playing with dolls, children learn to communicate with their peers and adults. They project the world they see around them onto the world of their toys. If a little girl played with dolls and took care of them as a child, then as an adult she will be able to skillfully cope with the responsibilities of the mother of her children and the keeper of the family hearth.
Of course, you can buy a house for dolls, but if you make it together with your child, it will not only be more interesting and more beautiful, but also more functional because the size and style of such a house can be made absolutely arbitrary. There can be several of them at once, if dolls live separately in each house.
The simplest houses made from cardboard are made by folding a sheet of cardboard and adding a roof. The walls of such a house look cozy by covering them with soft fabric.


Closing houses with four walls can be one-story.


They can also be two-story.

It’s easy to make such a house if you use a cardboard box rectangular shape. Its width becomes the base of the house, and the second floor is glued inside the cardboard box. And also two-story and even apartment building it turns out if cardboard boxes are placed on top of each other and glued together.


For making one-story house With gable roof you will need a simple pattern and colored paper for decorating the walls of the house.

The size of such a house and the shape of windows and doors depends on the wishes of the child. A boring house made of gray cardboard can be transformed by covering it with colored paper. To simplify pasting the walls of the house, they can be pasted disassembled, and only then assembled.


Houses for toy dogs in the form of a doghouse have round window And semicircular door. The dogs near the kennel are also made of cardboard.


How to make a cardboard bed for dolls
To make a crib for dolls, use a cut cardboard box.


The box is cut to the height of the crib. The headboards are glued to the head of the bed.


Apply paper masking tape along the edge of the crib to cover any unsightly cuts.


Now the crib can be painted any color you like. It is better to take opaque gouache paints for this.


You can put a mattress and other dolls at the bottom of the crib. bedding. And this is what the same crib might look like if you don’t paint it, but put a fabric cover on it.


Ruffles are sewn along the edge of the crib, and the back is decorated with lace.


The crib can be double and the child can put two dolls in it at once.


A bed for dolls can be made from cardboard using a simplified version. It is glued together from two cardboard boxes. One of them serves as a bed frame, and the other as a headrest.


To prevent such a bed from sagging, you can put a curved strip of cardboard inside it.
 Cardboard strip inside the bed
 Cardboard sofa for dolls
For a sofa made of cardboard, you will need a cut corner of a cardboard box and cardboard covered with fabric. The seat of the sofa and its side parts are pasted over and inserted into such a corner.


The sofa seat and its side parts are glued into the box.


Cover six sofa cushions with fabric.


The sofa with pillows is assembled and the glue is allowed to dry.


A cardboard chair for dolls can be made according to the pattern for assembling a sofa, but in this case the cardboard corner should be smaller and assembled from two pillows. And for making soft chair, cut out a seat in a cardboard box and cover it with a sheet of cardboard. Empty spaces under the armrests and seat are filled with foam rubber or other material.

The chair is covered with a fabric cover. To add volume, you can glue pieces of padding polyester onto the cardboard. Corner from small sofa and a square ottoman is made in the same way.


Cardboard cabinet for dolls
A wardrobe for doll dresses can be made with doors, or you can do without them. Inside such a closet, a crossbar for hangers with dresses is inserted into a slot in the cardboard. And below you can put drawers for small items.


Cardboard chest of drawers for dolls
The chest of drawers is assembled by placing small boxes in two or three rows in one large box. Such boxes can be decorated with paper different colors and make handles from bottle caps.


Cardboard computer for dolls
A child can make a computer out of cardboard himself; to do this, he will need to bend a sheet of cardboard in half and glue squares to it on one side, which will symbolize the keyboard, and on the other, a picture that will symbolize the monitor.

If you glue paper with a drawn keyboard onto a cardboard box covered with black paper, and pictures to the lid of the box, you will get a doll computer.

To make a TV from cardboard, just draw the handles of the sound and channel switches on a cardboard box and cut out a rectangle in it symbolizing the screen and insert pictures into this place. If the box is large enough, children can perform and speak in it themselves.


Kitchen made of cardboard for dolls
A cardboard kitchen for dolls can include a stove, refrigerator, kitchen tables and chairs. Such furniture does not have to be modeled from scratch. Use ready-made cardboard boxes for this. These boxes are painted to look like household appliances or covered with colored paper.


To make a refrigerator you will need a rectangular box. Shelves for food are glued inside it. The door is cut to size back wall refrigerator and glue it to the box. A handle is glued to the refrigerator door.

To make a stove from cardboard, you can use ready-made cardboard boxes. Burners for the stove can be unnecessary disks for the computer, and the handles are multi-colored covers from plastic bottles. To attach such a handle, cut a plastic bottle a few centimeters below the cap and insert it into the holes in the cardboard.

Cardboard food for dolls
Food for dolls is cut out from picture books, or you can draw it on paper and stick it on cardboard so that the images do not wrinkle or get lost.


Cardboard dishes for dolls
Plates for doll kitchens are cut out of cardboard and paper images of plates are glued onto them, which can be printed on a printer.


Pots and cups are made of two parts. One of them is the bottom, and the second side wall dishes. The lid for the pan is cut out several times larger diameter than the bottom of the pan.


Such dishes are decorated with applique or drawings.

Cardboard table for dolls
If you connect three rectangular boxes you will get a fairly stable table for dolls. From big boxes You can make not only a small doll table, but also a table for a child to play in the kitchen.

A sheet of cardboard is glued to the top, and you can decorate such furniture by gluing colored paper or sheets of wallpaper to the surface.

From matchboxes can be done small table with drawers. Matchbox cases are glued to the walls of the table, and boxes are inserted into them. These drawers slide out using handles.

Cardboard chairs for dolls
Using the same assembly pattern as for a three-box table, you can make chairs in the form of stools. Very small chairs for dolls are made from cardboard boxes for matches. The boxes are glued together with glue, and for strength they can be joined with paper masking tape. If you glue a circle of cardboard covered with a piece of fabric on top and put a piece of padding polyester under the fabric, the chair will turn out soft. More complex design near a cardboard chair with a back. In this model, the backrest is inserted into slots in the sides of the chair.
Boxes connected to each other make an excellent labyrinth with obstacles.

Cardboard hanger for dolls
To make clothes hangers for dolls, just measure the width of the doll's dresses along the shoulder line and cut out hangers of the same size from cardboard. You can strengthen the hangers from possible bends and glue such parts two at a time together. And if you stick paper on cardboard hangers and paint them with flowers, they will not only be functional, but also beautiful.

A cardboard phone for dolls can be either a mobile phone or a rotary phone.

A cardboard cradle is made by wrapping a deep cardboard box with beautiful fabric outside and inside.


Or paint the cardboard with paints, then bend and glue it on four sides to form a cradle.


Stroller for dolls made of cardboard
To make a stroller for dolls from cardboard, just wrap a small box in beautiful fabric or paper and attach a handle. The handle is inserted into a flat cardboard box smaller than the stroller. The box with a handle is glued to the cradle of the stroller.


VIDEO: How to make a toy house from fabric and cardboard?
Miniature doll furniture in children's toy stores costs a lot of money, but you need so much for games - a table, chairs, a sofa or bed, a wardrobe, bedside tables. Interior items can be made with your own hands, having simple materials on hand. Unlike store-bought furniture, homemade furniture can be made in a variety of ways. different forms and flowers and decorate as you wish.
No matter how much big house for a doll, he needs an interior. After all, your daughter’s doll should receive guests and relax somewhere. Making furniture for a dollhouse is very simple, and the costs for such work are minimal.

To create future furniture you will need:
- Empty matchboxes;
- Cardboard boxes;
- Boxes for tea, cosmetics;
- Plastic bottles;
- Tin lids for beer or soda;
- Pieces of fabric and thread;
- Paints;
- Buttons, rivets, beads.
First of all, you need to decide what pieces of furniture you want to have in your home. Do you need a bed, what size will the closet be, and where will the table and chairs be? Based on the general dimensions of the doll's house, you can roughly figure out the parameters of the furniture and select the necessary materials.
Furniture can be made both functional and simply decorative.
Matchboxes make ideal drawers for a chest of drawers or nightstand. You can cover a sofa with fabric and cotton wool - it will look just like a real one!
So that the wardrobe and other pieces of furniture are in harmony with each other and fit into the general view doll house, you can paste them with colored paper or paint them with paints.
Using your imagination, you can create the most unimaginable furniture and decorate it to your taste.
Paper furniture for a dollhouse: diagrams and detailed instructions
Before you start working on homemade furniture, you need to prepare drawings according to which the interior items will be assembled. In order for the furniture to turn out correctly when gluing, you need to draw a three-dimensional figure in parts with dimensions.

Diagrams of the main pieces of furniture:
- Table. It is needed even in doll house. If you want to make a rectangular table, you will need a piece of thick cardboard (or box) measuring 12x10 cm. To make table legs, you can use cocktail straws, which should be wrapped in paper and glued to the tabletop. You can also make square legs. To do this, you need to cut 16 strips 1 cm wide and 7 cm long and glue 4 pieces together. Glue the finished legs at the corners to the table.
- For round table You will need a piece of cardboard with a diameter of 8 cm. For the legs, you need to cut 4 strips of 17x2 cm, glue 2 each. Place the legs under the table in a semicircle crosswise and glue them to the tabletop.
- Chairs. The doll chair consists of two parts - a back with rear legs and the seat itself with front legs. The back of the chair can be curved a little, made openwork - as your child decides. The seat of the chair should be trapezoidal, like a real chair. Glue the finished parts together.
- Sofa. To create a sofa you will need 2 side parts 10x6 cm, a back 18x7 cm. For the base of the sofa you need to make something like a box - on a piece of cardboard 18x9.6 cm, retreat 2 cm on each side and make bends. Seal with thin tape to prevent the box from opening. Glue the side parts on the sides, place the back in the center.
Finished furniture can be covered with colored paper or self-adhesive film. The sofa can also be covered with thin felt, so it will look more like a real one.
What furniture templates are needed for dolls?
The topic of miniature doll furniture is now very relevant for parents who have daughters growing up. In addition to a doll, girls want to have a house, and it should have furniture. If it’s not worth saving on the doll, then both the housing and its contents can be made with your own hands.
In order to fold correctly doll furniture We need drawings with dimensions according to which we need to make templates. The cut-out printouts will be attached to the material from which the toy furniture will be made - cardboard, plywood, wood.

Templates can come in different shapes and sizes. For example, a table needs a rectangular or circle template. The legs will be attached to the finished base.
For a bed you need 7 different quadrangles - the base of the crib, the headboard, the foot and the side slats. In each plank you need to make cuts into which other parts of the bed will then be inserted. This doll bed does not need to be held together with glue; it will stick well anyway.
The bed can be made with a piece of an old towel or scraps of fabric.
Paper furniture for dolls: cut out according to templates
Many girls love to play paper dolls, which are cut out according to a template. Now in any bookstore or stationery store you can find a whole set of beautiful little paper dolls - Snow White, The Little Mermaid, Barbie, Monster High and many other modern cartoon characters. Such dolls often come with pictures, a set of clothes and dollhouse with furniture. All that is required of you is to cut out the templates, make bends in in the right places and glue the house and furniture together.

If the set does not include a certain piece of furniture, you can find it on the Internet, download it and print it on a printer.
When a baby plays with dolls, builds a house, and arranges furniture, she learns to be neat, develops imagination and develops creatively.
Doll furniture made of cardboard: making a chest of drawers for Barbie
Matchboxes will make an excellent chest of drawers for a doll. You can store beads, doll jewelry or rubber bands in a mini chest of drawers. To work, we will need three empty matchboxes (or other small boxes), PVA glue, a piece of cardboard, and beads for pens.
Work progress step by step:
- Glue the boxes together without the inner parts.
- Cover the finished frame with cardboard to form a durable quadrangle. We do not seal the front part of the chest of drawers where the drawers will be inserted!
- Cover the front of the drawer with colored paper and glue a bead onto the glue; by pulling it, you can open the drawer.
- Cover the entire chest of drawers with colored paper. Insert drawers into the chest of drawers.
- The legs of a toy chest of drawers can be made from shaped pushpins.
Your daughter will really like this chest of drawers. It is not difficult to make and, if desired, you can create many stylish chests of drawers for a dollhouse.
Miniature wardrobe: how to make furniture for a dollhouse
Your daughter's little friend also needs a closet to hide hers. beautiful dresses. It's easy and interesting to do. This is where your imagination can run wild! A doll's wardrobe will definitely be unique, because you come up with all the “stuffing” yourself - the number of shelves, drawers, their location.
To make a closet you need shoe box, wallpaper or colored paper, a piece of foil and a piece of wire.

Work progress:
- Trim the folds to the width of the cardboard box lid.
- Cut the lids lengthwise. Cover the halves with colored paper. These are the future cabinet doors.
- On inner side Glue a piece of foil to one of the doors to imitate a mirror.
- Glue the halves onto the box. You need to glue them on outside boxes so they can open.
- Make shelves from thick cardboard inside the cabinet as you wish.
- Make boxes from matchboxes.
- The wooden stick will serve as a pipe for the hangers. To do this, you need to make small indentations in the walls of the box and insert a stick coated with glue into it.
- Cover the entire closet with colored paper and make appliqués.
The doll closet is ready. Now all that remains is to fill it with doll clothes and shoes.
DIY furniture for a dollhouse (video)
Furniture for dolls can be made from all available materials; this will not only save your budget, but also give room for imagination. Don't forget that ready-made furniture can be decorated. Beads, tulle scraps or lace are suitable for this.
To make playing with dolls more interesting, you need doll furniture. You can buy chairs, cribs or sofas in the store, but not everyone can afford such costs. In addition, doll furniture self made is distinguished by its originality. That's why good decision– make furniture for a dollhouse with your own hands.
You can make furniture for a dollhouse with your own hands from scrap materials that can be found in every home. Advantages of handmade work: low cost, safety and original design.
The most comfortable materials are:
- Plywood (wood) is the material from which durable, stable and beautiful miniature furniture for a dollhouse is made. Working with wood is not easy, so you need to call your dad or grandfather, who has experience in working with such material, for help;
- Cardboard and paper are affordable and easy to process materials. You can take whole sheets or use empty cardboard boxes. Even children can make furniture for a dollhouse with their own hands; for this, adults only need to prepare diagrams from paper and provide the necessary materials;
- Matchboxes are a material that does not require special effort. To make furniture for Barbie with your own hands, you need to use your imagination, glue the boxes and decorate them at your own discretion;
- Wire is an easily bendable material that is suitable for creating frames and small parts. You can use it to make beds, chairs, hangers, chandeliers, candlesticks, curtains;
- Plastic bottles or cans. You can use cans to make bathtubs or tables with chairs. And if you show your imagination, plastic containers can turn into a crib, chair and other large furniture;
- If you use newspapers or magazines, you will need to wind more than a dozen tubes. Making wicker furniture is not difficult, just follow the steps exactly according to the diagram.
In addition to the materials listed, you can use lids, juice straws, polystyrene foam and egg containers to create your own furniture for a dollhouse.


How to make
To make furniture for miniature houses, you need to follow the instructions, making adjustments along the way if you don't have the right materials.
Sofa
To make a doll sofa you will need following materials: carton, fabric, foam rubber, stapler, thread, needle, scissors. The first step is to make the base. We cut off one narrow, one wide part and half from each short side from the box so that we get a frame. After this, we measure the dimensions of the sofa parts, transfer them to the fabric folded in half and cut them out. We sew the covers on both sides and turn them inside out. From foam rubber we cut out pieces smaller than the sofa parts. Foam rubber must be placed in covers and carefully stitched. We fasten the finished pillows with a stapler and insert them into a cardboard frame. For reliability, you can use a stapler to attach the soft part of the sofa to the cardboard base. As decoration, you can make several small pillows of different shapes.

Forming the frame

Cut out the required parts

Forming the seat

We fasten with tape

We carry out “tightening”

Finished product
Closet
To make a cabinet you will need the following materials: a shoe box, glue, scissors, decorative nails, pliers and wire cutters, tape, toothpaste caps, thread and needle, thick aluminum wire.
Making a doll cabinet takes place in several stages:
- Make a base - cut two unnecessary details boxes (closable elements at the top and bottom). The cabinet frame is ready;
- Make the legs. Turn the cabinet upside down and make markings for future legs in four places. Apply glue to each point and glue the toothpaste lids with the narrow part up;
- From the cut parts of the box you can build shelves inside the cabinet. To do this, you need to stick tape on both sides of the cardboard so that its length is several centimeters longer than the length of the future shelf. After this, you need to glue strips of tape on top of the shelf and below so that it is in a horizontal position;
- Make handles. To create them, you can use decorative carnations. They need to be stuck into the doors in the right place;
- Now you need to make a holder for hangers inside the closet. To do this, you need to take a stiff wire and use wire cutters to separate a piece that is 1 cm larger than the width of the cabinet. Then you need to mark the points inside the cabinet through which the holder will pass and stretch the wire through them;
- The cabinet is ready.
The finished cabinet can be decorated with any materials.

Finding a shoebox

Cover the box with white paper

Cutting out the elements

Cover the shelves with paper

Making shelves

Making a hanger from a wooden stick


Ottoman
An ottoman is not only furniture for relaxation, but also bright element interior The following materials will be useful for the work: a plastic comb, a cover or tape reel, wire, foam rubber, a piece of red or blue velvet, as well as paint, clear varnish, glue, and decorative gold ribbon. Decorative furniture It’s easy to make a doll with your own hands; to do this, you need to carefully follow all the steps:
- Make legs. Anything can be suitable for this, but to make them beautiful, you need to find an old patterned comb or a carved plastic decorative element and saw off four small rectangular pieces;
- Make the base. If you use a reel of tape to make a pouf, you need to stretch a wire across it so that the doll does not fall into the hole when sitting. Then a piece of thick foam rubber is placed on top and cut along the edge so that the base is completely covered. The material is glued and left to dry briefly. If a lid is used as a base, then the wire will not be useful in the process;
- Decorate the legs. While the base of the ottoman dries, you can start decorating the legs. Each part must be well rubbed with sandpaper and coated with gold paint. When the paint dries, apply a protective colorless varnish over the legs;
- Stretch velvet over the base. The fabric will not only decorate the pouf, but will also hide the unevenness of the original work;
- Glue decorative ribbon of golden or silver tone at the bottom of the pouf. This item will decorate and hide the place where the fabric and foam are glued together;
- Glue the legs to the base and check the chair for stability;
- The doll ottoman is ready.
If you choose the right materials and don’t miss a single point in the instructions, you will get a beautiful and comfortable ottoman.

Take the round one

Insert the wire

We cover the foam covering several times

Cover the base with fabric

We make decor

Mounting the legs
Table and chairs
From plastic bottles can be created kitchen set for Barbie, consisting of a dining table and several chairs. To create the kit you will need: bottles, scissors, double-sided sticky tape, marker, pieces beautiful fabric, cardboard, glue, padding polyester or cotton wool for filling. How to make furniture for a dollhouse with your own hands from plastic bottles.
- We draw a diagram of the future chair on paper, taking into account the size of the doll, cut it out, apply it to the bottle and outline it. Then we carefully cut it out with scissors and get an almost finished chair;
- Now you need to make legs for all the chairs. To make them, you need to remove the cork from the bottle, cut off small piece from the neck and glue to the bottom of the chair. These steps must be performed as many times as there are chairs at the exit you want to receive;
- Now decorate the chairs with paint or sew fabric capes. It is more convenient to use spray paints as a dye. To fill the dimples in the chairs, you need to sew round covers and fill them with soft filling.

Making a table template from paper

Cut it out

Painting and laying a soft seat
- Let's do dining table. It will require a piece of cardboard and the neck of a bottle. Measure the desired table height and cut the neck. Cut an oval or rectangular tabletop from cardboard and glue it where the cork should be;
- Paint the table the same color as the chairs;
- Cut a piece of ribbon lace and glue it along the edge of the tabletop;
- Make a copy of the tabletop and glue it on top of the table. Paint and let dry;
- The table and chairs are ready.
With this set of furniture you can invite guests and have a doll tea party. A similar set will decorate the kitchen, dining room or living room of a dollhouse.

Preparing the sticks for the legs

Decorating the legs

Making a table top

We screw in the screws

We put the sticks on the screws

Hanger
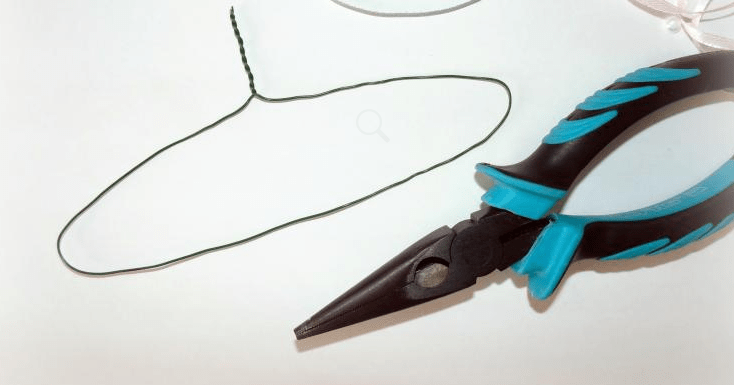
Each doll has more than one set of clothes that need to be stored somewhere. Cabinets and chests of drawers are convenient, but not practical. A hanger is what you need to keep your dresses in in the best possible way. To make a doll hanger you need: thin wire, satin ribbons, instant glue, beads, pliers. Making a hanger for a Barbie or other doll is not difficult.
First you need to decide on the sizes. In order not to deviate from the desired parameters, you can draw a hanger on a sheet of paper the right size, and during the manufacturing process apply a wire blank.
Now we take the wire and use pliers to form future hangers. It is very important that there are no sharp ends in the finished product. To avoid this, you need to bend and twist each edge of the wire. To make the hanger attractive, you can wrap a colored satin ribbon over it and secure its ends with super glue. The edges of the ribbon need to be burned so that the fabric does not fray. If you use beads for decoration, then during the process of creating the hanger you need to put a certain amount on the wire. Ready-made hangers, dried after glue, can be used to store doll things. They can be placed in a cabinet, the creation of which was described above.


Rounding off the product

Decorate with ribbon
DIY furniture for dolls - what could be better for joint creativity between parents and child? On the one hand, this great way save your family budget by buying miniature ones sofas and doll cabinets in specialized stores are not that cheap. Well, on the other hand, handicrafts help instill in your girl neatness, perseverance, and creative skills. So, let's figure out how to create doll furniture with your own hands and make it truly original, because you won't find exactly the same furniture set anywhere else!
Making furniture for dolls with your own hands: what available tools will be useful?
If you want to please your little one with a new addition to your doll's interior house, Don't rush to get rid of the following:
- matchboxes (it’s easy to build real ones from them) drawers For dressing tables and cabinets);
- cardboard boxes for shoes, cosmetics and small household appliances;
- plastic bottles;
- bright sponges for washing dishes and viscose napkins for cleaning;
- plywood;
- scraps and scraps of fabric and leather;
- flexible wire and foil;
- plastic food containers, egg molds;
- threads for knitting and other little things that will be useful in creating doll furniture.
Advice! In addition, you may need polymer clay, beads, beads, rhinestones and other decor at your discretion: after all, the brighter and more elegant the interior of the doll’s home, the better.
Master classes on creating furniture for dolls: detailed instructions for your creativity
Any mother knows: her daughter’s best friend is a doll. This means that you will have to make every effort to create a worthy home for your princess’s favorite toy. And you can’t do without furniture filling. We offer you several master classes that will tell you how to make furniture for Barbie, Monster High dolls, Winx dolls, baby dolls and so on with your own hands, and all you have to do is choose the appropriate option.
DIY furniture for dolls from boxes
We offer you two simple options making miniature furniture from cardboard boxes. We will make a dressing table and a chest of drawers.
For making dressing table we will need:
- a small cardboard box (hair dye packaging will do);
- scissors or stationery knife;
- ruler and pencil;
- foil;
- glue;
- white or colored paper for pasting finished product.
First, determine how high the future table will be so that the doll can comfortably sit in front of it. If you are making furniture for a doll standard height(Barbie, Monster High, Winx and so on), it can be 6-8 cm. Cut the box at this height.
Cut a flat piece of cardboard from the rest of the box (a blank for a mirror), the width of which matches the width of the table and has a height of 15-16 cm. Lubricate it with glue and attach it to the base.
Decorate the upper edge of the future mirror with curly openwork patterns or just make it round.
Cover the table with the mirror with white or colored paper.
Decorate the blank with drawn doors and drawers (they will not open or pull out). You can also decorate the walls of the table and the place for the mirror with any patterns.
The final touch: you need to cut it out of foil " mirror"and handles for drawers and doors, and stick them on the designated places.
Advice! Complete the dressing table with cardboard crib, made in the same style (for example, you can decorate its headboard with patterns similar to the decor of the table and mirror). This will help to decorate the interior of the doll's bedroom in a single key.
Connect the matchboxes together using glue so that their drawers slide out. When the furniture is ready, cover it with decorative paper.
As you can see, it is very easy to make furniture for dolls from cardboard with your own hands, and at the same time it looks just as beautiful as the purchased one.
DIY furniture for plywood dolls
We offer you a simple master class on making a round coffee table for a doll.
To make it you will need:
- plywood;
- a device for cutting plywood (for example, a jigsaw);
- glue;
- varnish or acrylic paint.
First you need to cut out two identical round elements (the surface of the table and the shelf), as well as the legs and stands for the shelf. Next, connect them together using glue, as shown in the diagrams we provided, and cover them with varnish or paint.
DIY furniture for dolls made of wood
We invite you to make a puppet sofa made of wood and fabric. To do this we need the following:
- flat wooden planks about 1 cm thick;
- wood cutting tool;
- glue;
- fabric for pasting.
Cut out five elements of the future sofa: the base (H6 cm * D16.4 cm), the same back and bottom (H6 cm * D14 cm) and two armrests that gradually widen towards the top (H4 cm * D6 cm below * D7 cm above).
Glue them together (except for the bottom).
Cut out fabric elements of similar sizes and glue them onto a wooden piece.
Separately cover the lower part of the sofa with fabric and place it on the base.
DIY furniture for paper dolls
To make a miniature paper doll table with a top made of mosaics, we need:
- very thick paper or cardboard for the base;
- ruler;
- awl;
- scissors/stationery knife;
- colored plain cardboard for mosaics;
- toothpicks or wooden skewers;
- thick threads;
- glue.
First of all, cut out the base for the tabletop from cardboard or thick paper. Its sizes can be any. Using an awl, make small holes on it in the corners for the legs, and on four sides for the stands that you will need to decorate the table with weaving.
Cut small squares from colored cardboard same size for table decoration. Stick them on top part tabletops in the form of a mosaic.
Insert toothpicks or skewers into the holes and secure them with a small amount of glue. Weave the table legs in a spiral with threads, the edges of which are secured with glue.
Glue the end of a thick thread to the underside of the tabletop near one of the racks. Start braiding the legs and uprights, passing the thread alternately under them and then over them. Make sure that the weaves of threads are located tightly, but do not tighten the racks too much, as this can lead to deformation of the finished product. Braid the table as much as you want, then decorate the lower and upper edges of the weaving with a decorative braid made from the same threads.