“Mail” is a famous tool from Apple that allows you to interact with email accounts in a compact client, where smart sorting of letters is available, the interface is clear, and you can enter new accounts indefinitely - important messages will arrive. This is the case, at least, with Google and Yahoo, but what if you need domestic services? It's simple! So, how to set up mail on iPhone.
General algorithm
Any interaction with third-party services in the “Mail” tool built into iOS begins from the “Settings” menu, or more precisely, from the “Accounts and Passwords” section, where, firstly, information about logins and passwords saved in the system for authorization, and secondly, a special platform is available for interaction with iCloud and “electronic boxes”.
Immediately after going to the section, you need to click on the “Add account” menu item, and then you will only have to act according to the specified algorithm, depending on the service being added (mail, yandex, gmail).
Sometimes setting up a new work or corporate email takes no more than ten seconds, sometimes you will have to enter a dozen additional values, select servers and nodes, and configure protocols. Even with a strong desire, it is impossible to get lost during setup - even beginners working with the Mail tool for the first time will immediately understand all the nuances and receive a truly multifunctional, and most importantly, completely customizable platform for personal and corporate communication on the network.
Settings options for mail.ru
You can set up Mail on iPhone as follows:
Settings for Yandex.ru

Settings options for GMail.ru

OutLook Mail

Rambler mail
The procedure for setting up the rambler completely repeats the instructions described for mail.ru and yandex.ru:

Mail settings for other services
Do you have an irresistible desire to add some exotic email account to your system, but you can’t find even the slightest details about the necessary setup on the Internet? Are the parameters not “clinging” in automatic mode? The situation is certainly complex, but solvable, there are at least two options:

Deleting emails from the server
Until recently (on iOS version 7+), Apple developers made it possible to transfer to an archive any messages appearing on Mail, both on a smartphone or tablet, and directly on the mail service’s servers. After iOS 10, the situation has changed - from now on, users can only choose where exactly to transfer old and unused messages - either to the trash bin or to the archive. This parameter is configured in the “Accounts and Passwords” section in the settings of the selected service.
Immediately after going to the “Advanced” menu, in the “Where to move unnecessary messages” item, select “Deleted”. Then, within a few weeks (or a month), the trash can will be cleared of accumulated garbage.
Mail apps on iPhone
The App Store, Apple's official app and entertainment store, is bursting with feature-rich email clients that make it easier to work with any email account. But, if you really choose the best mail application, then you should focus on three options:
- . Smart sorting of letters, and integration of third-party services (for example, developers allow phone numbers to be immediately saved to the address book, and dates to be transferred to the calendar), amazing optimization and support for the gesture system, as well as drafts, platforms for quick replies and history, where you can save an entire library. If the classic “Mail” has long been boring and changes are needed, then myMail is the best option;
- . And although there are no problems with authorizing a Google email account in iOS, the third-party application, Gmail, from a functional point of view, looks richer and more convenient than what the guys from Apple came up with. Everything here is of the highest standard - quickly, clearly, with gestures and integration. And you don’t have to worry about quick updates for new iPhones and iPads - Google always keeps an eye on new products;
- . Surprisingly, the domestic service copes with all its responsibilities perfectly - it has the same user-friendly interface as its competitors, the same ability to quickly transfer any data to third-party applications. There were even interesting additional technologies - like password-protected addresses and a schedule for sending letters throughout the day. The whole atmosphere is spoiled only by advertising that appears at a completely inconvenient time.
Additionally, it is worth noting the following clients - (interaction with other services of the famous search engine is perfectly configured - there is a search for hotels, and calling a taxi, and the ability to attach an account directly from the wallet), (simple, but tasteful), (very beautiful, but when working with multiple accounts you will have to pay at once).
Adding an account and setting up mail on iPhone is done in two ways - automatically and manually. Which method is more convenient is up to the user to decide.
For users of popular email services, the Apple device can independently carry out the setup in automatic mode. You just need to enter your email address and password. This is done in the following sequence:
- In the “Settings” of the iPhone, a submenu of accounts opens, where the “Add account” option is selected. In earlier versions of the operating system, this button is located in the “Mail” section.
- In the list that opens, click the service whose account the user is going to add. If its name is not in the list, select the “Other” line, where the service is entered manually.
- Enter the postal address and enter the password for it. Clicking the corresponding button starts checking the added information.
- Email account details can optionally be displayed on the phone. After setting the display parameters, the procedure is completed by clicking the “Save” button.
Russian sector
If the owner of an iPhone prefers services in the Russian space, the standard application makes it possible to do this as well. In the already mentioned Mail settings section on iPhone – “Other”, the following steps are taken:
- In the “New account” item, fill in the information lines. The “name” can be anything, it will be seen by email recipients as the author of the message. The “E-mail” field is filled in with the address of an existing mailbox. Enter the “Password” to access this mailbox and enter the corresponding domain in the “Description” section - Yandex.ru, Mail.ru or the domain of any other Russian service.
- Identification starts. When it passes, click “Save” and use of the service becomes available. If you still cannot receive and send letters, you will need to go through a few more steps.
- In the menu of the created account, select “Outgoing mail server”. To specify the primary server, sequentially press SMTP – “Not configured” – “Host name”. The last item is filled in in the form “smtp.example.ru”, where “example” is the name of the service being configured. By selecting “Save”, the primary server is stmp.example.ru.
- By clicking it, you should enable “Use SSL” in the options. The port value is set to 465.
- After saving the changes and returning to the account menu, you need to go to the “Advanced” section. SSL is also enabled here. The port value is set to 993.
Thus, you can add an account for the Russian sector, regardless of affiliation.
Selection of options
Almost always, the user does not need to manually enter parameters. If automatic regulation does not work, you may need to request the necessary information from the mail service.
The user will need to enter:
- protocol (IMAP, POP);
- port number of the incoming server (IMAP standard – 143 and 993, POP – 110 and 995);
- encryption option (SSL, TLS);
- outgoing port number (standard: 25, 587, 465).
This information will need to be obtained from the email service that the user plans to add to his iPhone. Other data required for manual entry should already be familiar and no special handling is required.
When accessing mail from multiple devices, it is preferable to choose IMAP. In this case, the data is stored by the mail server, so regardless of the access method, the user sees the full contents of the mailbox. If POP is used, messages received on one device will no longer be visible on another.
Other additions to settings
According to the preference of the iPhone owner, it is possible to select the mailbox checking mode.
In the “Downloading data” section of the account, you can choose the items “Manual”, “Push”, “Sampling”.
The first option assigns the function of downloading mail to the user himself. Every time you need to read a letter on your iPhone, you will have to activate message updating directly in the application.
“Push” notifies you of the receipt of new messages in real time, which is essential when waiting for important letters. In this case, increased energy consumption reduces the battery life of the smartphone. Also, “Push” does not synchronize with all servers.
“Sampling” combines the advantages of the two previous behavior models. There is automatic downloading - it turns on only when the device is charging and a Wi-Fi connection is established. There is a manual download that is enabled immediately upon entering the application, without the need to access it directly. And there is an interval mode in which mail is downloaded from the server at specified intervals. The shorter these intervals, the faster the battery charge is consumed.
Box liquidation
Removing any of the email accounts added there from your phone is even easier than adding it. It should be taken into account that all data associated with the deleted account will be lost.
- In “Settings”, select the “Mail, Addresses, Calendars” submenu, just like before binding an email address. In the list that opens, click the address intended for deletion.
- At the bottom of the screen, the user sees the “Delete account” option. But even by clicking on it, you still have the opportunity to change your mind - the system will ask for confirmation “Delete from iPhone.” If the decision is irrevocable, it is confirmed and all information associated with the box disappears.
The iPhone's focus on maximum convenience allows you to freely add and delete email accounts. But the user needs to be careful not to lose useful information when eliminating an extra box. Once deleted, this information can no longer be restored.
Setting up email on iPhone is really easy. Especially if it is mail from the mail provider Mail.ru. Carefully repeat each point of our instructions, and in a few minutes you will be able to receive emails directly to your smartphone.
How to set up/install Mail.ru mail on iPhone
1. First of all, we will need to go to the menu item " Settings"

3. As shown by the arrow in the figure, press the button " Add"

4. In the window that appears, there are no preferred settings for “Mail.ru” mail, so you need to add it yourself. Scroll down the page and click on the " Other"

5. Then go to the tab " New account"

6. When creating a new account, you have to fill in only 4 fields with the following names:
- Name- here we enter any account name you like
- Address- you need to enter the email address of the mailbox you registered earlier.
- Password- enter the password for your email address
- Description- in this field you can enter a description of your account that is convenient for you

7. If everything is entered correctly, your Mail.ru mailbox will work immediately. All you have to do is click on the icon Mail and check incoming emails.

Conclusion:
Setting up Mail.ru mail on an iPhone will take you no more than 5 minutes of free time. Setup instructions, checked several times. If something doesn’t work out for you, ask questions.
Stay tuned.
A mobile device should be comfortable and useful. And how can you do without fast and convenient mail? Proper configuration of your iPhone will allow you to achieve interaction between your iPhone and the desired mailbox.
Don't know how to create and add a new email? In this article we will tell you how to set up mail on iPhone (5, 6, 7, 8, X): Yandex, Rambler, Outlook, Mail.ru, Gmail and any other mailbox.
How to set up Gmail (Google) mail on iPhone 5, 6, 7, 8, X
Integration with Google is easier to do than with others. Those who limit themselves to this service will have the least hassle, because everything will happen almost instantly. Here's what owners of this mailbox need to do to set up mail on iPhone:
1. Select the “Mail” icon on the desktop of your smartphone (if mail is the first one).
2. Select "Google".
3. Enter the mailbox address and password.

That's the whole simple process. Additionally, you can specify your name and add a description, this can make using mail on iPhone more comfortable. All that remains is to save the result. It couldn't be simpler.
Setting up Yandex mail on iPhone 5, 6, 7, 8, X
This inconvenience has already been fixed in the new iOS, but users with older devices remain at a disadvantage. In this case, everything will be a little more complicated, but you won’t have to face anything truly difficult. Everything an iPhone user needs to do to integrate with the service:
1. Select “Settings”.
2. Click “Accounts and Passwords”.
3. Select “Add account”.
4. Click “Other”.
5. Select “New Account”.
6. Enter your email and password.
7. Change the IMAP protocol to POP.
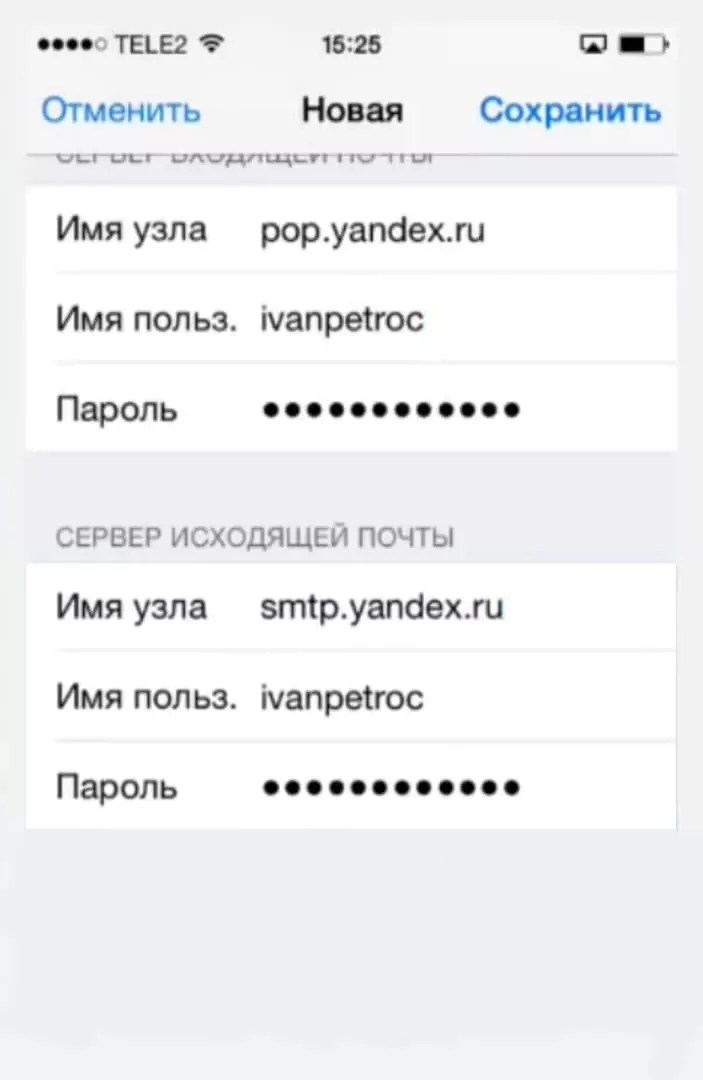
- In the “Incoming mail server” section, in the node name line we write: “pop.yandex.ru” and in the “User name” section we erase everything up to and including the dog.
- In the “Outgoing mail server” section, in the node name line we write: “smtp.yandex.ru” and in the “User name” section we erase everything up to and including the dog.


Setting up Mail, Rambler and other Russian-language mail on iPhone
In older versions of iOS, Russian postal services are not available by default. Therefore, as with Yandex, you will have to put more effort into integration compared to Google.
We will look at the three most popular Russian-language emails available for iPhone. Other Russian services will integrate with the iPhone in the same way as Yandex, Mail.ru and Rambler. The only difference from popular foreign analogues is that you will have to enter the data yourself.
Setting up Mail.ru mail
When adding an account for this service, you will have to do almost the same as with Yandex. The only difference is the names of the outgoing and incoming correspondence nodes.
This is what the name of the outgoing mail node should look like: smtp.mail.ru. The name of the incoming mail node should be made like this: pop3.mail.ru. Now the service is ready to work, and the user only has to save the result.

Setting up Rambler mail
Ideally, when using this service, all data should be entered automatically, but there are times when this does not happen. They are easy to enter yourself. The algorithm of actions is the same.
You need to change the node names. In this case, for the incoming mail server this name will look like this: pop.rambler.ru. The host name for the outgoing email server will be: smtp.rambler.ru.
For the service from Rambler, you can also use the IMAP protocol. It is more difficult to configure than POP3, but has a number of advantages. The service's help articles will help you activate the protocol.
Adding a second email on iPhone
Very often, people start using not one, but several emails on iPhone to achieve greater convenience. For example, one email can be used for Twitch and YouTube mailings, for games and other entertainment industries. Another may be working and limited only to business letters and invitations. I think you understand the essence of the message, so let's look at how to connect a second email on an iPhone.
1. First, go to “Settings” and find the “Accounts and Passwords” section (the name may be different depending on the iOS version).
2. Select the "Add Account" tab.
3. Now, simply repeat all the steps described in the previous step.


Important: the second mail will be located under the first and in order to go to it, you will need to scroll down the page.
How to find out your mail settings through the Apple website
In order to find out what your mail settings are, you can simply use the Apple website. To do this, do the following (or just go to):
1. Select "Support".
2. Click "iPhone".
3. Scroll down the page and select the “Programs” tab.
4. Click Mail.
5. Tap “Search for Mail program settings.”
6. Enter your mailbox address.

As a result, the user will receive settings for the Mail program. This is a convenient and quick way that allows you to easily find out which mailboxes have already been integrated, how filters are configured, etc.
How to set up mail on iPhone, making it more convenient?
Everything is clear with integration and basic settings. But it is important to know how to configure the rest. To achieve convenience and save time, it is worth paying attention to, among other things, the following aspects:
- Incoming letters;
- Outgoing letters;
- Spam;
- Drafts;
- Profile settings.
How to organize and sort a large number of incoming emails?
It is convenient to organize groups of messages by topic. This will significantly save time and also add convenience. You can do this in several mailboxes at once using the Mail program. Here's what to do:
1. Click “Settings”.
2. Select "Mail".
3. Click on “Processing themes”.
You can select Collapse Read, Organize by Topic, End Topics, or Last Email on Top. Which of all this is more convenient? Depends solely on the user's priorities.
It is convenient to respond to messages if they are all sorted into groups. Otherwise, the user risks getting confused and sending a message to the wrong place. This is especially important for business people.
Setting up email notifications
Setting up notifications for email replies is important. To do this, through “Settings” you need to go to “Notifications”, and then to “Mail”. There you can configure the “Notify me” function.
In principle, like all actions performed on the iPhone, setting up mailboxes has its own characteristics. It is not complicated, it is enough just to know some of the nuances when adding each of the services. It is advisable to connect your iPhone to the Internet before the procedure so that you can immediately check the correctness of the entered data and the presence of a box with the same name. And also to make sure that the created setting works. But this is not mandatory; everything can be done remotely. The first time you connect to the network, all necessary checks will be carried out.
If we are talking about our own (iCloud) or Apple-friendly resources - Yahoo, Outlook.com or Gmail, then even an inexperienced user can set them up without any problems. This is due to the fact that the standard client built into the iPhone operating system - iOS - Mail.app, can automatically add server settings for incoming and outgoing mail services. It will be enough to simply enter your information into your account and add the existing mailbox to the smartphone’s memory.
To do this, from the settings menu, go to the mail, addresses, calendars tab. Click on the item - Add account.
In the dialog box provided, select one of the automatically configured accounts. At the moment, the user is offered six options. Such a selection once again shows that iPhones are “tailored” to the American market.

After this, you will need to fill in your data in the standard four fields: username, E-mail address, password, as well as a description (the name of the future link is indicated here, you can simply duplicate your address here), and the mail manager can do everything else itself.
For example, this is what the process of setting up the Gmail service will look like.

After entering personal data into the dialog boxes, the system will offer to save everything and synchronize mail, all contacts and calendars with notes between the mailbox and the iPhone. To do this, activate the slider opposite the desired action, if necessary. Ready.
If you suddenly want to make any changes after installation, this option is available at any time. All you have to do is select a specific account and adjust the data.
For all other services offered by the manufacturer in accounts, the settings algorithm is exactly the same.
What about Russian-language postal services?
The situation is a little more complicated with other mail agents Rambler, Mail.ru or Yandex, popular in our latitudes. You will have to manually enter the data into the existing fields. Since they all have their own characteristics, we will consider each of them separately.
So, in order to set up your mailbox on the sixth iPhone Yandex- you need to partially repeat the path described above. Just select this time the item – Other – at the very bottom of the accounts menu.

Enter your name, email, password and description (the first and last are optional). Built-in mail settings manager in iPhone will prompt you to create your mailbox in the standard IMAP protocol, but when filling it out an error will probably be displayed. You will need to exit the automatically downloaded IMAP window and switch to POP. Select the appropriate tab on the right - POP. Most of the remaining data will be linked automatically.

Then you should change the host names for the incoming and outgoing mail servers to the following:
In the server subsection for incoming mail, next to - Host name - enter pop.yandex.ru;
In the server subsection for outgoing - Host name - on smtp.yandex.ru.

After checking and confirming the entered data, save all changes made. Synchronize contacts if necessary. After this, the mailbox will work safely on the iPhone.
Now let's repeat this procedure for Rambler. Don't forget to switch to the POP protocol. When trying to set up a new Rambler service mailbox, sometimes data about the mail server host name is not entered automatically after filling out the top user fields. If this happens to you, enter them manually, they should have the following names:
— Host name in the incoming mail server tab — enter pop.rambler.ru;
— The host name in the server tab for outgoing mail is smtp.rambler.ru.
This is what it should look like:

After the saving and synchronization procedure described above, this box in Rambler will also be linked to iPhone, and ready to go.
For Mail.ru – We repeat the same procedure again, but only in the settings menu of our mailbox, in addition to personal data, we enter:
The node name in the incoming server tab is pop3.mail.ru;
The host name in the outgoing server tab is smtp.mail.ru.
And a picture to illustrate these actions.

You can add several mailboxes from different mail services to your iPhone’s memory at once. Or configure one of them so that all incoming letters from different addresses flow to it.
That's all the manipulations you need to do yourself. It is enough to carry out this simple procedure once, and you can safely enjoy all the advantages of modern technologies - have unlimited access to incoming letters and respond to them promptly.
We have described the simplest option for designing and installing email services on an iPhone - via the POP protocol. Of course, to expand their capabilities it is better to use the more advanced IMAP protocol. But you can’t just install it from an iPhone. Before this, you will need to activate permission to use this protocol in the settings of each specific mail server. It is clear that this method is not suitable for beginners, since they will also have to familiarize themselves with their features and manuals. Therefore, if it is enough for you to simply send and receive letters, then make a simple and quick registration of the mailbox via the POP protocol, as described in this article. Good luck!