A good tool for caulking a log house will allow the master to do everything in the best possible way. It is impossible without diligence, concentration, and ability to achieve quality when caulking a house or any other construction project.
To perform a specific task, you need to have an appropriate set of tools. Its presence will allow everything to be completed with proper quality and as quickly as possible. This also applies to caulking at home.
In construction, the term caulking is used, which refers to the process itself and the tool for its implementation. This process is the sealing of gaps and cracks that arise for various reasons when installing log houses. Caulking is also called a special tool. This could be a wooden tool or a metal spatula.
A caulk is a handle with a blade. Additional tools are also required for caulking.
Selection and use of caulk
To work, you also need a flat caulk. The very name of the instrument speaks for itself. It is used to install insulation using the kit method. This means that the material is twisted into a single thread using a series of loops. The loops are pushed with a tool into the cracks and gaps between logs or beams. Well-known requirements for a blade:
- It is better to use a tool that has a metal main working part. Iron should not bend easily. In this regard, high-quality steel is preferable.
- The handle of the tool should fit well in the hand and be comfortable. Handles made of corrugated rubber or rubber handles have proven themselves to be the best.
- You need to hit the end of the handle with a mallet. The end should be a knob with a cap.
It is better to use a caulk with a blade measuring 100 mm and a thickness of 5 mm.
In addition, other tools are used for caulking a log house. They are presented in a wide range, which allows you to choose a copy that is convenient to use.
Correct caulk
Features of wooden tools
This tool is something like a wooden spatula. It can be made on your own. It may seem that there cannot be any special difficulties. You just need to plan a wooden blade and start insulating it. Slowly tap the instrument with a wooden mallet, sealing the seam with tow.
Some craftsmen even try to use an axe. They just try to stick the tow inside the seam.
Insulation is not an easy process. In ancient times, self-made blades of different widths and sharpness were used to perform it. But this was not entrusted to everyone, but only to a recognized craftsman.
A caulk is a tool that must have the following necessary qualities. It should be made from hardwood. If the material was unsuitable, it lost its qualities after just a couple of meters of sealed seam. The blade could become covered with burrs and become completely unusable.
If the hammer for hammering is made of metal, then the caulk must also have a metal handle.
The purpose of the application is to fill the seam as tightly as possible with insulation. When using low-quality logs in the construction of a log house, it will be necessary to seal fairly wide seams. This circumstance will allow you to fill them out without any extra effort. When finishing a log house with thin logs, you will need to use a metal device.
Using a caulking chisel
A caulking chisel is a metal version of this tool. Today you can buy it in a store without any problems. Branded products are offered by the best manufacturers.
A good quality chisel can also be adapted under certain conditions. It should not be particularly thick and have a blade less than 5 mm thick. A regular chisel is too narrow. They will have to carry out insulation for an unreasonably long time. The process will be speeded up by a 100 mm spatula. It is this device that needs to do the job. This tool is called a caulking tool.
Chisels are used to perform specific operations. They have different lengths and blade thicknesses. It is necessary when sealing seams and grooves of different sizes.
Using caulk with a hammer drill
A caulk with a hammer drill will significantly speed up the progress of work. In this case, the quality will be worse, since there is a high risk of damage to the logs of the log house. The load becomes uncontrollable. This is due to its shock nature. Manual execution requires the master to make only 1 blow per width of the blade of the device.
The insulation is placed at a given depth. Using a hammer drill involves frequent impacts that the worker cannot accurately assess. The insulation is laid unevenly, the seams are insulated poorly.
A significant positive aspect of using a hammer drill is the speed of the operation. Professional caulkers prefer not to use a hammer drill because they value their own reputation.
Mallet for performing insulation
A wooden hammer or mallet is simply necessary when insulating a log house. A good master with experience and significant experience usually has his own large set of mallets of various modifications. It is preferable to use a mallet of the same type of wood as the log house that needs to be caulked. This is not always essential, but it is desirable. Mallet has other names. Some masters call it a mushel, a beater.
A curved caulk will be very useful in this work. In a log house there are a large number of rounded sections, the ends of the logs. This type of caulking has a narrower blade than a flat caulking, its size is 50 mm with the same thickness of the blades of both modifications of the tool.
A road worker is also used. This tool has a fork-shaped appearance. It is necessary for forming rollers in the most convenient way. A road builder is used when caulking a log house using the stretch method. It should have a width of 170 mm. The recess in the road construction must be selected in accordance with the dimensions of the grooves. An experienced master always has at least 3 tools of this type with him. They are used for seams of different sizes.
It is equally important to have a breaking caulk on hand when caulking a log house. It is necessary to widen an excessively narrow groove. The breaking caulk has a wedge-shaped blade, which makes it possible to expand the space. It will have to be filled with material using another device.
Execution of work
Caulking of log houses or beams is a labor-intensive task that is performed entirely by hand. There are no devices that mechanize such work. This process is long and quite difficult; the master performs it only with his own hands.
Caulkers are a special specialty in wood construction. The caulking team consists of several physically resilient and strong men who perform caulking exclusively.
Since these masters are not involved in other types of work, they reach the pinnacle of mastery in their specialization and have the highest qualifications. If possible, you should definitely use the services of such a team, since everything is done quickly and with the highest quality.
It is quite clear that a team of caulkers has at its disposal the entire necessary set of tools to carry out caulking of a log house of any complexity:
- in the presence of any material for sealing the seams of the log house;
- different sizes of seams;
- different types of wood for wooden buildings;
- the need to seal seams in complex elements.
Every stage of work is important. It is impossible to neglect caulking, on which the warmth and comfort of living in the house depends. It is impossible to do without it in wooden construction.
Caulking a log house is hard and responsible work. With its help, you can correct some defects made during the installation of the house, even its distortions. You can decide to do caulking yourself only after thoroughly studying the caulking technique and choosing the right material for filling the cracks and the right tool.
Caulking Tools
When wooden log houses were the main method of house construction, professional caulkers mostly used wooden tools. Of course, it wore out quickly and had to be replaced frequently, but it was softer than the building material used and did not damage it. And now, although the market offers durable metal tools for caulking, craftsmen often use wood products. In addition to the fact that they are more practical to use, their price is lower than their metal counterparts.
Required set of tools:
- Stacked caulk.
- Crooked caulk.
- Breaking caulk.
- Road worker.
- Mushel (mallet).
Types of instruments
Types, purpose and characteristics of caulking tools:
Typesetting
The most important item for caulking a log house is a spatula, or, as it is also called, caulking. For ease of use, you need to have a set of several of these products of different sizes, which can be used to seal grooves of different widths: narrow, medium and very wide. The most commonly used tool is 10 cm wide, 0.5 cm thick and about 20 cm long: with its help, the main area of the log house is caulked. Narrow caulk is used when you need to seal cracks in inaccessible places.
Road worker
If the caulking of a log house will be done using jute or tow using the stretch method, it is better to choose a device with a longitudinal groove for the work - a road builder. Thanks to the recess in the tool, the material for filling gaps is easily rolled into a roller, and the work process moves faster. The road worker is a flat blade with a blade 8 to 15 mm thick, which has a 10 mm deep groove in the middle part. To work, you need to purchase a set of 3 of these products, and use them depending on the width of the gaps between the logs of the log house.

Crooked caulk
To seal seams in the corners or curves of a log house or house made of timber, curved caulk is used. With its help, grooves are filled that cannot be reached with a spatula with a flat blade. Unlike a spatula, it can be made of metal - it is easier to reach the very center of the bowl of corner joints.
Breakable
It is used when it is necessary to widen tight grooves so that enough material can be placed in them to seal them and is a flat wedge-shaped spatula, only about 3 cm wide.
Mushel (mall)
The tool, better known as a mallet, is a wooden hammer. By hitting the caulk with a mouchel, the jute or tow is pushed as deep as possible into the grooves. A metal hammer is not entirely suitable for these purposes, since the blows are hard and you can damage the log, fail to calculate the force of the blow and break the roller, and your hands get tired from working with a heavy tool. In exceptional cases, you can use a regular hammer, putting a rubber pad on its striking part.

The mushel is made from wood species whose hardness is superior to the wood used for logs. To protect the wooden hammer from splitting, hoops are placed on both sides of it.

All tools are simple in design, so you can make wooden objects yourself, following no complicated rules, and buy metal ones at a hardware store.
All types of blades should not be sharp, as a blade that is too sharp will cut tow, jute and other caulking materials. Wooden blades are made from wood that is slightly softer than log wood. A tool that is too hard will leave marks on the logs and crush the caulking material.
The blades of the blades must be perfectly smooth, free from burrs, roughness and other defects. If the shovel is flawed, the caulking material will catch on its irregularities and, instead of being pushed between the logs, will come out again.
Caulk is a slang word that refers to the process of caulking the walls of a wooden house. It comes from the name of the tool for sealing gaps and cracks in the frame of a wooden structure - caulking.
Tools used for caulking
Caulk is a wooden spatula. It is made of hard wood and looks like a blade with a pointed end and handle. The blows to the shoulder blade are applied mallet— it is also made of hard wood. Strikes with a mallet must be applied until the material begins to spring back, as it were, that is, to the maximum possible density. Builders call this condition “before the bell rings.” By gradually adding insulation, the seam being sealed is completely filled.
Attention! We do not sell tools, we do caulking of log houses.
By using flat caulking(A) caulk the gaps and grooves. The width of its blade is 100 mm, and its thickness is 5 mm. To seal corners and rounded areas, use a special crooked caulk(B) - its width is also 5 mm, and the blade is narrower, approximately 50 - 60 mm. To settle strands of tow and give them a roller shape, use road worker(G). The width of its blade reaches 170 mm, and the thickness is from 8 to 15 mm. A groove 10 mm deep is made along the length of the blade. It is more convenient to have three road guides - for grooves of different sizes: wide, medium and narrow. By using breaking caulk(B) with a 30mm wide wedge-shaped blade, widens narrow grooves, making it easier to insert insulating material into the gaps. Mallet, mushel, beater(D) - all these are the names of the wooden hammer that is used to hit the caulk.
The general requirements for all types of caulking tools are that their blades should not be too sharp so as not to cut the insulation used. They should not have any roughness on which the inserted materials could get caught and accidentally be removed from the groove.
Some nuances of caulking
The wooden structure is caulked in several stages. The first stage is caulking the building immediately after the roof is erected. In order for a wooden house to be warm and windproof, it must be caulked on both sides - external and internal. It is very important to properly insulate a building. Caulking begins from the bottom crown and sealant is placed in the gaps around the perimeter of the entire building. Then they move on to the next seam and continue work on insulating the structure to the very top.
At the same time as the outside of the structure, the inside should also be caulked. When insulating external and internal walls in turn, vertical deviation of the walls is possible. At first glance, caulking seems to be a fairly simple construction operation; in fact, it is a complex, time-consuming job, on which the quality of the built house largely depends.
The second time caulking is done after the house has given its initial, basic shrinkage. This usually happens after a year or two, depending on the type of material from which the structure is built, the degree of its humidity, and some other factors.
After 4 - 5 years, to achieve the final thermal insulation effect, it is advisable to repeat the work of caulking the building.
The window sill will help protect the building from the undesirable consequences of natural shrinkage. It will protect window and door openings from deformation, and the seal placed between the logs or beams and the casing itself will additionally insulate the structure.
To ensure that all the necessary work is completed efficiently and professionally, it is best to seek help from a team of specialists. The professional workers of the Konotopets.ru company, having invaluable many years of experience working with wood, will carry out the necessary construction operations with high quality and with full responsibility.
Caulking a log house is a painstaking process that requires patience and great effort. Everything matters here: the tool, the quality of the material, the sequence of work. Without the appropriate experience, not everyone can properly caulk a log house, so first you need to familiarize yourself with the technology, study caulking methods, and choose the right inter-crown insulation.
Caulking of a log house is carried out in two stages - immediately after construction and after some time, when shrinkage occurs. Primary (or rough) caulking can be carried out in two ways: with laying insulation during the process of assembling the walls or performing one-time work upon completion of construction.

1 way
Lay the bottom row of logs on the base.

Then the insulation is spread on top so that the ends of the material hang evenly on both sides. Next, lay the second crown, and again a layer of insulation. This is repeated until the very top of the log house. After all work on the construction of the log house is completed and the roof is installed, the protruding ends of the seal are driven into the gaps between the beams using caulking.

Method 2
Caulking begins after installation of the roofing system on the log house. Insulation (preferably tape) is applied to the seam of the bottom row and, using a tool, is pushed into the gaps between the logs along the entire length, leaving hanging edges 5-7 cm wide. Then these edges are folded in, formed into a roller and hammered inside the seam. Repeat the procedure in the next row and so on until the top of the structure.


The second stage of caulking is carried out after shrinkage of the log house - after 1-2 years. The selected insulation is applied to the cracks between the crowns and driven tightly inside. You should always start work from the bottom row, and be sure to do it along the perimeter of the log house.

You cannot caulk one wall first, then the second, and so on. In addition, each row is caulked both from the outside and from the inside to avoid distortions in the structure. The insulation raises the frame by 5-10 cm, and its uneven distribution contributes to the vertical deviation of the walls. In some cases, the log house is caulked for the third time - 5-6 years after construction. During this time, the wood completely shrinks and new gaps form.

There are two ways of caulking - “set” and “stretched”. The first is used to eliminate wide gaps between logs, the second is usually used during primary caulking, when the gaps are still narrow.
To work, you need tools - a set of caulking tools, a road worker and a mallet. As a rule, metal caulks are used, although many craftsmen make them themselves from hardwood.

| Name | Description | What is it used for? |
|---|---|---|
| Flat metal or wooden spatula. Blade width 100 mm, thickness 5-6 mm | The main tool for filling gaps between crowns | |
| Flat chisel with a blade width of 50-60 mm and a thickness of up to 5 mm | Used to seal seams in corners and rounded areas of a log house |
| The caulk is triangular in shape with a longitudinal groove along the blade. Width - 170 mm, thickness 8-15 mm | Tool for forming even beads from twisted strands of compaction | |
| Thick and narrow wedge up to 35 mm wide | Widens narrow gaps, making it more convenient to fill with insulation | |
| Wooden hammer | Used for filling the seal with wooden caulks |

The caulking blades should not be sharp, otherwise when driving the material they will cut it. Pay special attention to the surface of the blades: if it is rough, the insulation fibers will cling and be pulled back out of the seams.
Caulking materials

The following materials are used as inter-crown insulation:
- red and white moss;
- tow;
- felt;
- jute;
- flax wool.
| Type of material | Description |
|---|---|
| Environmentally friendly material with antiseptic properties. If you independently procure raw materials, the costs of insulating the log house will be minimal. It is usually collected in late autumn, when there are no snails and fewer insects. Immediately after collection, the moss is sorted, lumps of earth and debris are removed, and slightly dried. There is no need to dry it too much, otherwise the stems will become too brittle and unusable. Purchased moss must be soaked before caulking to make installation easier. Pros: durability, low thermal conductivity, resistance to temperature changes, environmental friendliness, antimicrobial properties, low cost. Cons: difficult to find on the market, requires protection from birds, requires pre-treatment before installation |
|
| Tow is suitable for the initial caulking of a log house and for sealing the crowns after shrinkage. It is made from flax fibers, and depending on their quality, it is divided into bale and roll (tape). Rolled fiber consists of shorter and stiffer fibers, which makes it difficult to stuff between the crowns. Tape tow is better in quality, softer and more convenient for caulking. Pros: has low thermal conductivity, does not electrify, is highly absorbent and dries quickly, has bactericidal properties. Disadvantages: labor-intensive installation, unaesthetic appearance of seams after caulking. |
|
| Until recently, natural felt was widely used in the insulation of log houses. Now its composition is supplemented with synthetic and plant fibers, which significantly improve its individual properties. And yet, felt insulation without additives has a number of advantages: it has high vapor permeability, does not allow odors to pass through, provides good noise insulation, has low thermal conductivity, is easy to use, and is environmentally friendly. Cons: susceptible to rotting, easily damaged by moths |
|
| Traditional insulation materials are increasingly being replaced by materials such as jute. It is available in the form of fibers, ropes of any thickness, and also in the form of tape. Tape jute is soft and pliable, compacts evenly, and is used for both primary and repeated caulking. It is more convenient to use jute fibers and ropes after shrinkage of the log house. Pros: it is durable, not damaged by moths and other insects, does not rot, and provides a favorable microclimate in the building. Cons: the material cakes quickly, short service life. |

Primary caulking “stretched”
The whole process is divided into two stages - laying insulation between the logs during the construction of a log house and the caulking itself. The insulation is laid after installation of each crown. If moss is used, it should be slightly damp.
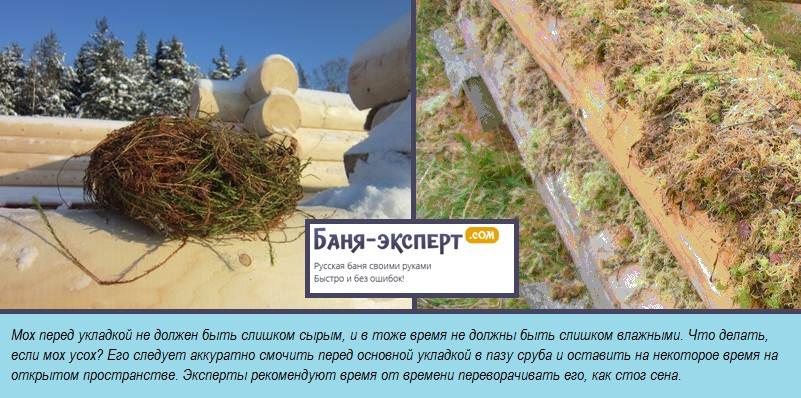
Take a large bunch of moss and lay it in fibers across the log so that the ends of the fibers hang down on both sides by 5-7 cm. The next bunch lies close together.

The fibers must be evenly distributed over the surface, forming a layer of equal thickness. The wood should not show through the moss, so make the insulation layer thicker. It is better to put too much than not to add, because a thin layer will not be able to effectively protect the seams from blowing.

If you use tape insulation, installation is much simpler and faster: the tape is rolled out along the crown and secured with the staples of a construction stapler. When the tape runs out, the new piece is overlapped by 5 cm so that there are no gaps at the joints. After the entire row around the perimeter is covered with insulation, the second crown is installed.

So, the log house has been erected, the roof has been installed, and the walls can be caulked.


The procedure for caulking and sealing cracks after shrinkage of a log house
It is more convenient if the insulation is tape, then forming a roller out of it is much faster. When twisting the material, it must be slightly stretched along the seam, which promotes greater compaction and uniform distribution of the insulation. Sometimes the thickness of the roller is not sufficient to fill the gap, then they take additional strands and wrap them in the hanging ends of the material. After this, the thickened roller is driven into the gap.

If during the construction process insulation was not laid between the logs, caulking is performed in the manner described above, only more material will be needed. It is necessary to apply it to the seams with the fibers across. The longitudinal arrangement of the fibers will not provide the required density; the material will not be able to be firmly fixed and will constantly crawl out of the grooves. When choosing a tape compactor, make sure that the width of the tape is several centimeters greater than the thickness of the log. Edges that are too short are difficult to tuck, and therefore the quality of caulking will be poor.
- The edge of the tape is laid on the ground near the corner of the log house and retreated along the wall, unwinding the roll. The material cannot be pulled, it should simply lie in an even strip on the ground. It is very important that the tape does not twist during the unwinding process. Having reached the second corner, the roll is also left lying, nothing is cut off yet.

- Return to the beginning of the tape, take it by the edge and apply it over the seam. Using a caulking blade, press the tape in the middle, leaving the edges to protrude by 5-7 cm. In this way, the entire inter-crown seam is passed.

Insert insulation into the seam
- Measure out another 25-30 cm of tape and only then cut it off the roll. This reserve will allow you to hammer the grooves more tightly without adding insulation.
- Now, little by little, straightening and tucking the edges of the material, they begin to caulk the seam. The tape should completely disappear into the gap between the logs along with the reserve.

- As a rule, one layer of tape is not enough for high-quality filling, so everything will have to be repeated two or even three more times.
- The finished seam should protrude from the grooves no more than 3-4 mm and be of uniform thickness.

If the gaps between the crowns are very wide, caulking is used “in a set”. For these purposes, tow, hemp ropes or jute cords are used. Long strands are formed from tow and wound into a ball. Finished cords or ropes are also wound into balls for convenience.

Start from the edge of the lower crown:
- clear the gap, removing loose chips and debris;
- unwind a small amount of cord, fold it into loops and push it into the gap with caulk;
- seal the loops first in the upper part of the gap, then in the lower part;
- put another strand on top, this time without loops, and level it with a road worker.

Further along the seam, the strands are laid in one layer until the next gap. The more densely the voids are clogged, the better the insulation. Try not to leave hanging fibers: firstly, they spoil the appearance of the wall, and secondly, the seal can be pulled away by birds. Having finished caulking the first row, they move on to the second, and everyone repeats in exactly the same way.
To make the log house decorative, you can hammer a jute cord along the entire length of the seams.

Caulking corners
The corners are caulked separately after the work on the walls is completed. It is also more convenient to use tape insulation here.

Since the seams between the logs at the corners have a semicircular shape, you will need a curved caulk.

Step 1. The tape is positioned vertically. Take it by the edge, apply it to the corner seam and press it inward with caulk. They step back down a little and drive the material into the gap again.
Step 2. As soon as the insulation has been secured a little, they begin to tuck the protruding edges and drive them deeper into the cracks.
Step 3. After filling and leveling the top seam, move on to the second. The material must be constantly straightened and stretched a little so that it lies more evenly.
This is how the entire corner is sequentially compacted. The seams should not protrude more than 5 mm, otherwise the appearance will be sloppy.

Video - How to caulk a corner of a log house
Caulking a log house with sealants
Caulking of log houses with special sealants, which are easy to apply, give the seams a very aesthetic appearance and reliably protect against blowing, is gaining popularity. If the log house is made of rounded logs or laminated veneer lumber, and jute is laid as insulation between the crowns, you can only use sealant and a rope made of foamed polyethylene. Sealing of seams is carried out no earlier than shrinkage of the log house occurs.
Step 1. The joints between the logs are cleaned of dust and clogged debris and wiped dry with a rag.
Step 2. A primer primer is applied along the perimeter of the seams using a brush or sprayer. If work is carried out in winter, the primer should be rubber-based; in summer, water-based.
Step 3. After the primer has dried, a rope of foamed polyethylene is inserted into the seams, the diameter of which is selected according to the width of the gap.


Step 4. Apply sealant. The composition is used in tubes, which is applied using a mounting gun, in buckets and in the form of a tape. The latter option is very easy to use: remove the protective film from one side of the tape, apply it to the seam, press it with your hand and roll it with a roller.


Step 5. After sealing all inter-crown joints, remove the outer layer of film so that the sealant hardens. Finally, the joints are coated with colorless varnish or a tinting compound is applied, depending on the color of the sealant.

When applying the composition with a spatula or from a tube, the sealant should be smoothed and excess should be removed with a damp cloth.
If the logs for the log house were harvested by hand, more uneven gaps will form during shrinkage. Here, one sealant and a polyethylene cord will not be enough. In such cases, caulking is performed in the traditional way, after which the seams are sealed with sealant. After such treatment, there is no need for subsequent caulking.
Video - How to caulk a log house
One of the important stages in the construction of a structure made of timber or logs is caulking. Gaps and cracks appear between the crowns of the log house. To ensure thermal insulation, they are filled with sealant. Traditionally, this work is done manually: using a spatula (chisel, spatula) and a mallet.
Work technology
Caulking is performed in 2 stages:
- primary - after shrinkage of the log house (about six months after construction);
- repeated - in a year and a half.
All walls run along the perimeter, starting from the bottom crown and ending with the top. First, the seams are caulked outside, then inside. This prevents the frame from warping.
Various materials (usually natural) are used as insulation:
- tow;
- felt;
- jute tape.
The seam is filled with insulation as tightly as possible, padding it at the top, bottom and center. When hitting with a sharp tool, it is important not to damage the log. As a final step, all seams can be treated with a special sealant (from a syringe or gun). By the way, if the logs are rounded and a jute fabric is laid between them, it is permissible to get by with just one sealant.
How to mechanize the process?
Manual caulking takes a lot of time and effort. This is why many people try to caulk a log house using a hammer drill. The tool is used as a jackhammer, that is, in pure impact mode (without rotation). To do this, you will need a three-mode model - for example, Hammer PRT650B, Makita HR2470 or Bosch PBH 2100 RE.
Flat metal spatulas or chisels are used as attachments. However, do not forget that you cannot work in chiseling mode for a long time! After 10-15 minutes of operation, you should briefly switch to rotation mode. Then the lubricant will be distributed properly in the cartridge.
The second thing you should pay attention to is proper handling of the hammer drill. If you press too hard on the tool, the chisel may get stuck between the logs. This will reduce the entire effect of using the tool to zero.
Finally
Master caulkers, as often happens, are divided into two camps. Some people believe that caulking with a hammer drill is a successful innovation. Others only accept hand caulking. In any case, no one bothers you to try both methods. And if you are not sure how to caulk a log house with a hammer drill, you can look for a video on this topic on the Internet.