In this article I want to tell you how you can make a cute photo magnet for your refrigerator. And not only produce it, but also sell it profitably.
My site was originally dedicated to sublimation printing. But this does not mean at all that you can make money only by selling mugs, plates, puzzles and other sublimation products. There are a lot of ideas! This includes thermal transfer and the production of watches with a photographic portrait and the printing of various calendars and much, much more.
The first article is about magnets.
What attracts me most about making vinyl magnets is the simplicity (no equipment needed) and the amazing price tag. Judge for yourself - a magnet measuring 65 x 90 mm costs me less than 5 rubles. I sell it in kindergartens for 120 rubles!
There are different magnets - plastic, metal, sunset ones. We will make a magnet based on magnetic vinyl. It looks like this:

In a nutshell, this is the most ordinary photograph pasted onto magnetic vinyl.
Choose any photo frame and insert a photo of the child. You can draw a photo frame yourself or download it from the Internet. Just don't forget about copyrights. Not all authors allow you to make money from their frameworks and templates.
To make a magnet we need the simplest tools:

This is a small piece of glass, a stationery knife and a metal ruler. Is that all? - you ask! Yes, this is enough to make good money. You don't even have to have your own printer. You can always order photo printing on the side. And your magnets will not become much more expensive. We'll calculate everything later.
A few words about magnetic vinyl. It is sold in rolls, usually 30 meters. Such a roll is not only quite expensive, but also very heavy. And this increases the cost of delivery for those who order vinyl by mail or through a transport company. Those who have the Zenon company nearby are luckier - they will sell at least half a meter of magnetic vinyl. Agree, this is very convenient.
Magnetic vinyl comes in different thicknesses. I recommend purchasing vinyl no thinner than 0.7 mm to make magnets. Magnets made from thinner vinyl look cheap and not solid.
Magnetic vinyl also comes with an adhesive layer and without an adhesive layer. With an adhesive layer it has a protective film and, with equal thickness, costs a little more.

All you have to do is choose a link:
Magnetic vinyl with adhesive layer + regular photo on paper
Magnetic vinyl without adhesive layer + photo on self-adhesive photo paper.
I'll use the second option. I have 0.75mm glueless and inkjet vinyl on hand from Privision.
So, let's start making our magnets.
I think finding a cute photo frame won't be too difficult for you. We will assume that you already have it. Adjust the photo frame to the size you need - mine is 65 x 90 mm. With this size, 9 magnets fit on an A4 sheet. Of course, you can choose absolutely any size.
You also photographed the children. All that remains is to insert the photos into the frame. This can be easily done using or.
By the way, a large section will soon appear on the site about how to photograph children in kindergartens and schools and process photographs. Don't forget to not miss the announcement.
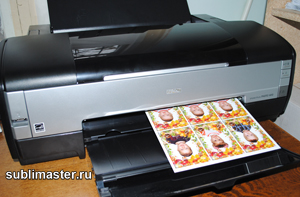
The photos have been inserted, now they need to be placed on a sheet of paper and printed. You can use Photoshop for this, but I like CorelDraw. I import one photo frame at a time and place it on A4 sheet. If they order more than one magnet, I duplicate it the required number of times.

All photo frames are placed, self-adhesive photo paper is inserted into the printer. We send the sheet for printing! We print with regular water-based ink.
Now we will stick the photo paper onto the magnetic vinyl. I first cut it into A4 sheets. More precisely, they turn out to be a little smaller - 20.5 x 29 cm. The width of the magnetic vinyl roll is 61.5 cm. I cut it equally into three parts. And I deliberately reduce the length a little; with my size of magnets this is quite enough. You also try to calculate everything so that there is less waste.
To ensure that the photo paper lays flat on the vinyl without bubbles or creases, just watch me do it and repeat.
First, turn the sheet face down and bend the backing paper about 15mm along the short edge of the self-adhesive.

Now we turn the sheet over and, holding the edge with the folded paper (not letting it stick), place the sheet exactly on the magnetic vinyl.

Having positioned the sheet as needed, carefully glue the edge of the sheet to the vinyl and iron it well with a dry soft cloth.

Now our sheet is securely attached to the magnetic vinyl and will not move anywhere. Place your left hand under the sheet, grab the edge of the protective paper and begin to smoothly pull it to the side, exposing the adhesive layer, and with your right hand, using a rag, smooth the sheet to the vinyl with progressive movements up and down.

So we smooth it to the end.

Set the resulting sandwich aside for 15 - 20 minutes so that the adhesive layer sets well. Now the magnets can be cut. A reciprocating cutter is ideal for this purpose, but you can do just fine without it.
A metal ruler and a utility knife are what you need. To ensure that the knife cuts rather than tears the vinyl paper, keep the angle of the knife as small as possible to the surface.
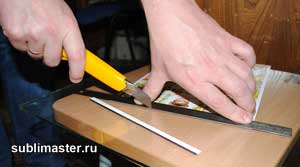
Renew the knife blade by breaking off the dull part. I usually do this after cutting the next A4 sheet.
Here are the first nine magnets ready.

I put each magnet in a separate bag. I have them 75 x 120 mm. This bag costs pennies, and parents really like the individual packaging.

That's the whole process. As you can see, nothing complicated. Now let's do some math.
I bought magnetic vinyl without glue 0.75 mm thick for 310 rubles per linear meter (width 0.61 cm), which is 504 rubles per square meter or 30.3 rubles per A4 sheet (rounded to 31 rubles).
I bought self-adhesive for 100 rubles for 20 A4 sheets. So one sheet costs 5 rubles.
31 + 5 = 36 rubles.
36 rubles: 9 magnets = 4 rubles per piece!
Let me remind you that I sell them for 120 rubles. I know that some people sell similar magnets for 150 rubles.
Now a few words about quality. Water-based inks have a serious drawback - they fade quite quickly. Particularly compatible inks. If your customers' refrigerator is located near a window, the magnet on its door may fade within a year. In this case, I will advise you to print the photos in a darkroom and glue them onto vinyl with an adhesive layer. In this situation, the cost of your magnet will increase by 2 - 3 rubles, but it will not fade over the years.
Alternatively, the magnet can be covered with a thin cold laminate (laminating film). This makes the process a little more complicated, but the magnet looks great!
You can also purchase an inexpensive corner cutter and beautifully trim the corners of your magnets.
In a word, I gave you an idea. How you put it into practice is entirely up to you. Now you know how to make a magnet with a photo. Take my word for it, such magnets are in constant demand in kindergartens and schools!
Surely every person is familiar with a magnet and its properties. The use of magnets is now quite widespread in various industries. Most of us have heard about neodymium magnets and their growing popularity. These are quite powerful magnets that include boron, iron, and the rare earth element neodymium. Also, the magnets are quite powerful for their small size, and their service life is much longer than usual. The price for them is quite high. In this article we will tell you where to get small copies of this magnet.
From the speakers of a broken cell phone
Neodymium magnets can be obtained from the speakers of an unnecessary phone; there are two such speakers: one small auditory one and a large one that plays a ringtone.
The larger magnet can be easily removed from the speaker; for this we will need pliers. Carefully break the speaker housing so as not to damage the magnet. Inside we see a small magnet with a diaphragm and a coil.

The magnet from the speaker is almost 2 times smaller than from the main speaker. Although it is small, it holds pliers with ease. Such a magnet can, for example, be attached to a screwdriver so that the screws do not fall off.

From a cell phone camera
Tiny neodymium magnets can be removed from a mobile phone camera, but only if the camera has optical autofocus or stabilization. Triangular magnets can be removed from the corners of the camera body.

Neodymium magnets can also be found in vibration motors. For example, in the iPhone 4s the vibration motor resembles a puck, in the center of which is a small, strong neodymium. In micromotors with an armature, most often simple magnets.


From headphones
Almost every person has old, torn headphones somewhere. Don't rush to throw them away; each earphone has a small neodymium magnet. They are easy to disassemble and take out.
From the latches
Very often, neodymium magnets are used in all kinds of magnetic latches on mobile phone cases, handbags, curtain latches, and accessory boxes.
The magnets in the latches are hidden in iron protection, this is done so that the magnet does not crumble when the latch is pulled.

Conclusion
Neodymium magnets have become very common in our lives. If you look closely, they surround us everywhere: in mobile phones, computers, engines, and various accessories. We tried to show several places where you can get them. You can use magnets wherever you have enough imagination. We used neodymium magnets in the generator of an eternal flashlight for a dog, and also as latches on VR glasses, as fastenings for notes on the refrigerator, and stuck a magnet on a screwdriver and screwdriver to make it convenient to unscrew and tighten screws.The unique properties of some substances have always surprised people with their unusualness. Particular attention was drawn to the ability of some metals and stones to repel or attract each other. Throughout all eras, this has aroused the interest of sages and the great surprise of ordinary people.
Starting from the 12th – 13th centuries, it began to be actively used in the production of compasses and other innovative inventions. Today you can see the prevalence and variety of magnets in all areas of our lives. Every time we come across another product made from a magnet, we often ask the question: “So how are magnets made?”
Types of magnets
There are several types of magnets:
- Constant;
- Temporary;
- Electromagnet;
The difference between the first two magnets lies in their degree of magnetization and the time they hold the field inside themselves. Depending on the composition, the magnetic field will be weaker or stronger and more resistant to external fields. An electromagnet is not a true magnet, it is just the effect of electricity that creates a magnetic field around a metal core.
Interesting fact: for the first time, research on this substance was carried out by our domestic scientist Peter Peregrin. In 1269, he published the “Book of the Magnet,” which described the unique properties of matter and its interaction with the outside world.
What are magnets made of?

Iron, neodymium, boron, cobalt, samarium, alnico and ferrites are used to produce permanent and temporary magnets. They are crushed in several stages and together melted, baked or pressed to obtain a permanent or temporary magnetic field. Depending on the type of magnets and the required characteristics, the composition and proportions of the components change.
Related materials:
How and from what is cement made?
This production makes it possible to obtain three types of magnets:
- Pressed;
- Cast;
- Sintered;
Making magnets

Electromagnets are made by winding wire around a metal core. By changing the dimensions of the core and the length of the wire, the power of the field, the amount of electricity consumed and the dimensions of the device change.
Component Selection
Permanent and temporary magnets are produced with different field strengths and resistance to environmental influences. Before production begins, the customer determines the composition and shape of future products depending on the place of application and the high cost of production. All components are selected to the nearest gram and sent to the first stage of production.
Smelting

The operator loads all the components of the future magnet into an electric vacuum furnace. After checking the equipment and matching the amount of material, the furnace is closed. Using a pump, all air is pumped out of the chamber and the melting process is started. Air is removed from the chamber in order to prevent oxidation of iron and possible loss of field power. The molten mixture is poured into the mold on its own, and the operator waits for it to cool completely. The result is a briquette that already has magnetic properties.
Even in ancient China, attention was paid to the attractive properties of some metals. This physical phenomenon is called magnetism, and materials that have this ability are called magnets. Now this property is actively used in radio electronics and industry, and especially powerful magnets are used, among other things, for lifting and transporting large volumes of metal. The properties of these materials are also used in everyday life - many people know magnetic cards and letters for teaching children. What kind of magnets there are, where they are used, what neodymium is, this text will tell you about it.
Types of magnets
In the modern world, they are classified into three main categories based on the type of magnetic field they create:
- permanent, consisting of a natural material that has these physical properties, for example, neodymium;
- temporary, possessing these properties while in the field of action of a magnetic field;
- Electromagnets are coils of wire on a core that create an electromagnetic field when energy passes through the conductor.
In turn, the most common permanent magnets are divided into five main classes, according to their chemical composition:
- ferromagnets based on iron and its alloys with barium and strontium;
- neodymium magnets containing the rare earth metal neodymium in an alloy with iron and boron (Nd-Fe-B, NdFeB, NIB);
- samarium-cobalt alloys, which have magnetic characteristics comparable to neodymium, but at the same time a wider temperature range of application (SmCo);
- Alnico alloy, also known as UNDC, this alloy is characterized by high corrosion resistance and a high temperature limit;
- magnetoplasts, which are a mixture of a magnetic alloy with a binder, this allows you to create products of various shapes and sizes.
Alloys of magnetic metals are brittle and fairly cheap products with average qualities. It is usually an alloy of iron oxide with strontium and barium ferrites. The temperature range for stable operation of the magnet is not higher than 250-270°C. Specifications:
- coercive force – about 200 kA/m;
- residual induction – up to 0.4 Tesla;
- average service life is 20-30 years.
What are neodymium magnets
These are the most powerful of the permanent ones, but at the same time they are quite fragile and not resistant to corrosion; these alloys are based on the rare earth mineral - neodymium. This is the strongest permanent magnet.
Specifications:
- coercive force – about 1000 kA/m;
- residual induction – up to 1.1 Tesla;
- average service life is up to 50 years.
Their use is limited only by the low limit of the temperature range; for the most heat-resistant brands of neodymium magnet it is 140°C, while less resistant ones are destroyed at temperatures above 80 degrees.

Samarium-cobalt alloys
Possessing high technical characteristics, but at the same time very expensive alloys.
Specifications:
- coercive force – about 700 kA/m;
- residual induction – up to 0.8-1.0 Tesla;
- average service life is 15-20 years.
They are used for difficult working conditions: high temperatures, aggressive environments and heavy loads. Due to their relatively high cost, their use is somewhat limited.
Alnico
A powder alloy of cobalt (37-40%) with the addition of aluminum and nickel also has good performance characteristics, in addition to the ability to retain its magnetic properties at temperatures up to 550°C. Their technical characteristics are lower than those of ferromagnetic alloys and are:
- coercive force – about 50 kA/m;
- residual induction – up to 0.7 Tesla;
- average service life is 10-20 years.
But, despite this, it is this alloy that is most interesting for use in the scientific field. In addition, the addition of titanium and niobium to the alloy helps to increase the coercive force of the alloy to 145-150 kA/m.
Magnetic plastics
They are used mainly in everyday life for making magnetic cards, calendars and other small things; the characteristics of the magnetic field decrease slightly due to the lower concentration of the magnetic composition.
These are the main types of permanent magnets. The principle of operation and application of an electromagnet differs somewhat from such alloys.
Interesting. Neodymium magnets are used almost everywhere, including in design to create floating structures, and in culture for the same purposes.
Electromagnet and demagnetizer
If an electromagnet creates a field when passing through the turns of the winding of electricity, then the demagnetizer, on the contrary, removes the residual magnetic field. This effect can be used for various purposes. For example, what can be done with a demagnetizer? Previously, the demagnetizer was used to demagnetize the playback heads of tape recorders, television picture tubes and perform other similar functions. Today it is often used for somewhat illegal purposes, to demagnetize meters after using magnets on them. In addition, this device can and should be used to remove residual magnetic fields from instruments.
The demagnetizer usually consists of an ordinary coil, in other words, in terms of design, this device completely replicates an electromagnet. An alternating voltage is applied to the coil, after which the device from which we remove the residual field is removed from the demagnetizer's coverage area, after which it turns off
Important! Using a magnet to “twist” the meter is illegal and will result in a fine. Improper use of the demagnetizer can lead to complete demagnetization of the device and its failure.
Making your own magnet
To do this, it is enough to find a metal bar made of steel or other ferroalloy; you can use a composite transformer core, and then make a winding. Wind several turns of copper winding wire around the core. For safety, it is worth including a fuse in the circuit. How to make a powerful magnet? To do this, you need to increase the current strength in the winding; the higher it is, the greater the magnetic force of the device.
When the device is connected to the network and electricity is supplied to the winding, the device will attract metal, that is, in fact, it is a real electromagnet, albeit of a somewhat simplified design.

In the modern world, magnetic field energy is widely used. Both in industry, radio electronics and electrical engineering, and for domestic purposes. Dozens of different devices have been created to generate a magnetic field, and the natural properties of minerals are also used.

The most widely used permanent magnet is the neodymium magnet. Its use and widespread use is due to both its cost and excellent technical characteristics. Its disadvantages are: a tendency to corrosion and fear of high temperatures. For this reason, in difficult operating conditions, other types are used that do not have these limitations.
Video
Everyone is familiar with the times of the Gold Rush, when people sold all their property and went in search of gold. Today, treasure hunting is a kind of hobby that many people enjoy. Some are looking for gold, others are looking for other metals. To simplify the search process, you can get a search magnet, which we will make right now.
So, first let's see how the author makes homemade products useful for many in his video
We will need:
- welding machine;
- Bulgarian;
- sledgehammers;
- a set of tools for bending and fastening;
- protective mask;
- metal rod;
- pipe;
- epoxy glue;
- neodymium magnet with magnetization N42.

Let us immediately note that the rod must be strong enough and smooth, since it will be used to make a fastening for the rope. The neodymium magnet that the author uses has a pull-out power of 240 kg. Other tools we will need are pliers and a needle file. Everything is very clear with the materials, and this means that you can safely get to work.

First of all, we need to bend our metal rod and give it a slightly round shape. Since the rod is strong, it is recommended to use a sledgehammer.


After cutting, we process the piece of pipe so that it is as smooth as possible at the edges. We will start processing using a grinder.

Next, take a needle file and carefully process the inside of the piece of pipe. The author of the video, for example, has a pipe covered in rust, which will certainly not allow the glue and the structure itself to remain stable, which is very important.

The next thing we need is the help of a welding machine, since we need to weld a piece of rod to a piece of metal pipe to get an eye. We cut off the excess parts of the rod with a grinder.