The rustic style of southern France fit so organically into the interiors of our latitudes that one can even call this event phenomenal. But, perhaps, there are no miracles here - the aesthetics of the style have long been close to us. The same country with which Provence is consonant has echoes in the Russian village style. Today we can safely talk about the interpenetration of styles - Provence intersects with country, shabby chic, English style, vintage style. All these areas have many common points in one plane. And the decoupage technique makes use of such stylistic consonance without hesitation.
But in order to emphasize precisely provencal style, you need to know exactly its main defining moments. And it's not just lavender and white, Provence is much more interesting and multifaceted.
Features of the Provencal style:
- The use of pastel, creamy vanilla colors, as well as muted tones of Provençal nature - delicate lavender, soft olive, warm sand, etc.;
- Floral prints and patterns, small designs;
- Attention to detail, but not too much detail.

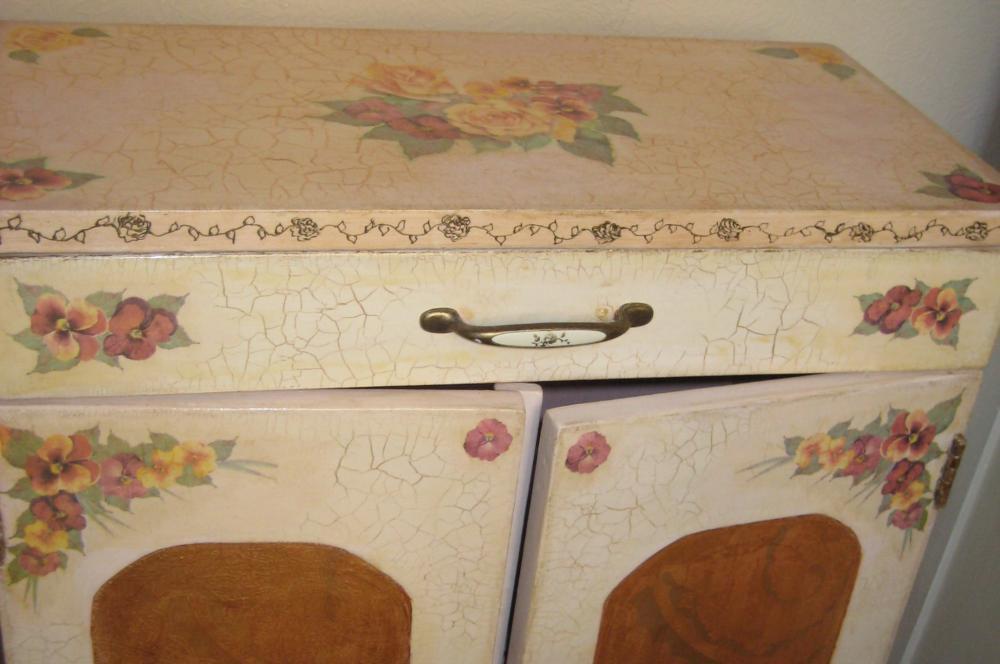
Provençal style emphasizes the elegance of simplicity. His motives are simple, but not without masterful execution. With the help of decoupage, it is probably the easiest way to start the “offensive” of style in the interior. You can decorate bottles, buckets, shelves, bread bins, napkin holders, tables and chairs, kitchen and cupboard surfaces, jugs, cans, etc. Decoupage of the Viennese chair is especially popular among us.
How to choose pictures for Provence decoupage
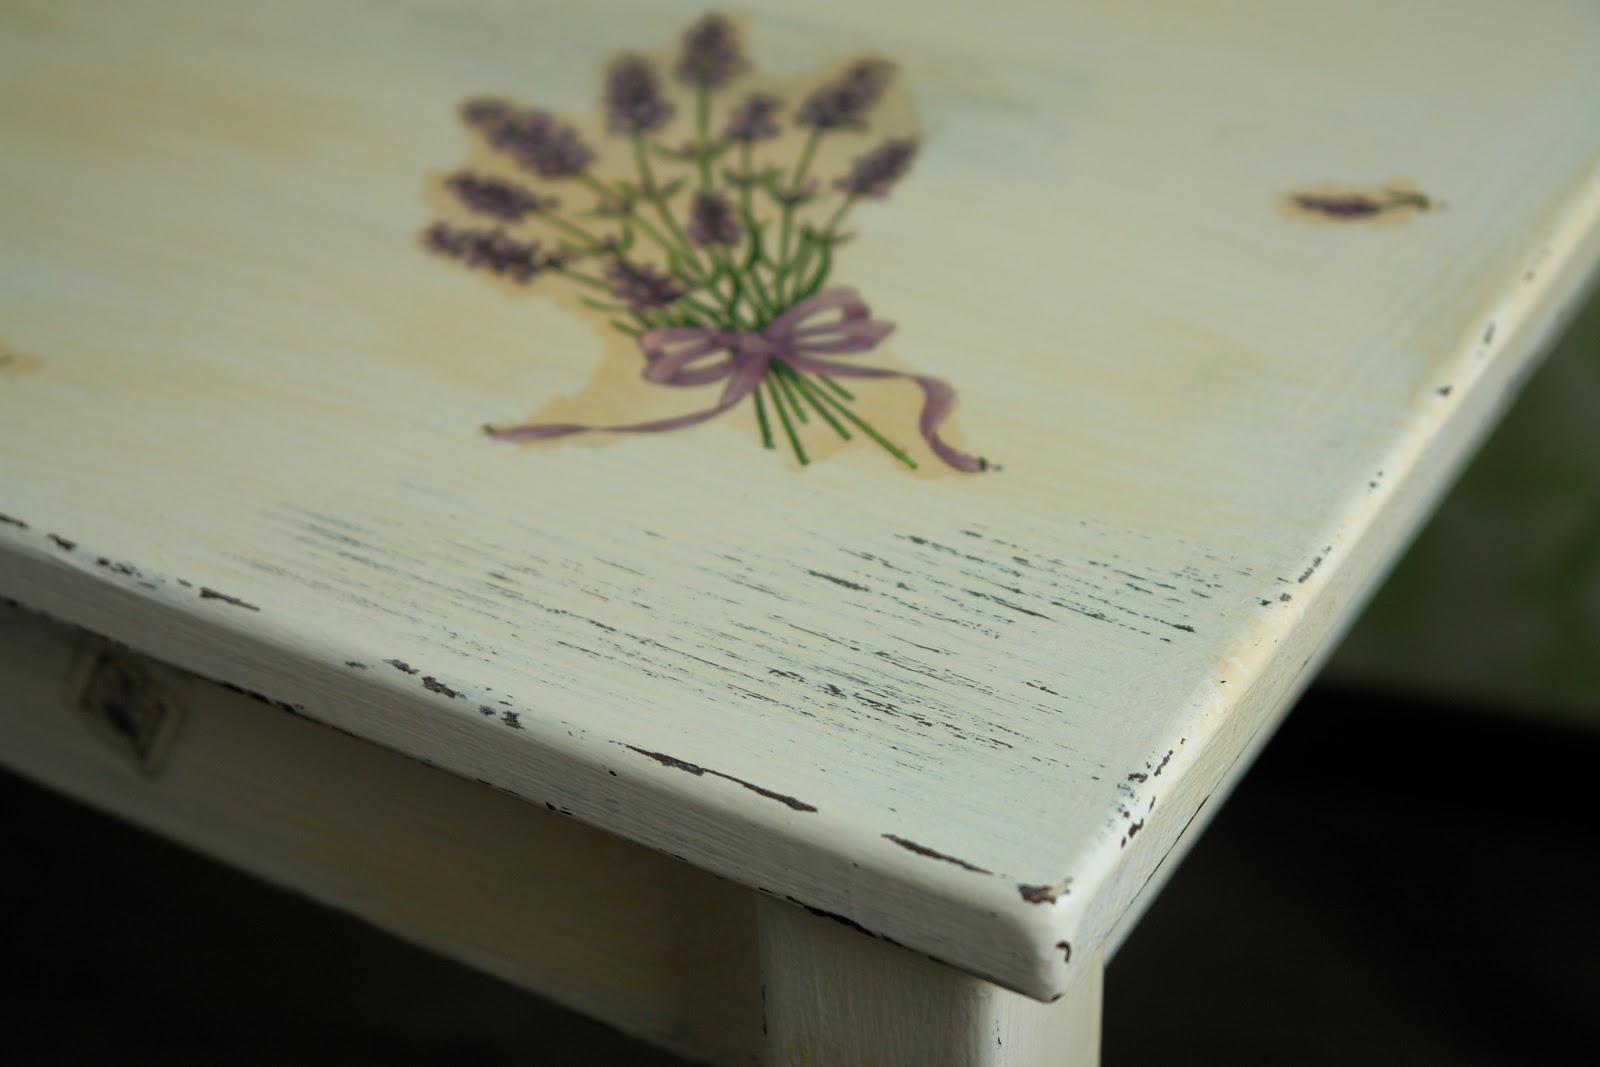
Even if you only know about napkins, which, when peeled, give the desired image on thin paper, this is already enough to select necessary pictures. These are all kinds of flowers, but not lush ones English roses, but rather graceful garden and cute wild flowers. Definitely not large. And even the buds of roses can be small, slightly blooming.

These can also be images of the courtyard - cute hens and roosters, a kitten on the porch, as well as fragrant Provençal herbs in the yard. These include still lifes with teapots, vases of lavender and homemade cakes. These include cute ceramics for the kitchen and bottles of southern wine. You can make prints on a color printer using rice paper or order decoupage cards with a Provençal theme from the online store.
In Provence style: decoupage by hand
The first thing you'll start with is choosing a base. Some people start by decoupaging bottles, others decide to start by decorating the refrigerator. Your favorite designs and backgrounds, patterns and hearts, motifs and ornaments can be transferred to anything - from large furniture to small salt shakers.
The most popular decoupage:
- Watering cans;
- Tray;
- Caskets;
- Tables and chairs;
- Cups and glasses;
- Buffets;
- Bread bins;
- Chest of drawers;
- cornice;
- Jug or can;
- Chest.
It is probably most convenient to start with the kitchen - there are a lot of items there that will form the style. Don't rush to throw away the unfashionable kitchen set, perhaps, after decoration it will become trendy. The work is worth it.
Mandatory effects in decoupage: master class and Provence style
Since the Provencal style can be correlated with the vintage style, there are some decoration nuances that can be called mandatory. They will indicate style and make the decorated items more convincing. These features are not always used together, but they definitely have a place in Provençal decoupage.
This is, first of all, deep aging of wood. This is also a one-step crackle, as well as patting, elements of the shabby chic technique, and processing with antique mediums.
If you look at examples of works using the decoupage technique, you will see these features. This way the execution of the item and the decoration turns out to be more stylistically correct. And the external effect becomes pronounced.
Master class: decoupage of a tray in Provence style
It’s good if you have a suitable wooden blank - this is a tray with sides. It will be more “on topic” than a metal tray. And the process of such decoupage itself is not so complicated.

You will need:
- Blank tray;
- Napkins or printed designs for decoupage;
- Decoupage varnish;
- Decoupage brushes;
- PVA glue;
- Sponge;
- Scissors;
- Sandpaper.
The wooden tray needs to be sanded so that the surface is smooth. Using a sponge, cover the tray with white paint, first the first layer, after drying - the second. You can dry it with a hairdryer. The contours of the tray can be rubbed, achieving an aging effect.
You can tear it all off top layer napkins, and transfer it to a tray, or only certain fragments. Dilute PVA glue with water. Glue with a brush, using very careful movements. Wait until it dries completely. Then coat the entire tray with acrylic varnish. One layer of varnish was dried and a second was applied. You need to apply at least five layers.
After drying, the tray should be rubbed with fine sandpaper. This will help get rid of unevenness. It is more difficult to decorate a metal tray, so try to find a wooden blank.
Simple master class: decoupage watering cans in Provence style
For decoupage watering cans you need - a garden metal watering can, napkins, brushes, varnish, acrylic paints. You will need PVA glue and acrylic varnish. Also stock up on solvent.

Work progress:
- Wash and dry the watering can; alcohol will help degrease the item;
- Cover the watering can with white acrylic paint in several layers;
- Apply with a brush to the intended aging areas. bitumen varnish, 15 minutes after application, dip a cloth into the solvent and use it to wipe off the areas with varnish;
- Remove the top layer from the napkin with the pattern; it’s good if the pattern is torn out by hand and not cut out;
- Apply PVA glue to the gluing area, cover this area with a napkin, smooth out the pattern;
- Retouching a picture - add details, draw on it, highlight the outline, if necessary.
All that remains is to coat the watering can with acrylic varnish. This is done in several layers. Each is applied after the previous one has completely dried.
Delicate decoupage boxes: master class in Provence style
The materials and tools will be approximately the same as those described in previous MKs. Clean and degrease the wooden workpiece. If there are cracks and chips on it, do not remove them or restore them - we need the effect of antiquity.
You need to apply white acrylic paint to the box. After this layer has dried, apply beige acrylic paint. Cut out a picture from a napkin. Glue the fragments onto the lid and sides of the box, using a minimum of glue. Wipe off excess with a sponge.
The base is treated with sandpaper only in those areas where the napkin is not glued. Cover the entire surface with acrylic varnish. As in other cases - in several layers.
DIY: decoupage table in Provence style
You need to remember a few simple steps. They are repeated, the stages are similar. When it comes to furniture, there are five basic steps.
Decoupage of table and other furniture:
- The surface of the furniture is cleaned;
- Acrylic paint is applied in two layers and allowed to dry;
- Try on a drawing, cut it out from napkins or cards;
- A stencil is applied to the selected location, PVA glue with water is applied on top, and dried;
- Apply two or three coats of clear varnish.
Apply a layer of gold paint around the edges with a thin brush. If you take the varnish on water based, and then use a hairdryer to create the effect of a flowing pattern. It's not that complicated!
Decoupage in Provence style master class (video)
Exalting the simplicity and beauty of plant patterns, natural natural colors combines Provence, country, Russian style. Therefore, beautiful Provencal motifs can also be found in this type of decoration such as decoupage.
Creative success!
Bottle vases in Provence style
Very cute and economical home decor. Today you will see in the photo step-by-step master class like two glass bottles whiskey bottles are transformed into Provence style vases.
Here's how it's done:
1. First drink good whiskey. Or two already empty containers of whiskey drunk by best friends are accepted as a gift.


2.Then, you need to peel off the stickers. This is the most time-consuming part of the project. Unfortunately, the labels are glued tightly, solely to make the decorator’s work more difficult. But there is no need to despair. I wash bottles in dishwasher, they become wonderfully limp there and then I wipe them with a dishwashing sponge on the hard side.
3.Then let it dry and paint. The paint used here is Rust-Oleum bronze spray paint. Please note that any bronze or bronze spray paint can be used. dark brown with a glossy effect. The spray is needed for uniform coverage and speed of the process.
This paint is needed for the bottom layer of paint.
It already looks great!
 It's already beautiful.
 4.But don’t stop, because this layer will show through here and there, or rather not here and there, but precisely in those places where you allow it to show through the beautiful chalk coating special paint. The paint used here is that used in the decoupage technique, this is paint from Annie Sloan Chalk Paint.
But if you don’t find such paint, buy regular matte acrylic, desired color and add a little ground chalk to it.
This paint is applied with a brush to create an antique effect.
One vase will be blue. Apply paint in one layer. Otherwise it will be difficult to achieve the base bronze color.

5.The other one will be white.

Acrylic paints are water-soluble and can be washed off with water while they are still wet. So don't wait, and as soon as the paint dries, get to work. Just start from the back so you can get a feel for how things are going and don't remove all the paint in a hurry.
See what happens.

7.Print the stencil, it is in pdf, this is in order to maintain the size of the picture when printing. Cut out the holes using small scissors with rounded ends. Place the stencil on the front of the vase and use a sponge dipped in paint to apply paint to the holes in the stencil using a blotting motion. Carefully remove the stencil so as not to smudge.
.
8.Have you ever noticed how beautiful the patterns are on some cookies? Find a cute one and paint it with bronze paint, glue it glue gun with silicone glue. Or you can look in handmade accessories wooden blanks, it is desirable that this medallion be thin.
 A thinner and harder cookie or a wooden piece
 9. The corks of such drinks are so good that it is a pity to throw them away, so they can also be used, especially since the vases again turn into bottles, only very beautiful ones, from which it is so pleasant to create compositions.

Decoupage of furniture in the Provence style, the master class of which helps you easily master decorative techniques, is a second life for it. Decoupage is an art, because furniture that has lost its appearance, can “rejuvenate” again. After many years, the furniture gets old and becomes unfashionable, but the quality is good and it’s a shame to throw it away. The interior has changed a little, and now old wardrobe Doesn't look good with the new wallpaper. The decoupage technique can correct the situation. You can use any pattern, any shade.
What is decoupage
Decoupage is a way decorative design various items from many materials by gluing cutouts of paper, newspapers, fabric, napkins, and other materials onto wood, glass, metal surface, further coating on top with varnish to secure and preserve the durability of the design.
Decoupage old furniture with your own hands will bring pleasure to the master from the work process, the furniture will be unique and inimitable.

Technology Provence
You can decorate furniture in different styles. The Provence style is considered the most gentle, romantic, cozy, and homely. Most often, kitchen furniture is decorated in this style. After all, in the kitchen, delicate little things are very important to create a cozy atmosphere.
Provence is a fairly popular technique. It is associated with the village, so it is relevant in the kitchen with the sea and the sun, with the smell of herbs, trees, and brings you closer to nature. The technique should include several necessary colors: white, cream, beige, pale yellow, pale green, pale blue, faded turquoise, faded orange, terracotta. Also, the Provence style is characterized by motifs of flowers, natural and artificial leaves.

Provence is simplicity, naturalness, uncomplicatedness, tenderness, warmth.
We create things in Provence style (video)
Decoupage kitchen
Decoupage in the kitchen will update the decor, add cleanliness, freshness, and newness. Women spend a lot of time in the kitchen. The interior can become boring, but thanks to this technology you can add at least something new to the boring interior. Provence style would be an excellent choice.

If it is impossible to purchase new furniture Kitchen decoupage will help temporarily refresh the interior and old furniture. In the kitchen, furniture wears out and gets damaged faster than in other rooms. Therefore, some defects can be sealed beautiful design, suitable for the kitchen.
Decoupage of the kitchen will help the creative housewife to realize the most fantastic dreams and desires for decorating kitchen furniture.
Bathroom furniture (video)
Now let's begin the technique of decoupage furniture in the Provence style.
It is necessary to prepare a decoration item. The master class on preparing the base consists of the following steps.
Wooden surface needs to be sanded and primed. You can sand it with fine sandpaper or grinder. Afterwards, the material is inspected, and if chips and cracks are found, they need to be thoroughly puttied, then sanded again. Now you can prime the entire surface; this must be done with a special primer or acrylic paint.

If the surface has a smooth varnish or paint coating, it must be completely removed using a sanding machine with medium-hard sandpaper or a drill with a special attachment. Then thoroughly wipe the workpiece, putty and sand it.
This is the most difficult stage; it will properly prepare the surface so that the application fits well on the surface. Do-it-yourself furniture decoupage is a difficult process for beginners. You can practice decorating old furniture; if it doesn’t work out, you won’t mind throwing it away. Photo of surface preparation 1.
Now we select the motives and materials of the application and prepare necessary tools. This could be an ordinary multi-layer paper napkin with a beautiful pattern, special paper for decoupage, pieces of wallpaper, or fabric with a cute pattern. In addition, you need to prepare:
- brushes with artificial bristles;
- PVA glue or special glue for decoupage techniques;
- wood varnish or special varnish, it can be with various effects;
- containers for liquid materials, rags, sponges.

To create an antique effect, the workpiece needs to be painted over with white paint or 3 layers of white paint applied. Let each layer dry. Then, in places where you want to create an effect, rub it with sandpaper of varying hardness and grain size, and a wire brush.
Pictures are being prepared. Motifs are cut out from wallpaper, fabric, newspaper. Decoupage of furniture with wallpaper can be done from one type and roll, or you can cut out motifs and create a picture, or cut squares and lay out a mosaic. The wallpaper should also be coated well with glue and allowed to soak a little before gluing. If it is a napkin, then its top layer with the pattern is removed. Decoupage of furniture with napkins is done in the same way, only with greater care so as not to tear the design.
Decoupage with fabric is performed in the same way; before applying the design, a piece of fabric is well impregnated with glue. The master class will help a beginner complete all the work. Photo of decor preparation 2.

Now, using a wide brush, apply glue to the workpiece and to the paper. In places where you do not need to stick paper, glue masking tape. In order for the drawing to fit well, it is necessary to saturate the material with glue. After 5 minutes, place a paper or rag pattern on the coated surface. Fix tightly, smooth with a second dry brush or velvet roller. We iron it over the entire surface from the center to the edge with a roller. You need to work carefully so as not to tear the drawing. Photo of pasting picture 3.
After the glue has dried, sand the edges, removing excess paper. The last stage is varnishing. Apply acrylic varnish with a brush over paper or fabric. Thus, securing and maintaining the integrity of the picture. Photo of varnishing 4.
Decoupage in popular and unusual style Provence is a reflection rustic style southern France. It involves cool colors such as blue, beige and, of course, white. France is known for its vineyards and lavender, so motifs of these plants can be seen everywhere. In addition to them, it is often found nautical theme(shells, seascape, seagulls). This is one of the types of country, or rustic style. Therefore, craftswomen often use rustic motifs. The photos of the products show plants and pets. By the way, it is worth noting that a good variation of decor would be.


Choosing a base for decoupage in Provence style
Wooden blanks, steel and metal objects are excellent as a base. And most the best option there will be textured painted wood. Just look at these photos!


But it’s worth paying attention to - the activity is creative and neat.
Mandatory effects when working with our equipment
Be sure to use deep aging of wood, one-step crackle, patination, treatment with antique mediums, and the shabby chic technique. These effects are clearly visible in these photos:


Furniture decor in the Provence style can benefit the style of your kitchen! It makes it stylish and cozy.

We decorate furniture in a simple master class quickly and easily with our own hands
In this master class we will try to decorate furniture in the style of Southern France.

- Poison filler (for furniture with large cracks) or putty;
- Sandpaper;
- PVA glue, you can purchase special glue for decoupage;
- Flat brush;
- Can of acrylic paint;
- Scissors.
For the main work in the Provence style, you can use decoupage napkins, printed pictures or newspaper clippings. A lot depends on the image of the product that appears in your head. Try to choose light pictures for Provence decoupage with drawings of lavender, grapes, olives, etc.
Step-by-step instructions for everyone
- The first step is to thoroughly rinse the surface soap solution. We sand the base, getting rid of irregularities and flaws. Then use a weak soap solution to wipe the surface again to degrease.
- Let's start priming the base. Let the product dry thoroughly.
- While the product dries, let's start drawing. Cut out the desired pattern and carefully separate the top one with the picture from the other layers.
- Lubricate the surface of the product with PVA glue. Place the design face up and, using a brush, carefully smooth the design, moving from the center to the edges.
- Having finished gluing the drawings, we begin to paint the furniture in the Provence style. To do this, take a flat, wide paint brush, dip into paint and paint the product. Before painting, be sure to remove excess paint with a napkin. Painting should be done strictly in one direction.
- Next, we need to give the appearance of a dusty coating in cracks, recesses and joints. Bitumen is perfect for this effect. Using a small brush, apply it to all imperfections. Remove excess bitumen varnish using white spirit. The corrected area should be immediately wiped with a dry cloth. The process can be repeated several times until you are sure you have achieved the desired effect.
- As a result, we will get a beautiful piece of furniture (chair, table, bedside table), decorated in Provence style.
Chairs and many other items are perfect for Provence style decoupage. The only rule is to stick to primary colors and motifs.
Interesting techniques you can use
The aging effect should not be avoided. One of the most beautiful effects aging is considered to be “craquelure” . Another interesting technique that we will look at is sprinkling.
"Crackelure" aging technique
- To do this, apply craquelure varnish to the base layer of paint.
- After the varnish has dried, apply another coat of paint.
- Under the influence of this paint, the varnish will begin to crack and the base paint will be visible under the cracks. In order to highlight cracks, dark paint or pastel is often used to grout with a sponge.
- Excess paint can be wiped off using cotton pad or a tampon, after dropping vegetable oil on it.
- We wipe the surface dry and cover it with fixing acrylic varnish.
The photo clearly shows the effect of using craquelure in the Provence style.

For this method you will need a toothbrush and contrasting paint. Before spraying, the product should be coated with varnish. In the future thanks varnish coating you can easily wipe away excess stains from the surface of the product. Dip the brush into paint. It is better to shake the excess paint or blot it with a napkin. We bring the brush to the surface of the product and begin to move our finger along the bristles of the brush. This creates splashes. In the photo you can see the splashes that can appear on the surface of the product.

Thus, you can make decor in this style yourself. With a little time and dedication, you can transform your home with your own hands.
Look how cozy this one looks, which you can make with your own hands!
Video tutorial for beginners
Now let's watch a short video tutorial for beginners.
The French word "decoupage" means "to cut out." The origins of beautiful ancient technology go back to the Middle Ages. The first mentions are found in German manuscripts of the late 15th century, it was at this time that furniture began to be decorated with carved decorative pictures. The technique became most popular in the 17th century, when elegant objects brought from the East began to appear in Europe. Society ladies appreciated the cute little things and enjoyed using them beautiful vases, decorated with pebbles, tights and lace to decorate fashionable European salons.
Today, an ancient decoration technique various items again at the peak of popularity. The ease and simplicity of the process allows even a novice designer to create unique works of art with his own hands.
For those who have decided to take up needlework for the first time, there is no need to buy expensive materials; it is better to purchase the necessary items in the regular stationery department.

For the upcoming decoration you will need:
- Brushes with soft bristles. Need different sizes;
- Small bowl. A utensil is needed for soaking napkins or rice paper;
- PVA glue. You can use regular stationery;
- Quick drying varnish. The varnish should be acrylic or polyurethane based;
- Cloth napkin or roller. It is more convenient to smooth out the formed wrinkles with a roller.
And, of course, the main item will be the product on which the decor is applied. This could be a vase, a bottle, a set of jars for bulk items.
After that they gather decorative materials for decoration:
- An artistic image plus applied to a paper base.
- Stencils with geometry, floral or plant patterns.
- Acrylic or stained glass paints for applying the main background.
- Shiny beads, gold thread, rhinestones different colors or eggshells.
Buying stationery items will not be difficult, but choosing decor can take certain time because it's creative process and you need to prepare for it thoroughly.
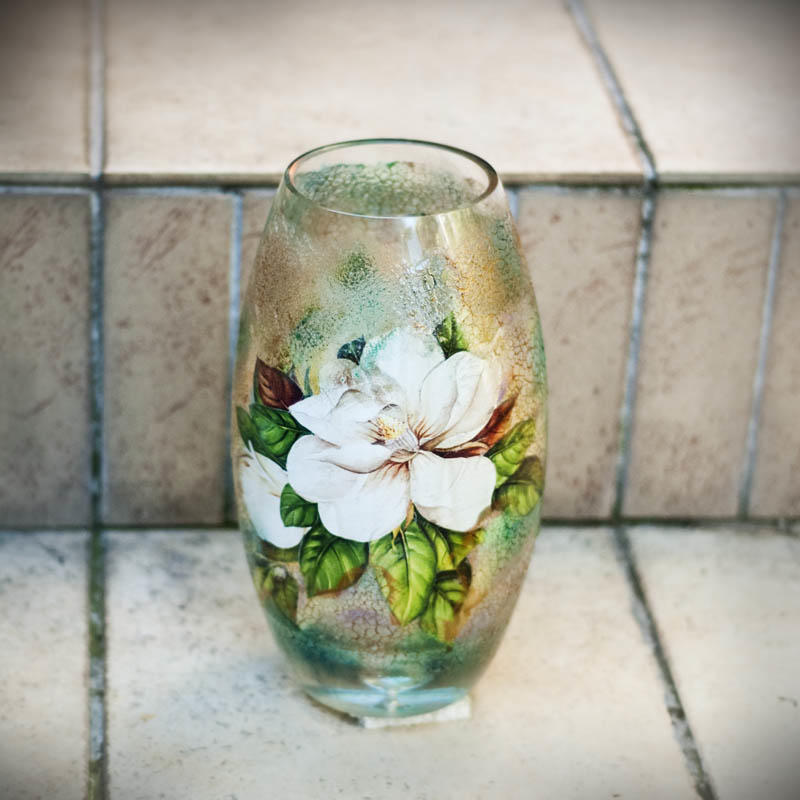
Decoupage vase in shabby chic style
The decoupage technique in the shabby chic style has no restrictions on the choice of artistic compositions, color solutions or accessories. Move to glass surface, possibly any pictures you like.

For this we use:
- Multilayer napkins. This is the most common option.
- Rice paper. Has a lot of advantages. Rice paper can be successfully played with various areas and achieve a beautiful three-dimensional image.
- Photo printing. You can use photographs as images famous personalities, for example, Charlie Chaplin or Marilyn Monroe. The product will be more individual and will be an excellent gift for the New Year holidays.
Before you start decorating a glass or wooden base, you need to decide what technique you need to use to decorate it. The process can be direct or reverse.
Advice! Selected as paper base Drawings and photographs must be printed on a printer using waterproof ink.
The direct technique in the shabby chic style is characterized by applying a decorative picture of a rose or a design with butterflies to the front surface, and reverse decoupage is done underneath it. It is important to consider that reverse decoupage is only possible on the most transparent glass surface.
The choice of method largely depends on how the decorated item will be used in the future. For example, to decorate a tabletop or floor vases Ikea is better off choosing direct application, but the saucers need to be decorated in the reverse way.
The photo selection presents beautiful creations by skilled craftswomen, made in beautiful nautical style using shells and pebbles.
We conduct a master class on decoupage of a glass vase
A detailed master class and the video below will help novice decorators become familiar with the main stages of decorating ceramic products.
What to do:
- We select the most convenient place for creativity and arrange the necessary tools in the most rational way.
- Carefully cut out the design you like from rice paper or a multi-layer napkin.
- On the glass, using a felt-tip pen, mark the places where it will be applied. beautiful pattern. Marks are necessary to quickly return slipped paper to the selected place.
- Soak the napkin in a bowl of warm water.
- Before applying the image, you need to clean and treat the area with PVA glue.
- Paper is quickly applied to the adhesive base and carefully straightened from the center to the edges with a soft roller or cloth napkins. Care should be taken to ensure that no unsightly folds or air bubbles remain on the surface.
- Another layer of glue is applied on top with smooth movements of the brush.
- We paint the background with multi-colored or plain acrylic paints.
- The dried layer of glue is coated with varnish, and then finished product must be placed in the oven and heated to 150 degrees.
Putties are not used for glass processing because smooth surfaces bottles provide excellent adhesion to the applied design.
Spectacular decoupage vase in vintage style
An excellent result can be achieved by artificially aging the surfaces. This unusual technique is called craquelure. After carrying out a special varnish or universal glue processing, the surface of the antique vase is covered with a web of tiny cracked lines. Paint and varnish composition must be applied to a still wet layer of paint. For products created using the craquelure technique, it is necessary to apply a background coating.

An interesting solution would be to use contrasting colors:
- First, the first layer is applied - primer;
- A special varnish or glue is applied to completely dry soil;
- Another layer of acrylic paint is quickly applied to the layer of craquelure varnish.
After the second layer of paint has completely dried, cracks appear on the surface to be decorated; their depth depends on the thickness of the applied layer of universal glue or craquelure agent.
Details: decoupage of a vase (video)
Today, there are a number of design options using the decoupage technique. large number. Ancient needlework allows you to bring to life your most unusual ideas, develop creativity and is a great pastime. In addition, with luxurious crafts you can not only decorate your home or apartment, but also please your friends and acquaintances. Beautiful pieces of art will become a real decoration of vintage or Provence style. A gift made with your own hands using the decoupage technique will delight true connoisseurs of luxurious exclusive items.