Different types of foundations require some differences in the implementation of their finishing decoration: finishing a pile foundation is not at all the same as cladding the ground part of a strip structure. In this article we will try to cover both options and tell you which materials are used in a given situation, or have universal application.
You will also be offered a video on the topic: “Finishing the foundation basement siding with your own hands."
The foundation part of the building is in direct contact with the ground and, first of all, needs to be protected from moisture. The aesthetics of the facade also, of course, matters, but it is secondary.
The best way to finish the base should be considered the option that can meet both requirements, and also be easy to do independently.
- The strip foundation type is the most common and differs from other structures by the presence of solid walls, the ground part of which is called the plinth. This is what needs to be protected to the maximum - especially considering that the vast majority of buildings with strip foundations have basements and semi-basements.

Option them interior design not so important: whether there is a technical floor or, for example, a living room with a fireplace, the basement walls must be not only airtight, but also warm. You need to choose the appropriate finishing option, and our instructions will help you with this.
Adhesive finishes
Concrete or brick walls foundations are an ideal base for adhesive cladding. Despite the fact that the labor intensity of cladding with natural stone (see), as well as the price of the material, is quite high, its popularity is only increasing over time.
So:
- Finishing the foundation with stone gives the simplest and most unpresentable facade solidity and a good appearance - hence the people’s love for its textures. For the same reason, and even thanks to the lower cost, ordinary ones are also in no less demand. plastic panels, stylized as stone.

- But we will talk about imitations a little later, but for now let’s talk about natural material. For cladding with glue, stones with different cutting variations are used, but not in too large a format. Due to their considerable weight, large slabs have a slightly different installation technology; they require anchoring.
- They are not used in low-rise construction - these are options for administrative and public buildings, architectural monuments, etc. Due to the lower price and the possibility of manufacturing directly on the construction site, decorative analogues are often used instead of natural stone.
- Of course, they are inferior to natural stone in terms of the aesthetics of the front surface, but they have much less weight, which significantly reduces the load on the foundation. There are dry mixes on sale, as well as silicone molds-compounds specially designed for the production of decorative stone.

- And here is a paradox: the stone is called artificial, but the components in its composition are natural - cement, gypsum, sand, stone chips. You can easily find instructions for making it. But as for the installation technology, the origin of the stone does not affect it in any way.
- The second most popular material used for plinth cladding is rightfully considered brick-like clinker tiles. Unlike the real one brick cladding, it does not require support on the foundation, reinforcement and anchoring - everything that has to be done when finishing the base with brick.
- By the way, if you use paving stones for cladding, that is, a stone in the shape of a solid brick, the masonry will also need support. Therefore, preference is usually given to such options for cutting stone as: noodles; combined rectangles or triangles; various mixes.

- Of particular interest to home owners is torn stone, popularly called plastushka - this is what you see in the photo below, as well as the exact size - usually in the form of brick tiles. Naturally, when using products of different configurations, some adjustments are made to the installation process.
- The cladding is made of stones that have an irregular geometric shape: rubble, pebbles, wild and torn stones, formed like a mosaic. Each part is first selected by shape and color, laid out and numbered according to them - and only then mounted on the wall.
- A stone with precise geometric shapes is glued according to the same principle as ceramic tiles(cm. ). Here, for the sake of proportion, it is important to maintain the thickness of the horizontal and vertical seams, which is why wedges or crosses are used during installation.
Otherwise, there is no difference in the sticker methods. The main thing is to prepare the surface well and use the right glue - better than factory-made ones.
The adhesive method of facing the foundation is used only in two cases: if the insulation of the base is done from the inside, or when there is no need for it at all.
Some information about siding
If foundation walls require insulation: external or even double-sided - there is only one way out: use materials mounted on the sheathing. There are many types of them, but specifically for foundations, various types of siding panels are used, as well as thermal panels, which differ only in structure.
- They are very similar in appearance, and therefore we will not focus on thermal panels. In low-rise construction, compact modular panels with imitation textures of natural materials are leading today. We are talking about finishing the foundations and walls of small private houses. Cladding of large office centers and others administrative buildings usually part of a project.
- It’s not all that simple: if, for example, they design a stone or porcelain stoneware cladding for the foundation, it will be in the form of slabs mounted on a frame. And the load-bearing structures are calculated based on the weight of this cladding. Although, with the advent of modern lightweight materials, heavy types of cladding are fading into the background.
Today, in designed buildings, the priority is given to panels made of thin sheet metal, especially durable plastic HPL, as well as sheet materials made of composite aluminum. For finishing foundations and walls multi-storey buildings siding is practically not used, since the strength of the material does not correspond to the loads.
Yes, and the cost of cladding large areas the facades turn out to be quite high.
Types of panels
As already mentioned, in private construction, basement siding is breaking all records of popularity. These are panels specially adapted in size for convenient finishing of the foundation (see).
On average, the height of the base is 700-900 mm. The height of the panels varies between 450-695 mm, which allows you to cover the foundation with a whole module or make two rows.

So:
- You can, of course, cut off pieces, but this will disrupt the integrity of the design and you need to try to choose a size for the panels that would allow you to do without cutting. The length of the modules usually does not exceed 1.25 m. The front surface of basement siding, as a rule, has the texture of stone, brickwork, tiles or wood chips.
- The exception is ceramic siding, which offers a wider range of textures. To all of the above options, imitation wood, decorative plasters and even photographic images are added. But if it is used, then for full finishing facade, and not just for the plinth. And the fastening system of ceramic siding, due to its more significant weight, is somewhat different.

- Ceramic siding is the most expensive type of panels, and, as a rule, imported. In a more affordable version, the following materials are used to make siding: polymers, metal, cement, composite wood. Vinyl and polypropylene panels lead this list by a wide margin. What to do: more low cost material is always the determining criterion for its choice by the buyer.
- Moreover, the polymer options have a very decent appearance. This type of panel differs from the usual lengthy panel only in the shape and stylization of the front surface, which is oriented towards the foundation part of the facade. Regarding the structure of the panel: it, by analogy with facade siding, also has a form factor located between the lock and nail strips.

During the installation process, a similar set of accessories is used - with the exception of connecting strips, which in this case not needed at all.
Since the panel imitates masonry with offset seams, the joint turns out to be zigzag and is practically invisible on the surface. At the final stage, the seams are simply sealed with sealant.
Design Possibilities
As for the installation technology, there are only minor differences when installing the sheathing related to the configuration of the cladding panels. In general, with the advent of siding in the basement version, it became possible to significantly diversify the cladding of the facade and even think about its design.

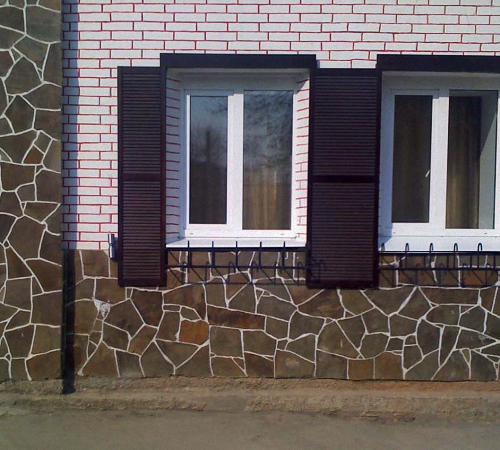
- Modular panels are equally successfully used for complete wall cladding, and are also combined with vertical or horizontal siding. By the way, long lengths are also used for finishing the base, but only when it is located flush with the surface of the walls, and the walls are faced from the ground.
- This is exactly the option we see in the example above, where, by the way, it is not the foundation, but the pediments that are sheathed with basement siding. In general, siding panels can be combined in any way you like: by texture, color, shape and even direction of cladding.
Therefore, they rarely cover only the foundation, but finish the house completely. The main thing here is not to buy material spontaneously.
First, it is advisable to make a sketch of the facade; think about which architectural elements are best to focus on; choose shades of panels that not only harmonize with each other, but also match the color of the roof well.
House on stilts: secrets of finishing the basement
The fact that the panels are installed on a subsystem allows them to be used not only for insulation and wall finishing strip foundation, but also for installing a false base on the facades of buildings erected on columnar and pile foundations (see). In fact, there is simply no other method as convenient and inexpensive as finishing a pile-screw foundation with plinth panels.
- If frame racks need to be installed underneath them on a concrete wall, then the metal piles themselves play the role of load-bearing elements of the sheathing. To make it easier to fasten the panels, they are tied around the perimeter with timber or a PPN profile. You can see what it looks like in the picture below.

- In addition to the horizontal belts of the sheathing, they also install vertical elements: corner and additional posts between piles, allowing the panels to rest across the entire area. Otherwise, the finishing of a pile foundation is no different from the covering of an uninsulated strip plinth: first, the corner elements are mounted, then along the lower perimeter starting profile, and finally the panels themselves.
- When one row of panels is enough to cover the height of the plinth, the locking part of the module is snapped into the groove starting bar. Its upper edge is attached through the mounting holes to the sheathing at the corners and, depending on the length of the panel, in one or two places in the middle.

- If the finishing above the base is done with a different type of siding or with a different material altogether, the top of the cladding will be covered with a base flashing. If the siding is done along the entire wall: from bottom to top, then the ebb can be installed along the bottom line of the cladding. It is necessary to prevent condensation from accumulating under the cladding.
- It would be unfair not to mention another option for finishing the basement of a house on stilts. These are half-brick walls that are erected along the perimeter of the foundation. They can be faced with stone or immediately laid out from decorative bricks.
- Previously it was, in fact, the only way finishing of this type of foundation. It is quite labor-intensive and expensive, because a shallow foundation support needs to be poured under the wall. In addition, you have to wait until the concrete gains strength, in general - a whole story.

- Materials such as flat slate or corrugated sheet, and do not look good at all basement cladding. Therefore, since panels with imitation stone appeared, which happened not so long ago, the issue of finishing pile foundations is almost always resolved unambiguously. In any case, if the distance from the ground to the grillage is not very large, it makes no sense to build walls from the point of view of economy.
It’s another matter when the lower crown of the house is one or more meters away from the ground. In this case, there is space that can be used in some way, for example: to store hoses, brooms, rakes, and other garden tools there. Then the walls should be made more durable, and a door can be built in them.
The procedure for finishing the basement of a building is quite important process which requires special care. Since it is the base that is under strong influence of moisture and other irritants. We will discuss below how to choose the right material for finishing the plinth and how to install it.
Features of cladding the basement of a house
The base is located at the bottom of any building; most often tiles or stones are used to decorate it. The plinth not only performs decorative function building, but also protects it from moisture penetration, dampness, and load distribution.

The base is the basis for the construction of load-bearing walls. Correct construction of the basement affects the quality of the future building.
The most irritating factor for the base is precipitation. In addition, he is under the influence groundwater, and the difference between the temperature in the ground and in the air.
Therefore, the most important requirement The finishing material used to cover the base is its stability and protection of this element from moisture. In addition, a properly finished base allows for reliable protection of the foundation.
The process of selecting materials for finishing the plinth should be based primarily on the use of high-strength materials that are resistant to changes in temperature and moisture. At the same time, they must have an attractive appearance and be in harmony with the overall exterior of the building.
There are cases of monolithic finishing of the base, which is a combination of the foundation and the base. For these purposes, concrete, individual blocks, stone or special bricks are used. The elevation of the base above the ground occurs at a level of 500-700 cm.
Most often, the finishing of the base is done after the walls have been erected. It is advisable to do otherwise; the base must be protected immediately after the foundation has been erected. In this case, all work is carried out in the form of waterproofing, plastering, finishing.
Before you start facing works a pillow is created drainage purpose, covering the entire perimeter of the structure. It looks like a recess, 150-200 mm wide, the width of which is about half a meter.
After finishing, the recess is filled with gravel, which acts as drainage. After preparing the base, it is plastered using cement-lime plaster. To increase the strength of the structure, in order to connect the base to the foundation, they are reinforced with a special mesh. To provide additional waterproofing of the base, special additives in the form of plasticizers, for example river sand, should be added to the solution.

If this is not done, the quality of the finishing of the basement will decrease significantly, the foundation will suffer, and the walls in the house will always be damp. On damp walls Wallpaper does not adhere well and mold and mildew appear, which are especially dangerous to human health.
In addition, there are two options for arranging the base:
- recessed;
- exalted.
The first option is preferable, since it does not lead to the accumulation of snow and ice on the surface. In addition, it is not exposed to precipitation and needs less protection from moisture.
The second option for arranging the base has a more attractive appearance, but it requires special protection using ebbs, tiles with slopes, and waterproofing components.
Before finishing the base, you should inspect its base. It should be durable and even. It should be free of dirt and dust. To eliminate various types of unevenness, to remove protruding areas or fill in recesses, it is used special compounds leveling direction.
A special primer is used to impregnate the surface; it will improve the adhesion between the surface of the base and the finishing material.
Materials in the form of artificial stone require additional treatment using moisture-repellent agents. Thus, the material will gain additional resistance to moisture and dirt. For these purposes, compositions in the form of water repellents are suitable. To apply them, just use a brush or roller.

Clinker tiles for plinth cladding
Materials in the form of slabs for finishing the base have a cement-stone, polystyrene foam or asbestos-cement base. To fix them, special compounds based on moisture-resistant glue are used.
The use of clinker tiles for cladding the plinth allows you to obtain an aesthetically attractive base that harmonizes perfectly with clinker bricks. The tiles are particularly light and do not load the building structure. Its thickness varies between 7-20 mm. Moreover, to improve corner joints special materials are used to simplify finishing.
Installation of clinker tiles involves determining the level for installing its first row. To do this, the height of the base is divided by the height of the tiles added to the width of the joints.
For example, to cover a 400 mm high plinth with a 65 cm high slab with 6 mm joints, you will need 6 tiles. At the same time, a six-millimeter gap will remain in the lower part of the base, which will require acrylic or polyurethane mass to fill.
To glue the tiles, an adhesive composition with increased frost resistance, characterized by elastic characteristics, is used. It is applied both to the tile and to the surface of the base. Please note that the solution can remain on a base that is not covered with tiles for no more than half an hour, after which it loses its properties.
Fusing clinker mortar is used to fill the joints between the tiles. Clinker tiles have zero moisture absorption, so they do not need to be treated with special compounds.

To finish the base you will need:
- primers;
- tile adhesive;
- tiles;
- mortar for filling joints.
Cladding the basement of a house with your own hands: stone, polysand and resin tiles
The plinth, decorated with stone tiles, is distinguished by its spectacular and attractive appearance. But, at the same time, a lot of money will be required to carry out the work and purchase the material. Natural stone for plinth cladding is most often limestone, granite or marble. The shape and configuration of tiles can be very different. Some elements are produced in the form of bricks, others in the form of slabs. This tile has a unique texture; its surface comes in four types:
- polished;
- rubble;
- grainy;
- polished.
Installing this type of tile is similar to installing clinker material. To fix the tiles to the surface, a special adhesive composition is used, designed for working with stones. The use of another type of glue is unacceptable, as cracks and defects may appear on the tiles. If it is necessary to have a complete appearance of the tile, it is recommended to leave gaps of 4-5 mm between its small parts, and 2-3 mm between large parts. Used to fill seams special solution. To treat limestone and sandstone, you will need to purchase a special moisture-repellent impregnation.

If there is a protruding base, a cornice is used to protect the finish. To clad the basement of a house with stone you will need:
- primers;
- glue;
- mortar used to fill the seams;
- tiles based on slate, granite, marble or limestone.
Granite cladding of the plinth is characterized by the long service life of such a coating and good technical characteristics.
A more modern finishing material is polymer sand-based tiles. Its use is associated with both the finishing of the facade of the building and the cladding of the basement. This type of tile is a composite material that has a relief brick texture. The material is lightweight, so it is suitable for finishing any type of plinth. The tile is characterized by high plasticity, resistance to cracking, moisture resistance and resistance to changes in temperature.
To fix the tiles, you should equip a special sheathing on which the material is attached using self-tapping screws. Insulation is most often installed in the space of the sheathing. The material is easy to clean, does not collect dirt and is easy to use.
The latest version of the tile is based on the use of resin for its manufacture. This material is an imitation of clinker tiles or natural stone. They are three millimeters thick. The material is used to finish various types of surfaces, even with slight irregularities. To cut tiles, it is enough to have scissors. It is mounted on either a concrete or plastered base. There are nine color options such tiles. In addition, it varies in texture, which can be embossed or smooth.
Plinth cladding photo:
Installation of such tiles involves determining the upper area for its fastening. Used to apply glue notched trowel. Laying should begin from the corner areas to fill the seams additional materials will not be required as they are filled with glue. To improve aesthetic appeal tiles, using a brush previously soaked in water, distribute the glue along the seams. The wall must be protected from moisture for three days from the moment the tiles are installed.
This material very naturally imitates natural stone, while installation work is easier and cheaper.
Features of plinth cladding with artificial stone
This type of finishing is similar in appearance to the use of tiles based on natural stone. Although ordinary concrete is used to make artificial stone. With the help of chemical, organic additives and fillers, the surface has high frost resistance, and dyes help to imitate stone. Artificial stone takes on the appearance of rock or torn stone.
In accordance with the manufacturers' recommendations, conventional or elastic adhesives are used to fix such stone on the surface. Special additives are used to fill joints. After finishing the base, the material is covered with moisture-protective agents, which significantly improve its service life.
The appearance of the surface is presentable, although the cost of purchasing the material is less than the price of natural stone.

Technology of covering the base with polyvinyl chloride panels
In order to avoid wet work on gluing tiles, a simpler option is used - PVC panels. This material is lightweight and easy to install. In addition, the panels are resistant to temperature changes. There are two main PVC option panels:
- with imitation brickwork;
- mosaic version of plaster.
The material is attached to a wooden or steel sheathing. First, the level is set and the starting profile is fixed. The first of the panels rests on it. The elements are joined to each other using grooves. Overlay elements are used to close the base.
There are special overlays for covering corners. This type the base does not need to be treated with moisture-repellent agents.

Mosaic plaster for plinth cladding - technology
This version of plaster is distinguished by the presence of small grains that have the shape of a multi-colored mosaic. Due to the presence of resin in the composition, the plaster is moisture-proof and vapor-permeable. In addition, it is highly resistant to mechanical stress and low temperatures.
This type of plaster fits well on a base made of plaster based on gypsum, cement, lime and sand. Application of this material to piece materials and heat-saving plaster is prohibited.
This type of plaster is applied manually. To carry out the work you will need a grater. To increase adhesion between the plaster and the coating, it is recommended to throw a little regular plaster mortar onto the wall before applying mosaic plaster.
After applying the plaster, the process of leveling it on the surface follows. Grouting of the solution is done with a trowel. After its application, special water repellents are used, which increase the resistance of the material to ultraviolet radiation, wind and precipitation.

Options for facing the base with brick
Brickwork improves the appearance of the building, making it more respectable. In addition, brick is in perfect harmony with other finishing materials used for wall cladding.
There are several options for cladding the base so that the surface takes on the appearance of brickwork:
1. Using natural brick - this method is distinguished by the possibility of creating a ventilated gap into which the insulation is mounted. In addition, brickwork has good thermal insulation characteristics. Bricks are used during the work:
- hyper-pressed type - characterized by high weight, low moisture absorption and good strength characteristics;
- silicate type - used less often, has worse performance characteristics, but costs less;
- ceramic type - hollow inside, so it retains heat well.
2. In order to give the base surface the appearance of brickwork, it is enough to use clinker tiles. They have the best performance characteristics, are easy to install and are no different in appearance from brickwork. In addition, the presence of effects such as artificial aging, uneven firing, different colors and texture, allows you to improve the appearance of the surface.

3. Base panels are a simpler option for simulating brickwork, the cost of which is much lower than previous options, and the ease of installation is higher. In addition, the panels are easy to clean and are not subject to contamination.
Plinth cladding video:
The technology for finishing the foundation of a house with your own hands differs depending on the chosen material. In this article we will talk about the types of foundations and their features. We will also consider in detail the most popular types of materials for finishing the basement of a private house, in particular: decorative plaster, natural and artificial stone, PVC panels and siding, mosaic plaster and different types of tiles.
Therefore, when choosing materials for finishing the facade of a house, it is important to take these nuances into account:
- materials for finishing the foundation of a house with your own hands:
- plastering solution;
- tile;
- siding panels;
- artificial and natural stone;
- brick.
The presented materials have their own advantages, and also differ in the methods of their application and installation.
Under no circumstances should the foundation be left unfinished, since concrete is predisposed to absorb moisture, which has a destructive force when the air temperature changes.
Before you begin finishing the basement of a private house, you should thoroughly clean it of dirt, level the wall, and repair chips and cracks. Next, the surface is coated with a primer for better adhesion. finishing materials with base.
Types of foundations:
Protruding. To finish the foundation of a house with your own hands, you first need to take care of the drainage. If installed incorrectly, water will begin to collect at the junction of the base and the wall. In order to prevent such a situation, water drainage should be planned taking into account the cladding of the base.
The appearance of the foundation, finished with such tiles, is similar to walls made of clinker bricks. The advantage of tiles is that they have less weight and thickness (8 - 20 cm).
The length and width are similar to brick. You can purchase additional corners to simplify the work and make the base look beautiful.
Step by step instructionsplinth finishes:

 It's very attractive to look at, but it's not cheap either. The most popular materials for such finishing are sandstone or limestone. Marble or granite are among the most expensive natural materials. Sandstone and limestone are pre-treated with a waterproofing compound. The laying pattern is the same as for tiling. Stone glue is used to secure the elements. Seams are left between small stones, and 2 mm between large stones. If the foundation protrudes forward, it is necessary to install a cornice to drain the water.
Artificial stone is very similar to natural stone. Thanks to special additives and fillers, manufacturers obtain stone with excellent performance properties.
Foundation finishing technique artificial stone reminiscent of laying tiles:

 Polymer sand tiles are an innovative material that imitates “torn” stone and brick. It is very light in weight, which makes it possible to lay it on weak-bearing structures. Manufacturers have minimized the risk of cracks and chips in the material and increased frost and moisture resistance. Therefore, there is no need for treatment with waterproofing agents.

Finishing the plinth with resin-based tiles
 The appearance of this material resembles clinker brick or sandstone. Its thickness is small, only 3 mm. Resin tiles are elastic, which allows them to be used on rounded plinths. They can also be bent at the corners of the plinth. The material is cut using scissors and can be easily attached to plaster, concrete and insulation. It has a smooth and rough surface and a wide range of colors.
Installation order:

 It has a granular structure. The grain size is about 3 mm. After the solution is applied to the wall, a pattern emerges that resembles a colored mosaic. The resin acts as a fixing agent.
, as a rule, protrudes above the ground. This part must be decorated not only for aesthetic, but also for practical purposes. We will look at the six most popular options with detailed instructions on installation.
Strip foundation is concrete mixture with metal or filled with crushed stone and gravel. Firstly, such a surface looks unattractive, even if its edges are perfectly smooth. And they are rarely even, depending on what formwork was used when pouring. Usually there are traces from shields and.

Based on this, we designate the tasks of finishing the plinth:
- it must protect the pouring surface from the scorching rays of the sun and winds;
- the cladding hides not only all the imperfections of the foundation, but also the layer;
- and finally, the decorative cladding should be consistent with the overall look and decorate the building.
Basics of self-finishing the basement of a private house
Before we talk about how to cover the base of a house from the outside, let's focus on the basics. First, installation of the cladding can be dry or wet. In the first case, the material is attached to or directly onto the concrete surface using fasteners. The second option requires the installation of lathing and the use of building mixtures.
The second important point is that you need to take into account the climate of your region.

It is important that the casing of the base does not absorb water and does not allow it to pass to the surface. Another nuance is that the cladding should not lose its qualities under the influence of reagents used in winter.
Advice! Taking into account the operating conditions of the facing material, its choice must be approached with full responsibility, trusting trusted manufacturers who guarantee the quality and durability of the product.
Features of the selection and use of natural stone for cladding the base
Natural stone is considered the most respectable and expensive finishing material. Construction professionals recommend not using loose rocks, such as shell rock and limestone, to decorate the base. They will soon lose their presentable appearance.
Dense frost-resistant material, preferably dark in color, is suitable for this purpose.

Igneous gabbro and granite are best suited in this regard.
Important! Finished with natural stone important condition– reliable sealing of joints and seams. If defects are allowed, moisture will seep through the cladding and destroy the base.
Features of choosing natural stone for exterior decoration
Natural stone must match in color and texture. But besides this, there are other requirements. If the stones themselves are very heavy, they need additional fasteners for strong fixation. It is also important to know that silicate rocks (quartzite and sandstone) are incompatible with carbonate rocks (marble, limestone). Their chemical components react with each other. The result is gradual mutual destruction.

Master class on plinth cladding with natural stone
Now let's see how the whole process looks in practice.
| Illustration | Description of action |
 | A metal mesh must be secured to the surface of the base. It will firmly fix the solution. |
 | Pre-arrange torn stones for the plinth on the ground in the order in which you will place them on vertical surface. Natural stone does not have two identical parts, so you need to assemble the cladding like putting together a puzzle. |
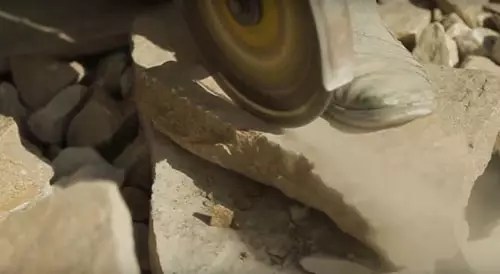 | The parts that will be on the bottom and top need to be cut so that there is a straight line. Use a special stone-cutting wheel for this. |
 | For covering the plinth natural stone prepare a solution of sand and... The consistency should be quite dense. It is better to wet the stones a little before installation. |
 | To form gaps between stones, insert wooden or stone choppers. Start laying from bottom to top. |
 | After the stones are firmly fixed to the base, remove the choppers and fill the gaps with mortar. |
The nuances of facing the base with artificial stone
Artificial stone will cost you much less than natural stone. This feature attracts many developers. In addition, the artificial material has regular geometric shapes, and this greatly simplifies the laying. All you need to do is trim the tiles a little in the corners using a grinder.

Installing corrugated sheets is not a difficult task. It is attached to a frame made of metal or wood using roofing ties.
Advice! To cover the base, use corrugated sheeting grade C8-21. You don’t need more embossed specimens. Optimal thickness sheet – 0.6 mm.
It is important to choose the correct corrugated sheet coating. Regular polyester is easily damaged, so it is better to choose pural or plastisol. These materials tolerate moisture and mechanical stress very well. Profiled sheets with this coating imitate stone or wood. The most durable coating option is Printech. Its service life is up to half a century. But it also costs a lot.
A short video on installing corrugated sheets:
Let's summarize: how to decorate the basement of a house
As you can see, there are many finishing options, and it is quite difficult to choose. Therefore, to resolve the issue of how to cover the basement of a house, you should simply decide on the most basic points: the construction budget and your aesthetic preferences. Perhaps you have your own options for finishing the plinth. Write to us about them in the comments!
YOU MAY ALSO BE INTERESTED IN:
The basement is one of the most important parts of the building. This is a kind of support that is subject to constant negative influence of the environment. Finishing the basement of a private house not only gives it an aesthetic appearance, but also protects it from adverse factors. Therefore, finishing materials must be moisture-resistant, frost-resistant, reliable and durable.
Most of the building's foundation is below ground level and hidden from view. The protruding part above ground level is called the plinth. According to standards, the height of the plinth from the ground must be at least 20 cm. It is usually made of brick, stone or concrete slabs.

Construction stone plinth is the most practical solution, since the design does not need additional finishing. However, it is worth considering that this is the most expensive method. Laying a brick plinth is more affordable. This material is environmentally friendly, has low and good strength characteristics.
Cladding the basement of a house is not only aesthetic. This is reliable protection of the building from external influences. Finishing materials that will be used to cover the base must have a high level of strength. Together with the plinth, its cladding will absorb the load created by the wall structures of the building and distribute it evenly over the foundation of the building. It must withstand pressure and protect the base from external factors, such as precipitation, sun rays, humidity, temperature fluctuations.
The finishing material protects the foundation of the building from damage by mold, mildew and various types of insects. The cladding of the base is carried out to insulate the building. This is also necessary to protect the foundation from severe frosts, under the influence of which its strength decreases and the process of erosion develops.

If you leave the surface of the base without covering, this will contribute to its slow destruction as a result of constant exposure to dry or liquid dirt containing aggressive chemicals and minerals.
Various options for finishing the basement of a private house, photos clearly confirm this, transform the building into a masterpiece of design art, making its appearance complete and unique.
Types of basement structures
There are main variations of designs that are used for house projects with a basement:
- protruding beyond the surface of the walls;
- flush with the building;
- sinking, relative to the wall.

Most often, when building a private house, a photo of the base of the house clearly confirms this; the first two options are used. A protruding plinth is recommended to be used when the house is being built with thin external walls, a warm underground is used, or the building has basement. In these cases, this type of base will provide the building with additional thermal insulation.
If the basement part is made flush with the building, when thin walls are used for its construction, dampness and condensation will inevitably occur during interior spaces. Here the most problematic thing is to install thermal insulation and finish.
Important! When choosing these types of plinth, you should take care in advance about the arrangement of ebb tides.
The sunken base is less damaged by precipitation. Here you can easily hide waterproofing, install insulation and perform cladding necessary materials, which contributes to a longer service life. This type of plinth is recommended for buildings without a basement. Finishing materials for the plinth will absorb soil pressure, performing a supporting function, thereby maintaining the safety of the entire structure.

The procedure for finishing the basement of a house
All work on the cladding of the basement structure is carried out at the final stage of production - the exterior finishing of the building. It is better to carry out work in warm, dry weather. Sheathing the base consists of the following actions, which are performed in a certain sequence:
- A trench 20 cm deep and 50 cm wide is dug around the entire perimeter of the building.
- Fill the space with gravel to provide drainage. Additionally, the trench can be strengthened using reinforcing mesh.
- The surface of the wall, 50-70 cm high for the future plinth, is cleaned of dirt and processed. If necessary, all irregularities are eliminated.
- Arrangement of thermal insulation.
- Decorative cladding of the base.
The choice of facing material and the method of its installation depends on the design of the base and the method of casting it.

Arrangement of ebb tides for the foundation plinth
To protect the plinth from the negative effects of precipitation, you should install a flashing, which is fixed above the protruding part of the plinth, and is a kind of delimiter between the base of the building and wall structure. One part is in contact with the wall at a certain angle, and the other hangs over the foundation, covering it, collecting rain and melt water.
The flashings for the plinth are strips measuring 50-400 mm. The color, size and shape of the ebb should be selected depending on the finishing material of the foundation. You can make a water-repellent structure yourself using waterproof materials, or you can buy ready-made flashings for the foundation plinth at any hardware store.
Today the industry produces several types of ebb tides:
- plastic;
- metal;
- concrete;
- clinker

The type of tide is selected based on the finishing material for the facade of the building. Plastic ebbs are most successfully combined with vinyl siding, which is used for cladding the building. Thanks to a wide range of colors, you can choose the most suitable option. The use of concrete or clinker flashings for the plinth is preferable for buildings that are lined with natural stone or brick. Metal canopies can be used with any type of finishing material.
Types of tides
The most budget option is the use of plastic moldings made of polyvinyl chloride. The cost of the product is 50 rubles. for 1 p.m. Despite the high level of water resistance, ebb tides show increased sensitivity to physical impact, especially in winter period, when the slightest blow can cause them to crack and split.
Useful advice! Due to the fact that plastic castings have increased fragility, preference should be given to more durable and expensive products.
The most durable and long lasting are those made of metal: steel, copper or aluminum. Installation of the products is convenient and simple, and involves attaching metal strips to the walls of the building using self-tapping screws and dowels. When choosing this material from a large assortment of types, special attention should be paid to aesthetically pleasing product so that it creates completeness general design buildings. The price of the product starts from 100 rubles/rm.

Useful advice! When installing base flashings, the planks should overlap each other by at least 30 mm. To avoid damage to the protective layer of the product, which will lead to corrosion and destruction of the material, do not cut the strips.
Metal castings are made from high-quality and frost-resistant cement M450 with the addition of river sand, granite crushed stone and plasticizers. The solution is poured into silicone molds of various geometric parameters. The result is an even and smooth product. These tides are attached to a special solution.
Flashings for the foundation plinth, the price of which is the highest and starts from 200 rubles. for 1 linear meter - these are products made from clinker tiles. This material has high strength properties, reliably protects the building from the negative effects of the environment and successfully emphasizes the design of the cladding.

Low tide installation technology
After selecting the low tide, you can begin its installation. Here it is necessary to take into account not only the material from which the ebbs are made, but also the design features of the building. So, for a wooden house, elements that will be fastened with self-tapping screws or other fasteners are suitable. Since wood has low adhesion and is susceptible to dampness, the use of adhesives is not advisable.
For buildings made of brick or facing stone, you can use flashings that will be fixed using polymer or cement-adhesive mortars.
Useful advice! When using concrete or ceramic sills, their installation should be carried out simultaneously with the cladding of the base and walls.
If it is necessary to install flashings on a building already finished with facing material, then it is better to use metal or vinyl elements.

Before installing the drip sills, it is necessary to seal the joints between the walls and the plinth. All cracks and crevices should be treated with a water-repellent mixture or sealed with sealant. Next, you need to use a level to mark the wall. The highest point of the base is determined and carried out horizontal line, along which it will be mounted upper part low tide The part of the foundation that protrudes must be cement screed compare with a horizontal plane. The lower part of the ebb will rest on it.
Important! The ebb plane relative to the wall should be located with a slope of 10-15%.
Installation of metal and plastic ebbs
Installation of drip linings should begin from the corner, using special corner elements, which can be purchased together with planks of the same width and color. Next, you need to finish all the protruding parts of the building structure: columns, pilasters and others.
Related article:
What materials are used for low tides. Which of them is better to choose and in what case. Installation of ebb tides.

In the upper part of the ebb, holes are drilled using a drill at a distance of 40-50 cm from each other. Next, the element is applied to the previously marked line on the wall of the house and is attached to it with dowels and self-tapping screws. The lower part of the ebb is attached to the concrete base of the plinth with dowel nails in increments of 40-50 cm. The joint between the ebb and the wall should be sealed with putty or silicone compound.

Important! During installation of the ebb, it should be taken into account that it should protrude 2-3 cm beyond the edge of the base, which will ensure better protection during precipitation.
After covering all the corners and protruding elements, you should begin installing the drip linings in straight sections. You need to start from one of the corners. Each subsequent element should be overlapped with the previous one by at least 3 cm. All joints should be treated with sealant to prevent moisture from entering.
Installation of concrete and clinker slabs
Flashings made of clinker and concrete should be installed at the stage of facing the facade of the building, since adjusting them to size during the installation process is a labor-intensive process.
These types of tides are better combined with facing materials such as brick, clinker tiles, natural or. To attach them, you should use a special adhesive composition for ceramics and stone, which is intended for outdoor use. It is purchased in the form of a dry mixture created on a cement or polymer base, and with the help of water it is brought to the state of thick sour cream. The solution can be made independently using cement and construction sand in a ratio of 1:3 or 1:4.

Installation of concrete and clinker ebbs also starts from the corner. To avoid complex processing of concrete castings, they should be pre-positioned in such a way as to minimize their cutting. This can be achieved by using the correct size of the seam between the elements. You can adjust the dimensions of clinker products by using a tile cutter or grinder with a diamond cutting wheel.
An adhesive mixture is applied to the back side of each element. The ebb tide is attached strictly along the previously outlined line. After waiting some time for the solution to set, putty or silicone sealant is applied to the joints between the casting elements. After the glue has completely set, you can cladding the walls of the building.
Waterproofing the foundation plinth
The base of the building is constantly in difficult conditions. It takes a significant load from the above-ground part of the building and comes into contact with the external environment, being exposed to moisture. To protect important part To protect a house from destruction, it is necessary to provide for a number of measures, one of which is the arrangement of waterproofing of the foundation plinth.

Waterproofing can be horizontal or vertical. Usually a set of works is performed that includes both methods. Horizontal waterproofing is carried out before the construction of walls and is aimed at protecting them from moisture. However, in order to ensure a complete protective set of measures, it is also necessary to carry out waterproofing between the foundation and the base.
Vertical waterproof protection is aimed at preventing the negative impact of surface and ground water on brick or concrete. Such insulation can be external or internal. The best effect is provided by double-sided moisture protection.
Today, pile foundations are predominantly used in the construction of buildings. Here the base plays not only decorative role, but also protects the house from heat loss. Despite the fact that this element is not load-bearing and does not directly affect the durability of the structure, waterproofing the base is mandatory.
Materials for waterproofing the basement from the outside
Coating, roll and injection compounds with penetrating action are widely used as materials used for waterproofing the foundation plinth.

It is often used to protect the foundation from the effects of groundwater. roll waterproofing, which can be fused or pasted over. Fused insulation consists of a base in the form of fiberglass, polyester or fiberglass and applied mastic. Pasted waterproofing it is laid on the surface of the foundation using bitumen mastic, which is first applied to the rolled material and to the monolith, then the element is glued, pressed and smoothed.
The main advantage roll material for the plinth plate is its low cost and high speed installation However, this type of waterproofing does not resist well mechanical stress and has a short service life. It cannot be used in places where communications pass or connect. Before installation, the surface should be cleaned of dust and dirt and dried thoroughly.
As coating waterproofing materials bitumen, polymer, bitumen-polymer mastics, astringent plasters and cement coatings, which are applied to the surface of the foundation using a brush or roller. This type of insulation is used for water pressure up to 2.6 kgf/cm².

Useful advice! To ensure increased strength of waterproofing after the first layer of mastic, it is recommended to reinforce the surface with fiberglass and apply subsequent layers on top of it.
The material is low cost and can be applied to a surface of any configuration. However, it is not durable and requires preparatory work and creating additional protection from mechanical impact.
The use of injection and penetrating compounds is the latest technology for waterproofing structures. Penetrating material is applied to a wet surface concrete base. Reacting with water, the composition turns into crystals that penetrate the pores of concrete, making it waterproof. The penetration depth reaches 150-250 mm.
Injection waterproofing is carried out using a liquid solution, which is injected under pressure into the cracks, pores and seams of the structure. This method can be used for waterproofing buildings made of rubble and brick. The use of this waterproofing is a very labor-intensive process that requires cleaning the structure down to concrete or brick, and the complexity of the work itself requires the involvement of experienced craftsman. In addition, such insulation is the most expensive.

Features of waterproofing a brick plinth
Ceramic brick is most often used to build a basement. Its waterproofing can be carried out using various methods.
Solid red brick can be used to build walls. This building material has already undergone factory processing, where a layer of waterproofing was previously applied to it. Therefore, using this brick for the construction of a building, external waterproofing may not be arranged. Despite the fact that the cost of this material is relatively high, these costs are offset by the fact that after laying the brick, no other work is required.
The next way to waterproof a brick plinth is to use bitumen lubricant, which is applied in several layers, cold or hot.

Insulation of the foundation plinth from the outside can be done independently using high-quality adhesive composition
Important! When using bituminous materials, it is important to strictly observe the temperature regime. If the lubricant overheats, the coating will turn out to be of poor quality with the formation of blisters, cracks and bubbles.
The traditional method of waterproofing is the use of roofing felt. For a brick plinth, it is recommended to cover it with this material in at least 4-5 layers.
One of the new construction technologies is the use of a penetrating active two-component waterproofing composition, which fills all the cracks and pores of the base with subsequent crystallization. This is the most reliable waterproofing of a brick plinth with a minimum thickness of material applied.
How to insulate the basement outside the house with your own hands
By insulating the foundation base from the outside, protection from moisture and cold is provided not only internal space, but also enclosing structures. However, to achieve good result, the insulation for the base should be:
- durable and elastic, in order to remain undamaged when taking on mechanical stress;

- moisture resistant;
- lightweight so as not to create additional load on the base of the building;
- durable;
- resistant to chemical influences.
Important! When selecting insulation material, it should be taken into account that its application technology should not compromise the integrity of the building’s structure.
The main features of arranging external insulation for a strip foundation:
- The insulation is installed not only on aboveground part building, but also to the one that is underground with a depth of about 50-80 cm. To do this, a trench 80 cm deep and 1 m wide is laid around the perimeter of the house.
- To protect the insulation from the effects of groundwater, drainage pipes are laid at the bottom of the trench.
- A layer is applied to the walls of the plinth liquid waterproofing using polymer compounds or bitumen mastic.
- After the waterproofing layer has completely dried, the heat-insulating material is installed.

All of the above operations, with the exception of digging a trench, are also performed to insulate the base of a pile-screw foundation.
Materials for insulating the foundation base from the outside
The materials used for thermal protection of the base of a building are subject to certain requirements: reliable protection, durability, simple and quick installation, reasonable cost.
Based on the stated requirements, one of the most economical and affordable thermal insulation options is to insulate the base with extruded polystyrene foam. This is a durable, moisture-resistant, frost-resistant and acid-resistant material that is small in thickness and weight, which simplifies its installation. The slabs are produced with a thickness of 3-10 cm. If the maximum thickness is not enough, then the thermal insulation is installed in two layers. However, it is worth paying attention that the material has a flammability G1-G4, so after its installation it is necessary to line the base with non-flammable materials.
Useful advice! For outdoor use, you should choose slabs with flame retardant impregnations (G1-G2).

Scheme for insulating the basement of a building using
Spraying polyurethane foam is rarely used to insulate the base. This is due to the fact that to carry out this type of thermal protection it is necessary to use special equipment, certain chemical components and the involvement of highly qualified workers. The essence of the method is that polyurethane foam is sprayed onto any surface. Expanding, it penetrates into all voids and reliably adheres to the base, forming a dense coating. This material can be used not only for spraying, but also for filling individual voids and areas.
Do-it-yourself technology for insulating the foundation plinth from the outside with penoplex
On preparatory stage it is necessary to prepare the foundation surface by cleaning it from old insulation, dirt and dust. Next, you should install a layer of waterproofing to protect the structure from rain, groundwater and snow water. Any type of waterproofing is suitable for penoplex, with the exception of compositions with organic components.
Work begins with insulation of the underground part of the foundation. For this purpose, EPS boards are attached using specialized contact adhesive, which is applied around the perimeter of the product and in the center. The second level should be laid with the joints between the slabs staggered in relation to the lower level. After installation, all cracks are filled with polyurethane foam.

The base insulation layer with penoplex requires additional protection from mechanical damage. To do this, an alkali-resistant reinforcing mesh is fixed to the slabs, which is subsequently plastered with a solution containing hydrophobic additives. Also, as protection, you can use wooden pinches, which are attached to the slabs using dowel nails. Wood must first be subjected to antiseptic, anti-foam and hydrophobic treatment.
The final stage is finishing the base with facing materials.
Cladding the basement of a house: which material is better to choose
Do-it-yourself finishing of the base various materials, which reliably protect and decorate its surface. This process must be performed before facing the walls in order to be able to hide the ebbs under the finishing material for the walls.

The material for cladding the plinth must have the following performance characteristics:
- have low thermal conductivity to avoid heat loss from the building;
- provide reliable and strong adhesion to the base;
- have a high level of strength and wear resistance to mechanical damage;
- have low hygroscopicity and vapor permeability to avoid moisture penetration into the foundation and wall panels.
Today, when the question is raised about how to decorate the basement of a house, the following materials are used that fully meet the above requirements:
- clinker or porcelain tiles;
- natural or artificial stone;
- brick;
- PVC panels or basement siding;
- profiled sheet;
- decorative or mosaic plaster.

Any finishing material can be used to cover the base of a strip foundation. But when the question arises of how to cover the base of a house on screw piles, you should give preference to brickwork, siding or corrugated sheets.
Before deciding how to decorate the outside of the house’s basement, you need to take into account some nuances:
- when covering the base with thick material, it is necessary to install an ebb above the protruding part;
- If you want to expand the foundation, it is better to use brickwork;
- When installing or corrugated sheeting, you should first install a frame, the space of which can be filled with a heat insulator for additional insulation of the foundation;
- Frame-cladding technology allows work to be carried out at any time of the year.
Using plaster to cover the base
When the question is: how to inexpensively decorate the basement of a house, the answer is obvious - use plaster. However, this option is the least durable and also has an unaesthetic appearance. Such cladding is easily damaged by any mechanical influences and does not provide adequate protection of the base from external factors. However, this method is widely popular due to its low cost. It is also acceptable in the case of erecting a brick plinth on a strip foundation.

Plastering itself is not the final stage. To protect the layer from moisture and environmental influences, acrylic, alkyd, silicone paint, a water-based or oil-based composition should be applied to it, which in turn decorates the base. The photo of the house decoration clearly demonstrates various options use of plaster.
Useful advice! It is not recommended to use it for painting the base. enamel paints. They do not allow air to pass through and are environmentally unsafe.
Decorative plaster is often used, which creates the effect of a fur coat and can be colored using dye. The use of mosaic plaster allows you to create a multi-colored mosaic on the surface, which occurs due to the presence of fine chips in the composition of the original mixture. The presence of resin as a binder gives the composition increased water resistance.
Using a special silicone stamp, which is used to make impressions on the plastered surface, will help you solve the question of how to make a plinth around the house with your own hands with the effect of natural stone.

In private homes, finishing the base with corrugated sheets is widely used. The material has a high moisture resistance, is resistant to temperature fluctuations, durable, easy to process and can be easily mounted on a wooden sheathing. However, corrugated sheeting is not suitable as a finishing material for wooden buildings due to the fact that it is susceptible to corrosion when exposed to high humidity, which can lead to wood rotting.
Profiled sheets are often used to finish the base of a pile-screw foundation, where it must be covered for reliable protection from atmospheric influences.
Features of using bricks for finishing the base
One of the most expensive finishing materials is brick. However, having high strength and performance characteristics, it allows you to create strong, reliable and durable protection. This material is suitable for any type of foundation. For brickwork, slotted, hollow, hyper-pressed or ceramic bricks should be used. Work begins with arranging the foundation for the masonry.

If the brick is used to build the base itself, it does not require additional finishing. However, here you should choose high-quality material in order to immediately solve two problems: utilitarian, protecting the walls of the house from external influences, and aesthetic, giving the building a decorative look. When deciding which brick is better for the foundation plinth, it is necessary to give preference to red baked brick, which is resistant to aggressive environment.
In the case of finishing the base of a pile-screw foundation using brickwork, it is necessary to install a base in the form of a strip of reinforced concrete or metal profile. Brick laying occurs with bandaging. To connect the elements, a cement-sand mortar is used. The thickness of the seams is 10-12 mm.
Cladding the basement of a private house is important, so you should carefully consider the choice of material for the work. It acts not only as a decorative element, but also reliable protection the entire building from the effects of atmospheric and mechanical factors.