Do you like indoor flowers? Then watch short videos of blooming anthuriums, hibiscus and other house flowers.
Learn to draw cartoon characters
Animal drawing lessons
Pet drawing lessons
Pencil drawing lessons for birds
Nature drawing lessons
Let's draw the mushroom step by step, first with a simple pencil. At the last step, you can color the picture of the mushroom with paints or colored pencils, and if you draw leaves and grass next to it, the picture of the mushroom will be very beautiful and attractive.
To begin with, remember that a rose consists of petals adjacent to each other. This is the biggest difficulty in drawing this flower. To make the rose flower look more realistic, also draw a rose stem with leaves.
It is better to draw flowers with paints; a black and white drawing of flowers cannot convey all the beauty of flowers. In this lesson we will learn how to draw flowers in a bouquet step by step with a simple pencil.
To draw a picture of a snowflake, in addition to a pencil, you definitely need a ruler. Any snowflake drawing has the correct geometric shape and therefore it is better to draw with a ruler.
It is better to paint a butterfly, just like flowers. But first, draw a butterfly step by step with a simple pencil.
Not all children, when they pick up a pencil for the first time, draw masterpieces. And the point here is not at all about talent, because every child initially has it. Where to begin?
It is important how to draw pictures step by step to get a good result.
You can start doing this already at the age of 3-4 years, when the child is already conscious about the activities. To begin with, you should choose simpler pictures that clearly describe how you can get, for example, a pig or a turtle from the simplest geometric shapes. The last stage of drawing is also important for kids – coloring the picture.
How to draw children's drawings?
When the child already knows how to draw individual objects, you can already try to arrange them. Before you draw a simple picture, you need to discuss what exactly the child wants to depict on it. After this, you need to determine the location of the individual parts on the sheet and proceed directly to drawing.
It’s enough just to draw the well-known bun on a forest path surrounded by flowers and berries. The sketch is made with a simple pencil and then colored with paints or felt-tip pens.

How to draw cool easy drawings?
Older children already want to portray funny cartoon characters, and there is no difficulty in this. Using the same geometric shapes (oval and circle), the body of the animal is drawn, and the remaining details - the fluffy tail and muzzle - are done in the form of shading. All that remains is to color the drawing in any convenient way.
 |
 |
Using a simple pencil you can easily draw your favorite animals. Girls love to pretend to be a horse. This graceful animal is probably already in your toy collection. To begin with, you should outline the head and muzzle of the animal with light strokes, and then begin to draw such small details as the eye, ears and mane.
Right-hemisphere pencil drawing lessons for adults
Mila Naumova
Author of the project,
professional drawing teacher,
painting and composition.
Author of books:
"About scribbles, or How to Become an Artist?"
"Learning to draw with a pencil" (PITER publishing house)
"A Drop of Courage"
Do your family and friends think you're doing crap?
B basic drawing course for adults X
those who want to quickly learn how to draw
(result in 2-3 weeks)
Course No. 1 "LEARNING TO SEE AND DRAW LIKE AN ARTIST"
If you want to quickly learn how to draw, then
so that your friends and acquaintances admire your drawings, then my course of 6 drawing lessons based on the method of one of the greatest draftsmen, Albrecht Durer, who worked at the turn of the 15th-16th centuries, will definitely help you.
Even if you don't know how to draw at all!
And if you are already a good drawer, then thanks to the course you will improve your technique and realize that you can draw anything from life - any still life, landscape, and even a portrait.
If you did not have a good artistic foundation, then you will discover a lot of new things for yourself, because I am talking about the basic fundamentals of drawing that are needed by both graphic draftsmen and painters.The most important thing for an artist is to learn to see like an artist, and then capture what you see on canvas or paper.
.
First of all, we will deal with the disclosure of artistic vision in the course, as well as we will learn to draw not objects and forms, but lines and spots.
ARTISTIC VISION
Teaching a person to draw without developing his artistic vision is a pointless exercise.Because when an ordinary person looks at a landscape, he sees a street, houses, trees, people. And when the Artist looks at this landscape, he sees lines and spots. If the Artist draws with a pencil at this moment, he sees dark and light spots; if he paints with paints, he sees colored dark and colored light spots.
The artist sees lines and spots, transfers them to the canvas, and the viewer distinguishes on the canvas - streets, houses, trees, people. This is such a magical transformation, and you can’t go anywhere without it. If you wish learn to draw from life
.
.anything, regardless of shape and material, try to see not objects and objects, but lines and spots.
WHAT DOES IT MEAN TO SEE SPOTS AND LINES?
In proper drawing training, they teach general principles (formulas), thanks to which a novice Artist can draw all similar objects from life and imagination.
For example?
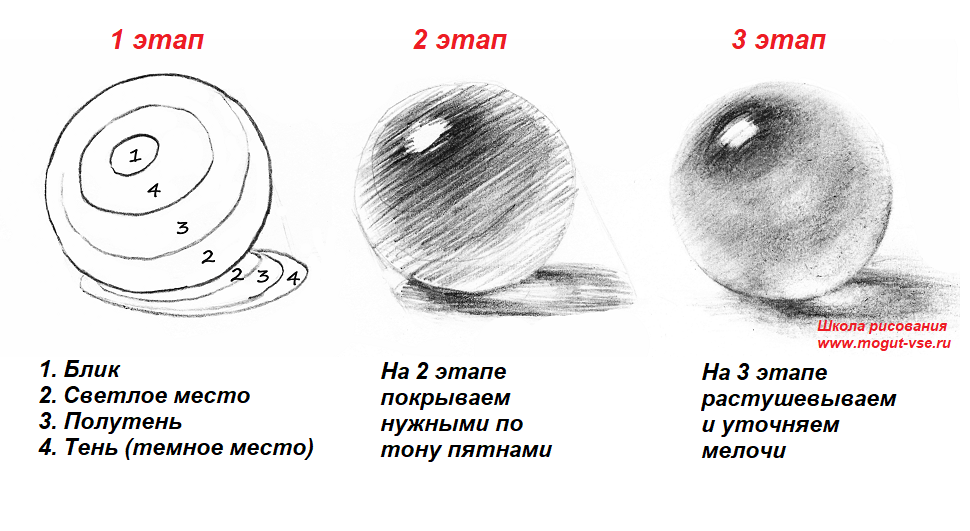
For example, if you watched the lessons on the site, you may have seen the following lesson: “SHADOWS ARE DIFFERENT, HOW TO CONVEY VOLUME.” In that lesson, I talked about how to make objects look three-dimensional by placing light and dark spots correctly: a highlight, light around the highlight, halftones (penumbra) around the light and shadow (the darkest places). This is a general formula for adding volume to any shape, from a ball to a person's face.
And it doesn’t even matter whether you know how to hatch or not! The main thing is to correctly find the place of dark and light spots.
I'll try to show with an example that it's as if I don't know how to hatch.
It looks something like this:
But if the object is at least a little transparent, then in our formula light and shadow change places.
That is, there will always be a dark place around the highlight, and where opaque objects usually have the darkest shadow, transparent objects will have light.
Something like this:
Let's check this formula on grapes:
On an average bottle, everything is the same: there are dark spots around the highlights, halftones around the dark spots, and light spots in the shadow itself, only the shape of the spots changes:
And even the iris of the eye is drawn according to the principle (formula) of transparent objects:
So, just by swapping the shadow and light in places when drawing any object, you can create the illusion of transparency! I hope you noticed that the principle of drawing and the stages of drawing different objects were the same. It is called.
general principles
There is an even more general principle for drawing from life, and even more so from a photo, thanks to which you can learn to draw ANYTHING from life in a couple of weeks! The main thing is that all this can pose for you for a while
I talk about this general principle in my already famous course.
"LET'S LEARN TO SEE AND DRAW LIKE AN ARTIST!"
basic course No. 1
BEFORE the training begins, I ask you to make test drawings so that after training the person can see for himself what he has learned during the course.
During the course we don’t learn to draw one picture, hand or landscape, but we learn to draw ANYTHING.A total of 6 training tasksand you can draw like this!


|
R
drawings and student reviews from Vladimir Pritchenko (Servo-s):
The first, introductory hand, painted out of fear in 20 minutes, was given a large advance in the form of praise. Now we had to prove that it was not in vain that Mila had been fussing with us for two weeks (well, we know for sure that it was not in vain)... |
|
| Mila, thank you for the wonderful course, it simply reveals something in us that we ourselves did not suspect. | BEFORE the course |
 |
 |
AFTER the course |
|
| Sweet! I bow my head before your teaching talent and am captivated by your dedication and desire to pass on all your knowledge to everyone. | Thank you again. |

|
 |
 |
 |
BEFORE the course |
|
| Sweet! I bow my head before your teaching talent and am captivated by your dedication and desire to pass on all your knowledge to everyone. | Thank you again. |
 |
 |
I’m posting my last assignment and I’m really looking forward to your opinion)) |
|
| Sweet! I bow my head before your teaching talent and am captivated by your dedication and desire to pass on all your knowledge to everyone. | BEFORE the course |
 |
 |
Now the skill needs practice. And for this - time, neck and eyes! And good tools, otherwise I seem to understand that I need to fix it, I wipe it, and the paper shrinks, and it doesn’t look the same at all. |
|
|
BEFORE the course |
|
 |
 |
|
BEFORE the course |
|
 |
 |
|
BEFORE the course |
|
 |
 |
| Mila, thank you for the wonderful course, it simply reveals something in us that we ourselves did not suspect. |
Mila, I wish you good luck in all your endeavors, interesting finds and pleasant acquisitions, joy and health!!! |
 |
 |
| Thank you again. | |
 |
 |
| Thank you again. | |
 |
 |
| Thank you again. | |
 |
 |
| More drawings :) | |
 |
 |
| And this baby was drawn in the third lesson |
Sixth task |
 |
 |
| And this baby was drawn in the third lesson |
BEFORE the course |
 |
 |
| And this baby was drawn in the third lesson |
BEFORE the course |
 |
 |
AFTER the course |
BEFORE the course |
 |

|
AFTER the course
BEFORE the courseWhat do you need for classes?
You need paper of size A4 (landscape sheet) and A3 (like two landscape sheets),
simple pencils and a soft eraser (preferably a kneaded eraser).
ATTENTION!
I'm updating the course and it's not working yet.
You can take my book from the publishing house "PETER" as a gift.
"Learning to draw with a pencil" The book contains all the lessons of the basic course + shading options.
If you are starting from scratch - complete zero, like me, and wanted to learn how to draw with a pencil - read the chronicle of a lazy, mediocre artist.
The last time I drew was at school. I drew like everyone else, averagely.
How can you draw with a pencil after 50 hours of practice?

, and how to learn it. I started drawing from scratch.
I did not draw regularly, on average 15 minutes a day, for six months. And you can learn in a couple of months, drawing 60 minutes a day!
Drawing - copying skill


I started drawing the following drawings in the belief that I was mediocre at drawing.
But since I know that almost everything I know about myself is not true.


I decided to double-check myself: do I really have crooked hands or did I suffer that much at school?


Sphere


The main element of drawing. Draw the shadows and penumbras of the sphere.


The time indicated is based on reading the textbook. Drawing itself takes half as much time.


Cube
Basic building brick of any design. Cube Modifications Drawing texture with a pencil
Flags and rose


Drawing cubes - advanced level


Drawing spheres - advanced level

From this stage you

obliged to buy

Street in perspective

Drawing in central perspective: castle, city


Inscription in perspective

Learning to draw a portrait

Learn to draw a hand

Exam: first portrait!
Drawing people is much more difficult than drawing roses or anime. The face cannot be distorted - every mistake is immediately noticeable.
You need to learn to draw people when you feel confident that you can draw a recognizable outline and sketch of a face.

Portraits cannot be drawn quickly; they require diligence and care.
This is the portrait I ended up with of my wife:
Learn to draw pictures from scratch
I painted eight paintings in a total of 24 hours, half the time. I also practiced with a pencil for one day.

You can learn to draw to the same results, even if your hands are growing out of your ass, in 50–150 hours.
In terms of TV series, this is 2-3 seasons of Dr. House.

Vasya Lozhkin took 6 hours to paint his first acrylic painting, “I Like You.”
I didn’t know what acrylic was and how to use it. I also held a brush for the first time since school. Kneading the desired shade is not easy. To give up everything because it wasn’t working out – I wanted to do it every half hour. We need a person who will support.
I went to study at an art studio and painted under the supervision of an artist. A year later, I took online drawing lessons a couple of times from the same teacher.
Cheap materials, and familiar from school. They are diluted with water, so a new layer of paint blurs the previous one.
It is difficult to master how she will behave. From scratch, on your own, it’s not easy to learn how to draw details.


I learned to draw with a pencil, and the skill turned out to be complex. I picked up a brush for the first time since school and painted. 6 long hours, a little crooked, but how great! The advantage is accessibility..
We draw with gouache.
Matte color, thicker than watercolor, is also diluted with water.

I learned to draw with a pencil, and the skill turned out to be complex. I picked up a brush for the first time since school and painted. 6 long hours, a little crooked, but how great! Great for beginners: it's easier to correct inaccuracies than watercolors. Cheap material..
acrylic paints

The most affordable professional material. Acrylic dries quickly, 5-15 minutes. It is easy for them to apply a second layer and correct flaws.

If it is of high quality, it is resistant to water.
Acrylic paint on canvas. You can also draw anything: a wall, a stool, a cup, a helmet, an ashtray, a T-shirt, photo frames.
I recommend then opening the work with varnish from a can.

I learned to draw with a pencil, and the skill turned out to be complex. I picked up a brush for the first time since school and painted. 6 long hours, a little crooked, but how great! Now I can give an extraordinary gift - draw a picture for a friend, a bookmark in a notebook, a caricature for work. I even made a small cartoon..
First painting: pastel, acrylic, gouache and oil.
I learned to draw with a pencil, and the skill turned out to be complex. I picked up a brush for the first time since school and painted. 6 long hours, a little crooked, but how great! All the equipment is made from scratch, and there’s no shame in hanging it on the wall..
How to learn to draw correctly - algorithm

Learning to draw with a pencil is the basis
More variety of colors than gel pens. The set will cost less. After 1–2 years, the markers dry out and you need to buy a new set.

The felt-tip pens saturate the paper a little and it begins to become limp, which is why I don’t like drawing with them.
You can draw 2-3 times and the line becomes more saturated, you can draw penumbra.
We paint with watercolors.
pastel - dry and oil The technique of drawing with pastels is unusual - you need to draw with crayons, rubbing them on paper.

The technique of drawing with oil pastels is similar to drawing with pencils, but has its own characteristics.
Painting with oils.
Complex professional paints. Durable, but you can’t buy cheap ones - they crack.
It takes a long time to dry, about 2–10 days. This is a plus - you can always remove a layer, finish drawing, shade.
But there is also a minus, you need to very carefully apply a layer on top so as not to spoil what you have. I do not recommend using them for beginners.
The first two techniques are about controlling your hand. You should train your hand, and also learn to coordinate the vigilance of the eye and the movement of the hand. Mechanical practices are great for beginners. You can use them later to try out new tools. They also allow you to relax and take a break from mental or physical work. So, how to start drawing correctly.
1. Many, many circles
Fill a sheet of paper with circles of different sizes. Try not to let the circles intersect.
Learning to draw circles is not as easy as you might think. Note that the more circles there are on the paper, the more difficult it is to add the next one. Draw them in two directions and as many as possible.
Advice. Shake your hand when it starts to cramp, do this after each approach.

2. Hatching - creating a structure
Fill a piece of paper with parallel lines.

Diagonal lines are the easiest for us, as they correspond to the movement of our wrist. Note that a left-hander prefers the opposite direction of strokes than a right-hander. Take a look at your favorite artist (in my case, Leonardo da Vinci) and try to guess which hand he wrote with?
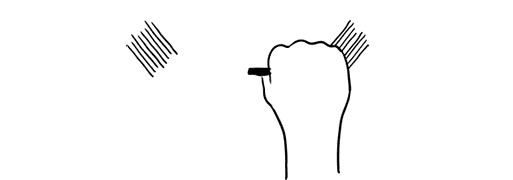
Try different stroke directions. Enjoy the shading process. Combine different strokes and enjoy how the paper is covered with different shadow spots.
Advice. Do not rotate the paper. It is very important to train your hand in different directions.
So, after we trained our arms, we need to do some exercises for our eyes!
Perception - learning to see
Drawing is primarily about vision and understanding what you see. People often assume that everyone sees the same thing, but this is actually not the case. You can always improve and improve the quality of your vision. The more you draw, the more you see. The following four techniques will force you to expand your view of familiar objects. This is exactly where they start learning to draw in different courses.
3. Outline - show me your hands!
Do you see these different fascinating contours of your hand? Draw them on a piece of paper. Don't try to recreate everything, just pick a few of the most interesting ones.

Whether you're drawing a person, a plant, or your favorite animal, you're creating an outline of what you see. Contours define a body or object and make it possible to recognize a pattern. The task is not to immediately display all existing distinctive features, but to learn to see them!
Even if you know the shape of an object, it's still worth taking a closer look and re-examining it.
4. Chiaroscuro - adding light and shadow
Draw a piece of fabric. Start with outlines, and then use your shading skills to find the light and shade transitions.

This exercise will help you learn how to convey light and shadow on paper. I must admit that this is not the easiest way for beginners. Keep in mind that you don't have to make perfect light and shade transitions. The fabric provides a playing field to practice the skills learned in previous lessons. Plus, you'll also understand how to learn how to paint chiaroscuro using just your hand.
Advice. You can do curved shading to create shape and cross shading to achieve deeper shadows that resemble fabric texture.

Advice. Close your eyes slightly when looking at the fabric. You will see a blurred image of the fabric and increased contrast between light and shadow.
5. Perspective - cubes in three-dimensional space
Let's draw some cubes! Follow simple steps.

Perspective drawing is a projection of a 3D object into 2D space (your sheet of paper).

Building a perspective is a separate science that cannot be fully considered in one article. However, we can have a little fun within the confines of a simple technique that gives us an intuitive sense of the magic of drawing in perspective.
Step 1: Draw a horizontal line. This will be the horizon.

Step 2. Place two points on the edges of the line - two invisible vanishing points.

Step 3. Draw a vertical line anywhere.

Step 4: Connect the ends of the vertical line to the vanishing points.

Step 5: Add two more vertical lines as shown below.

Step 6: Connect them to the vanishing points.

Step 7: Now use a black pencil or pen to trace the cube.

Repeat steps 3 to 7 as many times as desired. Enjoy the build! Have fun drawing, then you will succeed. You can shade the sides of the cube.

Advice. When you draw cross lines, it is better to slightly overlap one line over the other, this will make the shape easier to see.

Mastering perspective drawings will help you create the illusion of depth. And most importantly, you will teach your brain to see and recognize three-dimensional space. This is a great practice on how to start drawing from scratch without any skills.
Even if you decide to ignore the rules of perspective and make “flat drawings,” this knowledge will never be superfluous, but on the contrary, it will help expand your horizons and sharpen your visual receptor.
6. Construction of the composition - why here?
Make 5 different drawings of the same object. Position the item differently each time.
As you create different arrangements of your item on paper, try to see how this changes its connotation—meaning.

The author Ralph Ammer has several more interesting articles, but this is the one you need to watch first in order to understand where to start drawing with a pencil and more. In the comments I would like to see your opinion about the pros and cons of the presented methodology. Which exercises really gave you pleasure and which ones didn't? What else do you want to know on the topic or perhaps you have your own ideas on how to learn to draw from scratch - write it all below.
P.S. Free and complete SEO analysis of a website page - sitechecker.pro. In promotion, not only external factors are important, but the web project itself must be good.